Difference between revisions of "RSB-4680 user guide"
Xingxing.li (talk | contribs) |
Xingxing.li (talk | contribs) |
||
| Line 108: | Line 108: | ||
*[[電池(BAT1)_&_電池扣(BH1)|電池扣(BH1)]] | *[[電池(BAT1)_&_電池扣(BH1)|電池扣(BH1)]] | ||
| − | |||
*[[串口(COM_DB(COM3)、COM0、COM1_、COM2)|串口(COM_DB(COM2)、COM4,COM13,OTG,CN20 、USB34)]] | *[[串口(COM_DB(COM3)、COM0、COM1_、COM2)|串口(COM_DB(COM2)、COM4,COM13,OTG,CN20 、USB34)]] | ||
*[[显示接口(LVDS、HDMI)_LAN接口_USB接口(USB1-2、USB3-4、USB_OTG)_音频接口_电源及指示灯和开关机复位按钮_GPIO接口_MINI_PCIE接口_M.2接口_SPI、I2C_接口|显示接口(LVDS、LVDS Backlight、HDMI、DP)]] | *[[显示接口(LVDS、HDMI)_LAN接口_USB接口(USB1-2、USB3-4、USB_OTG)_音频接口_电源及指示灯和开关机复位按钮_GPIO接口_MINI_PCIE接口_M.2接口_SPI、I2C_接口|显示接口(LVDS、LVDS Backlight、HDMI、DP)]] | ||
| Line 117: | Line 116: | ||
*[[GPIO接口|GPIO接口]] | *[[GPIO接口|GPIO接口]] | ||
*[[MINI_PCIE接口_M.2接口_SPI、I2C_接口|MINI_PCIE接口_M.2接口_SPI、I2C_接口]] | *[[MINI_PCIE接口_M.2接口_SPI、I2C_接口|MINI_PCIE接口_M.2接口_SPI、I2C_接口]] | ||
| − | |||
| − | |||
=== ''' 机械尺寸 ('''Mechanical Characteristics) === | === ''' 机械尺寸 ('''Mechanical Characteristics) === | ||
Revision as of 06:47, 21 October 2021
Contents
- 1 資源特性(Features)
- 2 訂購資訊图片待换(Ordering Information)
- 3 规格(Specifications)
- 4 接口布局和尺寸(Layout and Sizes)
- 5 'Connector List'
- 6 快速入门 (Quick Start)
- 7 Linux 燒錄方法 (Linux Flash eMMC Method)
- 8 方法一:Update through Android Tool
- 9 方法二:Update image through SD-Card
- 10 Generate SD card
- 11 Upgrade image from SD card
- 12 Linux系统的基本使用(Linux System Basic Operating Method)
- 12.1 UUU 使用方法(USB Connection (OTG port))
- 12.2 Display Setting (ROM-5620)
- 12.3 乙太網路使用方法(Ethernent Testing Method)
- 12.4 WiFi使用方法(WIFI Testing Method)
- 12.5 4G使用方法(4G Testing Method)
- 12.6 GPIO使用方法(GPIO Operating Method)
- 12.7 串口使用方法(Serial Port Operating Method)
- 12.8 蓝牙使用方法(BlueTooth Operating Method)
- 12.9 遠程訪問及文件傳輸(Remote Access and File Transimmion)
- 13 通用方法(General Method)
- 14 Linux BSP編譯方法(Android BSP Compile Method)
資源特性(Features)
- Rockchip ARM Cortex-A17 RK3288 Quad Core, 最高可达1.6GHz
- 搭载 2GB DDR3L 内存及 8GB eMMC
- HDMI 3840x2160 at 60Hz, VGA 1920x1200 at 60Hz, 支持双通道18/24/30 bit LVDS
- 支持 4K H.264/H.265 视频解码器
- 6 UART, 6 USB2.0, 1 GbE, 8 GPIO, 1 MIPI CSI, 1 SPI
- 支持WIFI/ BT M.2, 3G/ 4G mini-PCIe
- Support Linux and Android
訂購資訊图片待换(Ordering Information)
规格(Specifications)
接口布局和尺寸(Layout and Sizes)
接口布局圖 Board Dimension Layout
'Connector List'
| BAT | RTC Battery Connector |
| CN2 | Audio |
| CN3 | GPIO |
| CN4 | 18/24/30 bit Dual-Channel LVDS |
| LVDS_BL | LVDS Backlight Control |
| CN5 | Power Button & LED |
| CN7 | Recover |
| CN16 | 12V DC Jack |
| CN20 | Internal USB Pin Header |
| USB34 | Dual Type A USB Connector |
| OTG | Micro USB Connector |
| CN21 | SPI |
| CN22 | I2C |
| COM | Internal RS232 (COM6 & COM7 with 12V/5V Power) |
| COM13 |
Internal RS232 (COM1 & COM3) |
| COM4 |
External COM (With RS232 &RS-485) |
| DEBUG |
COM2 or Console |
| HDMI |
HDMI |
| LAN |
LAN |
| M.2 |
M.2 |
| MINIPCIE |
MINIPCIE |
| SD |
Micro SD |
| SIM1 |
Standard SIM |
| SW2 |
Reset Button |
| VGA |
VGA |
接口引脚定義 (Pin definitions)
- 電池扣(BH1)
- 串口(COM_DB(COM2)、COM4,COM13,OTG,CN20 、USB34)
- 显示接口(LVDS、LVDS Backlight、HDMI、DP)
- LAN接口(LAN)
- USB接口(USB1-2、USB-4-5、USB Type C、USB OTG)
- 音频接口(Audio Output &Audio Codec)
- 电源及指示灯和开关机复位按钮(Power 、LED、Power Button、Reset Button、Sleep Button)
- GPIO接口
- MINI_PCIE接口_M.2接口_SPI、I2C_接口
机械尺寸 (Mechanical Characteristics)
快速入门 (Quick Start)
系统下载 (OS Download)
'Linux系统 (Linux OS)'
- Debian 9
- Pan.Baidu_Link_for_RK3288 Password : 4jvr
|
Git BSP Tag Version |
Product |
BSP/Image |
Date |
Alpha Release |
Beta Release |
MP Release |
Release Note |
Comment |
Release Owner |
|
RK3288LBV2100 |
RSB-4680 |
2019-05-27 |
2019-05-27 |
|
V |
|
1.for QA test 2.release for PM |
Yunjin.Jiang | |
| RK3288DIV21040 | RSB-4680 | 2019-09-05 |
2019-09-05 | |
V | |
Release Note |
1.for QA test 2.release for PM |
Yunjin.Jiang |
| RK3288DIV21041 |
RSB-4680 |
2020-04-21 | 2020-04-21 |
|
V | |
Release Note | 1.for QA test 2.release for PM |
Yunjin.Jiang |
|
RK3288DIV21045 |
RSB-4680 | 2021-08-10 | 2021-08-10 | V | |
|
Release Note | 1.for QA test 2.release for PM |
Yunjin.Jiang |
- Debian 10
- Baidu link for Debian10 Password:iz74
|
Image Version |
Product |
Date |
Release |
Release Note |
Binary OS Image Name |
|
DIV230009 |
RSB-4680 |
2021-04-13 |
Beta |
4680A3AIM20DIV230009_2021-04-13.img.tgz |
Linux 燒錄方法 (Linux Flash eMMC Method)
NOTE :
This way only support Linux(Debian9) upgrade to Linux(Debian9) 、 Android6.0 upgrade to Android6.0 or Android8.1 upgrade to Android8.1.
If the device is in Android, you want to upgrade to Linux(Debian9), please use Android Tool.
方法一:Update through Android Tool
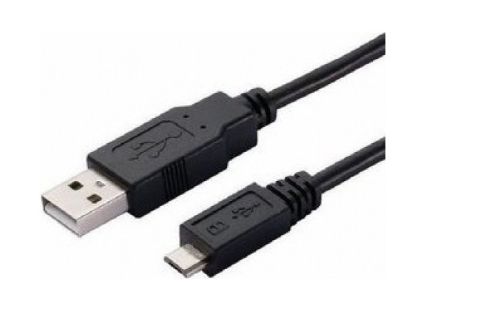
Step0: Need to use Micro USB to connect with RSB-4680 OTG port, and other Type-A USB to connect with your PC
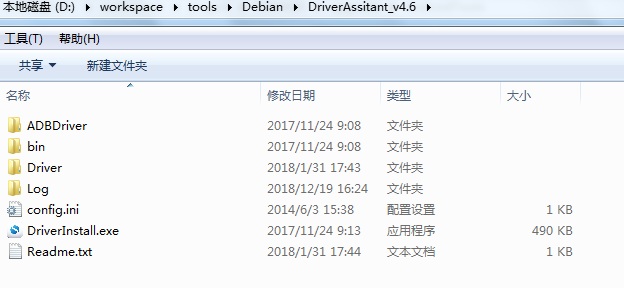
Step1: Double click DriverInstall.exe .
Step2: Enter into MASKROM mode .
There are two ways to enter MASKROM .
1. Hardware way to enter MASKROM
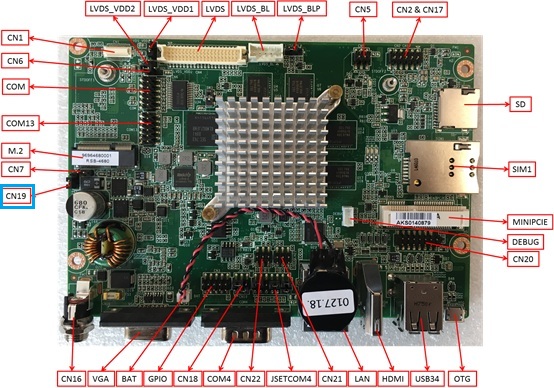
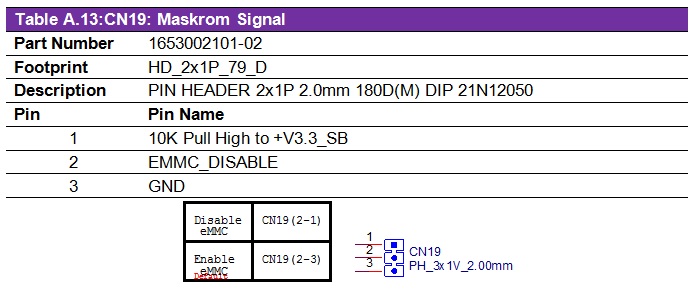
(1)Connect PIN2-PIN1 of CN19 to Disable eMMC,reboot device to enter MASKROM mode.
(2)After device enter into MASKROM mode,then connect PIN2-PIN3 of CN19 to Enable eMMC.
RSB-4680 Connector Layout :
RSB-4680 CN19 PIN define :
2. Software way to enter MASKROM
When the device boot up to debian, you can use Terminal or Debug port to input the following command :
sudo reboot loader
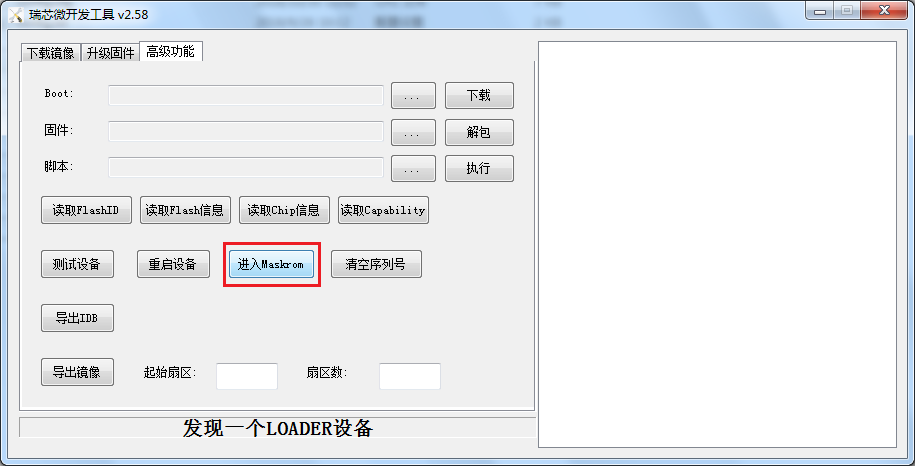
Click "Advantech Function" , then "Enter MASHROM" button to enter MASHROM mode .
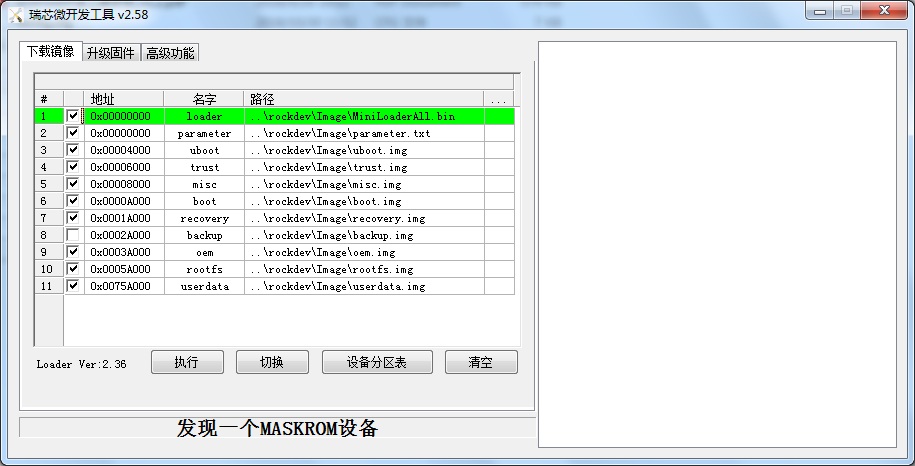
Step3: Select the image path .
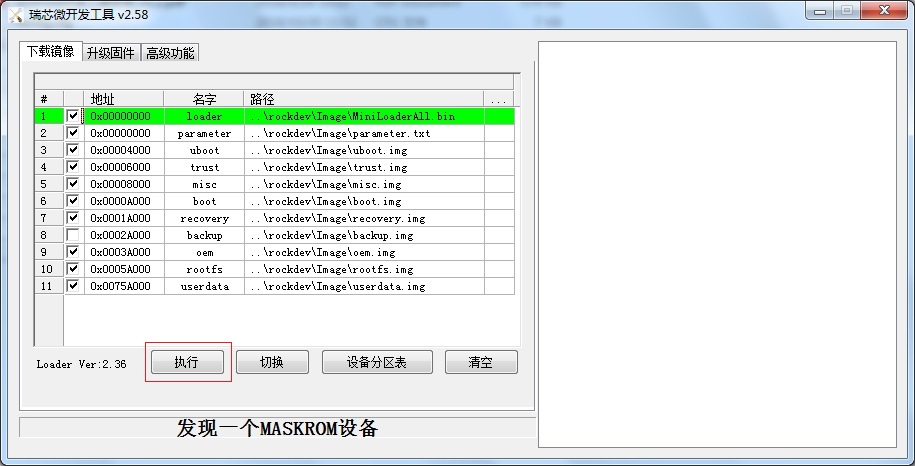
Step4 : Click update button to upgrade images .
Step5 : When“下載完成(Download finish )” , please unplug the Micro USB with RSB-4680 , then turn off and turn on the power again .
 Step6 : Please remove the Micro USB and the poewer , then reboot the device , you will see the Debian Desktop.
方法二:Update image through SD-Card
Download SD DiskTool
https://github.com/ADVANTECH-Rockchip/linux_tools/tree/rk3288_linux_v2.0
Step 1 : Put images to AndroidTool/rockdev/image, Make sure path is correct.
Step 2 : Double click rk3328-mkupdate.bat in AndroidTool/rockdev/ .
If there is no error, you will find update.img in AndroidTool/rockdev/ .
Generate SD card
Step 1 : Insert SD card to PC, Double click SD_Firmware_Tool.exe in SDDiskTool .
Step 2 : Choose SD card .
Step 3 : Choose update.img .
Step 4 : Create SD card .
NOTE :
The capacity of SD card is at least 4GB.
Upgrade image from SD card
Step 1 : Insert SD card to device .
Step 2 : Power up or reboot device, it will boot from SD card to auto upgrade images .
Step 3 : When upgrade is finish, you will get "Doing Actions succeeded,please remove sdcard......" on screen or debug console .
Step 4 : Remove SD card, the device will auto reboot .
Linux系统的基本使用(Linux System Basic Operating Method)
UUU 使用方法(USB Connection (OTG port))
Display Setting (ROM-5620)
U-boot Command :
setenv fdt_file xxxx.dtb
env save
boot
- Display
- LVDS
- g070vw01
- adv-imx8mxp-rom5620-a1.dtb
- g150xgel05
- adv-imx8qxp-rom5620-a1-lvds-chimei.dtb
- g215hvn01
- adv-imx8qxp-rom5620-a1-lvds-dual.dtb
- g070vw01
- LVDS to HDMI
- adv-imx8qxp-rom5620-a1-hdmi-bridge.dtb
- DSI to HDMI
- adv-imx8qxp-rom5620-a1-hdmi-bridge.dtb
- DSI
- auog101uan02
- adv-imx8qxp-rom5620-a1-auog101uan02.dtb
- auog101uan02
- LVDS
乙太網路使用方法(Ethernent Testing Method)
Command : ifconfig
Command: Ping - I eth1 8.8.8.8 or Ping - I eth0 8.8.8.8
WiFi使用方法(WIFI Testing Method)
Command :

# killall wpa_supplicant
# ifconfig wlan0 up
# wpa_passphrase "SSID" "PASSWORD" > /tmp/wpa.conf
# wpa_supplicant -BDwext -iwlan0 -c/tmp/wpa.conf
# udhcpc -b -i wlan0'''

ping 8.8.8.8
PING 8.8.8.8 (8.8.8.8) 56(84) bytes of data.
64 bytes from 8.8.8.8: icmp_seq=1 ttl=54 time=2.10 ms
64 bytes from 8.8.8.8: icmp_seq=2 ttl=54 time=2.10 ms
4G使用方法(4G Testing Method)
Command:
Test 4G: (EWM-C117FL06E - USB)
Step 1: Connect EWM-C117FL06E to Mini PCIE slot on 9680015491 and connect
the card to CN6 PCIe_D slot on ROM-DB5901.
Step 2: Connect the antenna 1750007990-01 to the SMA (F) connector on
9680015491
and connect the IPEX connector to MT1 on EWM-C117FL06E module.
Step 3: Connect the Mini USB cable from 9680015491 to USB 2.0 Type A port on
ROM-DB5901.
Step 4: Power on and execute the pppd command to connect to the network.
GPIO使用方法(GPIO Operating Method)
Loop-back Test (Take GPIO4 and GPIO5 as examples)

Step 1: Connect GPIO4 and GPIO5
Step 2: Export GPIO interface

root@imx8qxprom5620a1 : ~# echo 456 > /sys/class/gpio/export
root@imx8qxprom5620a1 : ~# echo 452 > /sys/class/gpio/export

Step 3: Set direction

root@imx8qxprom5620a1 : ~# echo out > /sys/class/gpio/gpio1/direction
root@imx8qxprom5620a1 : ~# echo in > /sys/class/gpio/gpio2/direction

Step 4: Read value and set output value then check

root@imx8qxprom5620a1 : ~# cat /sys/class/gpio/gpio2/value
0r
oot@imx8qxprom5620a1 : ~# echo 1 > /sys/class/gpio/gpio1/value
root@imx8qxprom5620a1 : ~# cat /sys/class/gpio/gpio2/value
1
串口使用方法(Serial Port Operating Method)
RS-232 Test
SW7 Setting (SW7設置)
蓝牙使用方法(BlueTooth Operating Method)
Command :

$ hciconfig hci0 up
$ bluetoothctl
$ discoverable on
$ pairable on
$ scan on
[NEW] FC:18:3C:8D:75:F4 myphone
$ scan off
$ pair FC:18:3C:8D:75:F4
$ connect FC:18:3C:8D:75:F4
遠程訪問及文件傳輸(Remote Access and File Transimmion)
查看主板IP位址 ( Chech IP Address ):
Command : ifconfig
Windows下SSH访问及文件传输
SSH Remote Log into Device
- SSH远程登录,以putty选择putty.exe(或者使用Xshell、SecureCRT等类似软件)
- 需要设置远程设备的IP、通讯端口(默认22)、通讯方式,登录后验证用户名密码
通用方法(General Method)
查看CPU温度(Check CPU Temperature)
    root@imx8qxprom5620a1:/# cat /sys/devices/virtual/thermal/thermal_zone0/temp 44600

    # 或者直接以度爲單位顯示 echo $[$(cat /sys/class/thermal/thermal_zone0/temp)/1000]° >>> 45°
查看CPU频率(Check CPU Frequency)
           cat /sys/devices/system/cpu/cpu0/cpufreq/cpuinfo_cur_freq
           >> 900000
           cat /sys/devices/system/cpu/cpu0/cpufreq/cpuinfo_max_freq
           >> 1200000
查看内存容量(Check Memory Capacity)
root@imx8qxprom5620a1:/# busybox free -m
             total       used       free     shared    buffers     cached
Mem:       1794920     516080    1278840      17252      9852        80292
-/+ buffers/cache:     425936    1368984
Swap:            0          0          0
查看存储容量(Check Storage Capacity)
root@imx8qxprom5620a1:/# busybox df -h
Filesystem                Size      Used Available Use% Mounted on
/dev/root                13.4G      1.7G     11.1G  13% /
devtmpfs                395.8M      4.0K    395.8M   0% /dev
tmpfs                   876.4M         0    876.4M   0% /dev/shm
tmpfs                   876.4M     16.5M    859.9M   2% /run
tmpfs                   876.4M         0    876.4M   0% /sys/fs/cgroup
tmpfs                   876.4M      4.0K    876.4M   0% /tmp
tmpfs                   876.4M    280.0K    876.2M   0% /var/volatile
/dev/mmcblk0p2           13.6G      1.7G     11.3G  13% /run/media/mmcblk0p2
/dev/mmcblk0p1           63.9M     23.4M     40.5M  37% /run/media/mmcblk0p1
/dev/mmcblk1p1           63.9M     23.4M     40.5M  37% /run/media/mmcblk1p1
tmpfs                   175.3M     88.0K    175.2M   0% /run/user/0
root@imx8qxprom5620a1:/#
網路Ping測試(Ping Network Testing)
     ping 8.8.8.8
     PING 8.8.8.8 (8.8.8.8) 56(84) bytes of data.
     64 bytes from 8.8.8.8: icmp_seq=1 ttl=54 time=2.10 ms
     64 bytes from 8.8.8.8: icmp_seq=2 ttl=54 time=2.10 ms
設置RTC (RTC Setting)
     root@imx8qxprom5620a1:/# systemctl stop ntpdate.service
     root@imx8qxprom5620a1:/# date 090816072021 && hwclock -w && date
             Wed Sep  8 16:07:00 UTC 2021
             Wed Sep  8 16:07:00 UTC 2021
     root@imx8qxprom5620a1:/# date
             Wed Sep  8 16:07:06 UTC 2021
     root@imx8qxprom5620a1:/#'''


