Difference between revisions of "RSB-4680 user guide"
Xingxing.li (talk | contribs) |
Xingxing.li (talk | contribs) |
||
| Line 397: | Line 397: | ||
<p style="text-align: justify;"> Debian 10 buster<br/> Linux version 4.4.19</p> | <p style="text-align: justify;"> Debian 10 buster<br/> Linux version 4.4.19</p> | ||
| − | + | <h2> <b>How_to_do</b> </h2> | |
| − | + | <ul><li><a href="How%20to%20Debug"><b>How_to_Debug</b></a> | |
| − | + | </li> | |
| − | + | <li><a href="How%20to%20use%20GPIO"><b>How_to_use_GPIO</b></a> | |
| − | + | </li> | |
| − | + | <li><a href="How%20to%20use%20UART"><b>How_to_use_UART</b></a> | |
| − | + | </li> | |
| − | + | <li><a href="How%20to%20Config%204G-module"><b>How_to_Config_4G-module</b></a> | |
| − | + | </li> | |
| − | + | <li><a href="How%20to%20Config%20Multi-Display"><b>How_to_Config_Multi-Display</b></a> | |
| − | + | </li> | |
| − | + | <li><a href="How%20to%20boot%20from%20sd-card"><b>How_to_boot_from_sd-card</b></a> | |
| − | + | </li></ul><p> | |
| − | === | + | </p><p> |
| − | <pre>Command : | + | </p> |
| + | <h2> <b>Get Docker Image</b> </h2> | ||
| + | <p>If you don't have docker in your system, then you can follow the below  steps to install docker and run it first. | ||
| + | </p><p><b>To install Docker Engine on your platform</b> | ||
| + | </p><p>Please refer to <a href="https://docs.docker.com/engine/installation/" alt="https://docs.docker.com/engine/installation/" title="https://docs.docker.com/engine/installation/">Docker Installation Guide</a> for details | ||
| + | </p><p><b>To pull <a href="https://hub.docker.com/r/advrisc/u16.04-rk3288lbv1/" alt="https://hub.docker.com/r/advrisc/u16.04-rk3288lbv1/" title="https://hub.docker.com/r/advrisc/u16.04-rk3288lbv1/">ubuntu 16.04 image from Docker Hub</a> </b> | ||
| + | </p> | ||
| + | <pre>$ sudo docker pull advrisc/u16.04-rk3288lbv1 | ||
| + | $ sudo apt-get update | ||
| + | $ sudo apt-get install binfmt-support qemu-user-static | ||
| + | </pre> | ||
| + | <h3> <b>WiFi使用方法(WIFI Testing Method)</b> </h3> | ||
| + | <pre>Command&nbsp;: | ||
# killall wpa_supplicant | # killall wpa_supplicant | ||
# ifconfig wlan0 up | # ifconfig wlan0 up | ||
| − | # wpa_passphrase | + | # wpa_passphrase "SSID" "PASSWORD" > /tmp/wpa.conf |
# wpa_supplicant -BDwext -iwlan0 -c/tmp/wpa.conf | # wpa_supplicant -BDwext -iwlan0 -c/tmp/wpa.conf | ||
# udhcpc -b -i wlan0''' | # udhcpc -b -i wlan0''' | ||
| Line 423: | Line 435: | ||
64 bytes from 8.8.8.8: icmp_seq=1 ttl=54 time=2.10 ms | 64 bytes from 8.8.8.8: icmp_seq=1 ttl=54 time=2.10 ms | ||
64 bytes from 8.8.8.8: icmp_seq=2 ttl=54 time=2.10 ms</pre> | 64 bytes from 8.8.8.8: icmp_seq=2 ttl=54 time=2.10 ms</pre> | ||
| − | + | <p><img src="/wiki/images/6/6e/WifiTest_2021-09-09_132238.jpg" _fck_mw_filename="WifiTest 2021-09-09 132238.jpg" _fck_mw_origimgwidth="638" _fck_mw_origimgheight="280" alt="RTENOTITLE" title="RTENOTITLE" style="vertical-align:middle;" /> | |
| − | + | </p> | |
| − | + | <h3> <b>4G使用方法(4G Testing Method)</b> </h3> | |
| − | |||
<pre>Command: | <pre>Command: | ||
Test 4G: (EWM-C117FL06E - USB) | Test 4G: (EWM-C117FL06E - USB) | ||
| Line 438: | Line 449: | ||
Step 4: Power on and execute the pppd command to connect to the network. | Step 4: Power on and execute the pppd command to connect to the network. | ||
</pre> | </pre> | ||
| − | + | <p><img src="/wiki/images/2/26/4GTest2021-09-09_133204.jpg" _fck_mw_filename="4GTest2021-09-09 133204.jpg" _fck_mw_origimgwidth="641" _fck_mw_origimgheight="72" alt="RTENOTITLE" title="RTENOTITLE" style="vertical-align:middle;" /> | |
| − | + | </p><p><img src="/wiki/images/7/7c/4GTest12021-09-09_133648.jpg" _fck_mw_filename="4GTest12021-09-09 133648.jpg" _fck_mw_origimgwidth="442" _fck_mw_origimgheight="333" alt="RTENOTITLE" title="RTENOTITLE" style="vertical-align:middle;" /> | |
| − | + | </p> | |
| − | + | <h3> <b>GPIO使用方法(GPIO Operating Method)</b> </h3> | |
| − | + | <p><img src="/wiki/images/5/57/GPIOpin2021-09-11_143437.jpg" _fck_mw_filename="GPIOpin2021-09-11 143437.jpg" _fck_mw_origimgwidth="557" _fck_mw_origimgheight="425" alt="RTENOTITLE" title="RTENOTITLE" style="vertical-align:middle;" /> | |
| − | + | </p><p> | |
| − | + | </p> | |
| − | |||
| − | |||
| − | |||
<pre>Loop-back Test (Take GPIO4 and GPIO5 as examples) | <pre>Loop-back Test (Take GPIO4 and GPIO5 as examples) | ||
| Line 453: | Line 461: | ||
Step 2: Export GPIO interface | Step 2: Export GPIO interface | ||
| − | root@imx8qxprom5620a1 : ~# echo 456 | + | root@imx8qxprom5620a1&nbsp;: ~# echo 456 > /sys/class/gpio/export |
| − | root@imx8qxprom5620a1 : ~# echo 452 | + | root@imx8qxprom5620a1&nbsp;: ~# echo 452 > /sys/class/gpio/export |
Step 3: Set direction | Step 3: Set direction | ||
| − | root@imx8qxprom5620a1 : ~# echo out | + | root@imx8qxprom5620a1&nbsp;: ~# echo out > /sys/class/gpio/gpio1/direction |
| − | root@imx8qxprom5620a1 : ~# echo in | + | root@imx8qxprom5620a1&nbsp;: ~# echo in > /sys/class/gpio/gpio2/direction |
Step 4: Read value and set output value then check | Step 4: Read value and set output value then check | ||
| − | root@imx8qxprom5620a1 : ~# cat /sys/class/gpio/gpio2/value | + | root@imx8qxprom5620a1&nbsp;: ~# cat /sys/class/gpio/gpio2/value |
0r | 0r | ||
| − | oot@imx8qxprom5620a1 : ~# echo 1 | + | oot@imx8qxprom5620a1&nbsp;: ~# echo 1 > /sys/class/gpio/gpio1/value |
| − | root@imx8qxprom5620a1 : ~# cat /sys/class/gpio/gpio2/value | + | root@imx8qxprom5620a1&nbsp;: ~# cat /sys/class/gpio/gpio2/value |
1</pre> | 1</pre> | ||
| − | + | <h3> <b>串口使用方法(Serial Port Operating Method)</b> </h3> | |
| − | + | <p>RS-232 Test  | |
| − | + | </p><p>SW7 Setting (SW7設置)  | |
| − | RS-232 Test& | + | </p><p><img src="/wiki/images/2/21/SW6%267settingn.jpeg" _fck_mw_filename="SW6&7settingn.jpeg" alt="RTENOTITLE" title="RTENOTITLE" style="vertical-align:middle;" /> |
| − | + | </p> | |
| − | SW7 Setting (SW7設置)& | + | <h3> <b>蓝牙使用方法(BlueTooth Operating Method)</b> </h3> |
| − | + | <pre>Command&nbsp;: | |
| − | |||
| − | |||
| − | |||
| − | <pre>Command : | ||
$ hciconfig hci0 up | $ hciconfig hci0 up | ||
| Line 489: | Line 493: | ||
$ pair FC:18:3C:8D:75:F4 | $ pair FC:18:3C:8D:75:F4 | ||
$ connect FC:18:3C:8D:75:F4</pre> | $ connect FC:18:3C:8D:75:F4</pre> | ||
| − | + | <p><img src="/wiki/images/d/d3/BTTest2021-09-09_132449.jpg" _fck_mw_filename="BTTest2021-09-09 132449.jpg" _fck_mw_origimgwidth="640" _fck_mw_origimgheight="211" alt="RTENOTITLE" title="RTENOTITLE" style="vertical-align:middle;" /> | |
| − | + | </p> | |
| − | + | <h3> <b>  遠程訪問及文件傳輸(Remote Access and File Transimmion)</b> </h3> | |
| − | + | <p><b>              查看主板IP位址 ( Chech IP Address ):</b> | |
| − | + | </p> | |
| − | + | <pre> Command&nbsp;: ifconfig</pre> | |
| − | <pre> Command : ifconfig</pre> | + | <p><img src="/wiki/images/5/52/Eth0ssh_2021-09-10_143210.jpg" _fck_mw_filename="Eth0ssh 2021-09-10 143210.jpg" _fck_mw_origimgwidth="1002" _fck_mw_origimgheight="395" alt="RTENOTITLE" title="RTENOTITLE" style="vertical-align:middle;" /> |
| − | + | </p> | |
| − | + | <h4> Windows下SSH访问及文件传输 </h4> | |
| − | + | <p>SSH Remote Log into Device  | |
| − | ==== | + | </p> |
| − | + | <ul><li>SSH远程登录,以putty选择putty.exe(或者使用Xshell、SecureCRT等类似软件) | |
| − | SSH Remote Log into Device& | + | </li> |
| − | + | <li>需要设置远程设备的IP、通讯端口(默认22)、通讯方式,登录后验证用户名密码 | |
| − | + | </li></ul><p> | |
| − | + | </p><p><img src="/wiki/images/3/35/SSHsettingdetail.png" _fck_mw_filename="SSHsettingdetail.png" _fck_mw_origimgwidth="748" _fck_mw_origimgheight="600" alt="RTENOTITLE" title="RTENOTITLE" style="vertical-align:middle;" /> | |
| − | + | </p><p><img src="/wiki/images/b/b6/SSHSetting2021-09-10_143631.jpg" _fck_mw_filename="SSHSetting2021-09-10 143631.jpg" _fck_mw_origimgwidth="477" _fck_mw_origimgheight="437" alt="RTENOTITLE" title="RTENOTITLE" style="vertical-align:middle;" /> | |
| − | + | </p><p> | |
| − | + | </p><p><img src="/wiki/images/b/b0/Sshsetting12021-09-10_143743n.jpg" _fck_mw_filename="Sshsetting12021-09-10 143743n.jpg" _fck_mw_origimgwidth="576" _fck_mw_origimgheight="363" alt="RTENOTITLE" title="RTENOTITLE" style="vertical-align:middle;" /> | |
| − | + | </p><p><img src="/wiki/images/7/78/SSHLogin_2021-09-10_143913n.jpg" _fck_mw_filename="SSHLogin 2021-09-10 143913n.jpg" _fck_mw_origimgwidth="576" _fck_mw_origimgheight="362" alt="RTENOTITLE" title="RTENOTITLE" style="vertical-align:middle;" /> | |
| − | + | </p> | |
| − | |||
| − | |||
| − | |||
| − | |||
| − | |||
| − | |||
| − | |||
== '''通用方法(General Method)''' == | == '''通用方法(General Method)''' == | ||
Revision as of 02:50, 26 October 2021
Contents
- 1 資源特性(Features)
- 2 訂購資訊图片待换(Ordering Information)
- 3 规格(Specifications)
- 4 接口布局和尺寸(Layout and Sizes)
- 5 Connector List
- 6 快速入门 (Quick Start)
- 7 Linux 燒錄方法 (Linux Flash eMMC Method)
- 8 方法一:Update through Android Tool
- 9 方法二:Update image through SD-Card
- 10 Generate SD card
- 11 Upgrade image from SD card
- 12 Linux系统的基本使用(Linux System Basic Operating Method)
- 13 Linux BSP Version
- 14 How_to_do
- 15 Get Docker Image
- 16 通用方法(General Method)
- 17 Linux BSP編譯方法(Android BSP Compile Method)
資源特性(Features)
- Rockchip ARM Cortex-A17 RK3288 Quad Core, 最高可达1.6GHz
- 搭载 2GB DDR3L 内存及 8GB eMMC
- HDMI 3840x2160 at 60Hz, VGA 1920x1200 at 60Hz, 支持双通道18/24/30 bit LVDS
- 支持 4K H.264/H.265 视频解码器
- 6 UART, 6 USB2.0, 1 GbE, 8 GPIO, 1 MIPI CSI, 1 SPI
- 支持WIFI/ BT M.2, 3G/ 4G mini-PCIe
- Support Linux and Android
訂購資訊图片待换(Ordering Information)
换一张订购信息图片
规格(Specifications)
接口布局和尺寸(Layout and Sizes)
接口布局圖 Board Dimension Layout
Connector List
| BAT | RTC Battery Connector |
| CN2 | Audio |
| CN3 | GPIO |
| CN4 | 18/24/30 bit Dual-Channel LVDS |
| LVDS_BL | LVDS Backlight Control |
| CN5 | Power Button & LED |
| CN7 | Recover |
| CN16 | 12V DC Jack |
| CN20 | Internal USB Pin Header |
| USB34 | Dual Type A USB Connector |
| OTG | Micro USB Connector |
| CN21 | SPI |
| CN22 | I2C |
| COM | Internal RS232 (COM6 & COM7 with 12V/5V Power) |
| COM13 |
Internal RS232 (COM1 & COM3) |
| COM4 |
External COM (With RS232 &RS-485) |
| DEBUG |
COM2 or Console |
| HDMI |
HDMI |
| LAN |
LAN |
| M.2 |
M.2 |
| MINIPCIE |
MINIPCIE |
| SD |
Micro SD |
| SIM1 |
Standard SIM |
| SW2 |
Reset Button |
| VGA |
VGA |
接口引脚定義 (Pin definitions)
- 电池扣(RTC)
- 串口(RS232_DB,RS232/485,Internal RS232)
- 显示接口(LVDS,LVDS_Balight,HDMI,VGA)
- LAN接口(LAN)
- USB接口(USB34,USB Pin header,OTG)
- 音频接口(Audio)
- Mico SD&SIM Card
- 电源及指示灯和开关机复位按钮(DC Power,Power Button&LED,Recover,Reset Button)
- GPIO接口
- MINI PCIE接口
- M.2接口
- SPI,I2C接口
- Jumper List
机械尺寸 (Mechanical Characteristics)
快速入门 (Quick Start)
系统下载 (OS Download)
'Linux系统 (Linux OS)'
- Debian 9
- Pan.Baidu_Link_for_RK3288 Password : 4jvr
|
Git BSP Tag Version |
Product |
BSP/Image |
Date |
Alpha Release |
Beta Release |
MP Release |
Release Note |
Comment |
Release Owner |
|
RK3288LBV2100 |
RSB-4680 |
2019-05-27 |
2019-05-27 |
|
V |
|
1.for QA test 2.release for PM |
Yunjin.Jiang | |
| RK3288DIV21040 | RSB-4680 | 2019-09-05 |
2019-09-05 | |
V | |
Release Note |
1.for QA test 2.release for PM |
Yunjin.Jiang |
| RK3288DIV21041 |
RSB-4680 |
2020-04-21 | 2020-04-21 |
|
V | |
Release Note | 1.for QA test 2.release for PM |
Yunjin.Jiang |
|
RK3288DIV21045 |
RSB-4680 | 2021-08-10 | 2021-08-10 | V | |
|
Release Note | 1.for QA test 2.release for PM |
Yunjin.Jiang |
- Debian 10
- Baidu link for Debian10 Password:iz74
|
Image Version |
Product |
Date |
Release |
Release Note |
Binary OS Image Name |
|
DIV230009 |
RSB-4680 |
2021-04-13 |
Beta |
4680A3AIM20DIV230009_2021-04-13.img.tgz |
Linux 燒錄方法 (Linux Flash eMMC Method)
NOTE :
This way only support Linux(Debian9) upgrade to Linux(Debian9) 、 Android6.0 upgrade to Android6.0 or Android8.1 upgrade to Android8.1.
If the device is in Android, you want to upgrade to Linux(Debian9), please use Android Tool.
方法一:Update through Android Tool
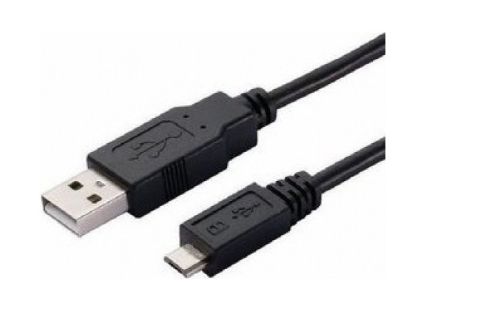
Step0: Need to use Micro USB to connect with RSB-4680 OTG port, and other Type-A USB to connect with your PC
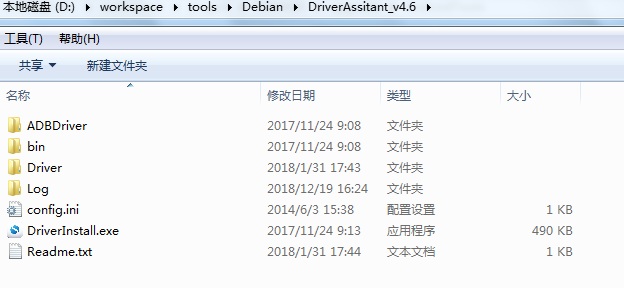
Step1: Double click DriverInstall.exe .
Step2: Enter into MASKROM mode .
There are two ways to enter MASKROM .
1. Hardware way to enter MASKROM
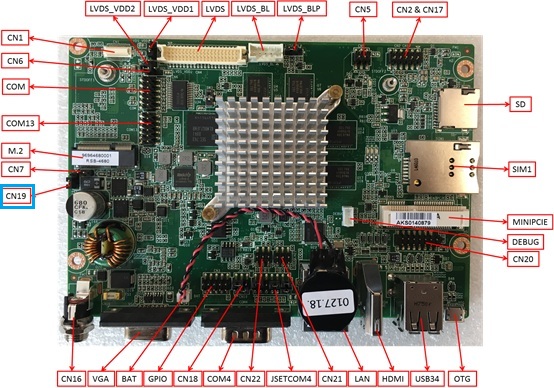
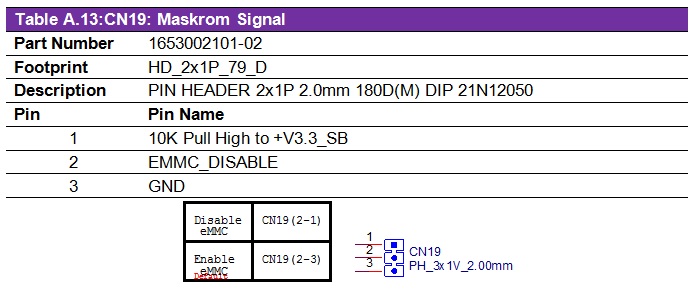
(1)Connect PIN2-PIN1 of CN19 to Disable eMMC,reboot device to enter MASKROM mode.
(2)After device enter into MASKROM mode,then connect PIN2-PIN3 of CN19 to Enable eMMC.
RSB-4680 Connector Layout :
RSB-4680 CN19 PIN define :
2. Software way to enter MASKROM
When the device boot up to debian, you can use Terminal or Debug port to input the following command :
sudo reboot loader
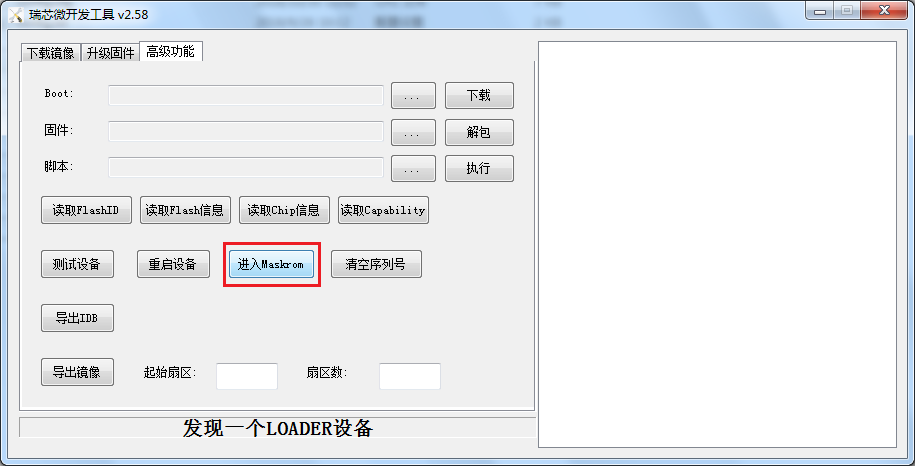
Click "Advantech Function" , then "Enter MASHROM" button to enter MASHROM mode .
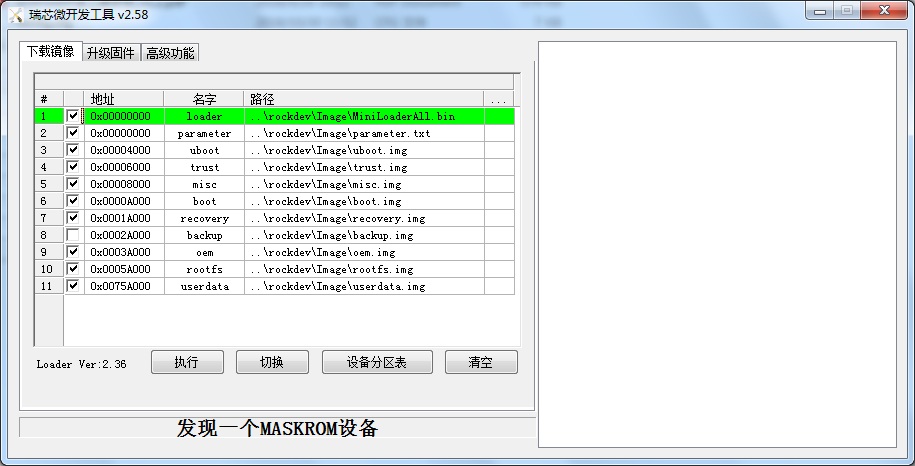
Step3: Select the image path .
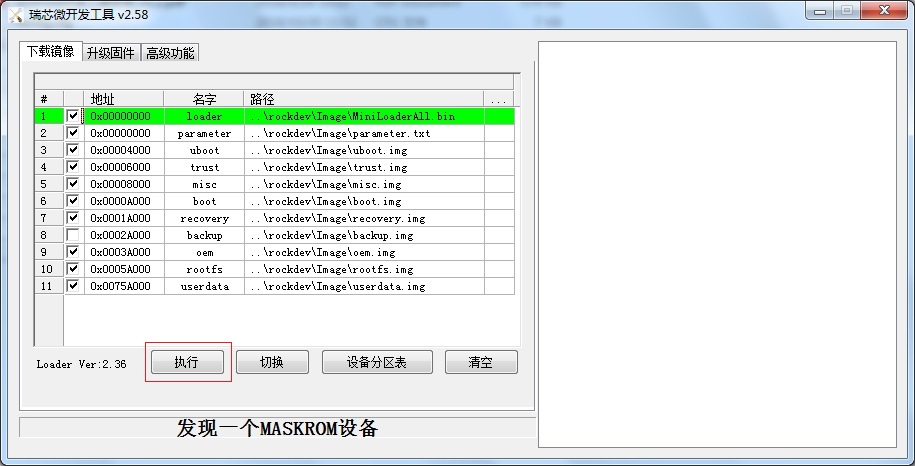
Step4 : Click update button to upgrade images .
Step5 : When“下載完成(Download finish )” , please unplug the Micro USB with RSB-4680 , then turn off and turn on the power again .
Step6 : Please remove the Micro USB and the poewer , then reboot the device , you will see the Debian Desktop.
方法二:Update image through SD-Card
Download SD DiskTool
https://github.com/ADVANTECH-Rockchip/linux_tools/tree/rk3288_linux_v2.0
Step 1 : Put images to AndroidTool/rockdev/image, Make sure path is correct.
Step 2 : Double click rk3328-mkupdate.bat in AndroidTool/rockdev/ .
If there is no error, you will find update.img in AndroidTool/rockdev/ .
Generate SD card
Step 1 : Insert SD card to PC, Double click SD_Firmware_Tool.exe in SDDiskTool .
Step 2 : Choose SD card .
Step 3 : Choose update.img .
Step 4 : Create SD card .
NOTE :
The capacity of SD card is at least 4GB.
Upgrade image from SD card
Step 1 : Insert SD card to device .
Step 2 : Power up or reboot device, it will boot from SD card to auto upgrade images .
Step 3 : When upgrade is finish, you will get "Doing Actions succeeded,please remove sdcard......" on screen or debug console .
Step 4 : Remove SD card, the device will auto reboot .
Linux系统的基本使用(Linux System Basic Operating Method)
Linux BSP Version
We have two versions for rk3288 series.
V2.1 :
Debian 9 stretch
Linux version 4.4.143
V230 :
Debian 10 buster
Linux version 4.4.19
How_to_do
- <a href="How%20to%20Debug">How_to_Debug</a>
- <a href="How%20to%20use%20GPIO">How_to_use_GPIO</a>
- <a href="How%20to%20use%20UART">How_to_use_UART</a>
- <a href="How%20to%20Config%204G-module">How_to_Config_4G-module</a>
- <a href="How%20to%20Config%20Multi-Display">How_to_Config_Multi-Display</a>
- <a href="How%20to%20boot%20from%20sd-card">How_to_boot_from_sd-card</a>
Get Docker Image
If you don't have docker in your system, then you can follow the below steps to install docker and run it first.
To install Docker Engine on your platform
Please refer to <a href="https://docs.docker.com/engine/installation/" alt="https://docs.docker.com/engine/installation/" title="https://docs.docker.com/engine/installation/">Docker Installation Guide</a> for details
To pull <a href="https://hub.docker.com/r/advrisc/u16.04-rk3288lbv1/" alt="https://hub.docker.com/r/advrisc/u16.04-rk3288lbv1/" title="https://hub.docker.com/r/advrisc/u16.04-rk3288lbv1/">ubuntu 16.04 image from Docker Hub</a>
$ sudo docker pull advrisc/u16.04-rk3288lbv1
$ sudo apt-get update
$ sudo apt-get install binfmt-support qemu-user-static
WiFi使用方法(WIFI Testing Method)
Command :

# killall wpa_supplicant
# ifconfig wlan0 up
# wpa_passphrase "SSID" "PASSWORD" > /tmp/wpa.conf
# wpa_supplicant -BDwext -iwlan0 -c/tmp/wpa.conf
# udhcpc -b -i wlan0'''

ping 8.8.8.8
PING 8.8.8.8 (8.8.8.8) 56(84) bytes of data.
64 bytes from 8.8.8.8: icmp_seq=1 ttl=54 time=2.10 ms
64 bytes from 8.8.8.8: icmp_seq=2 ttl=54 time=2.10 ms
<img src="/wiki/images/6/6e/WifiTest_2021-09-09_132238.jpg" _fck_mw_filename="WifiTest 2021-09-09 132238.jpg" _fck_mw_origimgwidth="638" _fck_mw_origimgheight="280" alt="RTENOTITLE" title="RTENOTITLE" style="vertical-align:middle;" />
4G使用方法(4G Testing Method)
Command:
Test 4G: (EWM-C117FL06E - USB)
Step 1: Connect EWM-C117FL06E to Mini PCIE slot on 9680015491 and connect
the card to CN6 PCIe_D slot on ROM-DB5901.
Step 2: Connect the antenna 1750007990-01 to the SMA (F) connector on
9680015491
and connect the IPEX connector to MT1 on EWM-C117FL06E module.
Step 3: Connect the Mini USB cable from 9680015491 to USB 2.0 Type A port on
ROM-DB5901.
Step 4: Power on and execute the pppd command to connect to the network.
<img src="/wiki/images/2/26/4GTest2021-09-09_133204.jpg" _fck_mw_filename="4GTest2021-09-09 133204.jpg" _fck_mw_origimgwidth="641" _fck_mw_origimgheight="72" alt="RTENOTITLE" title="RTENOTITLE" style="vertical-align:middle;" />
<img src="/wiki/images/7/7c/4GTest12021-09-09_133648.jpg" _fck_mw_filename="4GTest12021-09-09 133648.jpg" _fck_mw_origimgwidth="442" _fck_mw_origimgheight="333" alt="RTENOTITLE" title="RTENOTITLE" style="vertical-align:middle;" />
GPIO使用方法(GPIO Operating Method)
<img src="/wiki/images/5/57/GPIOpin2021-09-11_143437.jpg" _fck_mw_filename="GPIOpin2021-09-11 143437.jpg" _fck_mw_origimgwidth="557" _fck_mw_origimgheight="425" alt="RTENOTITLE" title="RTENOTITLE" style="vertical-align:middle;" />
Loop-back Test (Take GPIO4 and GPIO5 as examples)

Step 1: Connect GPIO4 and GPIO5
Step 2: Export GPIO interface

root@imx8qxprom5620a1 : ~# echo 456 > /sys/class/gpio/export
root@imx8qxprom5620a1 : ~# echo 452 > /sys/class/gpio/export

Step 3: Set direction

root@imx8qxprom5620a1 : ~# echo out > /sys/class/gpio/gpio1/direction
root@imx8qxprom5620a1 : ~# echo in > /sys/class/gpio/gpio2/direction

Step 4: Read value and set output value then check

root@imx8qxprom5620a1 : ~# cat /sys/class/gpio/gpio2/value
0r
oot@imx8qxprom5620a1 : ~# echo 1 > /sys/class/gpio/gpio1/value
root@imx8qxprom5620a1 : ~# cat /sys/class/gpio/gpio2/value
1
串口使用方法(Serial Port Operating Method)
RS-232 Test
SW7 Setting (SW7設置)
<img src="/wiki/images/2/21/SW6%267settingn.jpeg" _fck_mw_filename="SW6&7settingn.jpeg" alt="RTENOTITLE" title="RTENOTITLE" style="vertical-align:middle;" />
蓝牙使用方法(BlueTooth Operating Method)
Command :

$ hciconfig hci0 up
$ bluetoothctl
$ discoverable on
$ pairable on
$ scan on
[NEW] FC:18:3C:8D:75:F4 myphone
$ scan off
$ pair FC:18:3C:8D:75:F4
$ connect FC:18:3C:8D:75:F4
<img src="/wiki/images/d/d3/BTTest2021-09-09_132449.jpg" _fck_mw_filename="BTTest2021-09-09 132449.jpg" _fck_mw_origimgwidth="640" _fck_mw_origimgheight="211" alt="RTENOTITLE" title="RTENOTITLE" style="vertical-align:middle;" />
遠程訪問及文件傳輸(Remote Access and File Transimmion)
查看主板IP位址 ( Chech IP Address ):
Command : ifconfig
<img src="/wiki/images/5/52/Eth0ssh_2021-09-10_143210.jpg" _fck_mw_filename="Eth0ssh 2021-09-10 143210.jpg" _fck_mw_origimgwidth="1002" _fck_mw_origimgheight="395" alt="RTENOTITLE" title="RTENOTITLE" style="vertical-align:middle;" />
Windows下SSH访问及文件传输
SSH Remote Log into Device
- SSH远程登录,以putty选择putty.exe(或者使用Xshell、SecureCRT等类似软件)
- 需要设置远程设备的IP、通讯端口(默认22)、通讯方式,登录后验证用户名密码
<img src="/wiki/images/3/35/SSHsettingdetail.png" _fck_mw_filename="SSHsettingdetail.png" _fck_mw_origimgwidth="748" _fck_mw_origimgheight="600" alt="RTENOTITLE" title="RTENOTITLE" style="vertical-align:middle;" />
<img src="/wiki/images/b/b6/SSHSetting2021-09-10_143631.jpg" _fck_mw_filename="SSHSetting2021-09-10 143631.jpg" _fck_mw_origimgwidth="477" _fck_mw_origimgheight="437" alt="RTENOTITLE" title="RTENOTITLE" style="vertical-align:middle;" />
<img src="/wiki/images/b/b0/Sshsetting12021-09-10_143743n.jpg" _fck_mw_filename="Sshsetting12021-09-10 143743n.jpg" _fck_mw_origimgwidth="576" _fck_mw_origimgheight="363" alt="RTENOTITLE" title="RTENOTITLE" style="vertical-align:middle;" />
<img src="/wiki/images/7/78/SSHLogin_2021-09-10_143913n.jpg" _fck_mw_filename="SSHLogin 2021-09-10 143913n.jpg" _fck_mw_origimgwidth="576" _fck_mw_origimgheight="362" alt="RTENOTITLE" title="RTENOTITLE" style="vertical-align:middle;" />
通用方法(General Method)
查看CPU温度(Check CPU Temperature)
    root@imx8qxprom5620a1:/# cat /sys/devices/virtual/thermal/thermal_zone0/temp 44600

    # 或者直接以度爲單位顯示 echo $[$(cat /sys/class/thermal/thermal_zone0/temp)/1000]° >>> 45°
查看CPU频率(Check CPU Frequency)
           cat /sys/devices/system/cpu/cpu0/cpufreq/cpuinfo_cur_freq
           >> 900000
           cat /sys/devices/system/cpu/cpu0/cpufreq/cpuinfo_max_freq
           >> 1200000
查看内存容量(Check Memory Capacity)
root@imx8qxprom5620a1:/# busybox free -m
             total       used       free     shared    buffers     cached
Mem:       1794920     516080    1278840      17252      9852        80292
-/+ buffers/cache:     425936    1368984
Swap:            0          0          0
查看存储容量(Check Storage Capacity)
root@imx8qxprom5620a1:/# busybox df -h
Filesystem                Size      Used Available Use% Mounted on
/dev/root                13.4G      1.7G     11.1G  13% /
devtmpfs                395.8M      4.0K    395.8M   0% /dev
tmpfs                   876.4M         0    876.4M   0% /dev/shm
tmpfs                   876.4M     16.5M    859.9M   2% /run
tmpfs                   876.4M         0    876.4M   0% /sys/fs/cgroup
tmpfs                   876.4M      4.0K    876.4M   0% /tmp
tmpfs                   876.4M    280.0K    876.2M   0% /var/volatile
/dev/mmcblk0p2           13.6G      1.7G     11.3G  13% /run/media/mmcblk0p2
/dev/mmcblk0p1           63.9M     23.4M     40.5M  37% /run/media/mmcblk0p1
/dev/mmcblk1p1           63.9M     23.4M     40.5M  37% /run/media/mmcblk1p1
tmpfs                   175.3M     88.0K    175.2M   0% /run/user/0
root@imx8qxprom5620a1:/#
網路Ping測試(Ping Network Testing)
     ping 8.8.8.8
     PING 8.8.8.8 (8.8.8.8) 56(84) bytes of data.
     64 bytes from 8.8.8.8: icmp_seq=1 ttl=54 time=2.10 ms
     64 bytes from 8.8.8.8: icmp_seq=2 ttl=54 time=2.10 ms
設置RTC (RTC Setting)
     root@imx8qxprom5620a1:/# systemctl stop ntpdate.service
     root@imx8qxprom5620a1:/# date 090816072021 && hwclock -w && date
             Wed Sep  8 16:07:00 UTC 2021
             Wed Sep  8 16:07:00 UTC 2021
     root@imx8qxprom5620a1:/# date
             Wed Sep  8 16:07:06 UTC 2021
     root@imx8qxprom5620a1:/#'''


