Difference between revisions of "1. Using RKTool RSB-4810 Debain"
Xingxing.li (talk | contribs) |
Xingxing.li (talk | contribs) |
||
| (8 intermediate revisions by the same user not shown) | |||
| Line 1: | Line 1: | ||
| − | <span style="background:white"><span style="color:#002060">For example, the PC used is a laptop. The specifications are as follows:</span></span> | + | === '''<span style="background:white"><span style="color:#002060">Step 0 : For example, the PC used is a laptop. The specifications are as follows:</span></span>''' === |
<span style="background:white"><span style="color:#002060">[[File:PC specification.png|RTENOTITLE]]</span></span> | <span style="background:white"><span style="color:#002060">[[File:PC specification.png|RTENOTITLE]]</span></span> | ||
| Line 13: | Line 13: | ||
[[File:Success Driver.png|RTENOTITLE]] | [[File:Success Driver.png|RTENOTITLE]] | ||
| + | |||
| + | === '''Step 1_1:Change Tool language in config.ini, please change "Selected: to "2"''' === | ||
| + | |||
| + | 选择工具语言:Selected=1(中文)<--Chinese ;Selected=2(英文)<-- English [Language] Kinds=2 Selected=2 LangPath=Language\ | ||
| + | |||
| + | [[File:RSB-4810 set language method configini.PNG]] | ||
=== '''Step 2 : Go to the RKDevTool_Release folder and run the RKDevTool.exe program''' === | === '''Step 2 : Go to the RKDevTool_Release folder and run the RKDevTool.exe program''' === | ||
| Line 18: | Line 24: | ||
[[File:Step2 RKDevTool.png|RTENOTITLE]] | [[File:Step2 RKDevTool.png|RTENOTITLE]] | ||
| − | === '''Step 3 : Ensure that the path to the burned file is correct''' === | + | === '''Step 3 : Ensure that the path to the burned file is correct''' === |
| + | |||
| + | [[File:RSB-4810 rock.png|RTENOTITLE]] | ||
| + | |||
| + | === '''Step 4 : The device enters the burn mode''' === | ||
| + | |||
| + | a ) A data cable with male USB connectors at both ends is available. | ||
| + | |||
| + | [[File:RSB-4810 USB both.png|RTENOTITLE]] | ||
| + | |||
| + | b ) Connect jumper cap J4 to Pin1 - Pin2(set USB-otg mode). | ||
| + | |||
| + | Note:Default jumper cap J4 Connect Pin2-Pin3 (Set USB-host mode) | ||
| + | |||
| + | [[File:RSB-4810 J4 setting.png|RTENOTITLE]] | ||
| + | |||
| + | c ) Connect one part of the USB cable to the USB port below and the other end to the computer. | ||
| + | |||
| + | [[File:RSB-4810 USB conjoint.png|RTENOTITLE]] | ||
| + | |||
| + | d ) Jump the J1 jumper cap to Pin1-Pin2, then switch on the 12V power supply. | ||
| + | |||
| + | [[File:RSB-4810 J1 setting.png|RTENOTITLE]] | ||
| + | |||
| + | e ) Then the burning tool will appear: a MASKROM word found. | ||
| + | |||
| + | Note:Suspend or shut down the virtual machine during this process; otherwise, the pop-up information may affect the burning results. | ||
| + | |||
| + | [[File:RSB-4810 RKTool MASKROM.png|RTENOTITLE]] | ||
| + | |||
| + | f ) Jump the J1 jumper cap back to Pin2-Pin3 and click "Execute" | ||
| + | |||
| + | [[File:RSB-4810 J1 setting 1.png|RTENOTITLE]] | ||
| + | |||
| + | [[File:RSB-4810 burning.png|RTENOTITLE]] | ||
| + | |||
| + | g ) Just wait patiently for the burning to finish. | ||
| − | [[File:RSB-4810 | + | [[File:RSB-4810 RKTool success.png|RTENOTITLE]] |
Latest revision as of 01:48, 20 October 2023
Contents
- 1 Step 0 : For example, the PC used is a laptop. The specifications are as follows:
- 2 Step 1 :Extract Driver Assitant_v5.11.zip and follow these steps: Mounting driver.
- 3 Step 1_1:Change Tool language in config.ini, please change "Selected: to "2"
- 4 Step 2 : Go to the RKDevTool_Release folder and run the RKDevTool.exe program
- 5 Step 3 : Ensure that the path to the burned file is correct
- 6 Step 4 : The device enters the burn mode
Step 0 : For example, the PC used is a laptop. The specifications are as follows:
Decompress the downloaded image on the PC.
Step 1 :Extract Driver Assitant_v5.11.zip and follow these steps: Mounting driver.
Run the installer and wait for the installation to succeed
Step 1_1:Change Tool language in config.ini, please change "Selected: to "2"
选择工具语言:Selected=1(中文)<--Chinese ;Selected=2(英文)<-- English [Language] Kinds=2 Selected=2 LangPath=Language\
Step 2 : Go to the RKDevTool_Release folder and run the RKDevTool.exe program
Step 3 : Ensure that the path to the burned file is correct
Step 4 : The device enters the burn mode
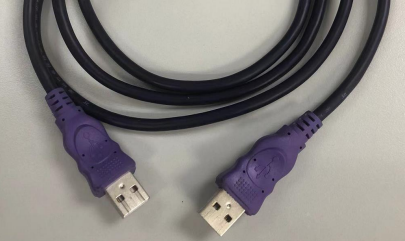
a ) A data cable with male USB connectors at both ends is available.
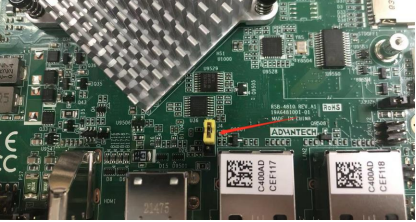
b ) Connect jumper cap J4 to Pin1 - Pin2(set USB-otg mode).
Note:Default jumper cap J4 Connect Pin2-Pin3 (Set USB-host mode)
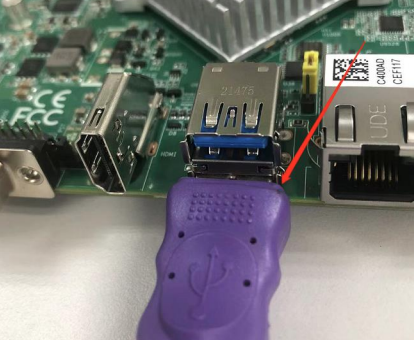
c ) Connect one part of the USB cable to the USB port below and the other end to the computer.
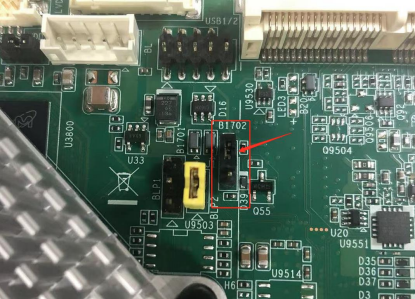
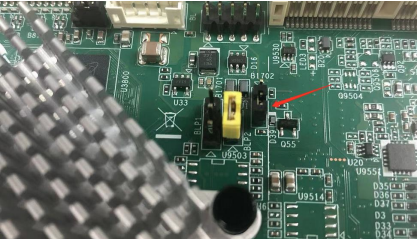
d ) Jump the J1 jumper cap to Pin1-Pin2, then switch on the 12V power supply.
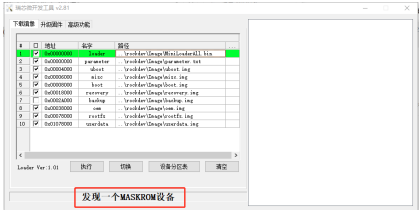
e ) Then the burning tool will appear: a MASKROM word found.
Note:Suspend or shut down the virtual machine during this process; otherwise, the pop-up information may affect the burning results.
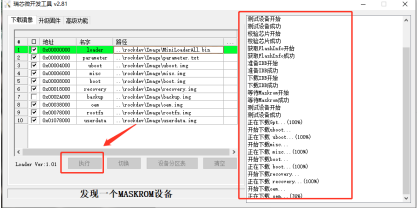
f ) Jump the J1 jumper cap back to Pin2-Pin3 and click "Execute"
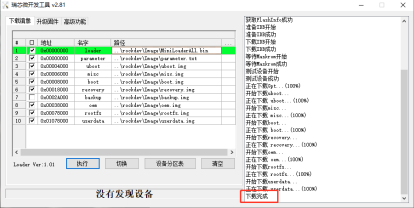
g ) Just wait patiently for the burning to finish.


