Difference between revisions of "EPC-R3220 user guide"
| Line 64: | Line 64: | ||
*'''Linux系统 (Linux OS)'''''' ''' | *'''Linux系统 (Linux OS)'''''' ''' | ||
| − | | + | Downloads |
| − | {| cellpadding="0" cellspacing="0" border="1" style="width: | + | {| cellpadding="0" cellspacing="0" border="1" style="width: 1213px;" |
|- | |- | ||
| − | | | + | | style="width: 121px;" | <p style="text-align: center;">Git BSP Tag Version</p> |
| − | Git BSP Tag Version | + | | style="width: 90px;" | <p style="text-align: center;">Product</p> |
| − | + | | style="width: 91px;" | <p style="text-align: center;">CPU</p> | |
| − | | style="width: | + | | style="width: 11px; text-align: center;" | BSP/Image |
| − | Product | + | | style="width: 87px;" | <p style="text-align: center;">Date</p> |
| − | + | | style="width: 139px;" | <p style="text-align: center;">Alpha Release</p> | |
| − | | style="width: 91px;" | | + | | style="width: 86px;" | <p style="text-align: center;">Beta Release</p> |
| − | CPU | + | | style="width: 78px;" | <p style="text-align: center;">MP Release</p> |
| − | + | | style="width: 104px;" | <p style="text-align: center;">Release Note</p> | |
| − | | style="width: 11px;" | BSP/Image | + | | style="width: 153px;" | <p style="text-align: center;">SDK</p> |
| − | | style="width: 87px;" | | + | | style="width: 166px;" | <p style="text-align: center;">Release Owner</p> |
| − | Date | ||
| − | |||
| − | | style="width: | ||
| − | Alpha Release | ||
| − | |||
| − | | style="width: | ||
| − | Beta Release | ||
| − | |||
| − | | style="width: | ||
| − | MP Release | ||
| − | |||
| − | | style="width: | ||
| − | Release Note | ||
| − | |||
| − | | style="width: | ||
| − | |||
| − | |||
| − | | style="width: | ||
| − | Release Owner | ||
| − | |||
|- | |- | ||
| − | | am335xDBV20012<br/> | + | | style="width: 121px;" | am335xDBV20012<br/> |
| − | | style="width: | + | | style="width: 90px;" | EPC-R3220A1<br/> |
| style="width: 91px;" | am3352<br/> | | style="width: 91px;" | am3352<br/> | ||
| style="width: 11px;" | 2021-07-29<br/> | | style="width: 11px;" | 2021-07-29<br/> | ||
| style="width: 87px;" | 2021-07-29<br/> | | style="width: 87px;" | 2021-07-29<br/> | ||
| − | | style="width: | + | | style="width: 139px;" | |
| − | | style="width: | + | Image:am335xDIV20012 |
| − | | style="width: | + | |
| − | | style="width: | + | BSP:am335xDBV20012 |
| − | | style="width: | + | |
| − | | style="width: | + | | style="width: 86px;" | <br/> |
| + | | style="width: 78px;" | <br/> | ||
| + | | style="width: 104px;" | [[Media:EPC-R3220_Release_Notes_Debian10_V20012.pdf|''<font color="#0066cc">Release Note</font>'']]<br/> | ||
| + | | style="width: 153px;" | am335xDBV20012_SDK<br/> | ||
| + | | style="width: 166px;" | Zhengguang.Yang | ||
|- | |- | ||
| − | | am335xUBV20012<br/> | + | | style="width: 121px;" | am335xUBV20012<br/> |
| − | | style="width: | + | | style="width: 90px;" | EPC-R3220A1<br/> |
| style="width: 91px;" | am3352<br/> | | style="width: 91px;" | am3352<br/> | ||
| style="width: 11px;" | 2021-07-29<br/> | | style="width: 11px;" | 2021-07-29<br/> | ||
| style="width: 87px;" | 2021-07-29<br/> | | style="width: 87px;" | 2021-07-29<br/> | ||
| − | | style="width: | + | | style="width: 139px;" | |
| − | | style="width: | + | Image:am335xUIV20012 |
| − | | style="width: | + | |
| − | | style="width: | + | BSP:am335xUBV20012 |
| − | | style="width: | + | |
| − | | style="width: | + | | style="width: 86px;" | <br/> |
| + | | style="width: 78px;" | <br/> | ||
| + | | style="width: 104px;" | [[Media:EPC-R3220_Release_Notes_Ubuntu18.04_V20012.pdf|''<font color="#0066cc">Release Note</font>'']]<br/> | ||
| + | | style="width: 153px;" | am335xUBV20012_SDK<br/> | ||
| + | | style="width: 166px;" | Zhengguang.Yang | ||
|- | |- | ||
| − | | am335xLBV20012<br/> | + | | style="width: 121px;" | am335xLBV20012<br/> |
| − | | style="width: | + | | style="width: 90px;" | EPC-R3220A1<br/> |
| style="width: 91px;" | am3352<br/> | | style="width: 91px;" | am3352<br/> | ||
| style="width: 11px;" | 2021-07-29<br/> | | style="width: 11px;" | 2021-07-29<br/> | ||
| style="width: 87px;" | 2021-07-29<br/> | | style="width: 87px;" | 2021-07-29<br/> | ||
| − | | style="width: | + | | style="width: 139px;" | |
| − | | style="width: | + | Image:am335xLIV20012 |
| − | | style="width: | + | |
| − | | style="width: | + | BSP:am335xLBV20012 |
| − | | style="width: | + | |
| − | | style="width: | + | | style="width: 86px;" | <br/> |
| + | | style="width: 78px;" | <br/> | ||
| + | | style="width: 104px;" | [[Media:EPC-R3220_Release_Notes_Yocto2.4_V20012.pdf|''<font color="#0066cc">Release Note</font>'']]<br/> | ||
| + | | style="width: 153px;" | am335xLBV20012_SDK<br/> | ||
| + | | style="width: 166px;" | Zhengguang.Yang | ||
|} | |} | ||
Revision as of 07:04, 4 October 2021
Contents
- 1 資源特性(Features)
- 2 訂購資訊(Ordering Information)
- 3 接口布局和尺寸(Layout and Sizes)
- 4 快速入门 (Quick Start)
- 5 Linux系统的基本使用(Linux System Basic Operating Method)
- 5.1 UUU 使用方法(USB Connection (OTG port))
- 5.2 Display Setting (ROM-5620)
- 5.3 乙太網路使用方法(Ethernent Testing Method)
- 5.4 WiFi使用方法(WIFI Testing Method)
- 5.5 4G使用方法(4G Testing Method)
- 5.6 GPIO使用方法(GPIO Operating Method)
- 5.7 串口使用方法(Serial Port Operating Method)
- 5.8 蓝牙使用方法(BlueTooth Operating Method)
- 5.9 遠程訪問及文件傳輸(Remote Access and File Transimmion)
- 6 通用方法(General Method)
- 7 Linux BSP編譯方法(Android BSP Compile Method)
資源特性(Features)
- TI Sitara™ AM3352 Cortex®-A8 800MHz processor
- 1GB of DDR3-800 and 8 GB of eMMC NAND Flash onboard
- 2 Gigabit Ethernet ports
- 2 RS232/485, 1 USB OTG, 6 GPIO
- WiFi/BT/LTE solution ready
- Yocto Linux support
- -20 ~ 70 °C operating temperature/ 12~24V DC power supply
- Equipped with hardware watchdog timer for system protection
訂購資訊(Ordering Information)
接口布局和尺寸(Layout and Sizes)
EPC-R3220 接口布局圖 Board Dimension Layout
Front I/O
Left-Side
Right-Side
接口引脚定義 (Pin definitions)
- 串口(Debug port 、RS-232、RS-485 、GPIO)
- LAN接口(LAN)
- USB接口(USB1-2、USB-4-5、USB Type C、USB OTG)
- 电源(DC-IN)
- MINI_PCIE接口、I2C_接口
机械尺寸 (Mechanical Characteristics)
EPC-R3220
快速入门 (Quick Start)
系统下载 (OS Download)
- 'Linux系统 (Linux OS)'
Downloads
| Git BSP Tag Version |
Product |
CPU |
BSP/Image | Date |
Alpha Release |
Beta Release |
MP Release |
Release Note |
SDK |
Release Owner |
| am335xDBV20012 |
EPC-R3220A1 |
am3352 |
2021-07-29 |
2021-07-29 |
Image:am335xDIV20012 BSP:am335xDBV20012 |
|
|
Release Note |
am335xDBV20012_SDK |
Zhengguang.Yang |
| am335xUBV20012 |
EPC-R3220A1 |
am3352 |
2021-07-29 |
2021-07-29 |
Image:am335xUIV20012 BSP:am335xUBV20012 |
|
|
Release Note |
am335xUBV20012_SDK |
Zhengguang.Yang |
| am335xLBV20012 |
EPC-R3220A1 |
am3352 |
2021-07-29 |
2021-07-29 |
Image:am335xLIV20012 BSP:am335xLBV20012 |
|
|
Release Note |
am335xLBV20012_SDK |
Zhengguang.Yang |
Linux 燒錄方法 (Linux Flash eMMC Method)
使用Flash tool 燒錄鏡像到eMMC (Flash image into eMMC by Flash Tools)
Step0: 檢查SD卡在Linux 環境的代號 (check SD card symbol in Linux system)
Step1: 創造一張可開機的SD 卡 (Create a bootable SD card)
Step2: 將可開機的SD 卡插入底板SD卡卡槽(Plug the SD card into Carrier board 's SD card slot)
Step4: 確認開機選擇指撥開關
SD 卡開機模式:
Step3:打開電源 和 終端機 (Turn on the Power & Terminal)
Step4: 解壓縮flash tools 檔案,並複製到U盤中(Unzip the flash tools file , then copy to USB Disk)
解壓縮(Unzip the file )
複製檔案到U盤中 (Copy the flash file to USB Disk)
1. 插入U盤到你的Ubuntu 電腦上 (Plug the USB Disk into you Linux PC
2. 檢視U盤在Ubuntu 系統代號 (Check the USB Disk's symbol in Ubuntu System)
3. 掛載U盤在Ubuntu 系統中
Debug 串口調試 (Debug port Setting)
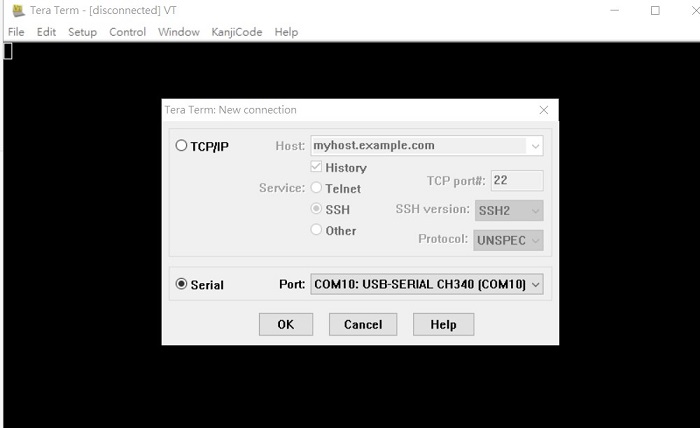
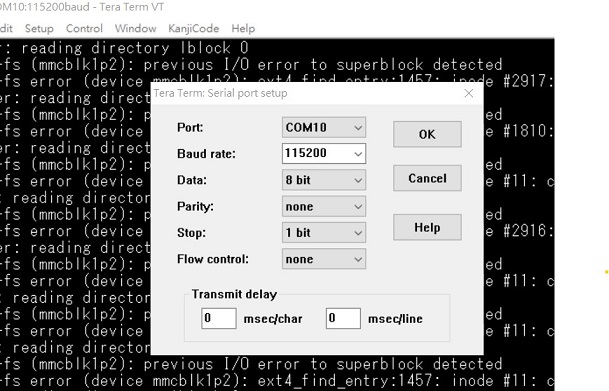
以 Tera Term 为例介绍如何使用串口调试功能
   Baud Rate波特率:115200
   Data 数据位:8
   Parity 奇偶校验:无
   Stop 停止位:1
   Flow Control流控:无
Tera Term Tool
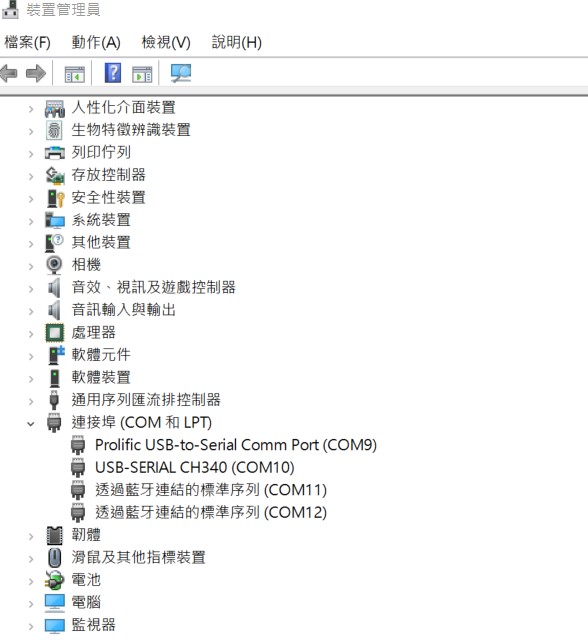
Check the Sriel port in Device Manager (查看PC端的串口号):
if you can not identify the Serial device , please check your serial driver.
Debug port connection (串口連接)
Log into Terminal Tool (进入串口调试终端):
Linux系统的基本使用(Linux System Basic Operating Method)
UUU 使用方法(USB Connection (OTG port))
Display Setting (ROM-5620)
U-boot Command :
setenv fdt_file xxxx.dtb
env save
boot
- Display
- LVDS
- g070vw01
- adv-imx8mxp-rom5620-a1.dtb
- g150xgel05
- adv-imx8qxp-rom5620-a1-lvds-chimei.dtb
- g215hvn01
- adv-imx8qxp-rom5620-a1-lvds-dual.dtb
- g070vw01
- LVDS to HDMI
- adv-imx8qxp-rom5620-a1-hdmi-bridge.dtb
- DSI to HDMI
- adv-imx8qxp-rom5620-a1-hdmi-bridge.dtb
- DSI
- auog101uan02
- adv-imx8qxp-rom5620-a1-auog101uan02.dtb
- auog101uan02
- LVDS
乙太網路使用方法(Ethernent Testing Method)
Command : ifconfig
Command: Ping - I eth1 8.8.8.8 or Ping - I eth0 8.8.8.8
WiFi使用方法(WIFI Testing Method)
Command :

# killall wpa_supplicant
# ifconfig wlan0 up
# wpa_passphrase "SSID" "PASSWORD" > /tmp/wpa.conf
# wpa_supplicant -BDwext -iwlan0 -c/tmp/wpa.conf
# udhcpc -b -i wlan0'''

ping 8.8.8.8
PING 8.8.8.8 (8.8.8.8) 56(84) bytes of data.
64 bytes from 8.8.8.8: icmp_seq=1 ttl=54 time=2.10 ms
64 bytes from 8.8.8.8: icmp_seq=2 ttl=54 time=2.10 ms
4G使用方法(4G Testing Method)
Command:
Test 4G: (EWM-C117FL06E - USB)
Step 1: Connect EWM-C117FL06E to Mini PCIE slot on 9680015491 and connect
the card to CN6 PCIe_D slot on ROM-DB5901.
Step 2: Connect the antenna 1750007990-01 to the SMA (F) connector on
9680015491
and connect the IPEX connector to MT1 on EWM-C117FL06E module.
Step 3: Connect the Mini USB cable from 9680015491 to USB 2.0 Type A port on
ROM-DB5901.
Step 4: Power on and execute the pppd command to connect to the network.
GPIO使用方法(GPIO Operating Method)
Loop-back Test (Take GPIO4 and GPIO5 as examples)

Step 1: Connect GPIO4 and GPIO5
Step 2: Export GPIO interface

root@imx8qxprom5620a1 : ~# echo 456 > /sys/class/gpio/export
root@imx8qxprom5620a1 : ~# echo 452 > /sys/class/gpio/export

Step 3: Set direction

root@imx8qxprom5620a1 : ~# echo out > /sys/class/gpio/gpio1/direction
root@imx8qxprom5620a1 : ~# echo in > /sys/class/gpio/gpio2/direction

Step 4: Read value and set output value then check

root@imx8qxprom5620a1 : ~# cat /sys/class/gpio/gpio2/value
0r
oot@imx8qxprom5620a1 : ~# echo 1 > /sys/class/gpio/gpio1/value
root@imx8qxprom5620a1 : ~# cat /sys/class/gpio/gpio2/value
1
串口使用方法(Serial Port Operating Method)
RS-232 Test
SW7 Setting (SW7設置)
蓝牙使用方法(BlueTooth Operating Method)
Command :

$ hciconfig hci0 up
$ bluetoothctl
$ discoverable on
$ pairable on
$ scan on
[NEW] FC:18:3C:8D:75:F4 myphone
$ scan off
$ pair FC:18:3C:8D:75:F4
$ connect FC:18:3C:8D:75:F4
遠程訪問及文件傳輸(Remote Access and File Transimmion)
查看主板IP位址 ( Chech IP Address ):
Command : ifconfig
Windows下SSH访问及文件传输
SSH Remote Log into Device
- SSH远程登录,以putty选择putty.exe(或者使用Xshell、SecureCRT等类似软件)
- 需要设置远程设备的IP、通讯端口(默认22)、通讯方式,登录后验证用户名密码
通用方法(General Method)
查看CPU温度(Check CPU Temperature)
    root@imx8qxprom5620a1:/# cat /sys/devices/virtual/thermal/thermal_zone0/temp 44600

    # 或者直接以度爲單位顯示 echo $[$(cat /sys/class/thermal/thermal_zone0/temp)/1000]° >>> 45°
查看CPU频率(Check CPU Frequency)
           cat /sys/devices/system/cpu/cpu0/cpufreq/cpuinfo_cur_freq
           >> 900000
           cat /sys/devices/system/cpu/cpu0/cpufreq/cpuinfo_max_freq
           >> 1200000
查看内存容量(Check Memory Capacity)
root@imx8qxprom5620a1:/# busybox free -m
             total       used       free     shared    buffers     cached
Mem:       1794920     516080    1278840      17252      9852        80292
-/+ buffers/cache:     425936    1368984
Swap:            0          0          0
查看存储容量(Check Storage Capacity)
root@imx8qxprom5620a1:/# busybox df -h
Filesystem                Size      Used Available Use% Mounted on
/dev/root                13.4G      1.7G     11.1G  13% /
devtmpfs                395.8M      4.0K    395.8M   0% /dev
tmpfs                   876.4M         0    876.4M   0% /dev/shm
tmpfs                   876.4M     16.5M    859.9M   2% /run
tmpfs                   876.4M         0    876.4M   0% /sys/fs/cgroup
tmpfs                   876.4M      4.0K    876.4M   0% /tmp
tmpfs                   876.4M    280.0K    876.2M   0% /var/volatile
/dev/mmcblk0p2           13.6G      1.7G     11.3G  13% /run/media/mmcblk0p2
/dev/mmcblk0p1           63.9M     23.4M     40.5M  37% /run/media/mmcblk0p1
/dev/mmcblk1p1           63.9M     23.4M     40.5M  37% /run/media/mmcblk1p1
tmpfs                   175.3M     88.0K    175.2M   0% /run/user/0
root@imx8qxprom5620a1:/#
網路Ping測試(Ping Network Testing)
     ping 8.8.8.8
     PING 8.8.8.8 (8.8.8.8) 56(84) bytes of data.
     64 bytes from 8.8.8.8: icmp_seq=1 ttl=54 time=2.10 ms
     64 bytes from 8.8.8.8: icmp_seq=2 ttl=54 time=2.10 ms
設置RTC (RTC Setting)
     root@imx8qxprom5620a1:/# systemctl stop ntpdate.service
     root@imx8qxprom5620a1:/# date 090816072021 && hwclock -w && date
             Wed Sep  8 16:07:00 UTC 2021
             Wed Sep  8 16:07:00 UTC 2021
     root@imx8qxprom5620a1:/# date
             Wed Sep  8 16:07:06 UTC 2021
     root@imx8qxprom5620a1:/#'''


