Difference between revisions of "IoTGateway/BSP/Linux/iMX6/Eclipse Plug-in"
From ESS-WIKI
(→Configuring the Cross-Compiler Options) |
(→Creating the Project) |
||
| Line 74: | Line 74: | ||
==Creating the Project== | ==Creating the Project== | ||
| + | # Select "Project" from the "File -> New" menu. | ||
| + | # Expand "C/C++". | ||
| + | # Double click "C Project" to create the project. | ||
| + | #:[[File:]] | ||
| + | # Expand "Yocto Project ADT Autotools Project". | ||
| + | # Select "Hello World ANSI C Autotools Project". | ||
| + | # Put a name in the "Project name:" field. Do not use hyphens as part of the name. | ||
| + | #:[[File:]] | ||
| + | # Click "Next". | ||
| + | # Add information in the Author and Copyright notice fields. | ||
| + | # Be sure the License field is correct. | ||
| + | # Click "Finish". | ||
| + | #:[[File:]] | ||
| + | # If the "open perspective" prompt appears, click "Yes" to open the C/C++ perspective. | ||
| + | #:[[File:]] | ||
| + | # The left-hand navigation pane shows your project. You can display your source by double clicking the project's source file. | ||
| + | #:[[File:]] | ||
| + | |||
==Building the Project== | ==Building the Project== | ||
==Deploying and Running the Application== | ==Deploying and Running the Application== | ||
Revision as of 04:21, 10 March 2016
Yocto User Guide - Eclipse Plug-in for iMX6 series
Prerequisites
Installing cross toolchain
Please use bitbake command to build one toolchain installer or get a pre-built one.
Qt4 SDK
Please perform following command to make toolchain installer.
$ bitbake fsl-image-x11 -c populate-sdk
Please change working directory to where installer located and perform the following command.
$ sudo ./poky-eglibc-x86_64-fsl-image-x11-cortexa9hf-vfp-neon-toolchain-qt4-1.5.3.sh
Qt5 SDK
Please perform following command to make toolchain installer.
$ bitbake fsl-image-x11-qt5 -c populate-sdk
Please change working directory to where installer located and perform the following command.
$ sudo ./poky-eglibc-x86_64-fsl-image-x11-qt5-cortexa9hf-vfp-neon-toolchain-1.5.3.sh
Working with Eclipse
Installing the Eclipse IDE
Please download "eclipse-standard-kepler-R-linux-gtk-x86_64.tar.gz" manually, put it to directory ~/FILES/ and perform the following commands:
$ cd ~/
$ tar xvf ~/FILES/eclipse-standard-kepler-R-linux-gtk-x86_64.tar.gz
Starting the Eclipse IDE
$ source /opt/poky/1.5.3/environment-setup-cortexa9hf-vfp-neon-poky-linux-gnueabi
$ ~/eclipse/eclipse
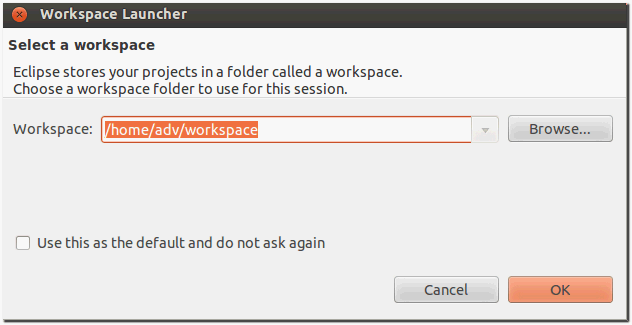
- select your workspace location
- Make sure you are in your Workbench and select "Install New Software" from the "Help" pull-down menu.
- Select "Kepler - http://download.eclipse.org/releases/kepler" from the "Work with:" pull-down menu.
- Expand the box next to "Linux Tools" and select the LTTng - Linux Tracing Toolkit boxes.
- Expand the box next to "Mobile and Device Development" and select the following boxes:
- Expand the box next to "Programming Languages" and select the following boxes:
- Complete the installation and restart the Eclipse IDE.
Installing the Pre-built Plug-in
- Start up the Eclipse IDE.
- In Eclipse, select "Install New Software" from the "Help" menu.
- Click "Add..." in the "Work with:" area.
- Enter "http://downloads.yoctoproject.org/releases/eclipse-plugin/1.5.4/kepler" in the URL field and provide a meaningful name in the "Name" field.
- Click "OK" to have the entry added to the "Work with:" drop-down list.
- Check the boxes next to following items:
- Complete the remaining software installation steps and then restart the Eclipse IDE to finish the installation of the plug-in.
- Click OK to continue when following dialog shows up.
Configuring the Cross-Compiler Options
- Choose "Preferences" from the "Windows" menu to display the Preferences dialog.
- Click "Yocto Project ADT"
- [[File:]]
- Specify corret "Toolchain Root Location" & "Sysroot Location".
- [[File:]]
Creating the Project
- Select "Project" from the "File -> New" menu.
- Expand "C/C++".
- Double click "C Project" to create the project.
- [[File:]]
- Expand "Yocto Project ADT Autotools Project".
- Select "Hello World ANSI C Autotools Project".
- Put a name in the "Project name:" field. Do not use hyphens as part of the name.
- [[File:]]
- Click "Next".
- Add information in the Author and Copyright notice fields.
- Be sure the License field is correct.
- Click "Finish".
- [[File:]]
- If the "open perspective" prompt appears, click "Yes" to open the C/C++ perspective.
- [[File:]]
- The left-hand navigation pane shows your project. You can display your source by double clicking the project's source file.
- [[File:]]
Building the Project
Deploying and Running the Application
Deploying and Debugging the Application


