Difference between revisions of "Mbed Connector Bridge"
Mingwei.tsai (talk | contribs) |
Mingwei.tsai (talk | contribs) |
||
| (12 intermediate revisions by the same user not shown) | |||
| Line 9: | Line 9: | ||
== Create your mbed Device Connector access key == | == Create your mbed Device Connector access key == | ||
| − | *Open the mbed Cloud Connect dashboard and log in: [https:// | + | *Open the mbed Cloud Connect dashboard and log in: [https://portal.mbedcloud.com/ https://portal.mbedcloud.com/] |
| − | |||
| − | |||
| − | |||
| − | + | [[File:Mbed Cloud Portal.png|center|750px|Mbed Cloud Portal]] | |
| − | * | + | *Go to API keys |
| − | |||
| − | |||
| − | |||
| − | |||
| − | [[File:Azure | + | [[File:Go to API keys.png|center|750px|Go to API keys]] |
| + | |||
| + | *Create API Key in Mbed Cloud | ||
| + | |||
| + | [[File:Create API Key in Mbed Cloud.png|center|750px|Create API Key in Mbed Cloud]] | ||
| + | |||
| + | *Copy API Key | ||
| + | |||
| + | [[File:Copy API Key.png|center|750px|Copy API Key]] | ||
| + | |||
| + | == Create Azure IoTHub and mbed bridge container instance == | ||
| + | |||
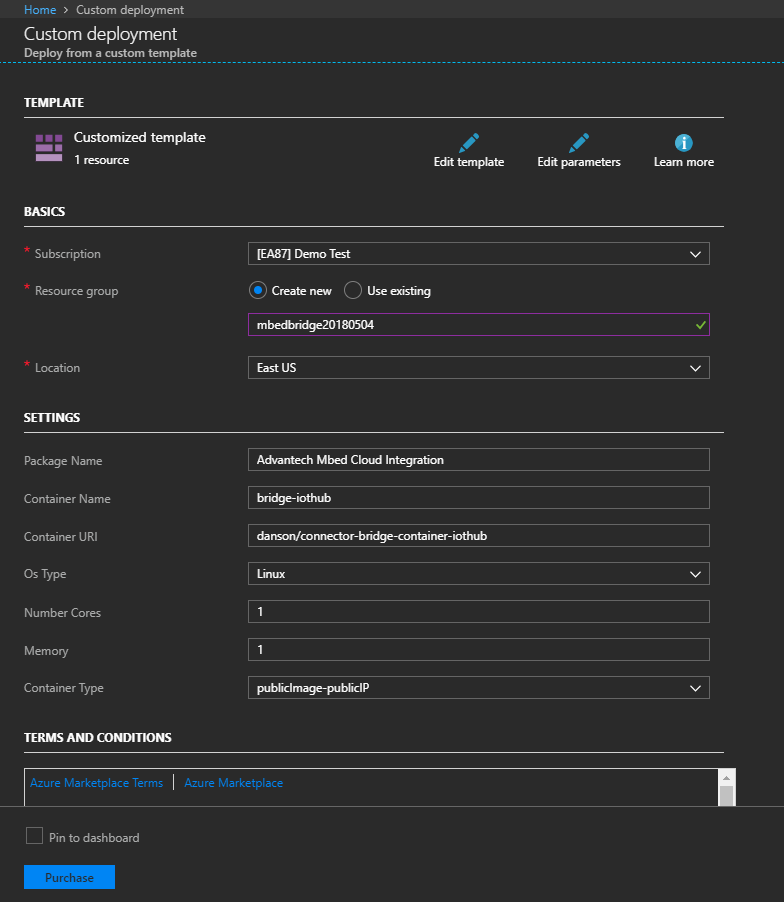
| + | *Custom deployment from Advantech Marketplace and login Azure Portal | ||
| + | *Enter Resource Group and select Location | ||
| + | *Click Purchase | ||
| + | |||
| + | [[File:Custom deploy.PNG|center|custom_deploy]] | ||
| + | |||
| + | *Wait deployment finial then go to your deploy resource group | ||
| + | |||
| + | [[File:Resourcegroup.PNG|center|resourcegroup]] | ||
| + | |||
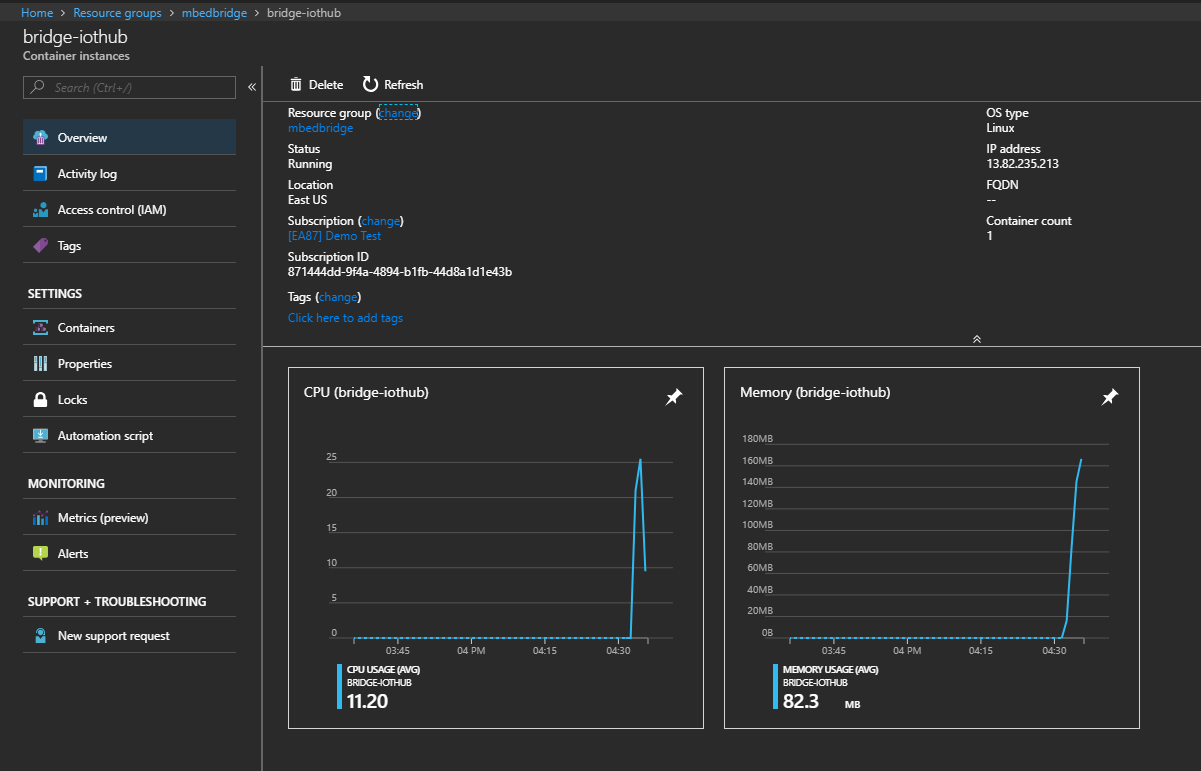
| + | *Select bridge-iothub and get container IP address | ||
| + | |||
| + | [[File:Bridge-iothub.PNG|center|bridge-iothub]] | ||
== Get your IoTHub Connection String == | == Get your IoTHub Connection String == | ||
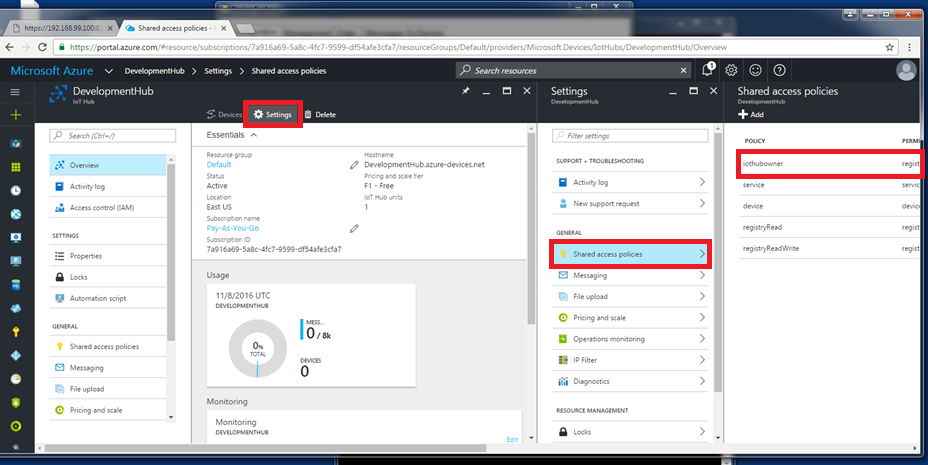
*Open the IoTHub instance dashboard, and select your IoTHub resource. | *Open the IoTHub instance dashboard, and select your IoTHub resource. | ||
| − | *Click Settings. | + | *Click '''Settings'''. |
| − | *Select Shared Access Policies >> iothubowner. | + | *Select '''Shared Access Policies >> iothubowner.''' |
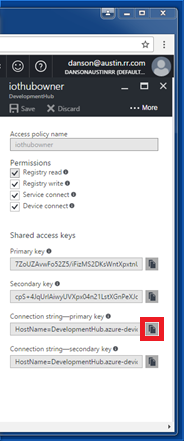
*Go to Connection String - Primary Key, and select Copy to Clipboard. | *Go to Connection String - Primary Key, and select Copy to Clipboard. | ||
| Line 35: | Line 52: | ||
== Create your SAS Token with DeviceExplorer == | == Create your SAS Token with DeviceExplorer == | ||
| + | *Install the latest version of Microsoft Device Explorer. ([https://github.com/Azure/azure-iot-sdk-csharp/releases https://github.com/Azure/azure-iot-sdk-csharp/releases]) | ||
*Open DeviceExplorer. | *Open DeviceExplorer. | ||
*Paste your connection string here. | *Paste your connection string here. | ||
| − | *Click Update. In the TTL (days) field, enter 365. Click Generate SAS. | + | *Click '''Update'''. |
| + | *In the '''TTL (days)''' field, enter 365. | ||
| + | *Click '''Generate SAS'''. | ||
*Copy ALL contents of your SAS Token, and save them. | *Copy ALL contents of your SAS Token, and save them. | ||
| Line 44: | Line 64: | ||
== Configure your IoTHub bridge == | == Configure your IoTHub bridge == | ||
| − | + | *Open Firefox or Chrome, and go to: https://[container IP address]:8234 | |
| − | |||
| − | *Open Firefox or Chrome, and go to: | ||
*Accept the self signed certificate. The credentials are: Username: admin Password: admin | *Accept the self signed certificate. The credentials are: Username: admin Password: admin | ||
| − | *Enter the name of your IoTHub, and click Save. | + | *mds_api_token: Enter the mbed Cloud API Key/Token, and click '''Save'''. |
| − | *Enter | + | *iot_event_hub_name: Enter the name of your IoTHub, and click '''Save'''. |
| − | *Enter | + | *iot_event_hub_sas_token: Enter your SAS Token, and click '''Save'''. |
| − | *Click Restart. | + | *mds_address: Enter the right API endpoint '''api.us-east-1.mbedcloud.com''' and click '''Save'''. |
| + | *Click '''Restart'''. | ||
| − | Your IoTHub bridge is now configured. [[File: | + | Your IoTHub bridge is now configured. [[File:Mbed-bridge web1.PNG|center|mbed-bridge_web1]] |
== Check that it all works == | == Check that it all works == | ||
| Line 61: | Line 80: | ||
*Under Data you should see output (if you do not see output, shake your device to generate some accelerometer readings). | *Under Data you should see output (if you do not see output, shake your device to generate some accelerometer readings). | ||
*Click monitor to start monitoring. | *Click monitor to start monitoring. | ||
| + | |||
| + | [[File:Mbed bridge iothub.png|center|mbed_bridge_iothub]] | ||
| + | |||
| + | |||
| + | |||
| + | |||
= AWS = | = AWS = | ||
| Line 71: | Line 96: | ||
*Explore the device’s data telemetry with Amazon’s web-based MQTT client. | *Explore the device’s data telemetry with Amazon’s web-based MQTT client. | ||
| − | == | + | == Create your mbed Device Connector access key == |
| + | |||
| + | *Open the mbed Cloud Connect dashboard and log in: [https://portal.mbedcloud.com/ https://portal.mbedcloud.com/] | ||
| + | |||
| + | [[File:Mbed Cloud Portal.png|center|750px|Mbed Cloud Portal]] | ||
| + | |||
| + | *Go to API keys | ||
| + | |||
| + | [[File:Go to API keys.png|center|750px|Go to API keys]] | ||
| + | |||
| + | *Create API Key in Mbed Cloud | ||
| − | + | [[File:Create API Key in Mbed Cloud.png|center|750px|Create API Key in Mbed Cloud]] | |
| − | + | ||
| − | * | + | *Copy API Key |
| − | + | ||
| − | + | [[File:Copy API Key.png|center|750px|Copy API Key]] | |
| − | |||
== Creating an AWS IoT instance == | == Creating an AWS IoT instance == | ||
| − | *Log into the AWS Management Console. | + | *Log into the AWS Management Console. [https://console.aws.amazon.com https://console.aws.amazon.com] |
| − | *Click AWS IoT. | + | *Click '''AWS IoT'''. |
| − | [[File: | + | |
| + | [[File:Aws iot in menu.png|center|aws_iot_in_menu]] | ||
| + | |||
*If you do not have one already, create an Instance: | *If you do not have one already, create an Instance: | ||
| − | [[File: | + | |
| − | *Open the Dashboard and click Test. | + | [[File:Aws iot get started.png|center|aws_iot_get_started]] |
| − | [[File: | + | |
| + | *Open the Dashboard and click '''Test'''. | ||
| + | |||
| + | [[File:Aws iot dashboard.png|center|aws_iot_dashboard]] | ||
| + | |||
*Determining your AWS region | *Determining your AWS region | ||
**Determine your AWS Region from the Test Console URL: | **Determine your AWS Region from the Test Console URL: | ||
| Line 97: | Line 137: | ||
*Make a note of your “region” parameter value | *Make a note of your “region” parameter value | ||
**In the above example, the AWS Region is us-east-1. | **In the above example, the AWS Region is us-east-1. | ||
| + | |||
| + | == Deploy mbed bridge EC2 instance == | ||
| + | |||
| + | *Custom deployment from Advantech Marketplace and login AWS console | ||
| + | [[File:CloudFormation1.PNG|center|CloudFormation1]] | ||
| + | *Select Next, Next, Create button to deploy your mbed bridge instance | ||
| + | [[File:CloudFormation2.PNG|center|CloudFormation2]] | ||
| + | [[File:CloudFormation3.PNG|center|CloudFormation3]] | ||
| + | *Get InstancePublicDnsName from stack outputs and copy. | ||
| + | [[File:CloudFormation4.PNG|center|CloudFormation4]] | ||
== Create your AWS Access Key and ID (New IAM User) == | == Create your AWS Access Key and ID (New IAM User) == | ||
| Line 119: | Line 169: | ||
*Click '''Close'''. | *Click '''Close'''. | ||
| − | |||
| − | |||
| − | |||
| − | |||
| − | |||
| − | |||
| − | |||
| − | |||
| − | |||
| − | |||
| − | |||
| − | |||
| − | |||
| − | |||
| − | |||
== Verifying administrator permissions on IAM == | == Verifying administrator permissions on IAM == | ||
| Line 139: | Line 174: | ||
Amazon’s Identity and Access Management service (IAM) users should have administrator permissions to create thing shadows, which you will need later. | Amazon’s Identity and Access Management service (IAM) users should have administrator permissions to create thing shadows, which you will need later. | ||
| − | *In your AAWS Management Console, click Users | + | *In your AAWS Management Console, click '''Users''' |
*Select your user. | *Select your user. | ||
| − | *Click permissions. | + | *Click '''permissions'''. |
| − | *Check the AdministratorAccess policy box. | + | *Check the '''AdministratorAccess '''policy box. |
| − | *Click Attach Policy. | + | *Click '''Attach Policy'''. |
| − | [[File: | + | |
| + | [[File:Aws attach policy.png|center|aws_attach_policy]] | ||
== Configuring the bridge == | == Configuring the bridge == | ||
| Line 152: | Line 188: | ||
**On Mac OS X or Linux: please use the IP you got at the end of the Docker import script. Go to [https:// https://]<your container IP address>:8234. | **On Mac OS X or Linux: please use the IP you got at the end of the Docker import script. Go to [https:// https://]<your container IP address>:8234. | ||
*Accept the self signed certificate. | *Accept the self signed certificate. | ||
| − | [[File: | + | |
| + | [[File:Privacy warning.png|center|privacy_warning]] | ||
| + | |||
*Log in. Username: admin. Password: admin. | *Log in. Username: admin. Password: admin. | ||
| − | *Enter the mbed Connector API token. Click Save. | + | *Enter the mbed Connector API token. Click '''Save'''. |
| − | *Enter your AWS region. Click Save. | + | *Enter your AWS region. Click '''Save'''. |
| − | *Enter your AWS access key. Click Save. | + | *Enter your AWS access key. Click '''Save'''. |
| − | *Enter your AWS access key ID. Click Save. | + | *Enter your AWS access key ID. Click '''Save'''. |
| − | *Click Restart at the top. | + | *Click '''Restart '''at the top. |
| − | [[File: | + | |
| + | [[File:Bridge configuration.png|center|bridge_configuration]] | ||
Your AWS bridge is now configured! You can restart your device and see messages coming into the AWS IoT via Amazon’s MQTT Client. | Your AWS bridge is now configured! You can restart your device and see messages coming into the AWS IoT via Amazon’s MQTT Client. | ||
| Line 168: | Line 207: | ||
*Go to the AWS dashboard: [link] | *Go to the AWS dashboard: [link] | ||
| − | *In the left-hand menu, click Registry > Things. | + | *In the left-hand menu, click '''Registry > Things'''. |
*You should see your device listed as a Thing. | *You should see your device listed as a Thing. | ||
| − | [[File: | + | |
| − | *In the left-hand menu, click Test. | + | [[File:Aws iot things.png|center|aws_iot_things]] |
| + | |||
| + | *In the left-hand menu, click '''Test'''. | ||
**Result: This opens the MQTT dashboard: | **Result: This opens the MQTT dashboard: | ||
| − | [[File: | + | |
| + | [[File:Aws iot test dashboard.png|center|aws_iot_test_dashboard]] | ||
| + | |||
*Subscribe to the observation topic | *Subscribe to the observation topic | ||
| − | 1. In the subscription topic field, enter: mbed/notify/#. 2. Click Subscribe to this topic. | + | 1. In the subscription topic field, enter: mbed/notify/#. |
| + | |||
| + | 2. Click '''Subscribe to this topic'''. | ||
*Subscribe to the command-response topic | *Subscribe to the command-response topic | ||
| − | 1. In the subscription topic field, enter: mbed/cmd-response/#. 2. Click Subscribe to this topic. | + | 1. In the subscription topic field, enter: mbed/cmd-response/#. |
| + | |||
| + | 2. Click '''Subscribe to this topic'''. | ||
*Result: | *Result: | ||
| − | [[File: | + | |
| + | [[File:Aws iot subscriptions.png|center|aws_iot_subscriptions]] | ||
Latest revision as of 07:01, 7 May 2018
Azure
Introduction
This tutorial explains how to connect your mbed device to Azure IoTHub, using mbed Device Connector and ARMs prototype IoTHub Connector Bridge.
Upon completion, you will be able to see and interact with your mbed devices from within the Azure IoTHub ecosystem.Create your mbed Device Connector access key
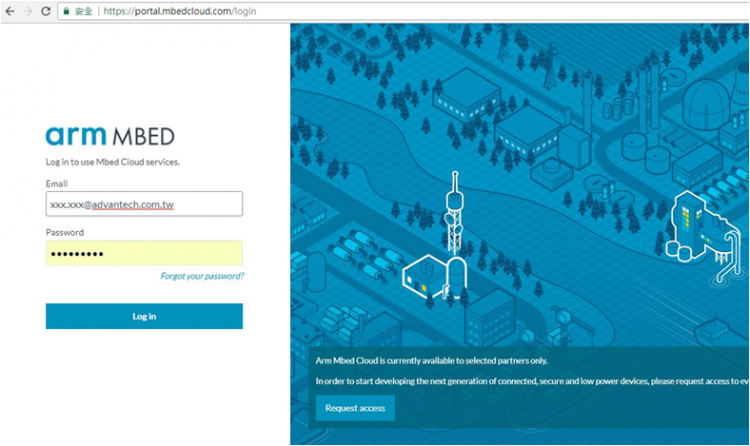
- Open the mbed Cloud Connect dashboard and log in: https://portal.mbedcloud.com/
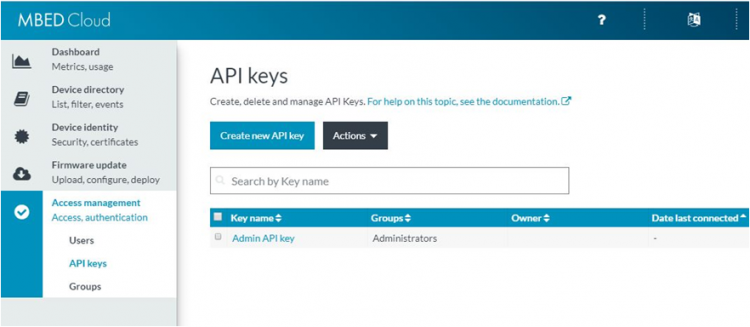
- Go to API keys
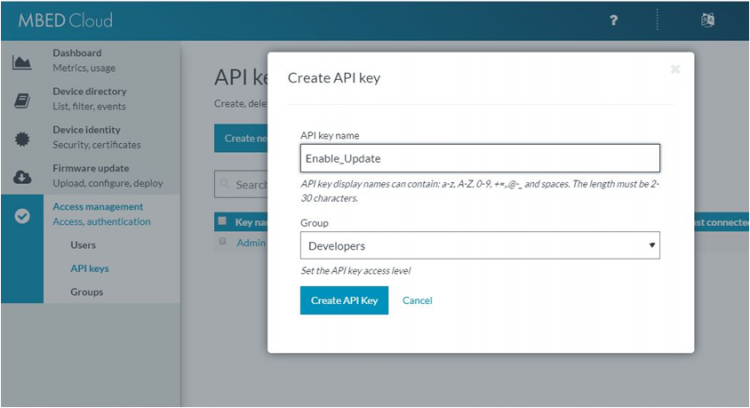
- Create API Key in Mbed Cloud
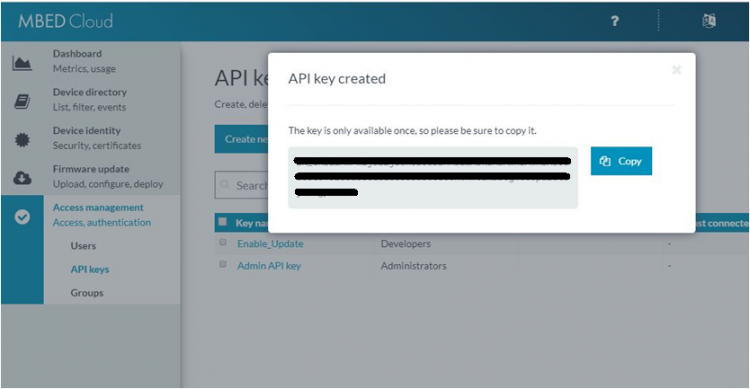
- Copy API Key
Create Azure IoTHub and mbed bridge container instance
- Custom deployment from Advantech Marketplace and login Azure Portal
- Enter Resource Group and select Location
- Click Purchase
- Wait deployment finial then go to your deploy resource group
- Select bridge-iothub and get container IP address
Get your IoTHub Connection String
- Open the IoTHub instance dashboard, and select your IoTHub resource.
- Click Settings.
- Select Shared Access Policies >> iothubowner.
- Go to Connection String - Primary Key, and select Copy to Clipboard.
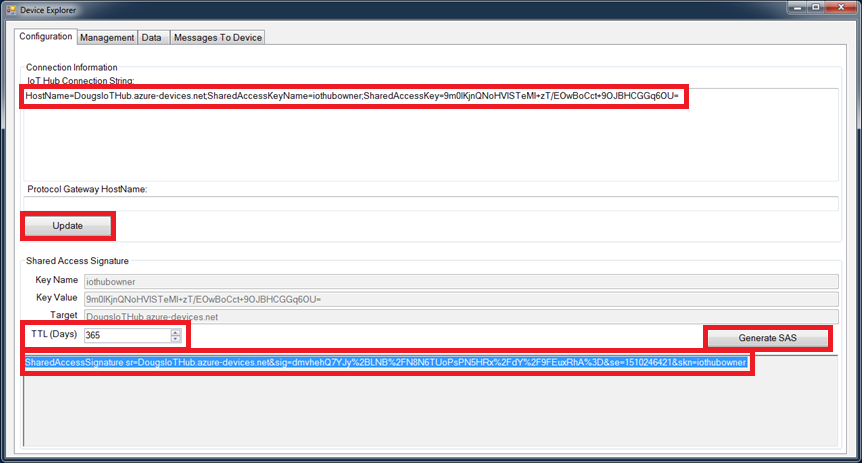
Create your SAS Token with DeviceExplorer
- Install the latest version of Microsoft Device Explorer. (https://github.com/Azure/azure-iot-sdk-csharp/releases)
- Open DeviceExplorer.
- Paste your connection string here.
- Click Update.
- In the TTL (days) field, enter 365.
- Click Generate SAS.
- Copy ALL contents of your SAS Token, and save them.
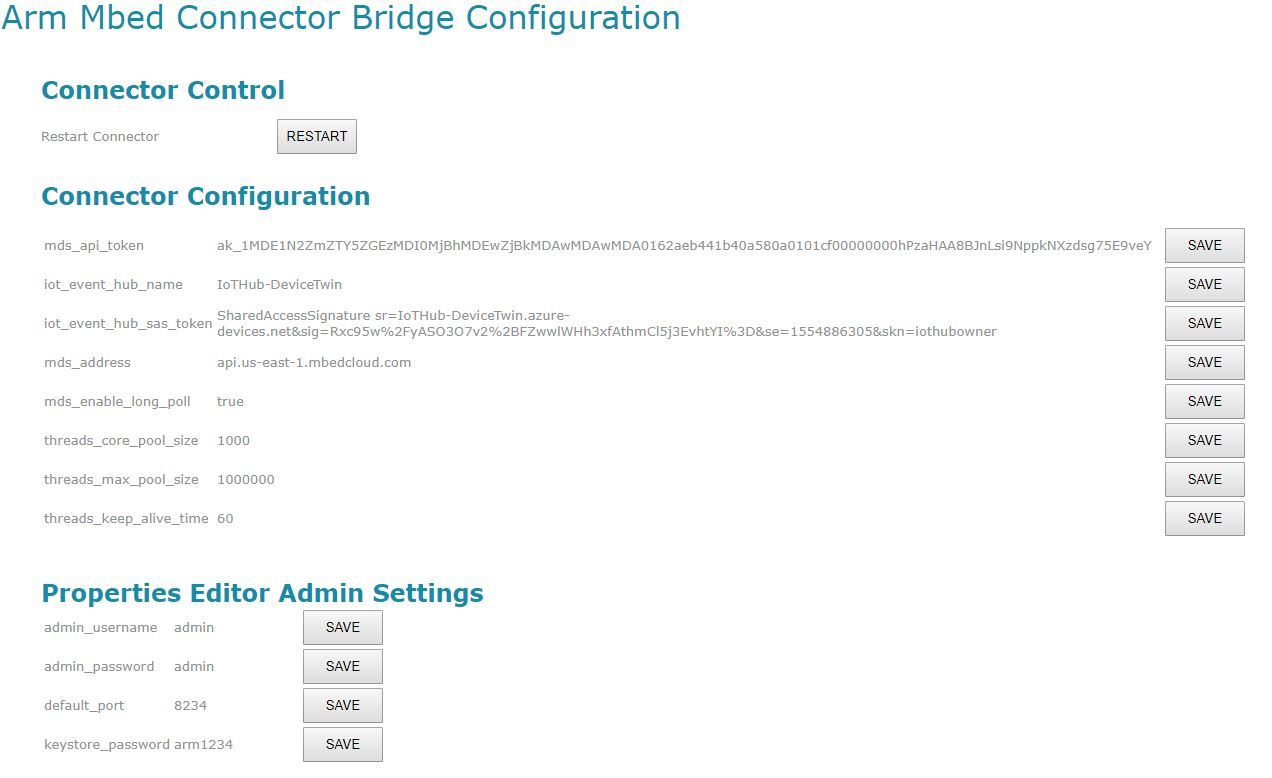
Configure your IoTHub bridge
- Open Firefox or Chrome, and go to: https://[container IP address]:8234
- Accept the self signed certificate. The credentials are: Username: admin Password: admin
- mds_api_token: Enter the mbed Cloud API Key/Token, and click Save.
- iot_event_hub_name: Enter the name of your IoTHub, and click Save.
- iot_event_hub_sas_token: Enter your SAS Token, and click Save.
- mds_address: Enter the right API endpoint api.us-east-1.mbedcloud.com and click Save.
- Click Restart.
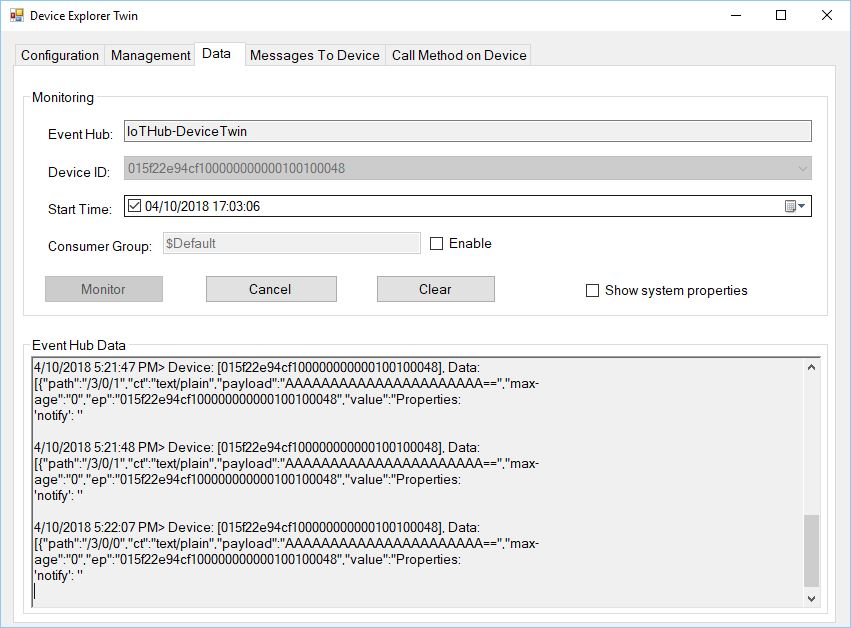
Check that it all works
- Open DeviceExplorer
- Under the Management tab you should see your device listed
- Under Data you should see output (if you do not see output, shake your device to generate some accelerometer readings).
- Click monitor to start monitoring.
AWS
Introduction
We’re going to use mbed Connector and ARM’s prototype AWS IoT Connector Bridge to connect an mbed device to AWS IoT. We’ll:
- Create an instance of ARM’s prototype AWS IoT Connector Bridge and bind it to your Amazon and Connector accounts.
- Explore the device’s data telemetry with Amazon’s web-based MQTT client.
Create your mbed Device Connector access key
- Open the mbed Cloud Connect dashboard and log in: https://portal.mbedcloud.com/
- Go to API keys
- Create API Key in Mbed Cloud
- Copy API Key
Creating an AWS IoT instance
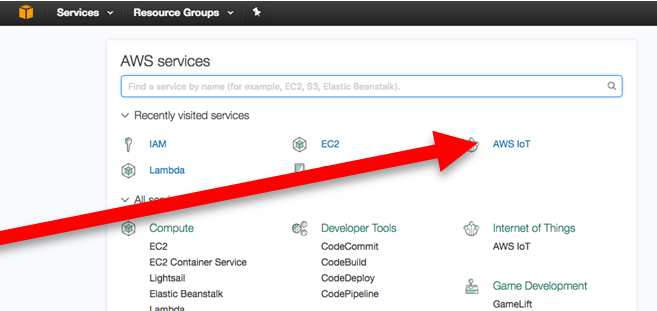
- Log into the AWS Management Console. https://console.aws.amazon.com
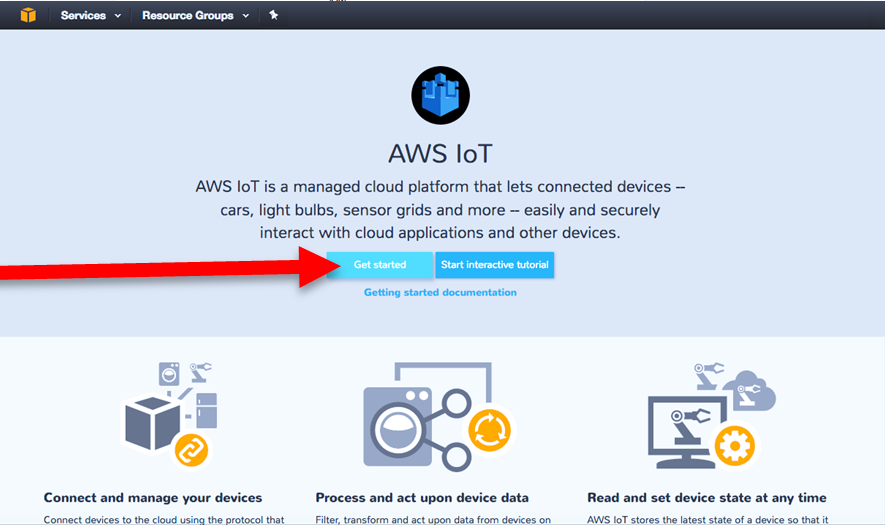
- Click AWS IoT.
- If you do not have one already, create an Instance:
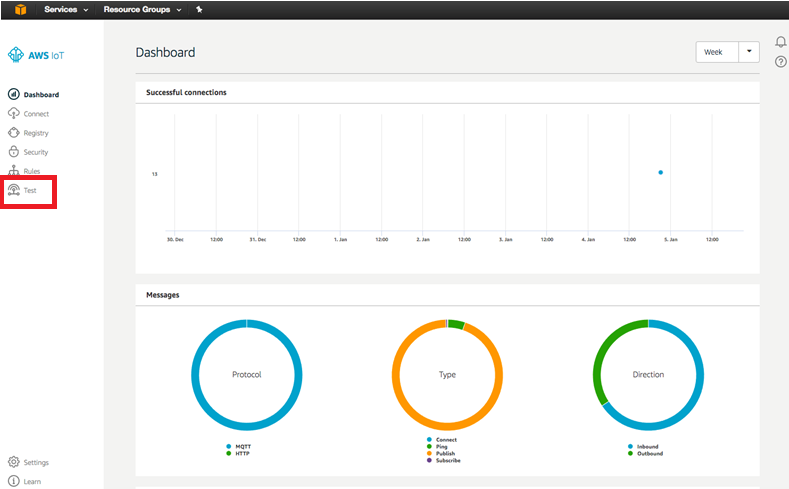
- Open the Dashboard and click Test.
- Determining your AWS region
- Determine your AWS Region from the Test Console URL:
Your URL should look something like this: https://console.aws.amazon.com/iotv2/home?region=us-east-1#/test
- Make a note of your “region” parameter value
- In the above example, the AWS Region is us-east-1.
Deploy mbed bridge EC2 instance
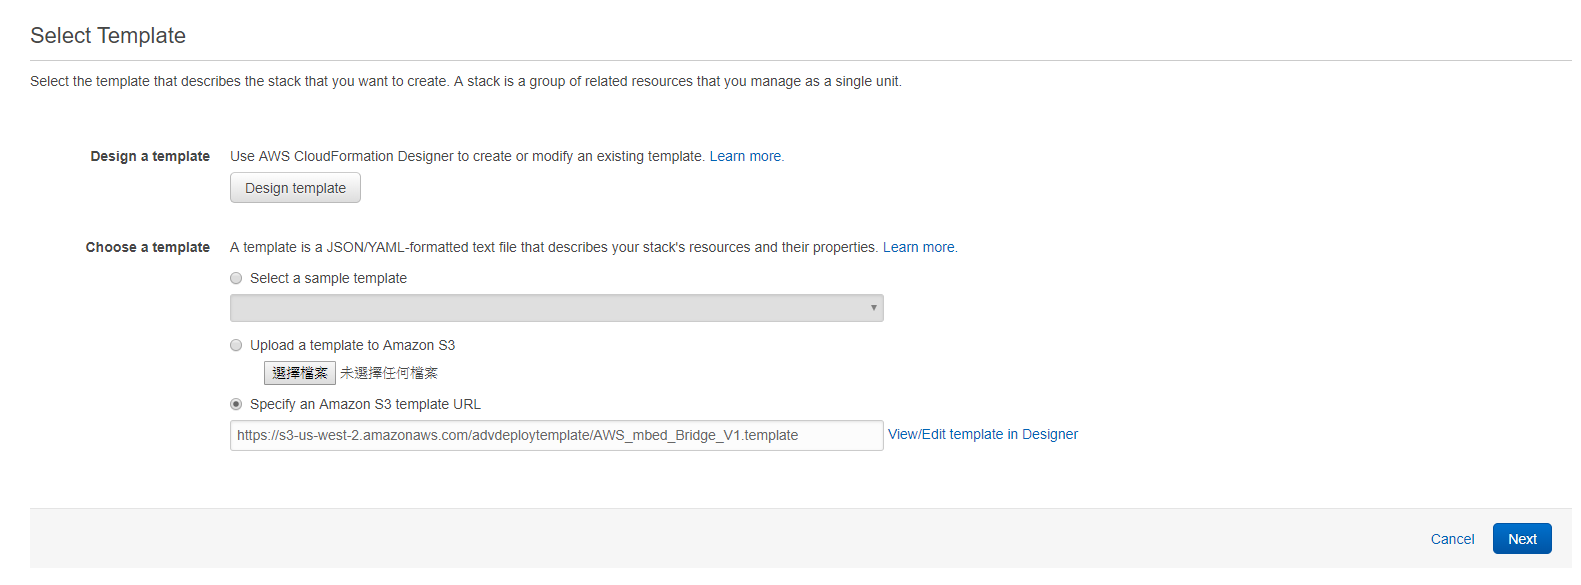
- Custom deployment from Advantech Marketplace and login AWS console
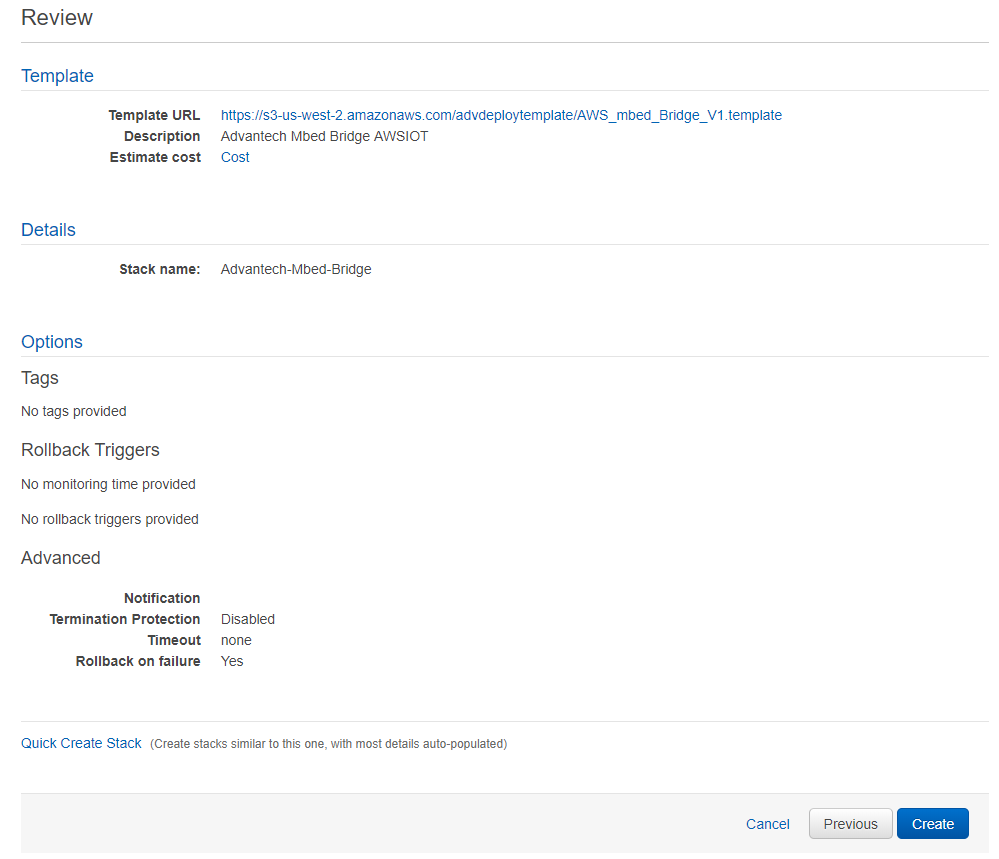
- Select Next, Next, Create button to deploy your mbed bridge instance
- Get InstancePublicDnsName from stack outputs and copy.
Create your AWS Access Key and ID (New IAM User)
- Using Chrome, go to: http://docs.aws.amazon.com/AWSSimpleQueueService/latest/SQSDeveloperGuide/sqs-setting-up.html
- Complete the steps in Amazon’s guide to create the Access Key and ID
- If you do not have an Identity and Management (IAM) User, you need to create one:
- Go to the AWS dashboard [link]
- From the left hand menu, click Users.
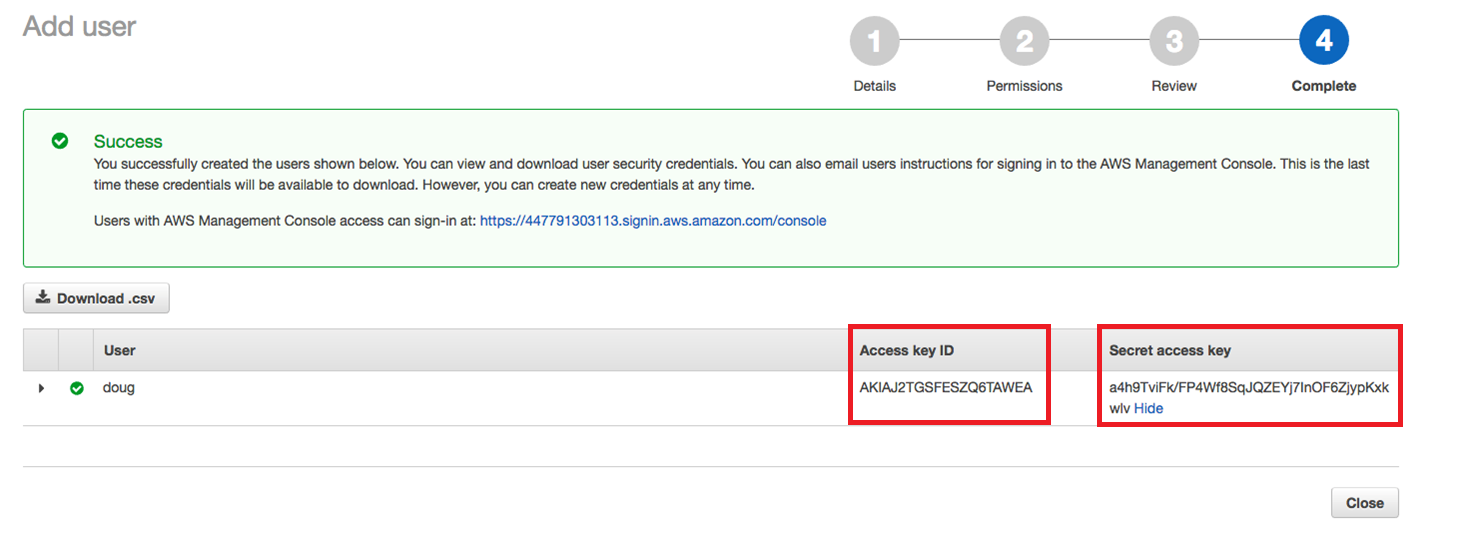
- Click Add user.
- Enter a username.
- Set Access type to Programmatic Access.
- Click Next Permissions
- When the new IAM User is created, you will be shown your keys.
- Click Show to see your Secret Access Key.
- Save both keys.
- Click Close.
Verifying administrator permissions on IAM
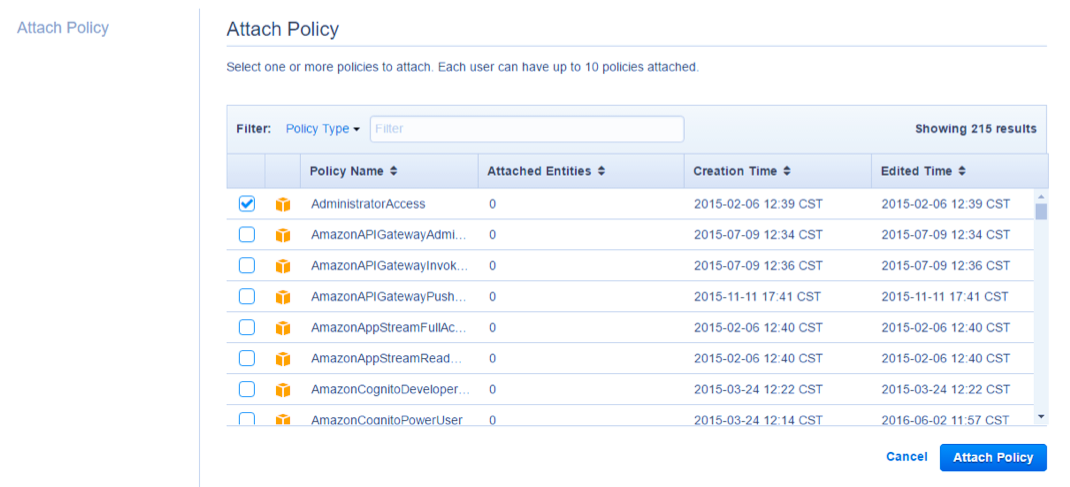
Amazon’s Identity and Access Management service (IAM) users should have administrator permissions to create thing shadows, which you will need later.
- In your AAWS Management Console, click Users
- Select your user.
- Click permissions.
- Check the AdministratorAccess policy box.
- Click Attach Policy.
Configuring the bridge
- Open Chrome or Firefox:
- On Windows: go to https://192.168.99.100:8234.
- On Mac OS X or Linux: please use the IP you got at the end of the Docker import script. Go to [https:// https://]<your container IP address>:8234.
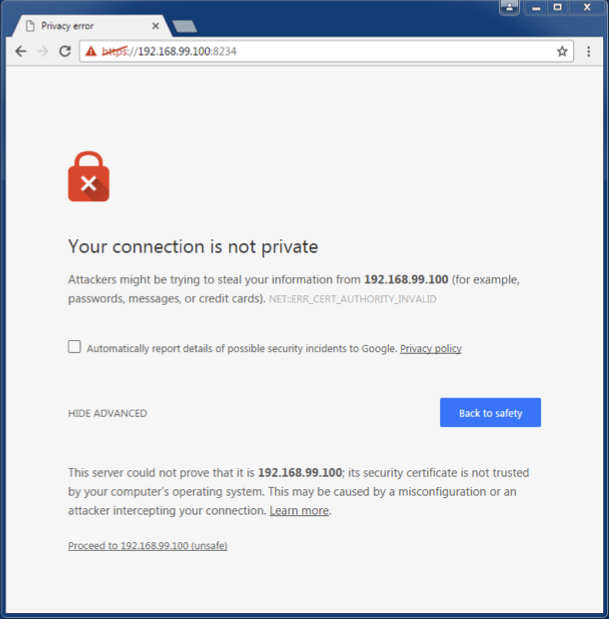
- Accept the self signed certificate.
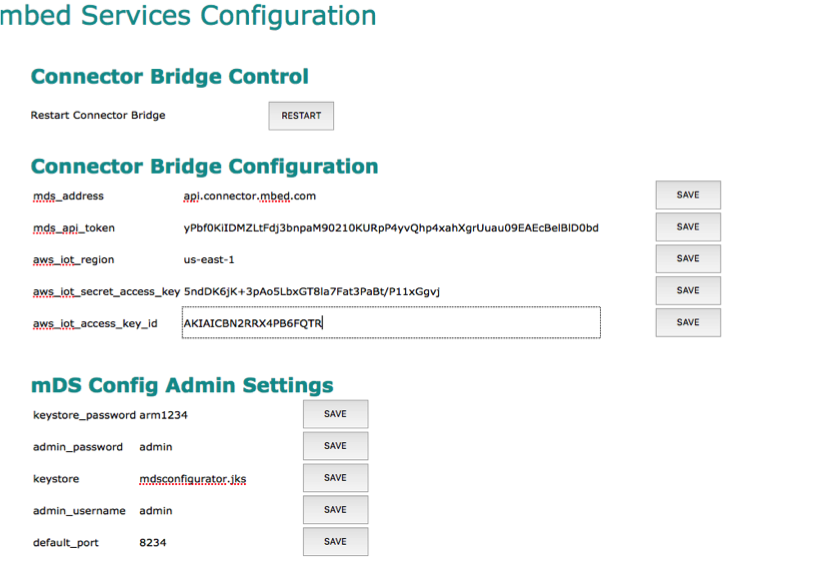
- Log in. Username: admin. Password: admin.
- Enter the mbed Connector API token. Click Save.
- Enter your AWS region. Click Save.
- Enter your AWS access key. Click Save.
- Enter your AWS access key ID. Click Save.
- Click Restart at the top.
Your AWS bridge is now configured! You can restart your device and see messages coming into the AWS IoT via Amazon’s MQTT Client.
Putting it all together
Connecting to the device
- Go to the AWS dashboard: [link]
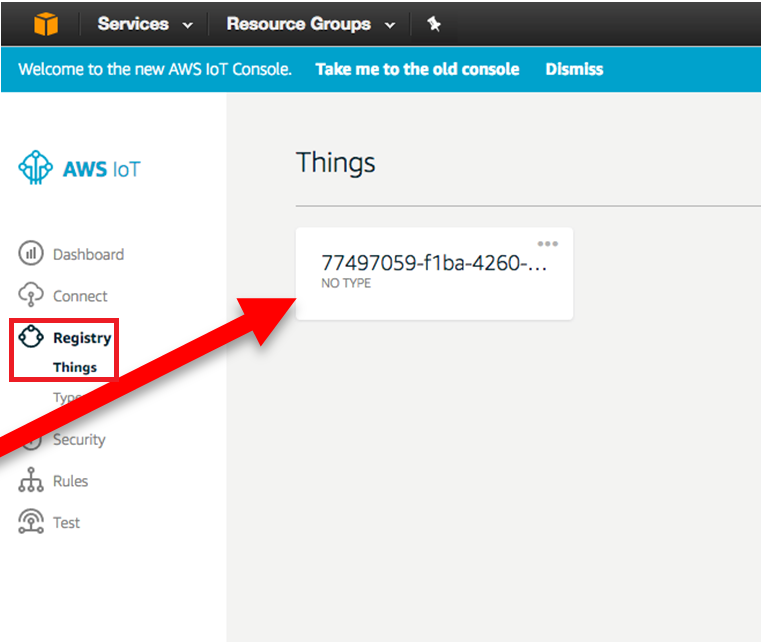
- In the left-hand menu, click Registry > Things.
- You should see your device listed as a Thing.
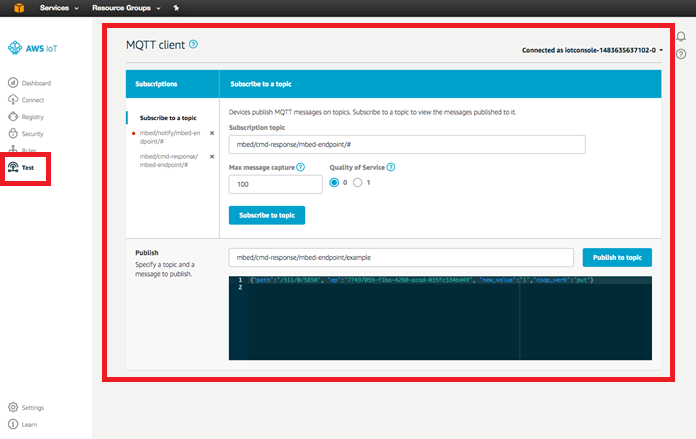
- In the left-hand menu, click Test.
- Result: This opens the MQTT dashboard:
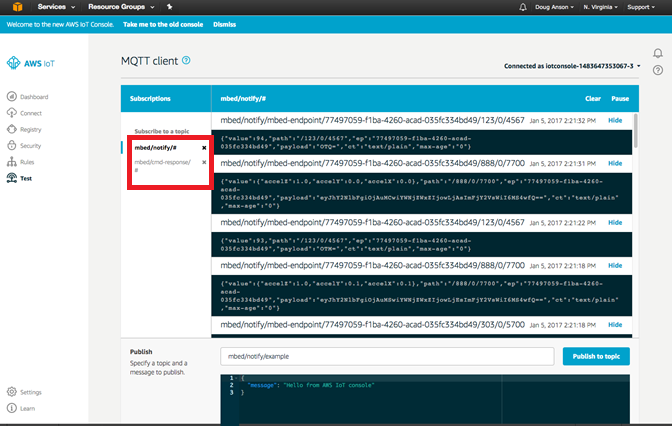
- Subscribe to the observation topic
1. In the subscription topic field, enter: mbed/notify/#.
2. Click Subscribe to this topic.
- Subscribe to the command-response topic
1. In the subscription topic field, enter: mbed/cmd-response/#.
2. Click Subscribe to this topic.
- Result:

