Difference between revisions of "EdgeSense"
Evelyn.tang (talk | contribs) |
Eric.liang (talk | contribs) |
||
| (37 intermediate revisions by 5 users not shown) | |||
| Line 59: | Line 59: | ||
# Follow the readme to install your converter protocol</pre> | # Follow the readme to install your converter protocol</pre> | ||
| − | === How | + | === How To modify EnSaaS ID/Password and resart === |
<pre># To fill your "IoTKey" then save and exit | <pre># To fill your "IoTKey" then save and exit | ||
<IoTKey>304a99b5b452444c749a83bbb9e35dpow</IoTKey> | <IoTKey>304a99b5b452444c749a83bbb9e35dpow</IoTKey> | ||
| Line 65: | Line 65: | ||
$sudo vim agent_config.xml | $sudo vim agent_config.xml | ||
$sudo docker restart ensaas-ei-agent</pre> | $sudo docker restart ensaas-ei-agent</pre> | ||
| + | |||
| + | === How To config Modbus and resart service === | ||
| + | <pre>$cd {Installed path}/Installer/packages/Plugins/docker-edgesense-image-x86/EdgeSense/EService-Modbus/config/ | ||
| + | $sudo vim Modbus_Handler.ini | ||
| + | $sudo docker restart service-modbus</pre> | ||
| + | |||
| + | === How To Restart Service === | ||
| + | <pre>// MQTT-BUS | ||
| + | $sudo docker restart advigw-mqtt-bus | ||
| + | |||
| + | // Node-RED | ||
| + | $sudo docker restart advigw-node-red | ||
| + | |||
| + | // Modbus_Handler Service | ||
| + | $sudo docker restart service-modbus | ||
| + | |||
| + | // HDD PMQ | ||
| + | $sudo docker restart service-hddpmq | ||
| + | |||
| + | // SUSIControl | ||
| + | $sudo docker restart service-susi</pre> | ||
| + | |||
| + | === How To Uninstall Edgent Sense Docker Image === | ||
| + | <pre>$cd {Installed path}/Installer/packages/Plugins/docker-edgesense-image-x86/ | ||
| + | $sudo ./deploy.sh rmi</pre> | ||
= Cloud = | = Cloud = | ||
| Line 108: | Line 133: | ||
[[File:Create hub 1.png|center|750px|create-hub.png]] | [[File:Create hub 1.png|center|750px|create-hub.png]] | ||
| − | *Input IoT hub name: '''protocol- | + | *Select Resource group created at step 2: click “'''Use existing'''” and select “'''protocol-conn-rg'''” |
| + | |||
| + | *Select Region: '''East Asia''' | ||
| + | |||
| + | *Input IoT hub name: '''protocol-con-hub''' (for example) | ||
| − | * | + | *Click on '''Review+Create''' |
| − | * | + | [[File:Iot hub.png|center|800px|iot_hub.png]] |
| + | |||
| + | *Click on '''Create''' | ||
| − | [[File: | + | [[File:Iot hub2.png|center|800px|iot_hub2.png]] |
=== Connect device and data to Azure for Windows device – Protocol Converter Using Node-RED === | === Connect device and data to Azure for Windows device – Protocol Converter Using Node-RED === | ||
| Line 122: | Line 153: | ||
Following steps will create an azure iot device to connect to iot hub created at [[#Create_Azure_IoT_Hub|previous section]]. | Following steps will create an azure iot device to connect to iot hub created at [[#Create_Azure_IoT_Hub|previous section]]. | ||
| − | Step 1. Go to iot hub created at previous section: Resource groups → protocol-conn-rg → protocol- | + | Step 1. Go to iot hub created at previous section: Resource groups → protocol-conn-rg → Overview → protocol-con-rg (for example) |
| − | [[File: | + | [[File:Iot device0.png|center|750px|iot_device0]] |
Step 2. IoT Devices → Add | Step 2. IoT Devices → Add | ||
| Line 137: | Line 168: | ||
*Connect device to IoT Hub: select “Enable” | *Connect device to IoT Hub: select “Enable” | ||
| + | *Save the configurations | ||
| − | [[File: | + | [[File:Add device.png|center|300px|add_device]] |
*Select the created iot device to get device connection string | *Select the created iot device to get device connection string | ||
| − | [[File: | + | [[File:Iot device.png|center|700px|iot_device]] |
*Click [[File:Save icon.png|20px|save-icon.png]] to copy “Connection string-primary key” and make sure the "Connect device to IoT Hub" is "'''Enable'''" | *Click [[File:Save icon.png|20px|save-icon.png]] to copy “Connection string-primary key” and make sure the "Connect device to IoT Hub" is "'''Enable'''" | ||
| Line 148: | Line 180: | ||
<span style="color:#FFA07A;">"Connection string-primary key" will be used later in Node-Red "Connection String" field.</span> | <span style="color:#FFA07A;">"Connection string-primary key" will be used later in Node-Red "Connection String" field.</span> | ||
| − | [[File: | + | [[File:Iot device2.png|center|700px|iot_device2]] |
*Save the connection string in a text file for later use | *Save the connection string in a text file for later use | ||
| Line 158: | Line 190: | ||
Following steps will configure device Node-RED nodes to enable communications between Advantech protocol converter modules and azure iot hub. | Following steps will configure device Node-RED nodes to enable communications between Advantech protocol converter modules and azure iot hub. | ||
| − | Step 1. Open Node-RED page in the web browser (default URI is [http://127.0.0.1:1880 http://127.0.0.1:1880]) | + | Step 1. Open Node-RED page in the web browser (default URI is '''[http://127.0.0.1:1880 http://127.0.0.1:1880]''') |
[[File:Nr-main.png|center|750px|nr main]] | [[File:Nr-main.png|center|750px|nr main]] | ||
| Line 192: | Line 224: | ||
Step 5. Click [[File:Deploy-icon.png|100px|deploy icon]] to complete edge device environment setups and make sure the states of MQTT nodes are "connected"[[File:Deploy-nr-protocol2.png|center|750px|nr deployed]] | Step 5. Click [[File:Deploy-icon.png|100px|deploy icon]] to complete edge device environment setups and make sure the states of MQTT nodes are "connected"[[File:Deploy-nr-protocol2.png|center|750px|nr deployed]] | ||
| − | + | Step 6. Jump to '''[[#Monitor_Messages|Monitor Messages]]''' for further steps. | |
=== Connect device and data to Azure for Linux Ubuntu device – Protocol Converter Using IoT Edge === | === Connect device and data to Azure for Linux Ubuntu device – Protocol Converter Using IoT Edge === | ||
| Line 238: | Line 270: | ||
1. Install IoT Edge control script (may need to run as root) | 1. Install IoT Edge control script (may need to run as root) | ||
| − | <pre> pip install -U azure-iot-edge-runtime-ctl</pre> | + | <pre> pip install -U azure-iot-edge-runtime-ctl==1.0.0rc17</pre> |
2. Make sure the “iotedgectl” command is available. (the version number may be different) | 2. Make sure the “iotedgectl” command is available. (the version number may be different) | ||
| Line 287: | Line 319: | ||
*Open a command prompt and type following command. Replace "{your iot edge device connection string}" with the saved device connection string | *Open a command prompt and type following command. Replace "{your iot edge device connection string}" with the saved device connection string | ||
| − | <pre> iotedgectl setup --connection-string "{your iot edge device connection string}" --auto-cert-gen-force-no-passwords</pre> | + | <pre> sudo iotedgectl setup --connection-string "{your iot edge device connection string}" --auto-cert-gen-force-no-passwords</pre> |
| − | + | ||
| − | |||
| − | |||
[[File:Edge-ctl-setup-linux.png|center|750px|iotedge-setup-linux]] | [[File:Edge-ctl-setup-linux.png|center|750px|iotedge-setup-linux]] | ||
*Start the IoT Edge runtime | *Start the IoT Edge runtime | ||
| − | <pre> iotedgectl start</pre> | + | <pre> sudo iotedgectl start</pre> |
| − | + | ||
| − | |||
| − | |||
[[File:Edge-ctl-start-linux.png|center|750px|iotedge-start-linux]] | [[File:Edge-ctl-start-linux.png|center|750px|iotedge-start-linux]] | ||
*Check Docker to see that the IoT Edge agent is running as a module | *Check Docker to see that the IoT Edge agent is running as a module | ||
| − | <pre> docker ps</pre> | + | <pre> sudo docker ps</pre> |
| − | |||
| − | |||
| − | |||
| − | |||
=== Deploy an IoT edge device module to edge device === | === Deploy an IoT edge device module to edge device === | ||
| Line 363: | Line 387: | ||
=== Monitor Messages === | === Monitor Messages === | ||
| − | ==== Device to Cloud (D2C) ==== | + | ==== .Device to Cloud (D2C) ==== |
*Get IoT Hub Connection String from below steps. | *Get IoT Hub Connection String from below steps. | ||
| − | |||
| − | |||
| − | Step 2. Click [[File:Save icon.png|20px|save-icon.png]] to copy iot hub connection string: Shared access policies → iothubowner → | + | Step 1. Go to iot hub created at "[[#Create_Azure_IoT_Hub|Create Azure IoT Hub]]" section: Resource groups → protocol-conn-rg → protocol-conn-hub [[File:Select-conn-hub.png|center|750px|select conn hub]] |
| − | [[File: | + | |
| + | Step 2. Click [[File:Save icon.png|20px|save-icon.png]] to copy iot hub connection string: Resource groups → Shared access policies → iothubowner → Connection String[[File:Share access policy.png|center|750px|Share_access_policy]] | ||
| − | * | + | *Use [https://github.com/azure/iothub-explorer iothub-explorer] tool (require nodejs and npm) to monitor D2C messages. |
<pre> npm install -g iothub-explorer | <pre> npm install -g iothub-explorer | ||
| − | iothub-explorer monitor-events | + | iothub-explorer monitor-events {Your IoT Device id} --login "{your iot hub connection string}" |
</pre> | </pre> | ||
| Line 381: | Line 404: | ||
[[File:Iothub-explorer-linux.png|center|700px|iothub-explorer-linux]] | [[File:Iothub-explorer-linux.png|center|700px|iothub-explorer-linux]] | ||
| + | |||
| + | '''When Installing''' '''iothub-explorer on Windows system, please use administrator role to execute cmd. Otherwise, the environment variable cannot be correctly written to the system. You can add the environment variable manually. ''' [[File:Iothub-explorer-win 1.png|center|700px|iothub-explorer-win_1]] [[File:Iothub-explorer-win 2.png|center|700px|iothub-explorer-win_2]] | ||
==== Cloud to Device (C2D) ==== | ==== Cloud to Device (C2D) ==== | ||
| Line 406: | Line 431: | ||
== AWS == | == AWS == | ||
| − | + | === Connect device and data to AWS for Windows device – Protocol Converter using Node-Red === | |
| − | + | ||
| − | + | Prerequisites: | |
| − | + | ||
| − | + | *AWS account | |
| − | + | ||
| − | + | *this example use service which is region in US East (N. Virginia). | |
| − | + | ||
| − | + | ==== Cloud Environment Setup ==== | |
| − | + | ||
| − | + | Step 1.Return the AWS console and go to IAM menu. [[File:IAM1.png|center|1000px|IAM1.png]] | |
| − | + | ||
| − | + | Step 2.Click “user” menu [[File:IAM2.png|center|1000px|IAM2.png]] | |
| − | + | ||
| − | + | Step 3.Click “Add user” button [[File:IAM3.png|center|1000px|IAM3.png]] | |
| − | + | ||
| − | + | Step 4.Enter your user name. In this example user name is “Adv_test”.→ chose Programmatic access → Click “Next Permissions” button. [[File:IAM4.png|center|1000px|IAM4png]] | |
| − | + | ||
| − | </ | + | Step 5.Click [[File:IAM GP.png|IAM_GP.png]] |
| − | + | ||
| − | + | Step 6.Choose AdministratorAccess → Click “Next: Review” button [[File:IAM6.png|center|1000px|IAM6.png]] | |
| − | + | ||
| − | + | Step 7.Click “Create user” [[File:IAM7.png|center|1000px|IAM7.png]] | |
| − | + | ||
| − | + | Step 8.Download the credentials. This is the last time these credentials will be available to download. | |
| − | + | ||
| − | + | Step 9.Click “Download .csv” button [[File:IAM8.png|center|1000px|IAM8.png]] | |
| − | + | ||
| − | + | Step 10. Go to AWS IoT Core. [[File:AWS iot core.png|center|1000px|AWS iot core.png]] | |
| − | + | ||
| − | + | Step 11. Copy the endpoint from "Setting". <span style="color:#FF8C00;">The endpoint will be used in Node-Red setting later.</span> Check if the region is N. Virginia before copying the endpint. [[File:13 2.png|center|1000px|13 2.png]] | |
| − | + | ||
| − | + | ==== Device Environment Setup ==== | |
| − | + | ||
| − | + | In this section, you will install Advantech Node-Red tool for and Configurate the setting to connect AWS IoT | |
| − | + | ||
| − | + | * click on desktop to open NodeRED in web browser | |
| − | + | ||
| − | + | [[File:8.png|center|1000px|8.png]] | |
| − | + | ||
| − | + | Set up edge device environment | |
| − | + | ||
| − | + | *Copy following NodeRED flow and import it into NodeRED: | |
| − | + | <pre>[ | |
| − | + | {"id":"79179714.505328","type":"tab","label":"Protocol Connector ","disabled":false,"info":""},{"id":"d79da03e.4ac02","type":"mqtt in","z":"79179714.505328","name":"Data Recieved","topic":"/cagent/admin/+/deviceinfo","qos":"2","broker":"7c9c4d87.a21bd4","x":150,"y":132,"wires":[["f9b3112b.9e99a","d48faaf7.aded28"]]}, | |
| − | + | {"id":"d48faaf7.aded28","type":"debug","z":"79179714.505328","name":"","active":true,"console":"false","complete":"payload","x":340,"y":112,"wires":[]},{"id":"27eaa5d8.f85fea","type":"comment","z":"79179714.505328","name":"Send Protocol Connector Sensor Data to AWS IoT","info":"","x":260,"y":69.36331176757812,"wires":[]},{"id":"3dc94fa0.0fb2d","type":"comment","z":"79179714.505328","name":"Send Auto-Report Request to Internal MQTT","info":"","x":220,"y":296,"wires":[]},{"id":"f9b3112b.9e99a","type":"function","z":"79179714.505328","name":"messgae topic","func":"var device_id = 'DK10';\nvar plugin_id = msg.topic.replace(/^\\/cagent\\/admin\\/|\\/deviceinfo$/g, \"\");\nmsg.topic = 'protocol-conn/' + device_id + '/' + plugin_id;\nreturn msg;","outputs":1,"noerr":0,"x":350,"y":157.10000610351562,"wires":[["21def20a.3d43ae"]]},{"id":"a99e0e2f.e33a3","type":"mqtt out","z":"79179714.505328","name":"Auto-Report Request","topic":"","qos":"0","retain":"false","broker":"7c9c4d87.a21bd4","x":692.0001220703125,"y":401,"wires":[]},{"id":"d10bad11.60342","type":"mqtt in","z":"79179714.505328","name":"Handler Registered","topic":"/cagent/admin/+/agentinfoack","qos":"2","broker":"7c9c4d87.a21bd4","x":160,"y":364.8398742675781,"wires":[["e0848357.efe7a"]]},{"id":"e0848357.efe7a","type":"function","z":"79179714.505328","name":"pakcage auto report command","func":"var auto_rpt_msg = function(device) {\n return {\n topic: \"/cagent/admin/\" + device + \"/agentcallbackreq\",\n payload: {\n \"susiCommData\": {\n \"commCmd\": 2053,\n \"requestItems\": {\"All\":{}},\n \"autoUploadIntervalSec\": 10,\n \"handlerName\": \"general\"\n }\n }\n };\n};\n\nvar registered = context.get(\"registered\") || [];\nvar dev_id = msg.topic.replace(/^\\/cagent\\/admin\\/|\\/agentinfoack$|\\/notify$/g, \"\");\nvar is_reg_msg = (\n msg.topic.endsWith(\"agentinfoack\") && JSON.parse(msg.payload).susiCommData.status\n);\nvar msg_out = (is_reg_msg || (!~registered.indexOf(dev_id)))? auto_rpt_msg(dev_id): null;\n\nif(!~registered.indexOf(dev_id)) {\n registered.push(dev_id);\n}\n\ncontext.set(\"registered\", registered);\nreturn msg_out;\n","outputs":1,"noerr":0,"x":418.0195617675781,"y":401.00390625,"wires":[["a99e0e2f.e33a3"]]}, | |
| − | + | {"id":"5b81aa8.282ba54","type":"mqtt in","z":"79179714.505328","name":"Handler Heartbeat","topic":"/cagent/admin/+/notify","qos":"2","broker":"7c9c4d87.a21bd4","x":157,"y":438,"wires":[["e0848357.efe7a"]]}, | |
| − | { | + | {"id":"21def20a.3d43ae","type":"AWS IotData","z":"79179714.505328","aws":"b610e400.9f9db8","operation":"Publish","thingName":"","topic":"","payload":"","endPoint":"","name":"","x":535,"y":156.75,"wires":[[]]}, |
| − | { | + | {"id":"7c9c4d87.a21bd4","type":"mqtt-broker","z":"","broker":"127.0.0.1","port":"1883","clientid":"","usetls":false,"compatmode":true,"keepalive":"60","cleansession":true,"willTopic":"","willQos":"0","willPayload":"","birthTopic":"","birthQos":"0","birthPayload":""}, |
| − | + | {"id":"b610e400.9f9db8","type":"amazon config","z":"","name":"AWS","region":"us-east-1"} | |
| − | + | ] | |
</pre> | </pre> | ||
| − | |||
| − | |||
| − | |||
| − | |||
| − | |||
| − | |||
| − | |||
| − | |||
| − | |||
| − | |||
| − | |||
| − | |||
| − | |||
| − | |||
| − | |||
| − | |||
| − | |||
| − | |||
| − | |||
| − | |||
| − | |||
| − | |||
| − | |||
| − | |||
| − | |||
| − | |||
| − | |||
| − | |||
| − | |||
| − | |||
| − | |||
| − | |||
| − | |||
| − | |||
| − | |||
| − | |||
| − | |||
| − | |||
| − | + | *Switch to Protocol Converter tab and double click “IotData Publish” node to set device configuration. | |
| − | + | *Click [[File:Button NR.png|button_NR.png]] button[[File:2018-02-13 145112.png|center|2018-02-13_145112.png]] | |
| − | + | ||
| − | + | | |
| − | + | ||
| − | + | *Enter the Access Id and Secret Key which is on credentials .csv file. | |
| − | + | ||
| − | + | [[File:11.png|center|11.png]] | |
| − | + | ||
| − | + | *Enter the Name “IoT Pubilsh” and Endpoint, <span style="color:#FF8C00;">Endpoint is copied in AWS IoT Core.</span> | |
| − | + | ||
| − | < | + | [[File:2018-02-13 144939.png|center|2018-02-13_144939.png]] |
| − | + | ||
| − | </ | + | *Check your message topic on the "message topic' function node[[File:15-2.png|center|1000px|15-2.png]] |
| − | + | ||
| − | + | *Enter {your device id} in device_id, you can choose {your device id} which you want. | |
| − | + | ||
| − | + | [[File:16-2.PNG|center|800px|16-2.PNG]] | |
| − | + | ||
| − | + | *Click [[File:Deploy.png|deploy.png]] to finish edge device environment setups. | |
| − | + | ||
| − | + | [[File:17-2.png|center|1000px|17-2.png]] | |
| − | + | ||
| − | + | *Click NodeRED “Debug” tab, the sent messages will be displayed. | |
| − | + | ||
| − | + | [[File:18-2.png|center|1000px|18-2.png]] | |
| − | + | ||
| − | + | *>Go back to AWS IoT menu | |
| − | + | *click “Test” and enter Subscription topic click [[File:Subscription.png|Subscription.png]] | |
| − | + | ||
| − | + | *For more information, see <references /><references /><references />[https://docs.aws.amazon.com/iot/latest/developerguide/topics.html https://docs.aws.amazon.com/iot/latest/developerguide/topics.html] | |
| − | + | ||
| − | < | + | [[File:2018-02-13 152730.png|center|1000px|2018-02-13_152730.png]] |
| − | + | ||
| − | < | + | *if your settings is correct, then you can see the message in this area. |
| − | </ | + | |
| − | </ | + | [[File:2018-02-13 152741.png|center|1000px|2018-02-13_152741.png]] |
| − | + | ||
| − | </ | + | === Connect device and data to AWS for Linux Ubuntu device – Protocol Converter using Greengrass === |
| − | + | ||
| − | + | ==== Prerequisites ==== | |
| − | < | + | |
| − | </ | + | AWS Account Linux Host OS version : Ubuntu 16.04 x64 [[#Basic_Requirment:|Protocol Converter installation steps]] |
| − | + | ||
| − | + | ==== Create Greengrass Group ==== | |
| − | + | ||
| − | + | Using the AWS IoT console, create an AWS IoT thing, certificate, and policy for your AWS Greengrass core device: Step 1. Go to the AWS IoT console and click Greengrass. [[File:2018-02-07 105949.png|center|1000px|2018-02-07_105948.png]] [[File:2018-02-07 110140.png|center|1000px|2018-02-07_110140.png]] | |
| − | + | ||
| − | + | Step 2. Create an AWS Greengrass group and name it GGC [[File:2018-02-07 110247.PNG|center|1000px|2018-02-07_110247.png]]Step 3. Create an AWS IoT for Greengrass core [[File:2018-02-07 110257.png|center|1000px|2018-02-07_110247.png]] Step 4. One-click to create Greengrass certificate and attach policy. [[File:2018-02-07 110405.png|center|1000px|2018-02-07_110405.png]] Step 5. Download Certificate and Greengrass config. <span style="color:#FF8C00;">This Certificate will be used later for setup AWS IoT device.</span>[[File:2018-02-07 110435.png|center|1000px|2018-02-07_110435.png]] | |
| − | + | ||
| − | + | ||
| − | < | + | |
| − | </ | + | ==== Setup Greengrass Group ==== |
| − | </ | + | |
| − | </ | + | To define your Greengrass group, follow these steps: |
| − | + | ||
| − | + | #Add devices to your group | |
| − | + | #Add Lambda functions to your group | |
| − | </ | + | #Add subscriptions to your group |
| − | + | ||
| − | + | ===== Add Device to Your Group ===== | |
| − | + | ||
| − | + | Step 1.Go to the AWS IoT console. Step 2.In the navigation pane, select Greengrass and then Groups. Step 3.Click on your group, "GGC" Step 4.In the navigation pane, click '''Devices '''and then '''Add Device'''. [[File:2018-02-07 114426.png|center|1000px|2018-02-07_114426.png]] | |
| − | + | ||
| − | + | Step 5. Enter AWS IoT Name Device and click Next [[File:2018-02-07 114443.png|center|1000px|2018-02-07_114443.png]] | |
| − | + | ||
| − | + | Step 6. Using default setting to quick create access permissions and certificate. [[File:2018-02-07 114456.png|center|1000px|2018-02-07_114456.png]] | |
| − | + | ||
| − | + | Step 7. Download certificate and finish this process.<span style="color:#FF8C00;"> This Certificate will be used for running GreenGrass Core.</span>[[File:2018-02-07 114508.png|center|1000px|2018-02-07_114508.png]] | |
| − | + | ||
| − | + | ===== Add Subscriptions to Your Group ===== | |
| − | + | ||
| − | + | Step 1.In the navigation pane, click Subscriptions and then Add Subscription. [[File:SubscriptionAdd.png|center|700px|SubscriptionAdd.png]] | |
| − | + | ||
| − | + | Step 2.Under Select a source, select the source of the subscription and click on Next. [[File:Subscription1.png|center|700px|Subscription1.png]] | |
| − | + | ||
| − | + | Step 3.Under Select a target, select the target of the subscription and click on Next. | |
| − | + | [[File:Subscription2.png|center|700px|Subscription2.png]] | |
| − | + | ||
| − | + | Step 4.In the Optional topic filter, type the topic of the subscription <span style="color:#FF8C00;">" topic/MQTT "</span>. [[File:Subscription3.png|center|700px|Subscription3.png]] | |
| − | + | ||
| − | + | Step 5.Click on finish to confirm and save subscription. [[File:Subscription4.png|center|700px|Subscription4.png]] | |
| − | + | ||
| − | + | Step 6.Review the subscription information. [[File:Subscription done.png|center|700px|Subscription done.png]] | |
| − | + | ||
| − | + | ==== Run Greengrass Core in Your Device ==== | |
| − | + | ||
| − | + | /greengrass is located under Installer folder, e.g. {$Unzip Path} is ~/Desktop/Installer/packages/AWS/EISXGCC <br /> | |
| − | + | ||
| − | + | To configure your core to recognize the AWS IoT thing, update the /greengrass/config/config.json file. and /greengrass/certs.<br /> | |
| − | + | ||
| − | + | Copy certs and config with root permission, <span style="color:#FF8C00;">use the certificate for GreenGrass Core</span>.<br /> | |
| − | + | ||
| − | + | Step 1.sudo cp -R certs/ {$Unzip Path}/greengrass/ <br /> | |
| − | + | Step 2.sudo cp -R config/ {$Unzip Path}/greengrass/ <br /> | |
| − | + | Step 3.sudo cp root.ca.pem {$Unzip Path}/greengrass/certs/ <br /> | |
| − | + | <span style="color:#888888;">root.ca.pem is just located under {$Unzip Path}.<br /> | |
| − | </ | + | If the original file under {$Unzip Path} is root-ca.pem, just rename it to root.ca.pem after copying to {$Unzip Path}/greengrass/certs/</span> |
| − | + | <br /> | |
| − | + | <span style="color:#888888;"># mv root-ca.pem root.ca.pem</span> | |
| + | |||
| + | The Greengrass core software is installed inside the /'''greengrass''' directory of your device. | ||
| + | |||
| + | Step 1.Make sure your device is connected to the Internet. <br /> | ||
| + | Step 2.sudo {$Unzip Path}/greengrass/ggc/core/greengrassd start [[File:Greengrassrun.png|center|1000px|greengrassrun.png]] | ||
| + | |||
| + | ==== Deploy Your Greengrass Group ==== | ||
| + | |||
| + | After running Greengrass core, you can deploy your Greengrass group to your device. <br /> | ||
| + | Step 1.Go to the AWS IoT console. <br /> | ||
| + | Step 2.In the navigation pane, select Greengrass and then Groups. <br /> | ||
| + | Step 3.Click on your group, GGC. <br /> | ||
| + | Step 4.In the navigation pane, click Deployments. <br /> | ||
| + | Step 5.Click Actions > Deploy. [[File:2018-02-01 135700.png|center|1000px|2018-02-01_135700.png]] | ||
| + | |||
| + | Step 6.In the Configure how Devices discover your Core select Automatic detection. [[File:2018-02-01 135720.png|center|1000px|2018-02-01_135720.png]] | ||
| + | |||
| + | Step 7.In the Grant permissions to access other services, click Grant permission. [[File:2018-02-01 135731.png|center|1000px|2018-02-01_135731.png]] | ||
| + | |||
| + | When the operation is complete, the Deployment successfully completed is displayed at the top of the page. [[File:2018-02-08 151442.png|center|1000px|2018-02-08_151442.png]] | ||
| + | |||
| + | ==== Set Up Your AWS IoT Things ==== | ||
| + | |||
| + | When Greengrass group is deployed successful. You can setup AWS IoT '''Device '''which is defined in Greengrass group with Protocol Converter. | ||
| + | |||
| + | AWS IoT devices need certificates to authenticate with AWS IoT and retrieve the connectivity information of your Greengrass core. You downloaded these certificates in '''Add devices to your group''' Create device things. | ||
| + | |||
| + | ==== Install Your IoT Thing Certificate ==== | ||
| + | |||
| + | <span style="color:#FF8C00;">Use Certificate for setup AWS IoT device.</span><br/>cp root-ca.pem {$Unzip Path}/ProtocolConnectorSample/certs<br/>cp <id>.cert.pem {$Unzip Path}/ProtocolConnectorSample/certs<br/>cp <id>.private.key {$Unzip Path}/ProtocolConnectorSample/certs | ||
| + | |||
| + | ==== Configure The Samples ==== | ||
| + | |||
| + | Inside the ProtocolConnectorSample/config/ directory you can find the configuration files <span style="color:#FF8C00;">SampleConfig.json</span> for your things: <br /> | ||
| + | 1. Please find your endpoint in Settings page in AWS IoT Console. <br /> | ||
| + | 2. Fill in relative path of root-ca.pem. <br /> | ||
| + | 3. Fill in relative path of <id>.cert.pem. <br /> | ||
| + | 4. Fill in relatvie path of <id>.private.key <br /> | ||
| + | 5. Fill in your device name that you added for GreenGrass group in the following three fields. [[File:Screenshot from 2018-02-09 16-17-16.png|center|2018-02-09 16-17-16.png]] | ||
| + | |||
| + | ==== Run the Protocol Converter Sample ==== | ||
| + | |||
| + | After setting AWS IoT you can execute protocol converter sample, In the ProtocolConnectorSample folder <br /> | ||
| + | ./MQTTAgent-sample [[File:Screenshot from 2018-02-09 16-18-09.png|center|2018-02-09 16-18-09.png]] | ||
= IoT connectivity = | = IoT connectivity = | ||
| + | |||
== How to use SUSI (Advantech HW information) plugin == | == How to use SUSI (Advantech HW information) plugin == | ||
Latest revision as of 11:36, 12 September 2018
Contents
- 1 Introduction
- 2 Installation Guide
- 3 Cloud
- 3.1 WISE-PaaS/EnSaaS
- 3.2 Azure
- 3.3 AWS
- 3.3.1 Connect device and data to AWS for Windows device – Protocol Converter using Node-Red
- 3.3.2 Connect device and data to AWS for Linux Ubuntu device – Protocol Converter using Greengrass
- 3.3.2.1 Prerequisites
- 3.3.2.2 Create Greengrass Group
- 3.3.2.3 Setup Greengrass Group
- 3.3.2.4 Run Greengrass Core in Your Device
- 3.3.2.5 Deploy Your Greengrass Group
- 3.3.2.6 Set Up Your AWS IoT Things
- 3.3.2.7 Install Your IoT Thing Certificate
- 3.3.2.8 Configure The Samples
- 3.3.2.9 Run the Protocol Converter Sample
- 4 IoT connectivity
- 5 Release
Introduction
WISE-PaaS/EdgeSense is an edge intelligence and sensing integration software solution that incorporates sensor data aggregation, cloud applications, edge analytics, and secure end-to-end data protection for fast and easy device-to-cloud operation. “Protocol Converter” is one of the major part of EdgeSense, it is an all-in-one message broker service which collects sensor data via various industrial protocols and then upload to cloud.
Installation Guide
For Windows Device
How To Install
- Step 1. Execute EdgeSense installer, click "Next >".

- Step 2. Select "I accept the ..." then click "Next >".

- Step 3. Select any cloud you would like to connect then click "Next >". (here we take WISE-PaaS/EnSaaS and RMM as example for below steps)

- Step 4. Click "Next >".

- Step 5. Click "Install".

- Step 6. Wait for installation finished.

- Step 7. Select "I agree to the ..." then click "Install".

- Step 8. Select "I agree to the ..." then click "Install".

- Step 9. Click "Finish". Now you have necessary component and agent installed in your device.

For Linux Ubuntu ( Docker version )
Basic Requirment:
- Host OS must be Linux Distribution (we developed and tested our software offering with Ubuntu 16.04 environment so below content is referring to this specific Linux distribution.)
- Docker Engine - Installation Guide ( Ubuntu )
- Docker compose - Installation Guid
- Hardward: Advantech x86_64 Platforms ( e.g. ARK-2121L...)
How To Install and Run - Protocol Converter Docker Container Services
# unzip installation package
tar zxvf EdgeSense_1.0.2.tar.gz
# Follow the readme to install your converter protocol
How To modify EnSaaS ID/Password and resart
# To fill your "IoTKey" then save and exit
 <IoTKey>304a99b5b452444c749a83bbb9e35dpow</IoTKey>
$cd {Installed path}/Installer/packages/Plugins/docker-edgesense-image-x86/EdgeSense/AgentService/config/
$sudo vim agent_config.xml
$sudo docker restart ensaas-ei-agent
How To config Modbus and resart service
$cd {Installed path}/Installer/packages/Plugins/docker-edgesense-image-x86/EdgeSense/EService-Modbus/config/
$sudo vim Modbus_Handler.ini
$sudo docker restart service-modbus
How To Restart Service
// MQTT-BUS
$sudo docker restart advigw-mqtt-bus

// Node-RED
$sudo docker restart advigw-node-red

// Modbus_Handler Service
$sudo docker restart service-modbus

// HDD PMQ
$sudo docker restart service-hddpmq

// SUSIControl
$sudo docker restart service-susi
How To Uninstall Edgent Sense Docker Image
$cd {Installed path}/Installer/packages/Plugins/docker-edgesense-image-x86/
$sudo ./deploy.sh rmi
Cloud
WISE-PaaS/EnSaaS
WISE-PaaS/EnSaaS is an open and standardized industrial IoT platform provided by Advantech Corp., and EdgeSense leverages cloud services on top of it to offer device management and visualization service.
You will be re-directed to WISE-PaaS online documentation site via below links.
Register account on EdgesSense Portal
Please visit this page for step by step instruction.
How to Connect Edge Devices to RMM Cloud
Please visit this page for step by step instruction.
Azure
Create Azure IoT Hub
To utilize Azure services, we need a Microsoft account to log in to azure portal. Following steps will create an azure iot hub to communicate with Advantech protocol converter modules.
Step 1. Log in to Microsoft Azure Portal
Step 2. Create a resource group
- Search “resource group” and create new one

- Input resource group name: protocol-conn-rg (for example)
- Select a location (service region): East Asia (for example)

Step 3. Create an azure iot hub
- Search “iot hub” and create new one

- Select Resource group created at step 2: click “Use existing” and select “protocol-conn-rg”
- Select Region: East Asia
- Input IoT hub name: protocol-con-hub (for example)
- Click on Review+Create

- Click on Create

Connect device and data to Azure for Windows device – Protocol Converter Using Node-RED
Cloud Environment Setup
Following steps will create an azure iot device to connect to iot hub created at previous section.
Step 1. Go to iot hub created at previous section: Resource groups → protocol-conn-rg → Overview → protocol-con-rg (for example)

Step 2. IoT Devices → Add

- Device ID: protocol-conn-device (for example)
- Authentication Type: select “Symmetric Key” for this tutorial
- Check “Auto Generate Keys”
- Connect device to IoT Hub: select “Enable”
- Save the configurations

- Select the created iot device to get device connection string

- Click
 to copy “Connection string-primary key” and make sure the "Connect device to IoT Hub" is "Enable"
"Connection string-primary key" will be used later in Node-Red "Connection String" field.

- Save the connection string in a text file for later use

Device Environment Setup
Following steps will configure device Node-RED nodes to enable communications between Advantech protocol converter modules and azure iot hub.
Step 1. Open Node-RED page in the web browser (default URI is http://127.0.0.1:1880)

Step 2. Copy following content and import it into Node-RED
        [
            {"id": "ce169f53.786dd" , "type": "tab", "label": "Protocol Connector ", "disabled": false, "info": ""},
            {"id": "104120.85f37ee" , "type": "mqtt in", "z": "ce169f53.786dd", "name": "Data Recieved", "topic": "/cagent/admin/+/deviceinfo", "qos": "2", "broker": "23acb8c5.a15ad8", "x": 150, "y": 132, "wires": [["12642914.e549c7", "95d1843d.e8a5c8"]]},
            {"id": "97d0f87d.614ea8", "type": "mqtt out", "z": "ce169f53.786dd", "name": "Auto-Report Request", "topic": "", "qos": "0", "retain": "false", "broker": "23acb8c5.a15ad8", "x": 692.0001220703125, "y": 401, "wires": []},
            {"id": "12642914.e549c7", "type": "debug", "z": "ce169f53.786dd", "name": "", "active": true, "console": "false", "complete": "payload", "x": 340, "y": 112, "wires": []},
            {"id": "6bacc623.4bc318", "type": "comment", "z": "ce169f53.786dd", "name": "Send Protocol Connector  Sensor Data to Azure IoT Hub", "info": "", "x": 270, "y": 69.36331176757812, "wires": []},
            {"id": "4a9698eb.3deed8", "type": "comment", "z": "ce169f53.786dd", "name": "Send Auto-Report Request to Internal MQTT", "info": "", "x": 240, "y": 296, "wires": []},
            {"id": "3a7f0c9.34066f4", "type": "mqtt in", "z": "ce169f53.786dd", "name": "Handler Registered", "topic": "/cagent/admin/+/agentinfoack", "qos": "2", "broker": "23acb8c5.a15ad8", "x": 160, "y": 364.8398742675781, "wires": [["3cd5a503.a6b2ca"]]},
            {"id": "3cd5a503.a6b2ca", "type": "function", "z": "ce169f53.786dd", "name": "pack auto report command", "func": "var auto_rpt_msg = function(device) {\n    return {\n        topic: \"/cagent/admin/\" + device + \"/agentcallbackreq\",\n        payload: {\n            \"susiCommData\": {\n                \"commCmd\": 2053,\n                \"requestItems\": {\"All\":{}},\n                \"autoUploadIntervalSec\": 10,\n                \"handlerName\": \"general\"\n            }\n        }\n    };\n};\n\nvar registered = context.get(\"registered\") || [];\nvar dev_id = msg.topic.replace(/^\\/cagent\\/admin\\/|\\/agentinfoack$|\\/notify$/g, \"\");\nvar is_reg_msg = (\n    msg.topic.endsWith(\"agentinfoack\") && JSON.parse(msg.payload).susiCommData.status\n);\nvar msg_out = (is_reg_msg || (!~registered.indexOf(dev_id)))? auto_rpt_msg(dev_id) : null;\n\nif(!~registered.indexOf(dev_id)) {\n    registered.push(dev_id);\n}\n\ncontext.set(\"registered\", registered);\nreturn msg_out;\n", "outputs": 1, "noerr": 0, "x": 418.0195617675781, "y": 401.00390625, "wires": [["97d0f87d.614ea8"]]},
            {"id": "95d1843d.e8a5c8", "type": "azureiothub", "z": "ce169f53.786dd", "name": "Send to Azure IoT Hub", "protocol": "http", "x": 370, "y": 152, "wires": [["ecc11415.86a138"]]},
            {"id": "ecc11415.86a138", "type": "debug", "z": "ce169f53.786dd", "name": "", "active": true, "console": "false", "complete": "payload", "x": 601.5, "y": 151.29998779296875, "wires": []},
            {"id": "bf50c923.03a288", "type": "comment", "z": "ce169f53.786dd", "name": "Display Cloud to Device Messages", "info": "", "x": 671, "y": 192, "wires": []},
            {"id": "71829e36.9c78c" , "type": "mqtt in", "z": "ce169f53.786dd", "name": "Handler Heartbeat", "topic": "/cagent/admin/+/notify", "qos": "2", "broker": "23acb8c5.a15ad8", "x": 157, "y": 438, "wires": [["3cd5a503.a6b2ca"]]},
            {"id": "23acb8c5.a15ad8", "type": "mqtt-broker", "z": "", "broker": "127.0.0.1", "port": "1883", "clientid": "", "usetls": false, "compatmode": true, "keepalive": "60", "cleansession": true, "willTopic": "", "willQos": "0", "willPayload": "", "birthTopic": "", "birthQos": "0", "birthPayload": ""}
        ]

Step 3. Select "Protocol Converter" tab and double click "Send to Azure IoT Hub" node to configure node settings.

Step 4. Copy the saved device "Connection String" and paste to "Connection String" field


Step 6. Jump to Monitor Messages for further steps.
Connect device and data to Azure for Linux Ubuntu device – Protocol Converter Using IoT Edge
Prerequisites
Before to perform Azure IoT Edge environment setup steps, please make sure all following packages and tools are available and are correctly setup.
Linux Host
- Docker:
1. Install Docker and check "docker" command is available. (the version number may be different).

Protocol Converter will install Python and IoT Edge Runtime Control Tool automatically, user could check the version to see if it's well installed.
- Python pip:
1. Install Python pip command.
sudo apt-get install python-pip
2. Make sure the “pip” command is available.

- IoT Edge Runtime Control Tool:
1. Install IoT Edge control script (may need to run as root)
pip install -U azure-iot-edge-runtime-ctl==1.0.0rc17
2. Make sure the “iotedgectl” command is available. (the version number may be different)

Cloud Environment Setup
Following steps will create an azure iot edge device at previously created iot hub.
Step 1. Create an iot edge device
- Go to iot hub created at previous section: Resource groups → protocol-conn-rg → protocol-conn-hub

- IoT Edge → Add IoT Edge Device

- Device ID: protocol-conn-device (for example)
- Authentication Type: select “Symmetric Key” for this tutorial
- Check “Auto Generate Keys”
- Connect device to IoT Hub: select “Enable”

- Select the created iot edge device to get device connection string

- Click to copy “Connection string-primary key” and make sure the "Connect device to IoT Hub" is "Enable"

- Save the connection string in a text file for later use

Device Environment Setup
Following steps will configure edge device to bind to azure iot edge device previously created.
Step 1. Configure the iot edge runtime (need administrator privileges on windows 10 host or root privileges on linux host)
- Open a command prompt and type following command. Replace "{your iot edge device connection string}" with the saved device connection string
sudo iotedgectl setup --connection-string "{your iot edge device connection string}" --auto-cert-gen-force-no-passwords

- Start the IoT Edge runtime
sudo iotedgectl start

- Check Docker to see that the IoT Edge agent is running as a module
sudo docker ps
Deploy an IoT edge device module to edge device
Step 1. Select iot edge device created at previous section
Step 2. Set Modules → Add IoT Edge Module

- Name: protocol-connector-module
- Image URI: advigw4x86/protocol-connector-azure-iot-edge:latest
- Container Create Options:
- In Windows host, paste following content
        {
            "Env": ["MQTT_HOST=10.0.75.1", "MQTT_PORT=1883"]
        }
- In Linux host, paste following content
        {
            "Env": ["MQTT_HOST=172.17.0.1", "MQTT_PORT=1883"]
        }
- Restart Policy: select “always”
- Desired Status: select “running”

- Click “Next” to specify routes step

- Paste following content to specify route and click “Next” to review template
        {
            "routes": {
                "moduleToIoTHub": "FROM /messages/modules/protocol-connector-module/outputs/output1 INTO $upstream"
            }
        }

- In the Review Template step, click “Submit”

- Return to the IoT Edge device details page and click Refresh. The "protocol-connector-module" should be running along with the IoT Edge runtime

Monitor Messages
.Device to Cloud (D2C)
- Get IoT Hub Connection String from below steps.

- Use iothub-explorer tool (require nodejs and npm) to monitor D2C messages.
        npm install -g iothub-explorer

        iothub-explorer monitor-events {Your IoT Device id} --login "{your iot hub connection string}"


Cloud to Device (C2D)
- C2D message is not yet ready on IoT Edge public preview.
- For Node-RED protocol converter modules, we can take following steps to send C2D messages.
Step 1. Open Node-RED in web browser, select Protocol Converter and click the debug tab

Step 2. Go to iot device created at previous section: Resource groups → protocol-conn-rg → protocol-conn-hub → protocol-conn-device, then select "Message To Device"

Step 3. Type our cloud to device messages in "Message Body" field then click "Send Message".

Step 4. Back to Node-RED page, we can see the received message

AWS
Connect device and data to AWS for Windows device – Protocol Converter using Node-Red
Prerequisites:
- AWS account
- this example use service which is region in US East (N. Virginia).
Cloud Environment Setup
Step 1.Return the AWS console and go to IAM menu.


Step 5.Click 


Step 8.Download the credentials. This is the last time these credentials will be available to download.
Step 9.Click “Download .csv” button


Device Environment Setup
In this section, you will install Advantech Node-Red tool for and Configurate the setting to connect AWS IoT
- click on desktop to open NodeRED in web browser

Set up edge device environment
- Copy following NodeRED flow and import it into NodeRED:
[
{"id":"79179714.505328","type":"tab","label":"Protocol Connector ","disabled":false,"info":""},{"id":"d79da03e.4ac02","type":"mqtt in","z":"79179714.505328","name":"Data Recieved","topic":"/cagent/admin/+/deviceinfo","qos":"2","broker":"7c9c4d87.a21bd4","x":150,"y":132,"wires":[["f9b3112b.9e99a","d48faaf7.aded28"]]},
{"id":"d48faaf7.aded28","type":"debug","z":"79179714.505328","name":"","active":true,"console":"false","complete":"payload","x":340,"y":112,"wires":[]},{"id":"27eaa5d8.f85fea","type":"comment","z":"79179714.505328","name":"Send Protocol Connector  Sensor Data to AWS IoT","info":"","x":260,"y":69.36331176757812,"wires":[]},{"id":"3dc94fa0.0fb2d","type":"comment","z":"79179714.505328","name":"Send Auto-Report Request to Internal MQTT","info":"","x":220,"y":296,"wires":[]},{"id":"f9b3112b.9e99a","type":"function","z":"79179714.505328","name":"messgae topic","func":"var device_id = 'DK10';\nvar plugin_id = msg.topic.replace(/^\\/cagent\\/admin\\/|\\/deviceinfo$/g, \"\");\nmsg.topic = 'protocol-conn/' + device_id + '/' + plugin_id;\nreturn msg;","outputs":1,"noerr":0,"x":350,"y":157.10000610351562,"wires":[["21def20a.3d43ae"]]},{"id":"a99e0e2f.e33a3","type":"mqtt out","z":"79179714.505328","name":"Auto-Report Request","topic":"","qos":"0","retain":"false","broker":"7c9c4d87.a21bd4","x":692.0001220703125,"y":401,"wires":[]},{"id":"d10bad11.60342","type":"mqtt in","z":"79179714.505328","name":"Handler Registered","topic":"/cagent/admin/+/agentinfoack","qos":"2","broker":"7c9c4d87.a21bd4","x":160,"y":364.8398742675781,"wires":[["e0848357.efe7a"]]},{"id":"e0848357.efe7a","type":"function","z":"79179714.505328","name":"pakcage auto report command","func":"var auto_rpt_msg = function(device) {\n    return {\n        topic: \"/cagent/admin/\" + device + \"/agentcallbackreq\",\n        payload: {\n            \"susiCommData\": {\n                \"commCmd\": 2053,\n                \"requestItems\": {\"All\":{}},\n                \"autoUploadIntervalSec\": 10,\n                \"handlerName\": \"general\"\n            }\n        }\n    };\n};\n\nvar registered = context.get(\"registered\") || [];\nvar dev_id = msg.topic.replace(/^\\/cagent\\/admin\\/|\\/agentinfoack$|\\/notify$/g, \"\");\nvar is_reg_msg = (\n    msg.topic.endsWith(\"agentinfoack\") && JSON.parse(msg.payload).susiCommData.status\n);\nvar msg_out = (is_reg_msg || (!~registered.indexOf(dev_id)))? auto_rpt_msg(dev_id): null;\n\nif(!~registered.indexOf(dev_id)) {\n    registered.push(dev_id);\n}\n\ncontext.set(\"registered\", registered);\nreturn msg_out;\n","outputs":1,"noerr":0,"x":418.0195617675781,"y":401.00390625,"wires":[["a99e0e2f.e33a3"]]},
{"id":"5b81aa8.282ba54","type":"mqtt in","z":"79179714.505328","name":"Handler Heartbeat","topic":"/cagent/admin/+/notify","qos":"2","broker":"7c9c4d87.a21bd4","x":157,"y":438,"wires":[["e0848357.efe7a"]]},
{"id":"21def20a.3d43ae","type":"AWS IotData","z":"79179714.505328","aws":"b610e400.9f9db8","operation":"Publish","thingName":"","topic":"","payload":"","endPoint":"","name":"","x":535,"y":156.75,"wires":[[]]},
{"id":"7c9c4d87.a21bd4","type":"mqtt-broker","z":"","broker":"127.0.0.1","port":"1883","clientid":"","usetls":false,"compatmode":true,"keepalive":"60","cleansession":true,"willTopic":"","willQos":"0","willPayload":"","birthTopic":"","birthQos":"0","birthPayload":""},
{"id":"b610e400.9f9db8","type":"amazon config","z":"","name":"AWS","region":"us-east-1"}
]
- Switch to Protocol Converter tab and double click “IotData Publish” node to set device configuration.
- Click
 button
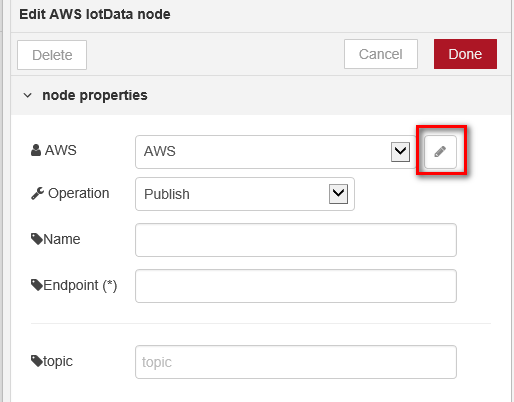

- Enter the Access Id and Secret Key which is on credentials .csv file.

- Enter the Name “IoT Pubilsh” and Endpoint, Endpoint is copied in AWS IoT Core.

- Check your message topic on the "message topic' function node


- Enter {your device id} in device_id, you can choose {your device id} which you want.

- Click
 to finish edge device environment setups.

- Click NodeRED “Debug” tab, the sent messages will be displayed.

- >Go back to AWS IoT menu
- click “Test” and enter Subscription topic click

- For more information, see https://docs.aws.amazon.com/iot/latest/developerguide/topics.html

- if your settings is correct, then you can see the message in this area.

Connect device and data to AWS for Linux Ubuntu device – Protocol Converter using Greengrass
Prerequisites
AWS Account Linux Host OS version : Ubuntu 16.04 x64 Protocol Converter installation steps
Create Greengrass Group
Using the AWS IoT console, create an AWS IoT thing, certificate, and policy for your AWS Greengrass core device: Step 1. Go to the AWS IoT console and click Greengrass.


Setup Greengrass Group
To define your Greengrass group, follow these steps:
- Add devices to your group
- Add Lambda functions to your group
- Add subscriptions to your group
Add Device to Your Group
Step 1.Go to the AWS IoT console. Step 2.In the navigation pane, select Greengrass and then Groups. Step 3.Click on your group, "GGC" Step 4.In the navigation pane, click Devices and then Add Device.


Add Subscriptions to Your Group
Step 1.In the navigation pane, click Subscriptions and then Add Subscription.

Step 3.Under Select a target, select the target of the subscription and click on Next.


Run Greengrass Core in Your Device
/greengrass is located under Installer folder, e.g. {$Unzip Path} is ~/Desktop/Installer/packages/AWS/EISXGCC
To configure your core to recognize the AWS IoT thing, update the /greengrass/config/config.json file. and /greengrass/certs.
Copy certs and config with root permission, use the certificate for GreenGrass Core.
Step 1.sudo cp -R certs/ {$Unzip Path}/greengrass/
Step 2.sudo cp -R config/ {$Unzip Path}/greengrass/
Step 3.sudo cp root.ca.pem {$Unzip Path}/greengrass/certs/
root.ca.pem is just located under {$Unzip Path}.
If the original file under {$Unzip Path} is root-ca.pem, just rename it to root.ca.pem after copying to {$Unzip Path}/greengrass/certs/
# mv root-ca.pem root.ca.pem
The Greengrass core software is installed inside the /greengrass directory of your device.
Step 1.Make sure your device is connected to the Internet.

Deploy Your Greengrass Group
After running Greengrass core, you can deploy your Greengrass group to your device.
Step 1.Go to the AWS IoT console.
Step 2.In the navigation pane, select Greengrass and then Groups.
Step 3.Click on your group, GGC.
Step 4.In the navigation pane, click Deployments.


Set Up Your AWS IoT Things
When Greengrass group is deployed successful. You can setup AWS IoT Device which is defined in Greengrass group with Protocol Converter.
AWS IoT devices need certificates to authenticate with AWS IoT and retrieve the connectivity information of your Greengrass core. You downloaded these certificates in Add devices to your group Create device things.
Install Your IoT Thing Certificate
Use Certificate for setup AWS IoT device.
cp root-ca.pem {$Unzip Path}/ProtocolConnectorSample/certs
cp <id>.cert.pem {$Unzip Path}/ProtocolConnectorSample/certs
cp <id>.private.key {$Unzip Path}/ProtocolConnectorSample/certs
Configure The Samples
Inside the ProtocolConnectorSample/config/ directory you can find the configuration files SampleConfig.json for your things:
1. Please find your endpoint in Settings page in AWS IoT Console.
2. Fill in relative path of root-ca.pem.
3. Fill in relative path of <id>.cert.pem.
4. Fill in relatvie path of <id>.private.key

Run the Protocol Converter Sample
After setting AWS IoT you can execute protocol converter sample, In the ProtocolConnectorSample folder

IoT connectivity
How to use SUSI (Advantech HW information) plugin
Page under construction...
How to use Modbus plugin
Please visit this page for more details and plugin configuration.
How to use OPC-UA plugin
Currently our OPC-UA plugin is only available on Windows platform. Please visit this page for more details and plugin configuration.
How to use PMQ plugin
Advantech storage PMQ solution includes the deployment of the trained model to make predictions and visualization UI, and recommendations for corresponding strategies. Except storage PMQ service for Advantech hardware, the objective is to provide software developers basic concepts and better understating of PMQ deployment and to be more effective to bring your predictive model to production with Advantech PMQ architecture.
Visit this page for more details.
Release
Pages under construction...