Difference between revisions of "OPC-UA Client"
| Line 44: | Line 44: | ||
| − | <pre> | + | <pre>{ |
| − | { | ||
"OPCUA_Server":[ | "OPCUA_Server":[ | ||
{ | { | ||
| Line 75: | Line 74: | ||
] | ] | ||
} | } | ||
| − | <pre | + | </pre> |
| − | |||
| − | |||
| − | |||
| − | |||
Name | Name | ||
| Line 95: | Line 90: | ||
*Assign Node ID you'd like to monitor | *Assign Node ID you'd like to monitor | ||
| − | + | ||
== Demonstrate to connect to a OPC-UA sample server == | == Demonstrate to connect to a OPC-UA sample server == | ||
| Line 106: | Line 101: | ||
[[File:DataAccessServer screenshot.png|RTENOTITLE]] | [[File:DataAccessServer screenshot.png|RTENOTITLE]] | ||
| − | |||
4. Edit opcua-client.json to set up client configuration, for example: | 4. Edit opcua-client.json to set up client configuration, for example: | ||
Revision as of 03:17, 19 December 2019
Contents
Introduction
OPC Unified Architecture (OPC UA) is a machine to machine communication protocol for industrial automation developed by the OPC Foundation.
EdgeSense OPC-UA Client
EdgeSense OPC-UA Client aims to collect data from OPC-UA Server and control.
Feature:
- Manage multi OPC-UA server and multi NodeID
- Support anonymous authentication, username/password authentication.
- Currently support up-link OPC-UA data to WISE-PaaS , not support down-link from WISE-PaaS.
- Detailed features, please see https://docs.google.com/spreadsheets/d/1hxUJgHvcPYq8f44gmVVmwUCddHhOPBflSRkSKR0H9Q4/edit?ts=5ca2bfc9#gid=348272669
How to
Software Requirements
- MQTT broker
- Node.js
Installation
Windows: 1.Download OPC-UA Service for Windows from Release Table. 2.Double click to launch the installer to install it to the machine.
Linux: 1.Download OPC-UA Service for Windows from Release Table. 2.Launch the installer to install it to the machine.
Configuration
EdgeSense OPC-UA client can manage multi OPC-UA setting and multi NodeID.
{
    "OPCUA_Server":[
        {
            "Name": "OPCUA-SERVER-1",
            "endpointUrl":"opc.tcp://opcuaserver1:62547",
            "userIdentity": {
                "userName": "admin",
                "password": ""
            },
            "NodeIDList":[{"NodeId":"ns=2;s=1:CC2001?Input2","Name":"CC2001-Input2", "Type":"v", "Interval":2},
                          {"NodeId":"ns=2;s=1:CC2001?Output","Name":"CC2001-Output", "Type":"v", "Interval":2},
                          {"NodeId":"ns=2;s=1:CC1001?Output","Name":"CC1001-Output", "Type":"v", "Interval":2}
                        ]

        },
        {
            "Name": "OPCUA-SERVER-2",
            "endpointUrl":"opc.tcp://opcuaserver2:62547",
            "userIdentity": {
                "userName": "admin",
                "password": ""
            },
            "NodeIDList":[{"NodeId":"ns=2;s=1:CC2001?Input2","Name":"CC2001-Input2", "Type":"v", "Interval":2},
                          {"NodeId":"ns=2;s=1:CC2001?Output","Name":"CC2001-Output", "Type":"v", "Interval":2},
                          {"NodeId":"ns=2;s=1:CC1001?Output","Name":"CC1001-Output", "Type":"v", "Interval":2}
                        ]

        }
    ]
}
Name
- Assign name for a OPC-UA server.
endpointUrl
- Assign OPC-UA Server Endpoint URL , format is opc:tcp://hostname:Port/ , hostname also can use ip address.
NodeId
- Assign Node ID you'd like to monitor
Demonstrate to connect to a OPC-UA sample server
1. Download and install OPC UA Sample Applications 1.02: OPC UA Sample Applications 1.02.msi are available at local server, please paste file's url in File Explorer to copy file.
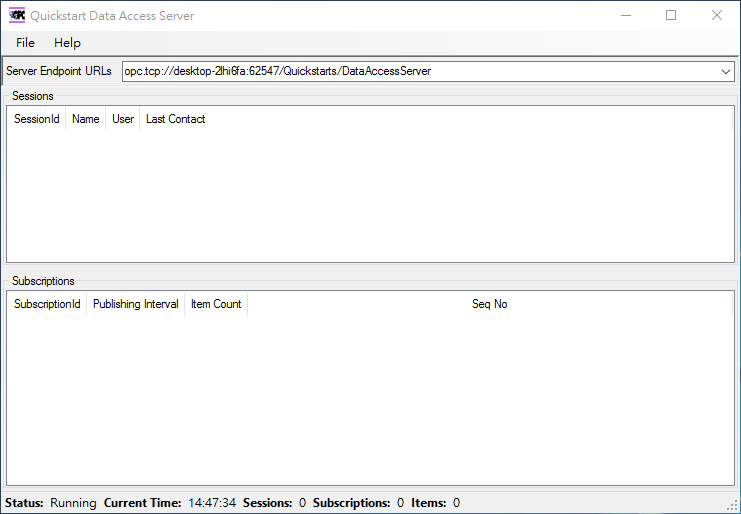
2. After OPC UA Sample Applications 1.02.msi is installed, launch DataAccess Server.
3. Config OPC-UA Client to connect to the sample Server, Endpoint URLs shown in application.
4. Edit opcua-client.json to set up client configuration, for example:
{
    "OPCUA_Server":[
        {
            "Name": "OPCUA-SERVER-1",
            "endpointUrl":"opc.tcp://desktop-2lhi6fa:62547",
            "userIdentity": {
                "userName": "admin",
                "password": ""
            },
            "NodeIDList":[{"NodeId":"ns=2;s=1:CC2001?Input2","Name":"CC2001-Input2", "Type":"v", "Interval":2},
                          {"NodeId":"ns=2;s=1:CC2001?Output","Name":"CC2001-Output", "Type":"v", "Interval":2},
                          {"NodeId":"ns=2;s=1:CC1001?Output","Name":"CC1001-Output", "Type":"v", "Interval":2}
                        ]

        }
    ]
}
