Difference between revisions of "Ubuntu L4T User Guide"
Daniel.hung (talk | contribs) (Created page with "= Getting Started = == <span style="color:#0070c0">Host Environment</span> == == <span style="color:#0070c0">Force Recovery Mode</span> == == <span style="color:#0070c0">Fl...") |
Daniel.hung (talk | contribs) |
||
| (13 intermediate revisions by the same user not shown) | |||
| Line 2: | Line 2: | ||
== <span style="color:#0070c0">Host Environment</span> == | == <span style="color:#0070c0">Host Environment</span> == | ||
| + | |||
| + | Ubuntu 18.04 (recommended) or 16.04 | ||
| + | |||
| + | '''[Prerequisite]''' | ||
| + | |||
| + | $ sudo apt-get install python | ||
== <span style="color:#0070c0">Force Recovery Mode</span> == | == <span style="color:#0070c0">Force Recovery Mode</span> == | ||
| − | == <span style="color:#0070c0">Flash | + | To enter force recovery mode, you can do: |
| + | |||
| + | :1. Hold the '''Recovery '''key | ||
| + | :2. Power on device | ||
| + | :3. Wait for 5 seconds and you can release the '''Recovery '''key | ||
| + | |||
| + | Once it enters recovery mode successfully, the HDMI output should be disabled. Then, you have to connect a USB cable with TX2 device and PC. A new "''nvidia apx''" device will be detected on PC. | ||
| + | |||
| + | $ lsusb | ||
| + | Bus 003 Device 125: ID '''<span style="color:#0000F0">0955:7c18</span> NVidia Corp'''. | ||
| + | |||
| + | == <span style="color:#0070c0">Flash Pre-built Image</span> == | ||
| + | |||
| + | First, make sure your TX2 device is already in Force Recover mode, and USB cable is connected. | ||
| + | |||
| + | Then, execute the '''TX2_flash.sh''' script which you can find it in the release folder. | ||
| + | |||
| + | $ sudo ./TX2_flash.sh | ||
| + | |||
| + | After script is done, the target device will boot into OS automatically. | ||
== <span style="color:#0070c0">Install SDK Components</span> == | == <span style="color:#0070c0">Install SDK Components</span> == | ||
| + | |||
| + | Download the SDK Manager for '''Jetson TX2 series''' from [https://developer.nvidia.com/embedded/jetpack JetPack website]. | ||
| + | |||
| + | '''Note:''' You will need a nVidia developer account for access. | ||
| + | |||
| + | After download complete, double click the DEB file to install, or you can run `sudo dpkg -i sdkmanager-xxx.deb` | ||
| + | |||
| + | [[File:Sdkmamanger install.png|800px|Sdkmamanger_install]] | ||
| + | |||
| + | Then, you're able to run SDK manager. | ||
| + | |||
| + | $ sdkmanager | ||
| + | |||
| + | Log in with your nVidia developer account, and you can see the STEP 01 page. | ||
| + | |||
| + | '''STEP 01:''' Set "''Target Hardware''" to "''Jetson TX2 P3310''", and select target OS you want to install. Here, we choose 4.2.2. | ||
| + | |||
| + | [[File:Tx2-sdk-step1.png|800px|Tx2-sdk-step1]] | ||
| + | |||
| + | '''STEP 02: '''Check the components you want, and continue. | ||
| + | |||
| + | [[File:Tx2-sdk-step2.png|800px|Tx2-sdk-step2]] | ||
| + | |||
| + | '''Note: '''Please <span style="color:#FF0000">DO NOT</span> check the "''Jetson OS''" item. It will generate and flash TX2 demo image into your device. | ||
| + | |||
| + | '''Note: '''You may need minimum 120GB free storage and 8GB RAM as prerequisite. | ||
| + | |||
| + | '''STEP 03:''' After download process is done, you need to input the IP address of your TX2 device. It will install SDK via network. | ||
| + | |||
| + | [[File:Tx2-sdk-step3-ip.png|500px|Tx2-sdk-step3-ip]] | ||
| + | |||
| + | It will take several minutes to finish the installation. | ||
| + | |||
| + | [[File:Tx2-sdk-step3-sdk.png|800px|Tx2-sdk-step3-sdk]] | ||
| + | |||
| + | '''Note: '''If you see the warning dialog said it's taking longer than expected, please press '''Yes '''to continue installing. | ||
| + | |||
| + | [[File:Install take longer.png|300px|Install_take_longer]] | ||
| + | |||
| + | '''STEP 04: '''When you go to this step, it's done! | ||
| + | |||
| + | [[File:Tx2-sdk-step4.png|800px|Tx2-sdk-step4]] | ||
= Demo = | = Demo = | ||
| + | |||
| + | In this section, we setup and run demo applications on TX2 target device. | ||
| + | |||
| + | Open '''Terminal '''program and export deepstream sdk root first. | ||
| + | |||
| + | $ export DS_SDK_ROOT="/opt/nvidia/deepstream/deepstream-4.0" | ||
== <span style="color:#0070c0">Deepstream Samples</span> == | == <span style="color:#0070c0">Deepstream Samples</span> == | ||
| + | |||
| + | There are 3 kinds of object detector demos in deepstream SDK. | ||
| + | |||
| + | To replace the video file, you can modify the corresponding config files. For example, | ||
| + | |||
| + | $ vim deepstream_app_config_yoloV3.txt | ||
| + | uri=[file:///home/advrisc/Videos/test.mp4 file:///home/advrisc/Videos/test.mp4] | ||
| + | |||
| + | === <span style="color:#0070c0">FasterRCNN</span> === | ||
| + | |||
| + | Setup: | ||
| + | |||
| + | $ cd $DS_SDK_ROOT/sources/objectDetector_FasterRCNN | ||
| + | $ wget --no-check-certificate [https://dl.dropboxusercontent.com/s/o6ii098bu51d139/faster_rcnn_models.tgz?dl=0 https://dl.dropboxusercontent.com/s/o6ii098bu51d139/faster_rcnn_models.tgz?dl=0] -O faster-rcnn.tgz | ||
| + | $ tar zxvf faster-rcnn.tgz -C . --strip-components=1 --exclude=ZF_* | ||
| + | $ cp /usr/src/tensorrt/data/faster-rcnn/faster_rcnn_test_iplugin.prototxt . | ||
| + | |||
| + | $ make -C nvdsinfer_custom_impl_fasterRCNN | ||
| + | |||
| + | Run: | ||
| + | |||
| + | $ deepstream-app -c deepstream_app_config_fasterRCNN.txt | ||
| + | |||
| + | === <span style="color:#0070c0">SSD</span> === | ||
| + | |||
| + | Setup: | ||
| + | |||
| + | $ cd $DS_SDK_ROOT/sources/objectDetector_SSD | ||
| + | |||
| + | $ cp /usr/src/tensorrt/data/ssd/ssd_coco_labels.txt . | ||
| + | $ sudo apt-get install python-protobuf | ||
| + | $ pip install tensorflow-gpu | ||
| + | |||
| + | $ wget [http://download.tensorflow.org/models/object_detection/ssd_inception_v2_coco_2017_11_17.tar.gz http://download.tensorflow.org/models/object_detection/ssd_inception_v2_coco_2017_11_17.tar.gz] | ||
| + | $ tar zxvf ssd_inception_v2_coco_2017_11_17.tar.gz | ||
| + | $ cd ssd_inception_v2_coco_2017_11_17 | ||
| + | $ python3 /usr/lib/python3.6/dist-packages/uff/bin/convert_to_uff.py \ | ||
| + | frozen_inference_graph.pb -O NMS -p /usr/src/tensorrt/samples/sampleUffSSD/config.py -o sample_ssd_relu6.uff | ||
| + | $ cp sample_ssd_relu6.uff ../ | ||
| + | |||
| + | $ cd .. | ||
| + | $ export CUDA_VER=10.0 | ||
| + | $ make -C nvdsinfer_custom_impl_ssd | ||
| + | |||
| + | Run: | ||
| + | |||
| + | $ deepstream-app -c deepstream_app_config_ssd.txt | ||
| + | |||
| + | === <span style="color:#0070c0">Yolo</span> === | ||
| + | |||
| + | Setup: | ||
| + | |||
| + | $ cd $DS_SDK_ROOT/sources/objectDetector_Yolo | ||
| + | $ ./prebuild.sh | ||
| + | $ export CUDA_VER=10.0 | ||
| + | $ make -C nvdsinfer_custom_impl_Yolo | ||
| + | |||
| + | Run: | ||
| + | |||
| + | $ deepstream-app -c deepstream_app_config_yoloV3.txt | ||
| + | -OR- | ||
| + | $ deepstream-app -c deepstream_app_config_yoloV3_tiny.txt | ||
== <span style="color:#0070c0">Deepstream Reference Apps</span> == | == <span style="color:#0070c0">Deepstream Reference Apps</span> == | ||
| + | |||
| + | In this repository, it provides some reference applications for video analytics tasks using TensorRT and DeepSTream SDK 4.0. | ||
| + | |||
| + | $ cd $DS_SDK_ROOT/sources/apps/sample_apps/ | ||
| + | $ git clone [https://github.com/NVIDIA-AI-IOT/deepstream_reference_apps.git https://github.com/NVIDIA-AI-IOT/deepstream_reference_apps.git] | ||
| + | $ cd deepstream_reference_apps | ||
| + | |||
| + | === <span style="color:#0070c0">back-to-back-detectors & anomaly</span> === | ||
| + | |||
| + | These two applications only support elementary h264 stream, not mp4 video file. | ||
| + | |||
| + | === <span style="color:#0070c0">runtime_source_add_delete</span> === | ||
| + | |||
| + | Setup: | ||
| + | |||
| + | $ cd runtime_source_add_delete | ||
| + | $ make | ||
| + | |||
| + | Run: | ||
| + | |||
| + | $ ./deepstream-test-rt-src-add-del <uri> | ||
| + | $ ./deepstream-test-rt-src-add-del [file://$DS_SDK_ROOT/samples/streams/sample_1080p_h265.mp4 file://$DS_SDK_ROOT/samples/streams/sample_1080p_h265.mp4] | ||
| + | $ ./deepstream-test-rt-src-add-del rtsp://127.0.0.1/video | ||
Latest revision as of 07:35, 6 May 2020
Contents
Getting Started
Host Environment
Ubuntu 18.04 (recommended) or 16.04
[Prerequisite]
$ sudo apt-get install python
Force Recovery Mode
To enter force recovery mode, you can do:
- 1. Hold the Recovery key
- 2. Power on device
- 3. Wait for 5 seconds and you can release the Recovery key
Once it enters recovery mode successfully, the HDMI output should be disabled. Then, you have to connect a USB cable with TX2 device and PC. A new "nvidia apx" device will be detected on PC.
$ lsusb
Bus 003 Device 125: ID 0955:7c18 NVidia Corp.
Flash Pre-built Image
First, make sure your TX2 device is already in Force Recover mode, and USB cable is connected.
Then, execute the TX2_flash.sh script which you can find it in the release folder.
$ sudo ./TX2_flash.sh
After script is done, the target device will boot into OS automatically.
Install SDK Components
Download the SDK Manager for Jetson TX2 series from JetPack website.
Note: You will need a nVidia developer account for access.
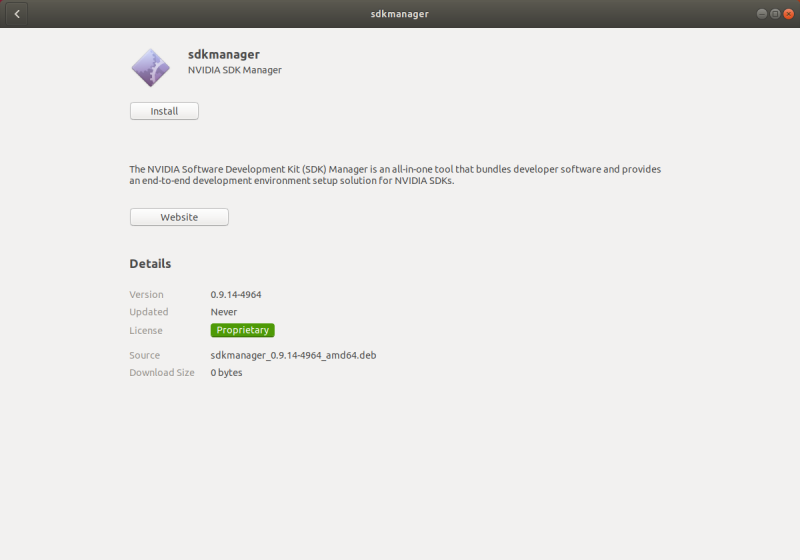
After download complete, double click the DEB file to install, or you can run `sudo dpkg -i sdkmanager-xxx.deb`
Then, you're able to run SDK manager.
$ sdkmanager
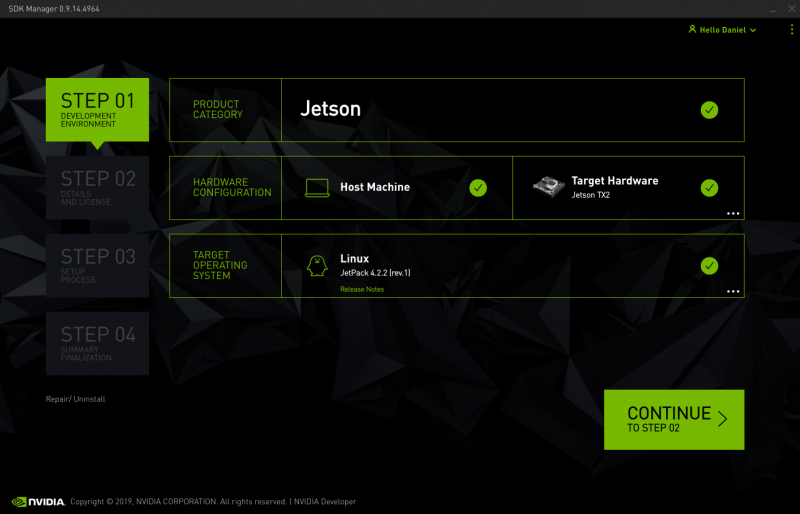
Log in with your nVidia developer account, and you can see the STEP 01 page.
STEP 01: Set "Target Hardware" to "Jetson TX2 P3310", and select target OS you want to install. Here, we choose 4.2.2.
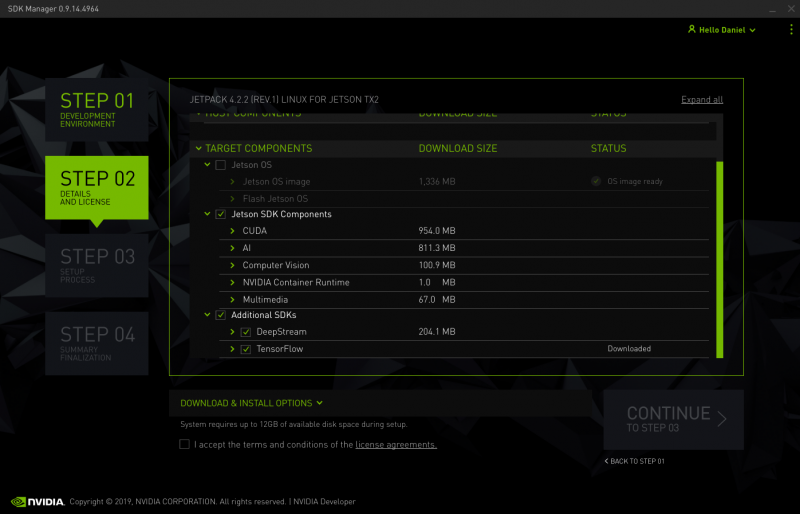
STEP 02: Check the components you want, and continue.
Note: Please DO NOT check the "Jetson OS" item. It will generate and flash TX2 demo image into your device.
Note: You may need minimum 120GB free storage and 8GB RAM as prerequisite.
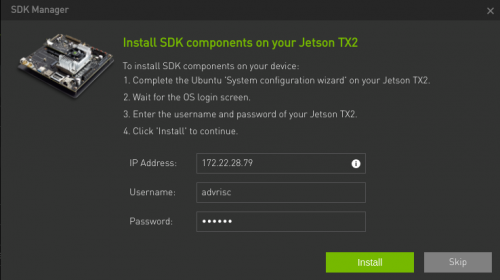
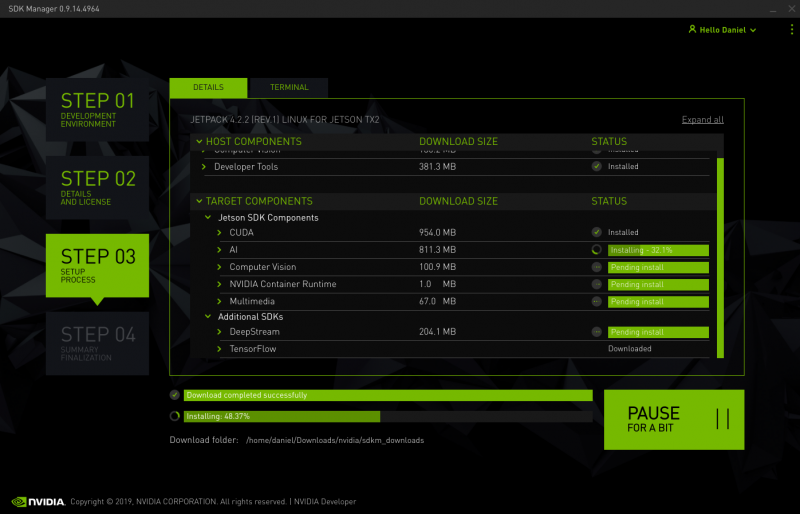
STEP 03: After download process is done, you need to input the IP address of your TX2 device. It will install SDK via network.
It will take several minutes to finish the installation.
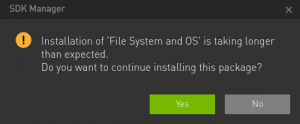
Note: If you see the warning dialog said it's taking longer than expected, please press Yes to continue installing.
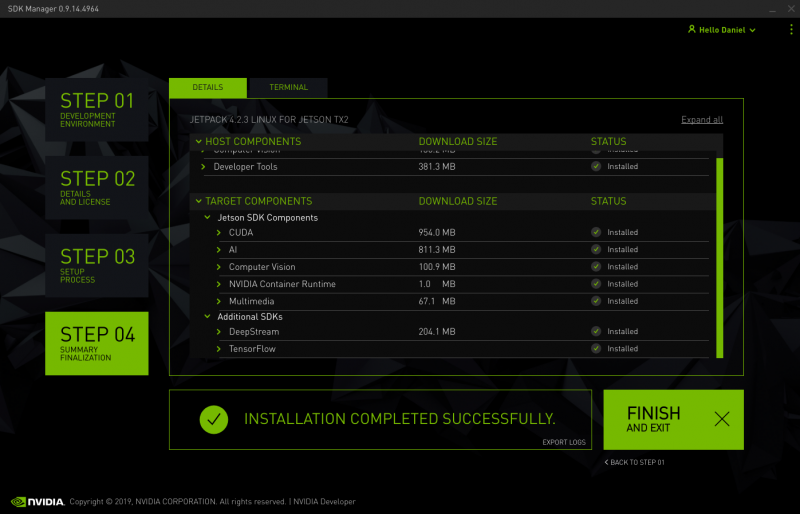
STEP 04: When you go to this step, it's done!
Demo
In this section, we setup and run demo applications on TX2 target device.
Open Terminal program and export deepstream sdk root first.
$ export DS_SDK_ROOT="/opt/nvidia/deepstream/deepstream-4.0"
Deepstream Samples
There are 3 kinds of object detector demos in deepstream SDK.
To replace the video file, you can modify the corresponding config files. For example,
$ vim deepstream_app_config_yoloV3.txt
uri=file:///home/advrisc/Videos/test.mp4
FasterRCNN
Setup:
$ cd $DS_SDK_ROOT/sources/objectDetector_FasterRCNN
$ wget --no-check-certificate  https://dl.dropboxusercontent.com/s/o6ii098bu51d139/faster_rcnn_models.tgz?dl=0  -O faster-rcnn.tgz
$ tar zxvf  faster-rcnn.tgz  -C .  --strip-components=1  --exclude=ZF_*
$ cp /usr/src/tensorrt/data/faster-rcnn/faster_rcnn_test_iplugin.prototxt .

$ make -C nvdsinfer_custom_impl_fasterRCNN
Run:
$ deepstream-app -c deepstream_app_config_fasterRCNN.txt
SSD
Setup:
$ cd $DS_SDK_ROOT/sources/objectDetector_SSD

$ cp /usr/src/tensorrt/data/ssd/ssd_coco_labels.txt .
$ sudo apt-get install python-protobuf
$ pip install tensorflow-gpu

$ wget http://download.tensorflow.org/models/object_detection/ssd_inception_v2_coco_2017_11_17.tar.gz
$ tar zxvf ssd_inception_v2_coco_2017_11_17.tar.gz
$ cd ssd_inception_v2_coco_2017_11_17
$ python3 /usr/lib/python3.6/dist-packages/uff/bin/convert_to_uff.py \
    frozen_inference_graph.pb  -O NMS  -p /usr/src/tensorrt/samples/sampleUffSSD/config.py  -o sample_ssd_relu6.uff
$ cp sample_ssd_relu6.uff ../

$ cd ..
$ export CUDA_VER=10.0
$ make -C nvdsinfer_custom_impl_ssd
Run:
$ deepstream-app -c deepstream_app_config_ssd.txt
Yolo
Setup:
$ cd $DS_SDK_ROOT/sources/objectDetector_Yolo
$ ./prebuild.sh
$ export CUDA_VER=10.0
$ make -C nvdsinfer_custom_impl_Yolo
Run:
$ deepstream-app -c deepstream_app_config_yoloV3.txt
-OR-
$ deepstream-app -c deepstream_app_config_yoloV3_tiny.txt
Deepstream Reference Apps
In this repository, it provides some reference applications for video analytics tasks using TensorRT and DeepSTream SDK 4.0.
$ cd $DS_SDK_ROOT/sources/apps/sample_apps/
$ git clone https://github.com/NVIDIA-AI-IOT/deepstream_reference_apps.git
$ cd deepstream_reference_apps
back-to-back-detectors & anomaly
These two applications only support elementary h264 stream, not mp4 video file.
runtime_source_add_delete
Setup:
$ cd runtime_source_add_delete
$ make
Run:
$ ./deepstream-test-rt-src-add-del <uri>
$ ./deepstream-test-rt-src-add-del file://$DS_SDK_ROOT/samples/streams/sample_1080p_h265.mp4
$ ./deepstream-test-rt-src-add-del rtsp://127.0.0.1/video
