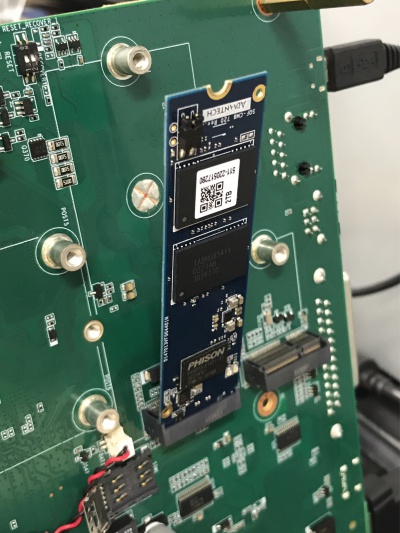
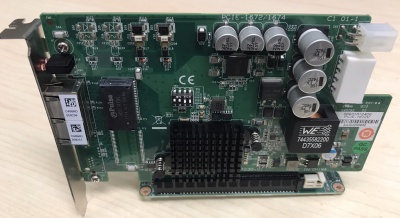
Difference between revisions of "AIR 030 Development"
| (83 intermediate revisions by 4 users not shown) | |||
| Line 2: | Line 2: | ||
== Flash Image == | == Flash Image == | ||
| − | + | Change the SW2 to ON and press power button.<br/> [[File:Recovery BT.png|400px|Recovery BT.png]] | |
| − | <pre>[ubuntu@linux 11:55:43 ~]$ lsusb | + | <pre>$ sudo reboot --force forced-recovery |
| + | </pre> | ||
| + | |||
| + | Connect a linux OS host wired AIR-030 with usb-otg cable.<br/> In the Host PC, make sure the AIR-030 (<span data-darkreader-inline-color="" style="color: rgb(0, 112, 192); --darkreader-inline-color: #46b2ff;">'''NVidia Corp'''</span>) has detectd. | ||
| + | <pre>[ubuntu@linux 11:55:43 ~]$ lsusb | ||
Bus 002 Device 002: ID 8087:8000 Intel Corp. | Bus 002 Device 002: ID 8087:8000 Intel Corp. | ||
Bus 002 Device 001: ID 1d6b:0002 Linux Foundation 2.0 root hub | Bus 002 Device 001: ID 1d6b:0002 Linux Foundation 2.0 root hub | ||
| Line 9: | Line 13: | ||
Bus 001 Device 024: ID 0955:7223 NVidia Corp. | Bus 001 Device 024: ID 0955:7223 NVidia Corp. | ||
Bus 001 Device 002: ID 8087:8008 Intel Corp. | Bus 001 Device 002: ID 8087:8008 Intel Corp. | ||
| + | Please Check there is 7223 NVidia Corp | ||
| + | </pre> | ||
| + | |||
| + | Install dependency package on HOST: | ||
| + | <pre> | ||
| + | $ sudo tools/l4t_flash_prerequisites.sh # For Debian-based Linux | ||
| + | </pre> | ||
| + | |||
| + | or | ||
| + | <pre>$ sudo apt install build-essential python libxml2-utils abootimg sshpass binutils -y | ||
| + | </pre> | ||
| + | |||
| + | For Jackpack 5.1.1<br/> 1.Extracted tarball file PS : | ||
| + | <pre>$ sudo tar -zxvf air030_image_XXXXXX.tar.gz | ||
| + | $ cd Linux_for_Tegra | ||
| + | </pre> | ||
| + | |||
| + | 2. Flash | ||
| + | <pre>$ sudo ./flash.sh -d rootfs/boot/tegra234-air030.dtb jetson-agx-orin-devkit mmcblk0p1 | ||
</pre> | </pre> | ||
| − | + | To NVME | |
| − | <pre>$ | + | <pre>$ sudo ./tools/kernel_flash/l4t_initrd_flash.sh --external-device nvme0n1p1 -c ./tools/kernel_flash/flash_l4t_external.xml -S 32GB --erase-all --showlogs jetson-agx-orin-devkit nvme0n1p1 |
</pre> | </pre> | ||
| − | + | For Jetpack 6.0<br/> To EMMC | |
| − | <pre> | + | <pre>$ sudo ./flash.sh jetson-agx-orin-devkit mmcblk0p1 |
| − | $ sudo - | ||
| − | |||
</pre> | </pre> | ||
| + | |||
| + | To NVME | ||
| + | <pre>$ $ sudo ./tools/kernel_flash/l4t_initrd_flash.sh --external-device nvme0n1p1 -p "-c ./bootloader/generic/cfg/flash_t234_qspi.xml" -c ./tools/kernel_flash/flash_l4t_t234_nvme.xml --showlogs --network usb0 jetson-agx-orin-devkit nvme0n1p1 | ||
| + | </pre> | ||
| + | |||
| + | If host get error message "Parsing board information failed" when flashing image.<br/> Please get crc code by get_eeprom_crc tool, once AIR-030 can boot into desktop.<br/> Download Link: [https://advantecho365-my.sharepoint.com/:u:/g/personal/seven_lin_advantech_com/EcDPLclPeAFFmCFM5nP72McBtjaHRoZZKH0qTNOM1TxBfg?e=nZ3sk9 [1]] | ||
| + | <pre>$ chmod a+x get_eeprom_crc | ||
| + | $ sudo ./get_eeprom_crc 0 | ||
| + | </pre> | ||
| + | |||
| + | Then overwrite correct crc value to EEPROM by i2cset command.<br/> Replace crc code in command $ sudo i2cset -f -y 0 0x50 0xff 0x<crc_code><br/> For example, execute this command if crc code is 28. | ||
| + | <pre>$ sudo i2cset -f -y 0 0x50 0xff 0x28 | ||
| + | </pre> | ||
| + | |||
| + | Then re-flash AIR-030 image by normal steps.<br/> Once AIR-030 cannot boot up to desktop, please flash AIR-030 by this command then follow previous steps to overwrite crc code and re-flash AIR-030 image.<br/> AGX Orin 32G uses BOARDSKU="0004", AGX Orin 64G uses BOARDSKU="0005". | ||
| + | <pre>$ sudo SKIP_EEPROM_CHECK=1 BOARDSKU="0004" CHIP_SKU=00:00:00:D2 ./flash.sh jetson-agx-orin-devkit internal | ||
| + | </pre> | ||
| + | |||
| + | This is original command with full parameter to flash from nVidia. | ||
| + | <pre>$ sudo BOARDID="3701" FAB="300" BOARDSKU="0004" BOARDREV="C.2" CHIP_SKU=00:00:00:D2 ./flash.sh jetson-agx-orin-devkit internal | ||
| + | </pre> | ||
| + | |||
| + | | ||
| + | |||
| + | == Board Layout == | ||
| + | |||
| + | Front | ||
| + | |||
| + | [[File:Air030 board layout front.jpg|400px|Air030 board layout front.jpg]] | ||
| + | |||
| + | Back | ||
| + | |||
| + | [[File:Air030 board layout back.jpg|400px|Air030 board layout back.jpg]] | ||
| + | |||
| + | Bottom | ||
| + | |||
| + | [[File:Air030 board layout bottom.jpg|400px|Air030 board layout bottom.jpg]] | ||
== Tools == | == Tools == | ||
| + | |||
| + | === JTOP === | ||
| + | |||
| + | install | ||
| + | <pre>$ sudo apt update | ||
| + | $ sudo apt install python3-pip | ||
| + | $ sudo pip3 install -U jetson-stats | ||
| + | </pre> | ||
| + | |||
| + | Run | ||
| + | <pre>$ sudo jtop | ||
| + | </pre> | ||
=== Test Command === | === Test Command === | ||
| Line 27: | Line 97: | ||
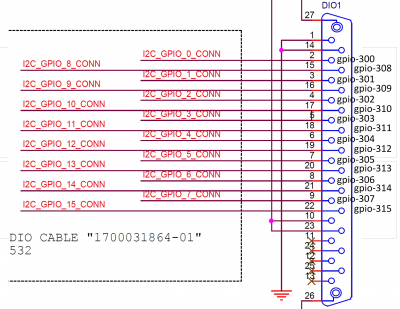
==== '''GPIO Expander''' ==== | ==== '''GPIO Expander''' ==== | ||
| − | Test GPIO high/low | + | [[File:Air030 dio.jpg|400px|Air030 dio.jpg]] |
| + | |||
| + | Test GPIO high/low | ||
| + | |||
| + | [[File:Air030 gpio expander io.png|400px|Air030 gpio expander io.png]]<br/> <br/> 1).Switch to root | ||
<pre>ubuntu@localhost:~ sudo -s | <pre>ubuntu@localhost:~ sudo -s | ||
</pre> | </pre> | ||
2).Commnad : where <GPIO> : GPIO0(GPIO300)~GPIO15(GPIO315) and <LEVEL> : high(1)/low(0)<br/> For example, pull up GPIO0 to high. | 2).Commnad : where <GPIO> : GPIO0(GPIO300)~GPIO15(GPIO315) and <LEVEL> : high(1)/low(0)<br/> For example, pull up GPIO0 to high. | ||
| − | <pre>root@localhost:/home/ubuntu# echo 300 | + | <pre>root@localhost:/home/ubuntu# echo 300 > /sys/class/gpio/export |
| − | root@localhost:/home/ubuntu# echo out | + | root@localhost:/home/ubuntu# echo out > /sys/class/gpio/gpio300/direction |
| − | root@localhost:/home/ubuntu# echo 1 > /sys/class/gpio/ | + | root@localhost:/home/ubuntu# echo 1 > /sys/class/gpio/gpio300/value |
| + | </pre> | ||
| + | |||
| + | JP6.2 | ||
| + | <pre> | ||
| + | root@localhost:/home/ubuntu# cat /sys/kernel/debug/gpio | ||
| + | </pre> | ||
| + | Please in order export (ex:300->301->302->...->315) | ||
| + | <pre> | ||
| + | root@localhost:/home/ubuntu# echo 300 > /sys/class/gpio/export | ||
| + | root@localhost:/home/ubuntu# echo out > /sys/class/gpio/gpio1/direction | ||
| + | root@localhost:/home/ubuntu# cat /sys/class/gpio/gpio1/direction | ||
| + | root@localhost:/home/ubuntu# echo 1 > /sys/class/gpio/gpio1/value | ||
| + | root@localhost:/home/ubuntu# cat /sys/class/gpio/gpio1/value | ||
| + | ... | ||
| + | root@localhost:/home/ubuntu# echo 301 > /sys/class/gpio/export | ||
| + | root@localhost:/home/ubuntu# echo out > /sys/class/gpio/gpio2/direction | ||
| + | root@localhost:/home/ubuntu# cat /sys/class/gpio/gpio2/direction | ||
| + | root@localhost:/home/ubuntu# echo 1 > /sys/class/gpio/gpio2/value | ||
| + | root@localhost:/home/ubuntu# cat /sys/class/gpio/gpio2/value | ||
| + | ... | ||
</pre> | </pre> | ||
==== '''WatchDog''' ==== | ==== '''WatchDog''' ==== | ||
<pre>root@linux:/home/ubuntu$ sudo -s | <pre>root@linux:/home/ubuntu$ sudo -s | ||
| − | root@linux:/home/ubuntu# sync; sleep 2; sync; echo c | + | root@linux:/home/ubuntu# sync; sleep 2; sync; echo c > /proc/sysrq-trigger |
</pre> | </pre> | ||
| Line 48: | Line 142: | ||
5. Synchronize system time and RTC time with NTP server. | 5. Synchronize system time and RTC time with NTP server. | ||
| − | <pre># ntpdate tock.stdtime.gov.tw | + | <pre># ntpdate tock.stdtime.gov.tw <===安裝ntpdate方式: $sudo apt-get install ntpdate <enter> |
# hwclock -w | # hwclock -w | ||
</pre> | </pre> | ||
6. Keep the DUT on for 24 hours.<br/> 7. Synchronize system time and RTC time with NTP server again and check inaccuracies. | 6. Keep the DUT on for 24 hours.<br/> 7. Synchronize system time and RTC time with NTP server again and check inaccuracies. | ||
| − | <pre># ntpdate tock.stdtime.gov.tw && hwclock -s &&ntpdate -u tock.stdtime.gov.tw | + | <pre># ntpdate tock.stdtime.gov.tw && hwclock -s &&ntpdate -u tock.stdtime.gov.tw |
</pre> | </pre> | ||
| Line 66: | Line 160: | ||
root@linux:/home/ubuntu# tpm2_create -C platform_primary.ctx -G rsa2048 -u key.pub -r key.priv | root@linux:/home/ubuntu# tpm2_create -C platform_primary.ctx -G rsa2048 -u key.pub -r key.priv | ||
root@linux:/home/ubuntu# tpm2_load -C platform_primary.ctx -u key.pub -r key.priv -c key.ctx | root@linux:/home/ubuntu# tpm2_load -C platform_primary.ctx -u key.pub -r key.priv -c key.ctx | ||
| − | root@linux:/home/ubuntu# echo | + | root@linux:/home/ubuntu# echo "my test" >msg.dat |
root@linux:/home/ubuntu# tpm2_rsaencrypt -c key.ctx -o msg.enc msg.dat | root@linux:/home/ubuntu# tpm2_rsaencrypt -c key.ctx -o msg.enc msg.dat | ||
root@linux:/home/ubuntu# cat msg.enc | root@linux:/home/ubuntu# cat msg.enc | ||
| Line 75: | Line 169: | ||
(3) 將資料儲存至 tpm 內存 | (3) 將資料儲存至 tpm 內存 | ||
| − | <pre>root@linux:/home/ubuntu# tpm2_nvdefine -Q 0x1500031 -C o -s 32 -a | + | <pre>root@linux:/home/ubuntu# tpm2_nvdefine -Q 0x1500031 -C o -s 32 -a "ownerread|policywrite|ownerwrite" |
| − | root@linux:/home/ubuntu# echo | + | root@linux:/home/ubuntu# echo "write_tpm_adv" > adv.data |
root@linux:/home/ubuntu# tpm2_nvwrite -Q 0x1500031 -C o -i adv.data | root@linux:/home/ubuntu# tpm2_nvwrite -Q 0x1500031 -C o -i adv.data | ||
root@linux:/home/ubuntu# tpm2_nvread -Q 0x1500031 -C o -s 32 -o read.data | root@linux:/home/ubuntu# tpm2_nvread -Q 0x1500031 -C o -s 32 -o read.data | ||
| Line 83: | Line 177: | ||
(4) 確認已經寫入儲存區域 | (4) 確認已經寫入儲存區域 | ||
| − | <pre>root@linux:/home/ubuntu# tpm2_nvreadpublic | + | <pre>root@linux:/home/ubuntu# tpm2_nvreadpublic > nv.out |
root@linux:/home/ubuntu# cat nv.out | root@linux:/home/ubuntu# cat nv.out | ||
</pre> | </pre> | ||
| Line 102: | Line 196: | ||
==== '''UART''' ==== | ==== '''UART''' ==== | ||
| − | [[File: | + | [[File:COMPort.png|400px|COMPort.png]]<br/> [[File:COMPortSwitchDefine.png|400px|COMPortSwitchDefine.png]]<br/> RS232 (<span data-darkreader-inline-color="" style="color: rgb(0, 112, 192); --darkreader-inline-color: #46b2ff;">'''COMX_SW1 : OFF-OFF-X-X'''</span>) |
| + | |||
| + | [[File:Air030 rs232loopback.jpg|400px|Air030 rs232loopback.jpg]] | ||
| + | |||
| + | UART5_SW1 - SW1 : ON | ||
{| border="1" cellpadding="1" cellspacing="1" style="width: 800px;" | {| border="1" cellpadding="1" cellspacing="1" style="width: 800px;" | ||
|- | |- | ||
| − | ! scope="col" style="width: 30px;background-color:rgb(80, 80, 80);color:# | + | | <tbody> |
| − | ! scope="col" style="width: 438px;background-color:rgb(80, 80, 80);color:# | + | |- |
| + | ! data-darkreader-inline-bgcolor="" data-darkreader-inline-color="" scope="col" style="width: 30px; background-color: rgb(80, 80, 80); color: rgb(255, 255, 255); --darkreader-inline-bgcolor: #3c4144; --darkreader-inline-color: #e8e6e3;" | COM Port | ||
| + | ! data-darkreader-inline-bgcolor="" data-darkreader-inline-color="" scope="col" style="width: 438px; background-color: rgb(80, 80, 80); color: rgb(255, 255, 255); --darkreader-inline-bgcolor: #3c4144; --darkreader-inline-color: #e8e6e3;" | Command (Please switch to root first before test) | ||
|- | |- | ||
! scope="row" | COM1 | ! scope="row" | COM1 | ||
| − | | style="width: 300px;" | stty -F /dev/ttyTHS0 speed 115200 raw -echo | + | | style="width: 300px;" | stty -F /dev/ttyTHS0 speed 115200 raw -echo |
| + | cat /dev/ttyTHS0 & echo "1234" > /dev/ttyTHS0 | ||
| + | |||
|- | |- | ||
! scope="row" | COM2 | ! scope="row" | COM2 | ||
| − | | style="width: 300px;" | stty -F /dev/ttyTHS4 speed 115200 raw -echo | + | | style="width: 300px;" | stty -F /dev/ttyTHS4 speed 115200 raw -echo |
| + | cat /dev/ttyTHS4 & echo "1234" > /dev/ttyTHS4 | ||
| + | |||
|- | |- | ||
! scope="row" | COM4 | ! scope="row" | COM4 | ||
| − | | style="width: 300px;" | stty -F /dev/ttyTHS3 speed 115200 raw -echo | + | | style="width: 300px;" | stty -F /dev/ttyTHS3 speed 115200 raw -echo |
| + | cat /dev/ttyTHS3 & echo "1234" > /dev/ttyTHS3 | ||
| + | |||
|- | |- | ||
! scope="row" | COM5 | ! scope="row" | COM5 | ||
| − | | style="width: 300px;" | stty -F /dev/ttyTHS1 speed 115200 raw -echo | + | | style="width: 300px;" | stty -F /dev/ttyTHS1 speed 115200 raw -echo |
| + | cat /dev/ttyTHS1 & echo "1234" > /dev/ttyTHS1 | ||
| + | |||
| + | |- | ||
| + | | </tbody> | ||
|} | |} | ||
| − | RS422<br/> Send and Received port<br/> (<span style="color:# | + | RS422<br/> Send and Received port<br/> (<span data-darkreader-inline-color="" style="color: rgb(0, 112, 192); --darkreader-inline-color: #46b2ff;">'''COM<PORT>_SW1 : ON-OFF-ON-OFF'''</span>)<br/> <br/> RS485<br/> Send port<br/> (<span data-darkreader-inline-color="" style="color: rgb(0, 112, 192); --darkreader-inline-color: #46b2ff;">'''COM<inPort>_SW1 ON-ON-ON-OFF'''</span>)<br/> Received port<br/> (<span data-darkreader-inline-color="" style="color: rgb(0, 112, 192); --darkreader-inline-color: #46b2ff;">'''COM<outPort>_SW1 ON-ON-ON-ON'''</span>) |
Setup up baudrate | Setup up baudrate | ||
| − | <pre># stty -F /dev/ttyTHS | + | <pre># stty -F /dev/ttyTHS<SEND_UART_NO> speed 115200 |
| − | # stty -F /dev/ttyTHS | + | # stty -F /dev/ttyTHS<RECEIVE_UART_NO> speed 115200 |
</pre> | </pre> | ||
Test | Test | ||
| − | <pre># cat /dev/ttyTHS | + | <pre># cat /dev/ttyTHS<RECEIVE_UART_NO> & |
| − | # echo | + | # echo "1234" > /dev/ttyTHS<SEND_UART_NO> |
</pre> | </pre> | ||
| + | |||
| + | '''Software control'''<br/> (<span data-darkreader-inline-color="" style="color: rgb(0, 112, 192); --darkreader-inline-color: #46b2ff;">'''COM<inPort>_SWx ON-ON-OFF-ON'''</span>)<br/> <span lang="EN-US" style="font-size:11.0pt"><span style="font-family:Roboto">AIR-030 RTS</span></span><span style="font-size:11.0pt"><span style="font-family:">的</span></span><span lang="EN-US" style="font-size:11.0pt"><span style="font-family:Roboto">GPIO</span></span><span style="font-size:11.0pt"><span style="font-family:">號碼</span></span> | ||
| + | |||
| + | <span data-darkreader-inline-bgcolor="" data-darkreader-inline-bgimage="" style="background: rgb(242, 242, 242); --darkreader-inline-bgimage: initial; --darkreader-inline-bgcolor: #1f2223;">'''<span lang="EN-US" style="font-size:11.0pt"><span style="font-family:Consolas">UART1_RTS L51 GPIO3_PR.04 gpio-<span data-darkreader-inline-color="" style="color: rgb(192, 0, 0); --darkreader-inline-color: #ff4646;">460 </span>(<span data-darkreader-inline-color="" style="color: red; --darkreader-inline-color: #ff1a1a;">PR.04</span>)</span></span>'''</span><br/> <span data-darkreader-inline-bgcolor="" data-darkreader-inline-bgimage="" style="background: rgb(242, 242, 242); --darkreader-inline-bgimage: initial; --darkreader-inline-bgcolor: #1f2223;">'''<span lang="EN-US" style="font-size:11.0pt"><span style="font-family:Consolas">UART2_RTS G58 GPIO3_PY.07 gpio-477 (PY.07)</span></span>'''</span><br/> <span data-darkreader-inline-bgcolor="" data-darkreader-inline-bgimage="" style="background: rgb(242, 242, 242); --darkreader-inline-bgimage: initial; --darkreader-inline-bgcolor: #1f2223;">'''<span lang="EN-US" style="font-size:11.0pt"><span style="font-family:Consolas">UART4_RTS L4 GPIO3_PH.05 gpio-396 (PH.05)</span></span>'''</span><br/> <span data-darkreader-inline-bgcolor="" data-darkreader-inline-bgimage="" style="background: rgb(242, 242, 242); --darkreader-inline-bgimage: initial; --darkreader-inline-bgcolor: #1f2223;">'''<span lang="EN-US" style="font-size:11.0pt"><span style="font-family:Consolas">UART5_RTS K58 GPIO3_PX.06 gpio-468 (PX.06)</span></span>'''</span> | ||
| + | |||
| + | <span style="font-size:11.0pt"><span style="font-family:">舉起每個</span></span><span lang="EN-US" style="font-size:11.0pt"><span style="font-family:Roboto">COM</span></span><span style="font-size:11.0pt"><span style="font-family:">的</span></span><span lang="EN-US" style="font-size:11.0pt"><span style="font-family:Roboto">RTS pin</span></span><span style="font-size:11.0pt"><span style="font-family:">的方式如下</span></span><span lang="EN-US" style="font-size:11.0pt"><span style="font-family:Roboto">(</span></span><span style="font-size:11.0pt"><span style="font-family:">以</span></span><span lang="EN-US" style="font-size:11.0pt"><span style="font-family:Roboto">UART1 RTS</span></span><span style="font-size:11.0pt"><span style="font-family:">來說</span></span><span lang="EN-US" style="font-size:11.0pt"><span style="font-family:Roboto">)</span></span> | ||
| + | |||
| + | <span lang="EN-US" style="font-size:11.0pt"><span style="font-family:Roboto">1.</span></span><span style="font-size:11.0pt"><span style="font-family:">權限</span></span> | ||
| + | |||
| + | <span data-darkreader-inline-bgcolor="" data-darkreader-inline-bgimage="" style="background: rgb(242, 242, 242); --darkreader-inline-bgimage: initial; --darkreader-inline-bgcolor: #1f2223;">'''<span lang="EN-US" style="font-size:11.0pt"><span style="font-family:Consolas">ubuntu@localhost:~$ sudo –s</span></span>'''</span> | ||
| + | |||
| + | <span lang="EN-US" style="font-size:11.0pt"><span style="font-family:Roboto">2.</span></span><span style="font-size:11.0pt"><span style="font-family:">設定</span></span> | ||
| + | |||
| + | <span data-darkreader-inline-bgcolor="" data-darkreader-inline-bgimage="" style="background: rgb(242, 242, 242); --darkreader-inline-bgimage: initial; --darkreader-inline-bgcolor: #1f2223;">'''<span lang="EN-US" style="font-size:11.0pt"><span style="font-family:Consolas">root@localhost:/home/ubuntu# echo <span data-darkreader-inline-color="" style="color: rgb(192, 0, 0); --darkreader-inline-color: #ff4646;">460 </span>> /sys/class/gpio/export</span></span>'''</span><br/> <span data-darkreader-inline-bgcolor="" data-darkreader-inline-bgimage="" style="background: rgb(242, 242, 242); --darkreader-inline-bgimage: initial; --darkreader-inline-bgcolor: #1f2223;">'''<span lang="EN-US" style="font-size:11.0pt"><span style="font-family:Consolas">root@localhost:/home/ubuntu# ls /sys/class/gpio/</span></span>'''</span><br/> <span data-darkreader-inline-bgcolor="" data-darkreader-inline-bgimage="" style="background: rgb(242, 242, 242); --darkreader-inline-bgimage: initial; --darkreader-inline-bgcolor: #1f2223;">'''<span lang="EN-US" style="font-size:11.0pt"><span style="font-family:Consolas">export gpiochip300 gpiochip316 gpiochip348 <span data-darkreader-inline-color="" style="color: red; --darkreader-inline-color: #ff1a1a;">PR.04</span> unexport</span></span>'''</span><br/> <span data-darkreader-inline-bgcolor="" data-darkreader-inline-bgimage="" style="background: rgb(242, 242, 242); --darkreader-inline-bgimage: initial; --darkreader-inline-bgcolor: #1f2223;">'''<span lang="EN-US" style="font-size:11.0pt"><span style="font-family:Consolas">root@localhost:/home/ubuntu# echo out > /sys/class/gpio/<span data-darkreader-inline-color="" style="color: red; --darkreader-inline-color: #ff1a1a;">PR.04</span>/direction</span></span>'''</span><br/> <span data-darkreader-inline-bgcolor="" data-darkreader-inline-bgimage="" style="background: rgb(242, 242, 242); --darkreader-inline-bgimage: initial; --darkreader-inline-bgcolor: #1f2223;">'''<span lang="EN-US" style="font-size:11.0pt"><span style="font-family:Consolas">root@localhost:/home/ubuntu# echo 1 > /sys/class/gpio/<span data-darkreader-inline-color="" style="color: red; --darkreader-inline-color: #ff1a1a;">PR.04</span>/value</span></span>'''</span> | ||
| + | |||
| + | <span lang="EN-US" style="font-size:11.0pt"><span style="font-family:Roboto">3.</span></span><span style="font-size:11.0pt"><span style="font-family:">驗證</span></span> | ||
| + | |||
| + | <span data-darkreader-inline-bgcolor="" data-darkreader-inline-bgimage="" style="background: rgb(242, 242, 242); --darkreader-inline-bgimage: initial; --darkreader-inline-bgcolor: #1f2223;">'''<span lang="EN-US" style="font-size:11.0pt"><span style="font-family:Consolas">root@localhost:/home/ubuntu# cat /sys/kernel/debug/gpio | grep <span data-darkreader-inline-color="" style="color: red; --darkreader-inline-color: #ff1a1a;">PR.04</span></span></span>'''</span><br/> <span data-darkreader-inline-bgcolor="" data-darkreader-inline-bgimage="" style="background: rgb(242, 242, 242); --darkreader-inline-bgimage: initial; --darkreader-inline-bgcolor: #1f2223;">'''<span lang="EN-US" style="font-size:11.0pt"><span style="font-family:Consolas">gpio-460 (PR.04 |sysfs ) out hi</span></span>'''</span> | ||
==== '''Audio''' ==== | ==== '''Audio''' ==== | ||
HDMI output | HDMI output | ||
| − | <pre>$ aplay -D hw:0,3 | + | <pre>$ aplay -D hw:0,3 <WAV file> |
</pre> | </pre> | ||
Line-Out | Line-Out | ||
| − | <pre>$ aplay -D hw:1,0 | + | <pre>$ aplay -D hw:1,0 <WAV file> |
</pre> | </pre> | ||
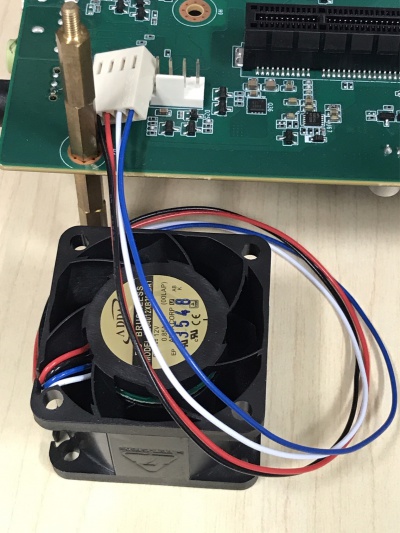
==== '''FAN''' ==== | ==== '''FAN''' ==== | ||
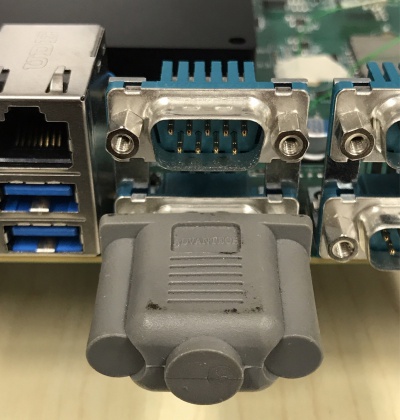
| + | |||
| + | [[File:Air030 fan.jpg|400px|Air030 fan.jpg]] | ||
Change PWM value ${PWM} from 1 ~ 255. | Change PWM value ${PWM} from 1 ~ 255. | ||
<pre>ubuntu@localhost:~$ sudo -s | <pre>ubuntu@localhost:~$ sudo -s | ||
For R35.1.0 | For R35.1.0 | ||
| − | root@localhost:/home/ubuntu# echo ${PWM} | + | root@localhost:/home/ubuntu# echo ${PWM} > /sys/class/hwmon/hwmon3/pwm1 |
For R35.3.1 | For R35.3.1 | ||
| − | root@localhost:/home/ubuntu# echo ${PWM} | + | root@localhost:/home/ubuntu# echo ${PWM} > /sys/class/hwmon/hwmon4/pwm1 |
| + | For R36.4.3 | ||
| + | root@localhost:/home/ubuntu# echo ${PWM} > /sys/class/hwmon/hwmon3/pwm1 | ||
</pre> | </pre> | ||
Before test this item, please disable fan-control service.(Only for R35.1.0) | Before test this item, please disable fan-control service.(Only for R35.1.0) | ||
<pre>$ sudo systemctl disable nvfancontrol.service | <pre>$ sudo systemctl disable nvfancontrol.service | ||
| + | $ sudo systemctl stop nvfancontrol | ||
</pre> | </pre> | ||
| Line 161: | Line 294: | ||
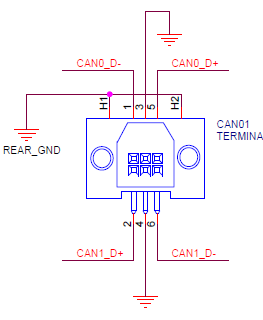
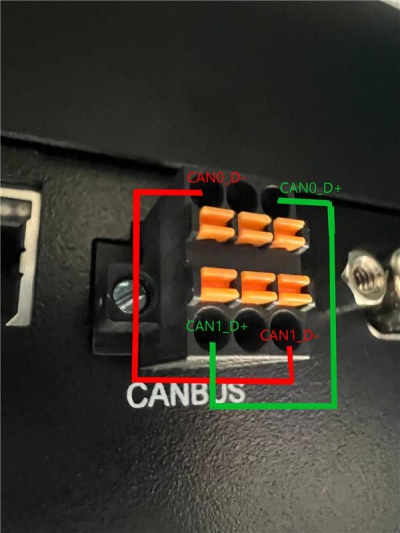
==== '''CAN''' ==== | ==== '''CAN''' ==== | ||
| + | |||
| + | [[File:Air030 can.jpg|400px|Air030 can.jpg]] | ||
| + | |||
| + | [[File:030CAN.png|400px|030CAN.png]]<br/> [[File:CAN LoopbackTest.jpg|400px|CAN LoopbackTest.jpg]] | ||
<pre>$ modprobe can | <pre>$ modprobe can | ||
$ modprobe can-dev | $ modprobe can-dev | ||
| Line 182: | Line 319: | ||
To test U-Disk read speed | To test U-Disk read speed | ||
<pre>$ sudo -s | <pre>$ sudo -s | ||
| − | # fio --ioengine=libaio --prio=0 --numjobs=1 --direct=1 --iodepth=32 --runtime= | + | # fio --ioengine=libaio --prio=0 --numjobs=1 --direct=1 --iodepth=32 --runtime=<runtime> --bwavgtime=5000 --time_based --rw=read --bs=128k --group_reporting --name=<device_path> |
</pre> | </pre> | ||
| Line 188: | Line 325: | ||
==== '''Camera''' ==== | ==== '''Camera''' ==== | ||
| + | |||
| + | <img _fck_mw_filename="Air030 camera imx219.jpg" _fck_mw_origimgheight="1199" _fck_mw_origimgwidth="1498" alt="File:Air030_camera_imx219.jpg" src="/wiki/images/f/f6/Air030_camera_imx219.jpg" style="vertical-align:middle;" title="File:Air030_camera_imx219.jpg" width="400" /> | ||
The imx219 mode:<br/> Size: Discrete 3280x2464 Interval: Discrete 0.048s (21.000 fps)<br/> Size: Discrete 3280x1848 Interval: Discrete 0.036s (28.000 fps)<br/> Size: Discrete 1920x1080 Interval: Discrete 0.033s (30.000 fps)<br/> Size: Discrete 1640x1232 Interval: Discrete 0.033s (30.000 fps)<br/> Size: Discrete 1280x720 Interval: Discrete 0.017s (60.000 fps)<br/> <br/> Preview command:<br/> 3280x2464 | The imx219 mode:<br/> Size: Discrete 3280x2464 Interval: Discrete 0.048s (21.000 fps)<br/> Size: Discrete 3280x1848 Interval: Discrete 0.036s (28.000 fps)<br/> Size: Discrete 1920x1080 Interval: Discrete 0.033s (30.000 fps)<br/> Size: Discrete 1640x1232 Interval: Discrete 0.033s (30.000 fps)<br/> Size: Discrete 1280x720 Interval: Discrete 0.017s (60.000 fps)<br/> <br/> Preview command:<br/> 3280x2464 | ||
| − | <pre>$ gst-launch-1.0 nvarguscamerasrc ! | + | <pre>$ gst-launch-1.0 nvarguscamerasrc&nbsp;! 'video/x-raw(memory:NVMM), width=3280, height=2464, format=NV12, framerate=21/1'&nbsp;! nv3dsink</pre> |
3280x1848 | 3280x1848 | ||
| − | <pre>$ gst-launch-1.0 nvarguscamerasrc ! | + | <pre>$ gst-launch-1.0 nvarguscamerasrc&nbsp;! 'video/x-raw(memory:NVMM), width=3280, height=1848, format=NV12, framerate=28/1'&nbsp;! nv3dsink</pre> |
1920x1080 | 1920x1080 | ||
| − | <pre>$ gst-launch-1.0 nvarguscamerasrc ! | + | <pre>$ gst-launch-1.0 nvarguscamerasrc&nbsp;! 'video/x-raw(memory:NVMM), width=1920, height=1080, format=NV12, framerate=29/1'&nbsp;! nv3dsink</pre> |
1640x1232 | 1640x1232 | ||
| − | <pre>$ gst-launch-1.0 nvarguscamerasrc ! | + | <pre>$ gst-launch-1.0 nvarguscamerasrc&nbsp;! 'video/x-raw(memory:NVMM), width=1640, height=1232, format=NV12, framerate=29/1'&nbsp;! nv3dsink</pre> |
1280x720 | 1280x720 | ||
| − | <pre>$ gst-launch-1.0 nvarguscamerasrc ! | + | <pre>$ gst-launch-1.0 nvarguscamerasrc&nbsp;! 'video/x-raw(memory:NVMM), width=1280, height=720, format=NV12, framerate=59/1'&nbsp;! nv3dsink</pre> |
| + | |||
| + | For R 36.4.3 | ||
| + | <pre>$ gst-launch-1.0 nvarguscamerasrc ! 'video/x-raw(memory:NVMM),format=NV12' ! nv3dsink sync=0</pre> | ||
| + | |||
| + | Example: 3280x2464 | ||
| + | <pre>$ gst-launch-1.0 nvarguscamerasrc ! 'video/x-raw(memory:NVMM),width=3280, height=2464, format=NV12, framerate=21/1' ! nv3dsink sync=0</pre> | ||
| + | |||
| + | Capture Image (for JP6 : No nv3dsink gstreamer element, fixed by installing package nvidia-l4t-gstreamer) | ||
| + | <pre>$ nvargus_nvraw --c 0 --mode 0 --file /home/ubuntu/sample.jpg --format "yuv, jpg" | ||
| + | </pre> | ||
=== '''Power Mode''' === | === '''Power Mode''' === | ||
| Line 208: | Line 357: | ||
[https://docs.nvidia.com/jetson/archives/r34.1/DeveloperGuide/text/SD/PlatformPowerAndPerformance/JetsonOrinNxSeriesAndJetsonAgxOrinSeries.html#supported-modes-and-power-efficiency Supported-modes-and-power-efficiency] | [https://docs.nvidia.com/jetson/archives/r34.1/DeveloperGuide/text/SD/PlatformPowerAndPerformance/JetsonOrinNxSeriesAndJetsonAgxOrinSeries.html#supported-modes-and-power-efficiency Supported-modes-and-power-efficiency] | ||
| − | + | '''Flash Mac''' | |
| − | [https://advantecho365-my.sharepoint.com/:u:/g/personal/jack501_chen_advantech_com/EczfhEigBcxIsAWt80o7iZkBH1EbUMTo7jQeX94DbJovsw?e=PPEyJU I225 Flash Tool] | + | [https://advantecho365-my.sharepoint.com/:u:/g/personal/jack501_chen_advantech_com/EczfhEigBcxIsAWt80o7iZkBH1EbUMTo7jQeX94DbJovsw?e=PPEyJU I225 Flash Tool] |
| + | |||
| + | Copy and extract I225_Flash_Tool.zip in the device. | ||
<pre>ubuntu@localhost:~$ unzip I225_Flash_Tool.zip | <pre>ubuntu@localhost:~$ unzip I225_Flash_Tool.zip | ||
</pre> | </pre> | ||
Chanage the tool execution permission. | Chanage the tool execution permission. | ||
| − | <pre> | + | <pre><pre>ubuntu@localhost:~$ sudo chmod a+x ./EepromAccessTool |
</pre> | </pre> | ||
| Line 242: | Line 393: | ||
</pre> | </pre> | ||
| − | Flash Mac Address To get <span style="color:# | + | Flash Mac Address To get <span data-darkreader-inline-color="" style="color: rgb(0, 112, 192); --darkreader-inline-color: #46b2ff;">'''-nic'''</span> value and <span data-darkreader-inline-color="" style="color: rgb(0, 112, 192); --darkreader-inline-color: #46b2ff;">'''BDF'''</span> value please using above method.<br/> ex : 0004:05:00.0 = domain 4 bus 5 device 0 function 0<br/> BUS 5 > NIC = 2 |
<pre>$ sudo -s | <pre>$ sudo -s | ||
# setpci -s 0004:04:00.0 COMMAND=0007 | # setpci -s 0004:04:00.0 COMMAND=0007 | ||
| Line 253: | Line 404: | ||
</pre> | </pre> | ||
| − | <span style="color:# | + | <span data-darkreader-inline-color="" style="color: rgb(0, 112, 192); --darkreader-inline-color: #46b2ff;">'''Please do cold reboot after flash mac address.'''</span> |
How to check whether the flash proccess is success or not | How to check whether the flash proccess is success or not | ||
| − | *<s>lspci command - If it is 0x125<span style="color:# | + | *<s>lspci command - If it is 0x125<span data-darkreader-inline-color="" style="color: rgb(255, 0, 0); --darkreader-inline-color: #ff1a1a;">'''f'''</span> value, it failed.</s> |
*ifconfig -a - Check the nerwork interface is available. ex: eth0, eth1 and so on. | *ifconfig -a - Check the nerwork interface is available. ex: eth0, eth1 and so on. | ||
| + | |||
=== Boot On Off === | === Boot On Off === | ||
| − | The boot count message will be printed before log-in.<br/> [[File:Air030 bootcount.jpg|200px | + | The boot count message will be printed before log-in.<br/> [[File:Air030 bootcount.jpg|200px]]<br/> Reset the boot count please remove <font color="#0070c0" data-darkreader-inline-color="" style="--darkreader-inline-color: #46b2ff;">'''bootCount.tt'''</font>. |
<pre>$ rm bootCount.tt | <pre>$ rm bootCount.tt | ||
</pre> | </pre> | ||
| Line 280: | Line 432: | ||
</pre> | </pre> | ||
| − | More power consumption version (nVidia suggestion + | + | More power consumption version (nVidia suggestion + <a href=":File%3AAir030-half-matrixMulCUBLAS.patch">0001-half-matrixMulCUBLAS.patch</a>)<br/> matrixMulCUBLAS |
<pre>/usr/local/cuda-11.4/samples/0_Simple/matrixMulCUBLAS/ | <pre>/usr/local/cuda-11.4/samples/0_Simple/matrixMulCUBLAS/ | ||
</pre> | </pre> | ||
| Line 297: | Line 449: | ||
nvenc engine - USB camera | nvenc engine - USB camera | ||
| − | <pre>$ gst-launch-1.0 v4l2src device=/dev/video0 ! | + | <pre>$ gst-launch-1.0 v4l2src device=/dev/video0&nbsp;! 'video/x-raw,width=1280,height=720'&nbsp;! nvvidconv&nbsp;! 'video/x-raw(memory:NVMM)'&nbsp;! nvvidconv&nbsp;! 'video/x-raw(memory:NVMM)'&nbsp;! nvv4l2h264enc&nbsp;! fakesink |
</pre> | </pre> | ||
nvdec engine - play 4K H264 video | nvdec engine - play 4K H264 video | ||
| − | <pre>gst-launch-1.0 filesrc location=/usr/local/bin/4k264.mp4 ! qtdemux ! queue ! h264parse ! nvv4l2decoder ! | + | <pre>gst-launch-1.0 filesrc location=/usr/local/bin/4k264.mp4&nbsp;! qtdemux&nbsp;! queue&nbsp;! h264parse&nbsp;! nvv4l2decoder&nbsp;! 'video/x-raw(memory:NVMM), format=(string)NV12'&nbsp;! queue&nbsp;! fakesink |
</pre> | </pre> | ||
| Line 309: | Line 461: | ||
== Module == | == Module == | ||
| + | |||
=== '''AW-CB375NF(EWM-W159M201E)''' === | === '''AW-CB375NF(EWM-W159M201E)''' === | ||
| + | |||
| + | [[File:Air030 awcb375nf.jpg|400px]] | ||
| + | |||
| + | [[File:Air030 awcb375nf onboard.jpg|400px]] | ||
Adjust dip switch | Adjust dip switch | ||
| Line 317: | Line 474: | ||
*UART5_SW1 - SW1 : OFF | *UART5_SW1 - SW1 : OFF | ||
| − | [[File:AIR030 LAN3 MKE SW1.jpg|400px | + | [[File:AIR030 LAN3 MKE SW1.jpg|400px]] |
| + | |||
| + | [[File:Air030 uart5 selection.jpg|400px]] | ||
'''Wi-Fi'''<br/> Start interface | '''Wi-Fi'''<br/> Start interface | ||
| Line 356: | Line 515: | ||
</pre> | </pre> | ||
| − | |||
| − | [[File:Air030 | + | === '''AIW-35x''' === |
| + | |||
| + | [[File:Air030 aiw-356.jpg|400px]] | ||
| + | |||
| + | [[File:Air030 aiw-356 onboard.jpg|400px]] | ||
| + | |||
| + | [[File:Air030 uart5 selection.jpg|400px]] | ||
| + | |||
| + | Check the module is available. | ||
<pre>ubuntu@localhost:~$ lsusb | <pre>ubuntu@localhost:~$ lsusb | ||
Bus 002 Device 002: ID 05e3:0625 Genesys Logic, Inc. USB3.2 Hub | Bus 002 Device 002: ID 05e3:0625 Genesys Logic, Inc. USB3.2 Hub | ||
| Line 365: | Line 531: | ||
</pre> | </pre> | ||
<pre>buntu@localhost:~$ ifconfig usb0 | <pre>buntu@localhost:~$ ifconfig usb0 | ||
| − | usb0: flags=4227 | + | usb0: flags=4227<UP,BROADCAST,NOARP,MULTICAST> mtu 1500 |
ether 00:33:34:37:35:33 txqueuelen 1000 (Ethernet) | ether 00:33:34:37:35:33 txqueuelen 1000 (Ethernet) | ||
RX packets 0 bytes 0 (0.0 B) | RX packets 0 bytes 0 (0.0 B) | ||
| Line 373: | Line 539: | ||
</pre> | </pre> | ||
<pre>ubuntu@localhost:~$ sudo dmesg | grep usb0 | <pre>ubuntu@localhost:~$ sudo dmesg | grep usb0 | ||
| − | [ 14.115707] GobiNet 1-3.4:1.4 usb0: register | + | [ 14.115707] GobiNet 1-3.4:1.4 usb0: register 'GobiNet' at usb-3610000.xhci-3.4, GobiNet Ethernet Device, d2:77:82:0c:af:59 |
</pre> | </pre> | ||
| Line 381: | Line 547: | ||
ATcommand : at+gtusbmode=32<br/> 30 : mbim<br/> 32 : rmnet(gobinet) | ATcommand : at+gtusbmode=32<br/> 30 : mbim<br/> 32 : rmnet(gobinet) | ||
| + | |||
| + | ===== EWM-W179M201E ===== | ||
| + | First need to install WIFI module | ||
| + | <pre> | ||
| + | $ cd /usr/local/bin/EWM-W179 | ||
| + | $ sudo su | ||
| + | # insmod rtk_btusb.ko | ||
| + | # insmod 8852be.ko | ||
| + | </pre> | ||
| + | |||
| + | === AIW-356 === | ||
| + | First need to soft link source for build driver | ||
| + | <pre> | ||
| + | $ cd /lib/modules/<kernel version>/build/arch/ | ||
| + | $ sudo ln -s arm64 aarch64 | ||
| + | </pre> | ||
| + | Tar file | ||
| + | <pre> | ||
| + | $ cd /usr/local/bin/AIW-356 | ||
| + | $ sudo tar -xvf AIWS00LTX0317.tar.bz2 | ||
| + | </pre> | ||
| + | Build driver | ||
| + | <br/> | ||
| + | Please reference AIW [https://docs.aiw-module.advantech.com/assets/files/AIW-Tool_UserGuide_v1.0-cc56524ec46f5992c290edbe56f94bf3.pdf Document] | ||
| + | |||
| + | === '''NVME''' === | ||
| + | |||
| + | [[File:Air030 nvme.jpg|400px]] | ||
| + | |||
| + | [[File:Air030 nvme onboard.jpg|400px]] | ||
| + | |||
| + | |||
| + | === '''PCIE-1672''' === | ||
| + | |||
| + | [[File:Air030 pcie1672v.jpg|400px]] | ||
== Image == | == Image == | ||
| − | The test image is available [https://advantecho365-my.sharepoint.com/personal/jack501_chen_advantech_com/_layouts/15/onedrive.aspx?ga=1&id=/personal/jack501_chen_advantech_com/Documents/AIR-030/image HERE]. <u>The 1st and 2nd image is only available for AGX-ORIN devkit.</u> | + | The test image is available [https://advantecho365-my.sharepoint.com/personal/jack501_chen_advantech_com/_layouts/15/onedrive.aspx?ga=1&id=/personal/jack501_chen_advantech_com/Documents/AIR-030/image HERE]. |
| + | |||
| + | <u>The 1st and 2nd image is only available for AGX-ORIN devkit.</u> | ||
{| border="1" cellpadding="1" cellspacing="1" style="width: 800px;" | {| border="1" cellpadding="1" cellspacing="1" style="width: 800px;" | ||
| + | |- | ||
| + | | <tbody> | ||
|- | |- | ||
! scope="row" | | ! scope="row" | | ||
| − | ! scope="col" style="width: 30px;background-color:rgb(80, 80, 80);color:# | + | ! data-darkreader-inline-bgcolor="" data-darkreader-inline-color="" scope="col" style="width: 30px; background-color: rgb(80, 80, 80); color: rgb(255, 255, 255); --darkreader-inline-bgcolor: #3c4144; --darkreader-inline-color: #e8e6e3;" | Image |
| − | ! scope="col" style="width: 438px;background-color:rgb(80, 80, 80);color:# | + | ! data-darkreader-inline-bgcolor="" data-darkreader-inline-color="" scope="col" style="width: 438px; background-color: rgb(80, 80, 80); color: rgb(255, 255, 255); --darkreader-inline-bgcolor: #3c4144; --darkreader-inline-color: #e8e6e3;" | Release Note |
|- | |- | ||
! scope="row" | 1 | ! scope="row" | 1 | ||
| Line 402: | Line 607: | ||
! scope="row" | 3 | ! scope="row" | 3 | ||
| style="width: 300px;" | air030_image_20221020_burning_test.tar.gz | | style="width: 300px;" | air030_image_20221020_burning_test.tar.gz | ||
| − | | style="width: 1138px;" | For power/thermal/SI power sequence used<br/> | + | | style="width: 1138px;" | For power/thermal/SI power sequence used<br/> <a href=":File%3AAIR-030%20Burning%20Test.pdf">Burning Testing SOP</a> |
|- | |- | ||
! scope="row" | 4 | ! scope="row" | 4 | ||
| Line 418: | Line 623: | ||
! scope="row" | 7 | ! scope="row" | 7 | ||
| style="width: 300px;" | air030_image_20221128_dqatest.tar | | style="width: 300px;" | air030_image_20221128_dqatest.tar | ||
| − | | style="width: 1138px;" | For DQA & QA using<br/> | + | | style="width: 1138px;" | For DQA & QA using<br/> <a href=":File%3AAIR-030%20QA%20Test.pdf">QA Testing SOP</a> |
|- | |- | ||
! scope="row" | 8 | ! scope="row" | 8 | ||
| Line 430: | Line 635: | ||
! scope="row" | 10 | ! scope="row" | 10 | ||
| style="width: 300px;" | air030_image_20221216.tar.gz | | style="width: 300px;" | air030_image_20221216.tar.gz | ||
| − | | style="width: 1138px;" | fix: | + | | style="width: 1138px;" | fix: |
| + | 1).Date and Time 的時間只要reboot 後就會又回到 April 21.<br/> 2).QA - USB3.2 port 1/2 speed 及 Type C port performance 太低, 約 40MB/s<br/> 3).開機後第1次接(或接著disk開機), OS的左側工作列看得到disk符號(lsblk也看得到), 熱插拔後再接上 OS 左側工作列看不到disk(lsblk也看不到), 試過兩台type c USB disk(Sandisk and Seagate) 一樣問題. 4).USB3.2 port1/2接 Sandisk USB3.2 gen2 x1 500G disk (E80)熱插拔後認不到, 接Seagate USB3.2 gen2x2 500G disk完全偵測不到(reboot 也沒用). | ||
| + | |||
|- | |- | ||
! scope="row" | 11 | ! scope="row" | 11 | ||
| Line 442: | Line 649: | ||
! scope="row" | 13 | ! scope="row" | 13 | ||
| style="width: 300px;" | <s>air030_image_20230204_factory_test.tar</s> | | style="width: 300px;" | <s>air030_image_20230204_factory_test.tar</s> | ||
| − | | style="width: 1138px;" | For factory test used.<br/> | + | | style="width: 1138px;" | For factory test used.<br/> <a href=":File%3AAir030%20factory%20test.pdf">Air030_factory_test.pdf</a> |
|- | |- | ||
! scope="row" | 14 | ! scope="row" | 14 | ||
| style="width: 300px;" | air030_image_20230220_factory_test.tar | | style="width: 300px;" | air030_image_20230220_factory_test.tar | ||
| − | | style="width: 1138px;" | For factory test used. | + | | style="width: 1138px;" | For factory test used. |
| + | Add flash/read mac address, rtc time, watchdog <a href=":File%3AAir030%20factory%20test%2020230217.pdf">Air030_factory_test_20230217.pdf</a> | ||
| + | |||
|- | |- | ||
! scope="row" | 15 | ! scope="row" | 15 | ||
| Line 458: | Line 667: | ||
! scope="row" | 17 | ! scope="row" | 17 | ||
| style="width: 300px;" | air030_image_20220324_dqatest.tar.gz | | style="width: 300px;" | air030_image_20220324_dqatest.tar.gz | ||
| − | | style="width: 1138px;" | For DQA using (Jetpack 5.1/L4T 35.2.1) | + | | style="width: 1138px;" | For DQA using (Jetpack 5.1/L4T 35.2.1) |
| + | Its only provided camera feature. The test commnand please check the camera section. | ||
| + | |||
| + | |- | ||
| + | ! scope="row" | 18 | ||
| + | | style="width: 300px;" | air030_image_20230410_thermal.tar.gz | ||
| + | | style="width: 1138px;" | (Jetpack 5.1.1/L4T 35.3.1) | ||
| + | |- | ||
| + | ! scope="row" | 19 | ||
| + | | style="width: 300px;" | air030_image_20230411_dqatest.tar.gz | ||
| + | | style="width: 1138px;" | (Jetpack 5.1.1/L4T 35.3.1) | ||
| + | |- | ||
| + | ! scope="row" | 20 | ||
| + | | style="width: 300px;" | air030_image_20230412_factory_test.tar.gz | ||
| + | | style="width: 1138px;" | (Jetpack 5.1.1/L4T 35.3.1) | ||
| + | |- | ||
| + | ! scope="row" | 21 | ||
| + | | style="width: 300px;" | air030_image_20230428_poweronoff_atx_mode.tar.gz | ||
| + | | style="width: 1138px;" | (Jetpack 5.1.1/L4T 35.3.1)<br/> Patched the mb1_35.3.1_overlay.tbz2 for the issue "Can't Boot in Cold Start Test". | ||
|- | |- | ||
| − | ! scope="row" | | + | ! scope="row" | 22 |
| − | | style="width: 300px;" | | + | | style="width: 300px;" | air030_image_20230503_poweronoff_atx_mode.tar.gz |
| + | | style="width: 1138px;" | (Jetpack 5.1.1/L4T 35.3.1)<br/> Patched the mb1_35.3.1_overlay.tbz2 for the issue "Can't Boot in Cold Start Test". | ||
| + | |- | ||
| + | ! scope="row" | 23 | ||
| + | | style="width: 300px;" | air030_image_20230508_dqatest.tar.gz | ||
| + | | style="width: 1138px;" | (Jetpack 5.1.1/L4T 35.3.1)<br/> fix COM2 function.". | ||
| + | |- | ||
| + | ! scope="row" | 24 | ||
| + | | style="width: 300px;" | air030_image_20230509_factory_test.tar.gz | ||
| + | | style="width: 1138px;" | (Jetpack 5.1.1/L4T 35.3.1) | ||
| + | Note:<br/> [Audio]Remove "hit a enter" before testing audio playback. [Burning]Add function timeout after 2hr. | ||
| + | |||
| + | |- | ||
| + | ! scope="row" | 25 | ||
| + | | style="width: 300px;" | air030_image_20230510_poweronoff_at_mode.tar.gz | ||
| style="width: 1138px;" | (Jetpack 5.1.1/L4T 35.3.1) | | style="width: 1138px;" | (Jetpack 5.1.1/L4T 35.3.1) | ||
| + | |- | ||
| + | ! scope="row" | 26 | ||
| + | | style="width: 300px;" | air030_image_20230516_dqatest.tar.gz | ||
| + | | style="width: 1138px;" | (Jetpack 5.1.1/L4T 35.3.1) | ||
| + | Note: [UI]Fix "System hang by adjusting date time widget". | ||
| + | |||
| + | |- | ||
| + | ! scope="row" | 27 | ||
| + | | style="width: 300px;" | air030_image_20230518_poweronoff_atx_mode.tar.gz | ||
| + | | style="width: 1138px;" | (Jetpack 5.1.1/L4T 35.3.1)<br/> Note: Patch optee. | ||
| + | |- | ||
| + | ! scope="row" | 28 | ||
| + | | style="width: 300px;" | air030_image_20230703_dqatest.tar.gz | ||
| + | | style="width: 1138px;" | (Jetpack 5.1.1/L4T 35.3.1)<br/> Note: Fix com2 function error for 64GB. | ||
| + | |- | ||
| + | | </tbody> | ||
|} | |} | ||
Latest revision as of 10:31, 18 November 2025
Contents
Flash Image
Change the SW2 to ON and press power button.
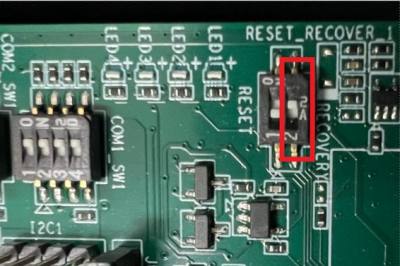
$ sudo reboot --force forced-recovery
Connect a linux OS host wired AIR-030 with usb-otg cable.
In the Host PC, make sure the AIR-030 (NVidia Corp) has detectd.
[ubuntu@linux 11:55:43 ~]$ lsusb
Bus 002 Device 002: ID 8087:8000 Intel Corp.
Bus 002 Device 001: ID 1d6b:0002 Linux Foundation 2.0 root hub
Bus 001 Device 003: ID 0bda:0161 Realtek Semiconductor Corp. Mass Storage Device
Bus 001 Device 024: ID 0955:7223 NVidia Corp.
Bus 001 Device 002: ID 8087:8008 Intel Corp.
Please Check there is 7223 NVidia Corp
Install dependency package on HOST:
$ sudo tools/l4t_flash_prerequisites.sh # For Debian-based Linux
or
$ sudo apt install build-essential python libxml2-utils abootimg sshpass binutils -y
For Jackpack 5.1.1
1.Extracted tarball file PS :
$ sudo tar -zxvf air030_image_XXXXXX.tar.gz
$ cd Linux_for_Tegra
2. Flash
$ sudo ./flash.sh -d rootfs/boot/tegra234-air030.dtb jetson-agx-orin-devkit mmcblk0p1
To NVME
$ sudo ./tools/kernel_flash/l4t_initrd_flash.sh --external-device nvme0n1p1 -c ./tools/kernel_flash/flash_l4t_external.xml -S 32GB --erase-all --showlogs jetson-agx-orin-devkit nvme0n1p1
For Jetpack 6.0
To EMMC
$ sudo ./flash.sh jetson-agx-orin-devkit mmcblk0p1
To NVME
$ $ sudo ./tools/kernel_flash/l4t_initrd_flash.sh --external-device nvme0n1p1 -p "-c ./bootloader/generic/cfg/flash_t234_qspi.xml" -c ./tools/kernel_flash/flash_l4t_t234_nvme.xml --showlogs --network usb0 jetson-agx-orin-devkit nvme0n1p1
If host get error message "Parsing board information failed" when flashing image.
Please get crc code by get_eeprom_crc tool, once AIR-030 can boot into desktop.
Download Link: [1]
$ chmod a+x get_eeprom_crc
$ sudo ./get_eeprom_crc 0
Then overwrite correct crc value to EEPROM by i2cset command.
Replace crc code in command $ sudo i2cset -f -y 0 0x50 0xff 0x<crc_code>
For example, execute this command if crc code is 28.
$ sudo i2cset -f -y 0 0x50 0xff 0x28
Then re-flash AIR-030 image by normal steps.
Once AIR-030 cannot boot up to desktop, please flash AIR-030 by this command then follow previous steps to overwrite crc code and re-flash AIR-030 image.
AGX Orin 32G uses BOARDSKU="0004", AGX Orin 64G uses BOARDSKU="0005".
$ sudo SKIP_EEPROM_CHECK=1 BOARDSKU="0004" CHIP_SKU=00:00:00:D2 ./flash.sh jetson-agx-orin-devkit internal
This is original command with full parameter to flash from nVidia.
$ sudo BOARDID="3701" FAB="300" BOARDSKU="0004" BOARDREV="C.2" CHIP_SKU=00:00:00:D2 ./flash.sh jetson-agx-orin-devkit internal
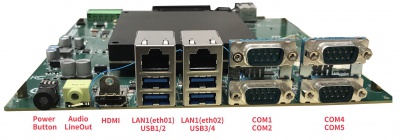
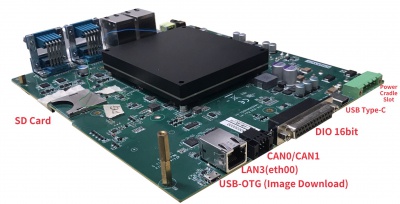
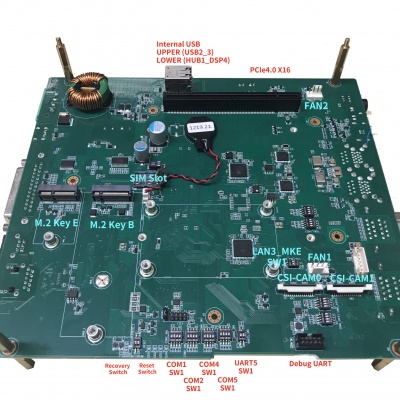
Board Layout
Front
Back
Bottom
Tools
JTOP
install
$ sudo apt update
$ sudo apt install python3-pip
$ sudo pip3 install -U jetson-stats
Run
$ sudo jtop
Test Command
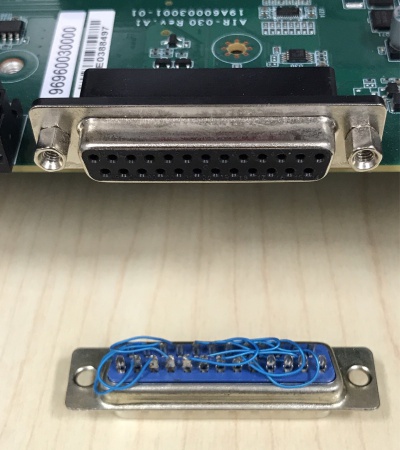
GPIO Expander
Test GPIO high/low
ubuntu@localhost:~ sudo -s
2).Commnad : where <GPIO> : GPIO0(GPIO300)~GPIO15(GPIO315) and <LEVEL> : high(1)/low(0)
For example, pull up GPIO0 to high.
root@localhost:/home/ubuntu# echo 300 > /sys/class/gpio/export
root@localhost:/home/ubuntu# echo out > /sys/class/gpio/gpio300/direction
root@localhost:/home/ubuntu# echo 1 > /sys/class/gpio/gpio300/value
JP6.2
root@localhost:/home/ubuntu# cat /sys/kernel/debug/gpio
Please in order export (ex:300->301->302->...->315)
root@localhost:/home/ubuntu# echo 300 > /sys/class/gpio/export
root@localhost:/home/ubuntu# echo out > /sys/class/gpio/gpio1/direction
root@localhost:/home/ubuntu# cat /sys/class/gpio/gpio1/direction
root@localhost:/home/ubuntu# echo 1 > /sys/class/gpio/gpio1/value
root@localhost:/home/ubuntu# cat /sys/class/gpio/gpio1/value
...
root@localhost:/home/ubuntu# echo 301 > /sys/class/gpio/export
root@localhost:/home/ubuntu# echo out > /sys/class/gpio/gpio2/direction
root@localhost:/home/ubuntu# cat /sys/class/gpio/gpio2/direction
root@localhost:/home/ubuntu# echo 1 > /sys/class/gpio/gpio2/value
root@localhost:/home/ubuntu# cat /sys/class/gpio/gpio2/value
...
WatchDog
root@linux:/home/ubuntu$ sudo -s
root@linux:/home/ubuntu# sync; sleep 2; sync; echo c > /proc/sysrq-trigger
RTC
DUT AC on:
1. Power on DUT and boot into OS.
2. Connect a LAN cable from the DUT to DHCP server.
3. Get a dynamic IP from DHCP server.
4. Type cmd to disable ntp service in DUT.
# sudo timedatectl set-ntp false
5. Synchronize system time and RTC time with NTP server.
# ntpdate tock.stdtime.gov.tw <===安裝ntpdate方式: $sudo apt-get install ntpdate <enter>
# hwclock -w
6. Keep the DUT on for 24 hours.
7. Synchronize system time and RTC time with NTP server again and check inaccuracies.
# ntpdate tock.stdtime.gov.tw && hwclock -s &&ntpdate -u tock.stdtime.gov.tw
TPM
(1)產生randon code
root@linux:/home/ubuntu# tpm2_getrandom --hex 20
(2) 對指定檔案 msg.dat 加密
root@linux:/home/ubuntu# tpm2_createprimary -C p -c platform_primary.ctx
root@linux:/home/ubuntu# tpm2_create -C platform_primary.ctx -G rsa2048 -u key.pub -r key.priv
root@linux:/home/ubuntu# tpm2_load -C platform_primary.ctx -u key.pub -r key.priv -c key.ctx
root@linux:/home/ubuntu# echo "my test" >msg.dat
root@linux:/home/ubuntu# tpm2_rsaencrypt -c key.ctx -o msg.enc msg.dat
root@linux:/home/ubuntu# cat msg.enc
root@linux:/home/ubuntu# tpm2_rsadecrypt -c key.ctx -o msg.ptext msg.enc
root@linux:/home/ubuntu# cat msg.ptext
root@linux:/home/ubuntu# cat msg.dat
(3) 將資料儲存至 tpm 內存
root@linux:/home/ubuntu# tpm2_nvdefine -Q 0x1500031 -C o -s 32 -a "ownerread|policywrite|ownerwrite"
root@linux:/home/ubuntu# echo "write_tpm_adv" >  adv.data
root@linux:/home/ubuntu# tpm2_nvwrite -Q 0x1500031 -C o -i adv.data
root@linux:/home/ubuntu# tpm2_nvread -Q 0x1500031 -C o -s 32 -o read.data
root@linux:/home/ubuntu# cat read.data
(4) 確認已經寫入儲存區域
root@linux:/home/ubuntu# tpm2_nvreadpublic > nv.out
root@linux:/home/ubuntu# cat nv.out
Error
ERROR: Esys_NV_DefineSpace(0x14C) - tpm:error(2.0): NV Index or persistent object already defined
ERROR: Failed to create NV index 0x1500031.
fixed
root@linux:/home/ubuntu# tpm2_nvundefine 0x1500031
LAN
LAN1USB12 - eth01
LAN2USB34 - eth02
LAN3 - eth00
UART
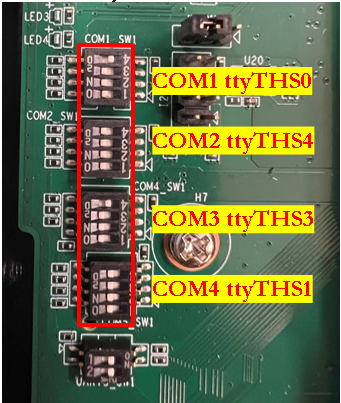
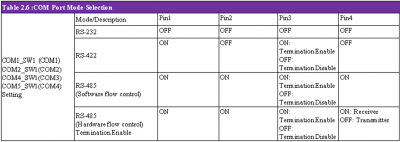
RS232 (COMX_SW1 : OFF-OFF-X-X)
UART5_SW1 - SW1 : ON
| <tbody> | |
| COM Port | Command (Please switch to root first before test) |
|---|---|
| COM1 | stty -F /dev/ttyTHS0 speed 115200 raw -echo
cat /dev/ttyTHS0 & echo "1234" > /dev/ttyTHS0 |
| COM2 | stty -F /dev/ttyTHS4 speed 115200 raw -echo
cat /dev/ttyTHS4 & echo "1234" > /dev/ttyTHS4 |
| COM4 | stty -F /dev/ttyTHS3 speed 115200 raw -echo
cat /dev/ttyTHS3 & echo "1234" > /dev/ttyTHS3 |
| COM5 | stty -F /dev/ttyTHS1 speed 115200 raw -echo
cat /dev/ttyTHS1 & echo "1234" > /dev/ttyTHS1 |
| </tbody> |
RS422
Send and Received port
(COM<PORT>_SW1 : ON-OFF-ON-OFF)
RS485
Send port
(COM<inPort>_SW1 ON-ON-ON-OFF)
Received port
(COM<outPort>_SW1 ON-ON-ON-ON)
Setup up baudrate
# stty -F /dev/ttyTHS<SEND_UART_NO> speed 115200
# stty -F /dev/ttyTHS<RECEIVE_UART_NO> speed 115200
Test
# cat /dev/ttyTHS<RECEIVE_UART_NO> &
# echo "1234" > /dev/ttyTHS<SEND_UART_NO>
Software control
(COM<inPort>_SWx ON-ON-OFF-ON)
AIR-030 RTS的GPIO號碼
UART1_RTS L51 GPIO3_PR.04 gpio-460 (PR.04)
UART2_RTS G58 GPIO3_PY.07 gpio-477 (PY.07)
UART4_RTS L4 GPIO3_PH.05 gpio-396 (PH.05)
UART5_RTS K58 GPIO3_PX.06 gpio-468 (PX.06)
舉起每個COM的RTS pin的方式如下(以UART1 RTS來說)
1.權限
ubuntu@localhost:~$ sudo –s
2.設定
root@localhost:/home/ubuntu# echo 460 > /sys/class/gpio/export
root@localhost:/home/ubuntu# ls /sys/class/gpio/
export gpiochip300 gpiochip316 gpiochip348 PR.04 unexport
root@localhost:/home/ubuntu# echo out > /sys/class/gpio/PR.04/direction
root@localhost:/home/ubuntu# echo 1 > /sys/class/gpio/PR.04/value
3.驗證
root@localhost:/home/ubuntu# cat /sys/kernel/debug/gpio | grep PR.04
gpio-460 (PR.04 |sysfs ) out hi
Audio
HDMI output
$ aplay -D hw:0,3 <WAV file>
Line-Out
$ aplay -D hw:1,0 <WAV file>
FAN
Change PWM value ${PWM} from 1 ~ 255.
ubuntu@localhost:~$ sudo -s
For R35.1.0
root@localhost:/home/ubuntu# echo ${PWM} > /sys/class/hwmon/hwmon3/pwm1
For R35.3.1
root@localhost:/home/ubuntu# echo ${PWM} > /sys/class/hwmon/hwmon4/pwm1
For R36.4.3
root@localhost:/home/ubuntu# echo ${PWM} > /sys/class/hwmon/hwmon3/pwm1
Before test this item, please disable fan-control service.(Only for R35.1.0)
$ sudo systemctl disable nvfancontrol.service
$ sudo systemctl stop nvfancontrol
CAN
$ modprobe can
$ modprobe can-dev
$ modprobe mttcan
$ ip link set can0 type can bitrate 500000
$ ip link set can0 up
$ ip link set can1 type can bitrate 500000
$ ip link set can1 up
In other terminal, run below command
$ candump can1
then run
$ cansend can0 123#abcdabcd
USB
To test U-Disk read speed
$ sudo -s
# fio --ioengine=libaio --prio=0 --numjobs=1 --direct=1 --iodepth=32 --runtime=<runtime> --bwavgtime=5000 --time_based --rw=read --bs=128k --group_reporting --name=<device_path>
Where:
<runtime> : how long the test time (ms), ex : 30 second : --runtime=30000
<device_path> : ex: --name=/dev/sda1
Camera
<img _fck_mw_filename="Air030 camera imx219.jpg" _fck_mw_origimgheight="1199" _fck_mw_origimgwidth="1498" alt="File:Air030_camera_imx219.jpg" src="/wiki/images/f/f6/Air030_camera_imx219.jpg" style="vertical-align:middle;" title="File:Air030_camera_imx219.jpg" width="400" />
The imx219 mode:
Size: Discrete 3280x2464 Interval: Discrete 0.048s (21.000 fps)
Size: Discrete 3280x1848 Interval: Discrete 0.036s (28.000 fps)
Size: Discrete 1920x1080 Interval: Discrete 0.033s (30.000 fps)
Size: Discrete 1640x1232 Interval: Discrete 0.033s (30.000 fps)
Size: Discrete 1280x720 Interval: Discrete 0.017s (60.000 fps)
Preview command:
3280x2464
$ gst-launch-1.0 nvarguscamerasrc ! 'video/x-raw(memory:NVMM), width=3280, height=2464, format=NV12, framerate=21/1' ! nv3dsink
3280x1848
$ gst-launch-1.0 nvarguscamerasrc ! 'video/x-raw(memory:NVMM), width=3280, height=1848, format=NV12, framerate=28/1' ! nv3dsink
1920x1080
$ gst-launch-1.0 nvarguscamerasrc ! 'video/x-raw(memory:NVMM), width=1920, height=1080, format=NV12, framerate=29/1' ! nv3dsink
1640x1232
$ gst-launch-1.0 nvarguscamerasrc ! 'video/x-raw(memory:NVMM), width=1640, height=1232, format=NV12, framerate=29/1' ! nv3dsink
1280x720
$ gst-launch-1.0 nvarguscamerasrc ! 'video/x-raw(memory:NVMM), width=1280, height=720, format=NV12, framerate=59/1' ! nv3dsink
For R 36.4.3
$ gst-launch-1.0 nvarguscamerasrc ! 'video/x-raw(memory:NVMM),format=NV12' ! nv3dsink sync=0
Example: 3280x2464
$ gst-launch-1.0 nvarguscamerasrc ! 'video/x-raw(memory:NVMM),width=3280, height=2464, format=NV12, framerate=21/1' ! nv3dsink sync=0
Capture Image (for JP6 : No nv3dsink gstreamer element, fixed by installing package nvidia-l4t-gstreamer)
$ nvargus_nvraw --c 0 --mode 0 --file /home/ubuntu/sample.jpg --format "yuv, jpg"
Power Mode
Supported-modes-and-power-efficiency
Flash Mac
Copy and extract I225_Flash_Tool.zip in the device.
ubuntu@localhost:~$ unzip I225_Flash_Tool.zip
Chanage the tool execution permission.
<pre>ubuntu@localhost:~$ sudo chmod a+x ./EepromAccessTool
Check All Intel-226 Module in PCI bus, The BDF(bus number/device number/function number) value will be first column.
ubuntu@localhost:~$ lspci
0004:00:00.0 PCI bridge: NVIDIA Corporation Device 229c (rev a1)
0004:01:00.0 PCI bridge: ASMedia Technology Inc. Device 2806 (rev 01)
0004:02:00.0 PCI bridge: ASMedia Technology Inc. Device 2806 (rev 01)
0004:02:06.0 PCI bridge: ASMedia Technology Inc. Device 2806 (rev 01)
0004:02:0e.0 PCI bridge: ASMedia Technology Inc. Device 2806 (rev 01)
0004:04:00.0 Ethernet controller: Intel Corporation Device 15f2 (rev 03)
0004:05:00.0 Ethernet controller: Intel Corporation Device 15f2 (rev 03)
Check NIC value with EepromAccessTool tool.
ubuntu@localhost:~$ ./EepromAccessTool
Intel(R) EEPROM Access Tool NVM/OTP Programming Example Tool   Version 0.8.0
Provided under the terms of a CNDA.  Do Not Distribute.
Copyright(C) 2017-2020 by Intel(R) Corporation
NIC     BUS     DEV     FUN     Silicon Memory Type Present
===     ===     ===     ===     =====   ======================
Check Command open to write error
 1      4        0       0      I225         FLASH
Check Command open to write error
 2      5        0       0      I225         FLASH
Flash Mac Address To get -nic value and BDF value please using above method.
ex : 0004:05:00.0 = domain 4 bus 5 device 0 function 0
BUS 5 > NIC = 2
$ sudo -s
# setpci -s 0004:04:00.0 COMMAND=0007
# ./EepromAccessTool -nic=1 -f=FXVL_15F2_LM_2MB_ARK_1.82_D.bin -mac=D4E5F6123456
The other Intel-I226
#setpci -s 0004:05:00.0 COMMAND=0007
#./EepromAccessTool -nic=2 -f=FXVL_15F2_LM_2MB_ARK_1.82_D.bin -mac=D4E5F6123457
Please do cold reboot after flash mac address.
How to check whether the flash proccess is success or not
lspci command - If it is 0x125f value, it failed.- ifconfig -a - Check the nerwork interface is available. ex: eth0, eth1 and so on.
Boot On Off
The boot count message will be printed before log-in.
![]()
Reset the boot count please remove bootCount.tt.
$ rm bootCount.tt
THERMAL / EMI Burning
Install prerequisite packages
$ sudo apt install --yes nvidia-jetpack
pva engine
/opt/nvidia/vpi2/samples/05-benchmark/vpi_sample_05_benchmark
GPU
matrixMul (Depreciated)
/usr/local/cuda-11.4/samples/0_Simple/matrixMul/
More power consumption version (nVidia suggestion + <a href=":File%3AAir030-half-matrixMulCUBLAS.patch">0001-half-matrixMulCUBLAS.patch</a>)
matrixMulCUBLAS
/usr/local/cuda-11.4/samples/0_Simple/matrixMulCUBLAS/
emc engine
sudo apt install mbw
cpu
sudo apt install stress
dla0 dla1 engine
/usr/src/tensorrt/bin/trtexec
nvenc engine - USB camera
$ gst-launch-1.0 v4l2src device=/dev/video0 ! 'video/x-raw,width=1280,height=720' ! nvvidconv ! 'video/x-raw(memory:NVMM)' ! nvvidconv ! 'video/x-raw(memory:NVMM)' ! nvv4l2h264enc ! fakesink
nvdec engine - play 4K H264 video
gst-launch-1.0 filesrc location=/usr/local/bin/4k264.mp4 ! qtdemux ! queue ! h264parse ! nvv4l2decoder ! 'video/x-raw(memory:NVMM), format=(string)NV12' ! queue ! fakesink
ape engine
aplay -D hw:1,0 /usr/local/bin/1kHz.wav
Module
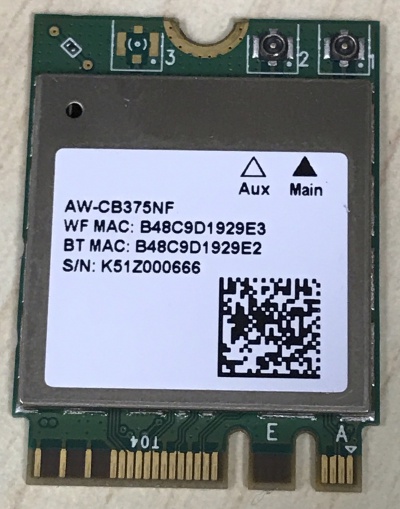
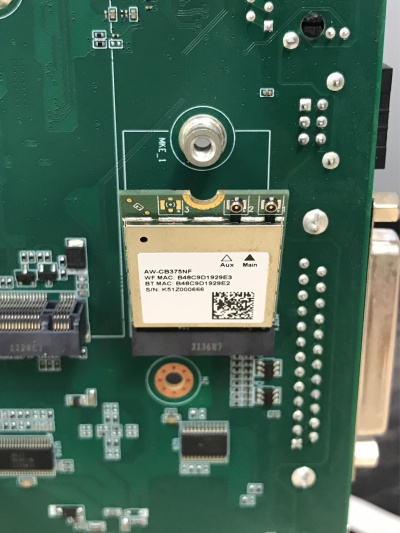
AW-CB375NF(EWM-W159M201E)
Adjust dip switch
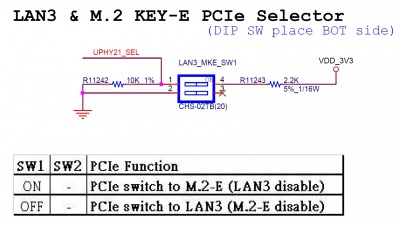
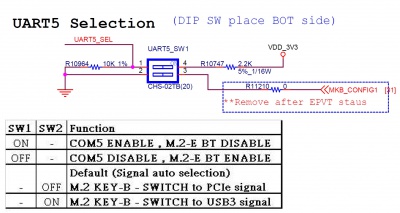
- LAN3_MKE_SW1 - SW1 : ON
- UART5_SW1 - SW1 : OFF
Wi-Fi
Start interface
$ sudo ifconfig wlan0 up
$ Scan AP
$ sudo iw dev wlan0 scan ap-force
Bluetooth
$ bluetoothctl
[bluetooth]# agent on
[bluetooth]# scan on
AW-CB511NF
Adjust dip switch
- LAN3_MKE_SW1 - SW1 : ON
- UART5_SW2 - SW1 : OFF
Wi-Fi
Start interface
$ sudo ifconfig wlan0 up
$ Scan AP
$ sudo iw dev wlan0 scan ap-force
Bluetooth
$ sudo -s
# hciattach /dev/ttyTHS1 bcm43xx 3000000 flow -t 20
# bluetoothctl
[bluetooth]# agent on
[bluetooth]# scan on
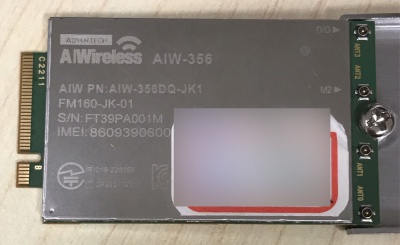
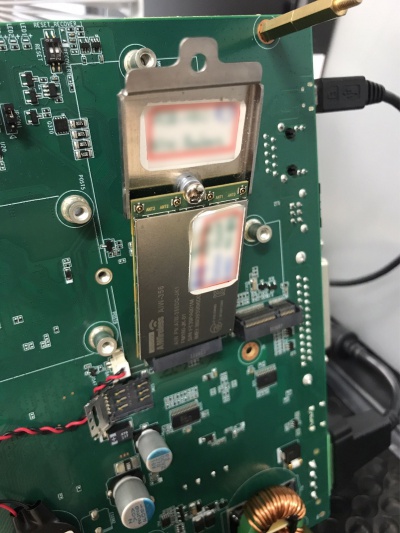
AIW-35x
Check the module is available.
ubuntu@localhost:~$ lsusb
Bus 002 Device 002: ID 05e3:0625 Genesys Logic, Inc. USB3.2 Hub
Bus 002 Device 001: ID 1d6b:0003 Linux Foundation 3.0 root hub
Bus 001 Device 006: ID 2cb7:0104
buntu@localhost:~$ ifconfig usb0
        usb0: flags=4227<UP,BROADCAST,NOARP,MULTICAST> mtu 1500
        ether 00:33:34:37:35:33  txqueuelen 1000  (Ethernet)
        RX packets 0  bytes 0 (0.0 B)
        RX errors 0  dropped 0  overruns 0  frame 0
        TX packets 0  bytes 0 (0.0 B)
        TX errors 0  dropped 0 overruns 0  carrier 0  collisions 0
ubuntu@localhost:~$ sudo dmesg | grep usb0
[ 14.115707] GobiNet 1-3.4:1.4 usb0: register 'GobiNet' at usb-3610000.xhci-3.4, GobiNet Ethernet Device, d2:77:82:0c:af:59
Switch mode:
$ sudo minicom -D /dev/ttyUSBx
ATcommand : at+gtusbmode=32
30 : mbim
32 : rmnet(gobinet)
EWM-W179M201E
First need to install WIFI module
$ cd /usr/local/bin/EWM-W179
$ sudo su
# insmod rtk_btusb.ko
# insmod 8852be.ko
AIW-356
First need to soft link source for build driver
$ cd /lib/modules/<kernel version>/build/arch/
$ sudo ln -s arm64 aarch64
Tar file
$ cd /usr/local/bin/AIW-356
$ sudo tar -xvf AIWS00LTX0317.tar.bz2
Build driver
Please reference AIW Document
NVME
PCIE-1672
Image
The test image is available HERE.
The 1st and 2nd image is only available for AGX-ORIN devkit.
| <tbody> | ||
| Image | Release Note | |
|---|---|---|
| 1 | air030_image_20221006.tar.gz | The first boot up image verified on AGX-ORIN Devkit. |
| 2 | air030_image_20221006_bootonoff.tar.gz | Based on air030_image_20221006.tar.gz added boot on off feature (The system will power off after 40 seconnds) |
| 3 | air030_image_20221020_burning_test.tar.gz | For power/thermal/SI power sequence used <a href=":File%3AAIR-030%20Burning%20Test.pdf">Burning Testing SOP</a> |
| 4 | air030_image_20221110.tar.gz | |
| 5 | air030_image_20221110_burning.tar.gz | For Power/Thermal/EMI test using. |
| 6 | air030_image_20221123.tar.gz | fix HDMI hotplug in HD (4K:TBD) |
| 7 | air030_image_20221128_dqatest.tar | For DQA & QA using <a href=":File%3AAIR-030%20QA%20Test.pdf">QA Testing SOP</a> |
| 8 | air030_image_20221201_poweronoff_at_mode.tar.gz | Power On OFF test with AT mode + BOOT count |
| 9 | air030_image_20221201_poweronoff_atx_mode.tar.gz | Power On OFF test with ATX mode + BOOT count |
| 10 | air030_image_20221216.tar.gz | fix:
1).Date and Time 的時間只要reboot 後就會又回到 April 21. |
| 11 | air030_image_20221226.tar.gz | Added HDMI hotplug patch. Added EWM-W159 outbox driver. |
| 12 | air030_image_20221229.tar.gz | Modify dp_aux pinmux for HDMI. |
| 13 | |
For factory test used. <a href=":File%3AAir030%20factory%20test.pdf">Air030_factory_test.pdf</a> |
| 14 | air030_image_20230220_factory_test.tar | For factory test used.
Add flash/read mac address, rtc time, watchdog <a href=":File%3AAir030%20factory%20test%2020230217.pdf">Air030_factory_test_20230217.pdf</a> |
| 15 | air030_image_20230303_dqatest.tar.gz | |
| 16 | air030_image_20230307_burning.tar.gz | For SE / PV using. |
| 17 | air030_image_20220324_dqatest.tar.gz | For DQA using (Jetpack 5.1/L4T 35.2.1)
Its only provided camera feature. The test commnand please check the camera section. |
| 18 | air030_image_20230410_thermal.tar.gz | (Jetpack 5.1.1/L4T 35.3.1) |
| 19 | air030_image_20230411_dqatest.tar.gz | (Jetpack 5.1.1/L4T 35.3.1) |
| 20 | air030_image_20230412_factory_test.tar.gz | (Jetpack 5.1.1/L4T 35.3.1) |
| 21 | air030_image_20230428_poweronoff_atx_mode.tar.gz | (Jetpack 5.1.1/L4T 35.3.1) Patched the mb1_35.3.1_overlay.tbz2 for the issue "Can't Boot in Cold Start Test". |
| 22 | air030_image_20230503_poweronoff_atx_mode.tar.gz | (Jetpack 5.1.1/L4T 35.3.1) Patched the mb1_35.3.1_overlay.tbz2 for the issue "Can't Boot in Cold Start Test". |
| 23 | air030_image_20230508_dqatest.tar.gz | (Jetpack 5.1.1/L4T 35.3.1) fix COM2 function.". |
| 24 | air030_image_20230509_factory_test.tar.gz | (Jetpack 5.1.1/L4T 35.3.1)
Note: |
| 25 | air030_image_20230510_poweronoff_at_mode.tar.gz | (Jetpack 5.1.1/L4T 35.3.1) |
| 26 | air030_image_20230516_dqatest.tar.gz | (Jetpack 5.1.1/L4T 35.3.1)
Note: [UI]Fix "System hang by adjusting date time widget". |
| 27 | air030_image_20230518_poweronoff_atx_mode.tar.gz | (Jetpack 5.1.1/L4T 35.3.1) Note: Patch optee. |
| 28 | air030_image_20230703_dqatest.tar.gz | (Jetpack 5.1.1/L4T 35.3.1) Note: Fix com2 function error for 64GB. |
| </tbody> |
