Difference between revisions of "NXP eIQ"
Darren.huang (talk | contribs) |
Darren.huang (talk | contribs) (→eIQ - A Python Framework for eIQ on i.MX Processors (Yocto 3.0)) |
||
| (41 intermediate revisions by the same user not shown) | |||
| Line 1: | Line 1: | ||
| − | |||
=== <span style="color:#0070c0">NXP i.MX series</span> === | === <span style="color:#0070c0">NXP i.MX series</span> === | ||
| Line 5: | Line 4: | ||
The i.MX 8M Plus family focuses on neural processing unit (NPU) and vision system, advance multimedia, andindustrial automation with high reliability. | The i.MX 8M Plus family focuses on neural processing unit (NPU) and vision system, advance multimedia, andindustrial automation with high reliability. | ||
| − | * | + | *The Neural Processing Unit (NPU) of i.MX 8M Plus operating at up to 2.3 TOPS''' |
| − | ==== <span style="color:#0070c0">NXP Demo Experience | + | ==== <span style="color:#0070c0">NXP Demo Experience (Yocto 3.3 ~ latest)</span> ==== |
*Preinstalled on NXP-provided demo Linux images | *Preinstalled on NXP-provided demo Linux images | ||
| Line 20: | Line 19: | ||
[[File:2023-09-27 155552.png|400px|2023-09-27 155552.png]] | [[File:2023-09-27 155552.png|400px|2023-09-27 155552.png]] | ||
| − | Machine Learning Demos | + | ===== <span style="color:#0070c0">Machine Learning Demos</span> ===== |
*NNStreamer demos | *NNStreamer demos | ||
| Line 29: | Line 28: | ||
**ML gateway | **ML gateway | ||
| − | + | [[File:2023-09-27 155836.png|400px|2023-09-27 155836.png]] | |
*OpenCV demos | *OpenCV demos | ||
| Line 35: | Line 34: | ||
**Selfie segmentation | **Selfie segmentation | ||
| − | [[File:2023-09-27 | + | [[File:2023-09-27 162615.png|400px|2023-09-27 162615.png]] |
| + | |||
| + | ===== <span style="color:#0070c0">NNStreamer Demo: Object Detection</span> ===== | ||
| + | |||
| + | Click the "Object Detection " and Launch Demo | ||
| + | |||
| + | [[File:111111111333.png|400px|111111111333.png]] | ||
| + | |||
| + | Set some parameters: | ||
| + | |||
| + | [[File:22222222222.png|400px|22222222222.png]] | ||
| + | |||
| + | *Source: Select the camera to use or to use the example video | ||
| + | *Backend: Select whether to use the NPU (if available) or CPU for inferences. | ||
| + | *Height: Select the input height of the video if using a camera. | ||
| + | *Width: Select the input width of the video if using a camera. | ||
| + | *Label Color: Select the color of the overlay labels. | ||
| + | |||
| + | The result of NPU object detection: | ||
| + | |||
| + | [[File:3333333333.png|400px|3333333333.png]] | ||
| + | |||
| + | ===== <span style="color:#0070c0">NXP Demo Experience - Text User Interface(TUI)</span> ===== | ||
| + | |||
| + | Demos can also be launched from the command line through log-in into the board remotely or using the onboard serial debug console. Keep in mind that most demos still require a display to run successfully. | ||
| + | |||
| + | To start the text user interface, type the following command into the command line. | ||
| + | |||
| + | $ demoexperience tui | ||
| + | |||
| + | [[File:2023-09-27 170604.png|400px|2023-09-27 170604.png]] | ||
| + | |||
| + | The interface can be navigated using the following keyboard inputs: | ||
| + | |||
| + | *'''Up and down arrow keys:''' Select a demo from the list on the left | ||
| + | *'''Enter key:''' Runs the selected demo | ||
| + | *'''Q key or Ctrl+C keys:''' Quit the interface | ||
| + | *'''H key: '''Opens the help menu | ||
| + | |||
| + | Demos can be closed by closing the demo onscreen or pressing the "Ctrl" and "C" keys at the same time. | ||
| | ||
| − | ==== <span style="color:#0070c0"> | + | ==== <span style="color:#0070c0">PyeIQ - A Python Framework for eIQ on i.MX Processors (Yocto 3.0)</span> ==== |
[https://source.codeaurora.org/external/imxsupport/pyeiq/ PyeIQ] is written on top of [https://www.nxp.com/design/software/development-software/eiq-ml-development-environment:EIQ eIQ™ ML Software Development Environment] and provides a set of Python classes | [https://source.codeaurora.org/external/imxsupport/pyeiq/ PyeIQ] is written on top of [https://www.nxp.com/design/software/development-software/eiq-ml-development-environment:EIQ eIQ™ ML Software Development Environment] and provides a set of Python classes | ||
| Line 49: | Line 87: | ||
===== <span style="color:#0070c0">Installation</span> ===== | ===== <span style="color:#0070c0">Installation</span> ===== | ||
| − | *Method 1: Use pip3 tool to install the package located at [https://pypi.org/project/ | + | *Method 1: Use pip3 tool to install the package located at [https://pypi.org/project/pyeiq/#description PyPI] repository: |
| − | $ pip3 install | + | $ pip3 install pyeiq |
| − | |||
| − | |||
| − | |||
| − | |||
| − | |||
| − | |||
*Method 2: Get the latest tarball [https://pypi.org/project/eiq/#files Download files] and copy it to the board: | *Method 2: Get the latest tarball [https://pypi.org/project/eiq/#files Download files] and copy it to the board: | ||
| Line 63: | Line 95: | ||
$ pip3 install <tarball> | $ pip3 install <tarball> | ||
| − | + | pyeiq tarball: | |
| + | |||
| + | *[[:File:pyeiq-3.0.0.tar.gz]] | ||
| + | *[[:File:pyeiq-3.1.0.tar.gz]] | ||
| + | |||
| + | For the 5.4.70_2.3.0 BSP: | ||
| + | |||
| + | *Install the v3.0.0 version and it run on NPU | ||
| + | |||
| + | For the 5.10.72_2.2.0 ~ 6.1.22_2.0.0 BSP (Suggest to use the demo experience) | ||
| − | + | *Install the v3.1.0 version, but it run on CPU | |
| − | + | Download PyeIQ Cache Data | |
| − | [ | + | *Download link: [https://github.com/ADVANTECH-Corp/pyeiq-data https://github.com/ADVANTECH-Corp/pyeiq-data] |
| + | *Decompress the files to /home/root/.cache/ | ||
| − | + | $ tar -zxvf eiq-cache-data_3.0.0.tar.gz | |
| + | |||
| + | [[File:2023-09-28 092741.png|400px|2023-09-28 092741.png]] | ||
===== <span style="color:#0070c0">How to Run Samples</span> ===== | ===== <span style="color:#0070c0">How to Run Samples</span> ===== | ||
* Start the manager tool: | * Start the manager tool: | ||
| − | + | <pre>$ pyeiq</pre> | |
| − | |||
*The above command returns the PyeIQ manager tool options: | *The above command returns the PyeIQ manager tool options: | ||
| Line 105: | Line 148: | ||
| pyeiq --clear-cache | | pyeiq --clear-cache | ||
| Clear cached media generated by demos. | | Clear cached media generated by demos. | ||
| − | | # pyeiq --info | + | | # pyeiq --info object_detection_tflite |
|} | |} | ||
| − | + | ===== <span style="color:#0070c0">PyeIQ Demos</span> ===== | |
| − | + | *covid19_detection | |
| − | + | *object_classification_tflite | |
| − | + | *object_detection_tflite | |
| − | |||
| − | |||
| − | |||
| − | |||
| − | |||
| − | |||
| − | |||
| − | + | <span style="color:#0070c0">Demos Example - Running Object Detection</span> | |
| − | + | Object detection is a computer technology related to computer vision and image processing that deals with detecting instances of semantic objects of a certain class (such as humans, buildings, or cars) in digital images and videos. Well-researched domains of object detection include face detection and pedestrian detection. Object detection has applications in many areas of computer vision, including image retrieval and video surveillance. | |
| − | |||
| − | |||
| − | |||
| − | |||
| − | / | + | *Run the ''Object Detection'' '''Default Image '''demo using the following line: |
| + | <pre>$ pyeiq --run object_detection_tflite</pre> | ||
| − | + | * This runs inference on a default image: | |
| − | |||
| − | |||
| − | |||
| − | |||
| − | + | [[File:2023-09-27 172321.png|400px|2023-09-27 172321.png]] | |
| − | + | *Run the ''Object Detection'' '''Custom Image '''demo using the following line: | |
| − | + | <pre>$ pyeiq --run object_detection_tflite --image=/path_to_the_image</pre> | |
| − | |||
| − | |||
| − | |||
| − | + | *Run the ''Object Detection '''''Video File''' using the following line: | |
| + | <pre>$ pyeiq --run object_detection_tflite --video_src=/path_to_the_video</pre> | ||
| − | + | *Run the ''Object Detection '''''Video Camera or Webcam''' using the following line: | |
| − | + | <pre>$ pyeiq --run object_detection_tflite --video_src=/dev/video<index></pre> | |
| − | |||
| − | |||
| − | |||
| − | + | | |
| − | + | ==== <font color="#0070c0">eIQ Toolkit</font> ==== | |
| − | |||
| − | |||
| − | |||
| − | / | ||
| − | / | + | The eIQ Toolkit is a machine-learning software development environment that enables the use of ML algorithms on<br/> NXP microcontrollers, microprocessors, and SoCs.<br/> The eIQ Toolkit is for those interested in building machine learning solutions on embedded devices. A background in<br/> machine learning, especially in supervised classification, is helpful to understand the entire pipeline. However, if the<br/> user does not have any background in the areas mentioned above, the eIQ Toolkit is designed to assist the user.<br/> The eIQ Toolkit consists of the following three key components: |
| − | + | *eIQ Portal | |
| − | + | *eIQ Model Tool | |
| − | + | *eIQ Command-line Tools | |
| − | |||
| − | |||
| − | + | [[File:2023-09-27 174948.png|400px|2023-09-27 174948.png]] | |
| − | + | Download link: [https://www.nxp.com/design/software/eiq-ml-development-environment/eiq-toolkit-for-end-to-end-model-development-and-deployment:EIQ-TOOLKIT/ https://www.nxp.com/design/software/eiq-ml-development-environment/eiq-toolkit-for-end-to-end-model-development-and-deployment:EIQ-TOOLKIT\] | |
| − | |||
| − | |||
| − | |||
| − | / | ||
| − | |||
| − | / | ||
| − | |||
| − | |||
| − | |||
| − | |||
| − | |||
| − | |||
| − | + | There are two approaches available with the eIQ Toolkit, based on what the user provides and what the expectations are. | |
| − | + | *'''Bring Your Own Data (BYOD) '''– the users bring image data, use the eIQ Toolkit to develop their own model, and deploy it on the target. | |
| − | + | *'''Bring Your Own Model (BYOM) '''– the users bring a pretrained model and use the eIQ Toolkit for optimization, deployment, or profiling. | |
| − | |||
| − | |||
| − | |||
| − | |||
| − | |||
| − | |||
| − | |||
| − | |||
| − | |||
| − | |||
| − | |||
| − | |||
| − | |||
| − | |||
| − | |||
| − | |||
| − | |||
| − | |||
| − | |||
| − | |||
| − | |||
| − | |||
| − | * | ||
| − | |||
| − | |||
| − | |||
| − | |||
| − | |||
| − | |||
| − | |||
| − | |||
| − | |||
| − | |||
| − | |||
| − | |||
| − | |||
| − | |||
| − | |||
| − | |||
| − | |||
| − | |||
| − | |||
| − | |||
| − | |||
| − | |||
| − | |||
| − | |||
| − | |||
| − | |||
| − | |||
| − | |||
| − | |||
| − | |||
| − | |||
| − | |||
| − | |||
| − | |||
| − | |||
| − | |||
| − | |||
| − | |||
| − | |||
| − | |||
| − | |||
| − | |||
| − | |||
| − | |||
| − | |||
| − | |||
| − | |||
| − | |||
| − | |||
| − | |||
| − | |||
| − | |||
| − | |||
| − | |||
| − | |||
| − | |||
| − | |||
| − | |||
| − | |||
| − | |||
| − | |||
| − | |||
| − | |||
| − | |||
| − | |||
| − | |||
| − | |||
| − | |||
| − | |||
| − | |||
| − | |||
| − | |||
| − | |||
| − | |||
| − | |||
| − | |||
| − | |||
| − | |||
| − | |||
| + | [[File:2023-09-27 175257.png|400px|2023-09-27 175257.png]] | ||
| | ||
| − | + | === <span style="color:#0070c0">References</span> === | |
| − | |||
| − | [ | + | '''i.MX Machine Learning User's Guide:''' [https://www.nxp.com/docs/en/user-guide/IMX-MACHINE-LEARNING-UG.pdf https://www.nxp.com/docs/en/user-guide/IMX-MACHINE-LEARNING-UG.pdf] |
| − | + | '''NXP Demo Experience User's Guide: ''' [https://www.nxp.com/docs/en/user-guide/DEXPUG.pdf https://www.nxp.com/docs/en/user-guide/DEXPUG.pdf] | |
| − | + | '''pyeiq: '''[https://community.nxp.com/t5/Blogs/PyeIQ-3-x-Release-User-Guide/ba-p/1305998 https://community.nxp.com/t5/Blogs/PyeIQ-3-x-Release-User-Guide/ba-p/1305998] | |
| − | + | '''eIQ Toolkit User Guide:''' [https://www.nxp.com/docs/en/user-guide/EIQTKUG-1.8.0.pdf https://www.nxp.com/docs/en/user-guide/EIQTKUG-1.8.0.pdf] | |
| − | + | '''TP-EVB_eIQ_presentation.pdf:''' [https://www.nxp.com/docs/en/training-reference-material/TP-EVB_eIQ_presentation.pdf https://www.nxp.com/docs/en/training-reference-material/TP-EVB_eIQ_presentation.pdf] | |
| − | |||
| − | |||
| − | |||
| − | |||
| − | |||
| − | |||
| − | |||
| − | |||
| − | |||
| − | |||
| − | |||
| − | |||
Latest revision as of 02:51, 28 September 2023
Contents
NXP i.MX series
The i.MX 8M Plus family focuses on neural processing unit (NPU) and vision system, advance multimedia, andindustrial automation with high reliability.
- The Neural Processing Unit (NPU) of i.MX 8M Plus operating at up to 2.3 TOPS
NXP Demo Experience (Yocto 3.3 ~ latest)
- Preinstalled on NXP-provided demo Linux images
- imx-image-full image must be used
- Yocto 3.3 (5.10.52_2.1.0 ) ~ Yocto 4.2 (6.1.1_1.0.0)
- Need to connect the internet
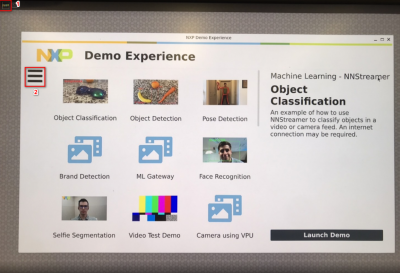
Start the demo launcher by clicking NXP Logo is displayed on the top left-hand corner of the screen
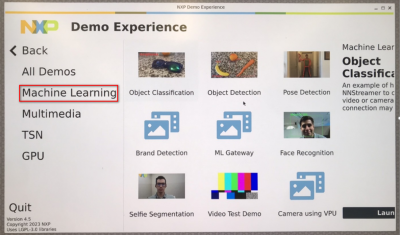
Machine Learning Demos
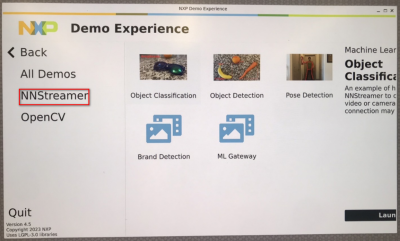
- NNStreamer demos
- Object classification
- Object detection
- Pose detection
- Brand detection
- ML gateway
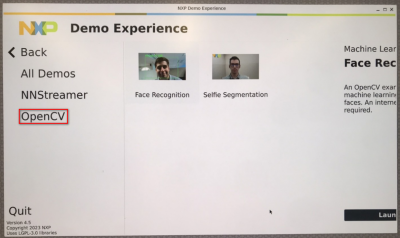
- OpenCV demos
- Face recognition
- Selfie segmentation
NNStreamer Demo: Object Detection
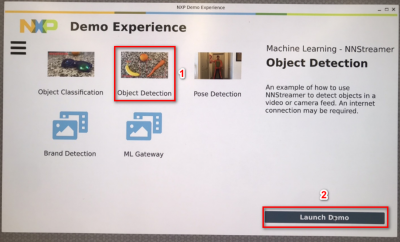
Click the "Object Detection " and Launch Demo
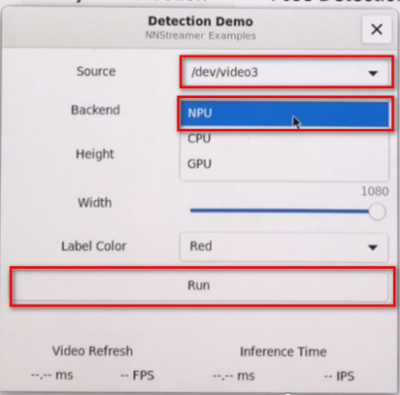
Set some parameters:
- Source: Select the camera to use or to use the example video
- Backend: Select whether to use the NPU (if available) or CPU for inferences.
- Height: Select the input height of the video if using a camera.
- Width: Select the input width of the video if using a camera.
- Label Color: Select the color of the overlay labels.
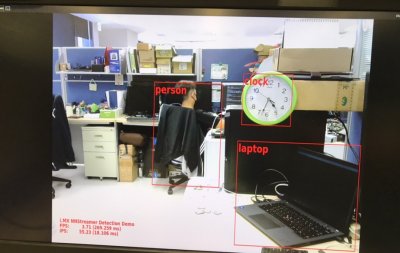
The result of NPU object detection:
NXP Demo Experience - Text User Interface(TUI)
Demos can also be launched from the command line through log-in into the board remotely or using the onboard serial debug console. Keep in mind that most demos still require a display to run successfully.
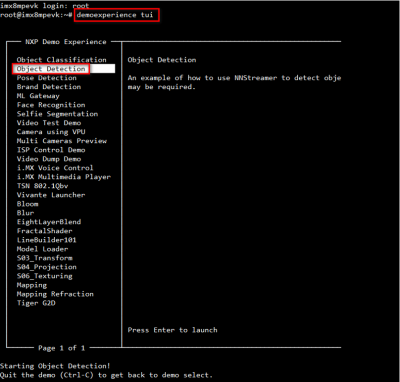
To start the text user interface, type the following command into the command line.
$ demoexperience tui
The interface can be navigated using the following keyboard inputs:
- Up and down arrow keys: Select a demo from the list on the left
- Enter key: Runs the selected demo
- Q key or Ctrl+C keys: Quit the interface
- H key: Opens the help menu
Demos can be closed by closing the demo onscreen or pressing the "Ctrl" and "C" keys at the same time.
PyeIQ - A Python Framework for eIQ on i.MX Processors (Yocto 3.0)
PyeIQ is written on top of eIQ™ ML Software Development Environment and provides a set of Python classes
allowing the user to run Machine Learning applications in a simplified and efficiently way without spending time on
cross-compilations, deployments or reading extensive guides.
Installation
- Method 1: Use pip3 tool to install the package located at PyPI repository:
$ pip3 install pyeiq
- Method 2: Get the latest tarball Download files and copy it to the board:
$ pip3 install <tarball>
pyeiq tarball:
For the 5.4.70_2.3.0 BSP:
- Install the v3.0.0 version and it run on NPU
For the 5.10.72_2.2.0 ~ 6.1.22_2.0.0 BSP (Suggest to use the demo experience)
- Install the v3.1.0 version, but it run on CPU
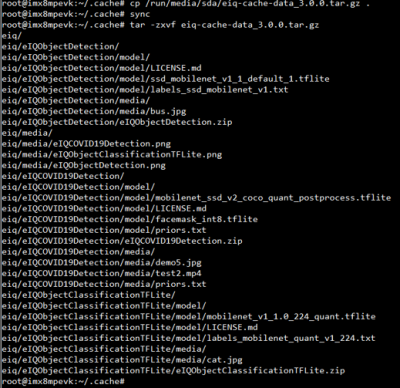
Download PyeIQ Cache Data
- Download link: https://github.com/ADVANTECH-Corp/pyeiq-data
- Decompress the files to /home/root/.cache/
$ tar -zxvf eiq-cache-data_3.0.0.tar.gz
How to Run Samples
- Start the manager tool:
$ pyeiq
- The above command returns the PyeIQ manager tool options:
| Manager Tool Command | Description | Example |
| pyeiq --list-apps | List the available applications. | |
| pyeiq --list-demos | List the available demos. | |
| pyeiq --run <app_name/demo_name> | Run the application or demo. | # pyeiq --run object_detection_tflite |
| pyeiq --info <app_name/demo_name> | Application or demo short description and usage. | |
| pyeiq --clear-cache | Clear cached media generated by demos. | # pyeiq --info object_detection_tflite |
PyeIQ Demos
- covid19_detection
- object_classification_tflite
- object_detection_tflite
Demos Example - Running Object Detection
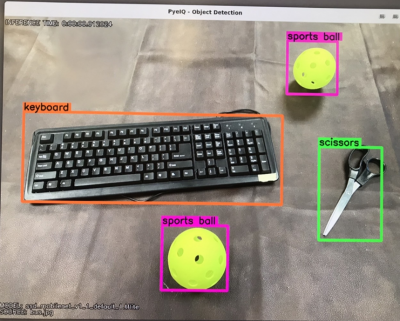
Object detection is a computer technology related to computer vision and image processing that deals with detecting instances of semantic objects of a certain class (such as humans, buildings, or cars) in digital images and videos. Well-researched domains of object detection include face detection and pedestrian detection. Object detection has applications in many areas of computer vision, including image retrieval and video surveillance.
- Run the Object Detection Default Image demo using the following line:
$ pyeiq --run object_detection_tflite
* This runs inference on a default image:
- Run the Object Detection Custom Image demo using the following line:
$ pyeiq --run object_detection_tflite --image=/path_to_the_image
- Run the Object Detection Video File using the following line:
$ pyeiq --run object_detection_tflite --video_src=/path_to_the_video
- Run the Object Detection Video Camera or Webcam using the following line:
$ pyeiq --run object_detection_tflite --video_src=/dev/video<index>
eIQ Toolkit
The eIQ Toolkit is a machine-learning software development environment that enables the use of ML algorithms on
NXP microcontrollers, microprocessors, and SoCs.
The eIQ Toolkit is for those interested in building machine learning solutions on embedded devices. A background in
machine learning, especially in supervised classification, is helpful to understand the entire pipeline. However, if the
user does not have any background in the areas mentioned above, the eIQ Toolkit is designed to assist the user.
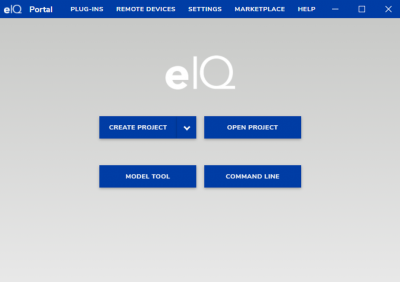
The eIQ Toolkit consists of the following three key components:
- eIQ Portal
- eIQ Model Tool
- eIQ Command-line Tools
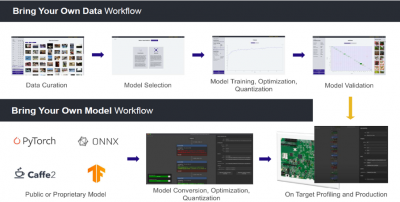
There are two approaches available with the eIQ Toolkit, based on what the user provides and what the expectations are.
- Bring Your Own Data (BYOD) – the users bring image data, use the eIQ Toolkit to develop their own model, and deploy it on the target.
- Bring Your Own Model (BYOM) – the users bring a pretrained model and use the eIQ Toolkit for optimization, deployment, or profiling.
References
i.MX Machine Learning User's Guide: https://www.nxp.com/docs/en/user-guide/IMX-MACHINE-LEARNING-UG.pdf
NXP Demo Experience User's Guide: https://www.nxp.com/docs/en/user-guide/DEXPUG.pdf
pyeiq: https://community.nxp.com/t5/Blogs/PyeIQ-3-x-Release-User-Guide/ba-p/1305998
eIQ Toolkit User Guide: https://www.nxp.com/docs/en/user-guide/EIQTKUG-1.8.0.pdf
TP-EVB_eIQ_presentation.pdf: https://www.nxp.com/docs/en/training-reference-material/TP-EVB_eIQ_presentation.pdf
