Difference between revisions of "WISE-PaaS/OTA Packager Tool"
Yinghui.yin (talk | contribs) |
|||
| (37 intermediate revisions by 2 users not shown) | |||
| Line 1: | Line 1: | ||
| + | [[File:Ota packager2.png|right|235x143px|Ota packager2.png]] | ||
| + | |||
= Introduction = | = Introduction = | ||
| Line 8: | Line 10: | ||
<ol style="list-style-type: lower-alpha;"> | <ol style="list-style-type: lower-alpha;"> | ||
<li>For the operating system, it is suggested to use Windows7, 8 and 10 (32bit) which has been tested.</li> | <li>For the operating system, it is suggested to use Windows7, 8 and 10 (32bit) which has been tested.</li> | ||
| − | <li>The [https://www.microsoft.com/zh-cn/download/details.aspx?id=30653 <u>Microsoft .NET Framework 4.5</u>] should be installed.</li> | + | <li>The [https://www.microsoft.com/zh-cn/download/details.aspx?id=30653 " <u>Microsoft .NET Framework 4.5</u>] should be installed.</li> |
</ol> | </ol> | ||
| − | = | + | = Quickly Start = |
| − | = | + | <span style="color: rgb(255, 0, 0);">''Note:''</span> |
| − | + | <span style="color: rgb(255, 0, 0);">''The following platform can be supported to generator the OTA package which only suitable for the specific paltform using this tool. When you selected the specific os and arch, the Preliminary platfrom detection'' ''will be excute when you deployed the update pacakges.''</span> | |
| − | + | <span style="color: rgb(255, 0, 0);">''Windows7/8/10''</span> | |
| − | + | <span style="color: rgb(255, 0, 0);">''Ubuntu-14.04 ''</span> | |
| − | = | + | <span style="color: rgb(255, 0, 0);">''CentOS-6.5''</span> |
| + | |||
| + | <span style="color: rgb(255, 0, 0);">''Yocto x86 (Poky-1.7.1)''</span> | ||
| + | |||
| + | <span style="color: rgb(255, 0, 0);">''Yocto Risc(Poky-1.5.3)''</span> | ||
| + | |||
| + | <span style="color: rgb(255, 0, 0);">''If you not selected the supported arch and os, then the system info will be ignored when deploy the update packages using the OTA Agent.''</span> | ||
For your convenience, some user cases are described in this document. | For your convenience, some user cases are described in this document. | ||
| − | <span style="font-size: medium;">'''''Case 1''''' | + | == Single File == |
| + | |||
| + | <span style="font-size: medium;">'''''Case 1''''''':'' '''''Only a single installation file included in the upgrade package'''</span> | ||
| + | |||
| + | ''Platform: Windows 7 32bit Resource Files: AcronisIntaller.exe. To generate a new OTA package, please perform the following steps.'' | ||
| − | + | ''1) Create a new folder and the folder name is not limited. Input all of the resource files which are used to upgrade into this folder as shown below.'' | |
| − | + | [[File:OTA Packager3.png|center|886x164px|OTA Packager3.png]] | |
| − | + | ''2) Find the OTAPackger.exe from the installer folder and start up.'' | |
| − | + | ''a) Please complete the required items according to the steps which are shown in the figure below on this page. '' | |
| − | + | [[File:OTA Packager4.png|center|654x663px|OTA Packager4.png]] | |
| + | |||
| − | + | ''Please note that:'' | |
| − | + | ''a) Output directory and input directory must be different.'' | |
| − | + | ''b) Output directory can not be the sub-folder of input directly.'' | |
| − | + | ''3) After confirming the above information, please click the “Generate” button to create a new OTA package. The progress is shown as follows: '' | |
| − | + | [[File:OTA Packager5.png|center|274x209px|OTA Packager5.png]] | |
The following picture will pop up when the package is generated completely. | The following picture will pop up when the package is generated completely. | ||
| − | 4) The target OTA package can be found in the output directory. | + | [[File:OTA Packager6.png|center|275x211px|OTA Packager6.png]] |
| + | |||
| + | ''4) The target OTA package can be found in the output directory. '' | ||
| + | |||
| + | [[File:OTA Packager7.png|center|1066x195px|OTA Packager7.png]] | ||
Note:Because the MD5 check-sum is added in the packaging process, two OTA packages will be generated with different name (only two different MD5) when you click the ”Generate” button repeatedly. In this sense, any OTA package is valid. | Note:Because the MD5 check-sum is added in the packaging process, two OTA packages will be generated with different name (only two different MD5) when you click the ”Generate” button repeatedly. In this sense, any OTA package is valid. | ||
| − | 5) A simple OTA package can be generated after you follow the above steps completely. | + | [[File:OTA Packager8.png|center|1072x200px|OTA Packager8.png]] |
| + | |||
| + | ''5) A simple OTA package can be generated after you follow the above steps completely.'' | ||
| + | |||
| + | == Multiple files == | ||
| + | |||
| + | ''<span style="font-size: medium;">'''Case 2'''</span>''<span style="font-size: medium;">:''''' Multiple files which included in the upgrade package, and provide the installation guide by script''''' </span>Platform: Windows7 32bit Resource Files: Deploy.bat, configure.ini, AdvFundation.dll, communication.xml, play.avi To generate a new OTA package, please perform the following steps. | ||
| + | |||
| + | 1) Create a new folder and the folder name is not limited. Input all of the resource files which are used to upgrade into this folder as shown below. | ||
| + | |||
| + | [[File:OTA Packager9.png|center|972x267px|OTA Packager9.png]] | ||
| + | |||
| + | or like this: | ||
| + | |||
| + | [[File:OTA Packager10.png|center|1066x200px|OTA Packager10.png]] | ||
| + | |||
| + | ''<span style="color: rgb(255, 0, 0);">Note: The locations of Deploy.bat file and other related files have a relation with the realization of Deploy scripts. Users should properly arrange the internal directory structure based on the scripting to make sure the scripts can be correctly executed. However, Deploy. bat file must be placed in the newly-created folder which is Package Source directory in the example.</span>'' | ||
| + | |||
| + | 2) Start up the OTAPackager. | ||
| + | |||
| + | 3) Please complete the required items according to the steps which are shown in the figure below on this page. | ||
| + | |||
| + | [[File:OTA Packager11.png|center|627x649px|OTA Packager11.png]] | ||
| + | |||
| + | 4) After confirming the above information, please click the “Generate” button to create a new OTA package. | ||
| + | |||
| + | = Download = | ||
| + | |||
| + | *[[Media:OTAPackager-20180428.zip|OTAPackager-20180428.zip]] | ||
| + | |||
| + | = FAQ = | ||
| + | |||
| + | ''Q1: Is it necessary to put all installer files into a new folder?'' | ||
| + | |||
| + | A: It is not necessary. Please ensure that all the installer files are placed in the same directory. And the deployment file must be located in the top-level directory. You must select this folder, when you enter the input path. All files and subfolders will be packaged to OTA package. | ||
| + | |||
| + | ''Q2: What is the package type?'' | ||
| + | |||
| + | A: The different type of software is identified by Package Type. Different version of the same software should have the same package type. | ||
| + | |||
| + | ''Q3: How to determine whether the input is legitimate?'' | ||
| + | |||
| + | A: The invalid input will be notified by appropriate message (shown below), and this tips will guide the user to complete the items correctly. | ||
| + | |||
| + | [[File:OTA Packager12.png|center|645x654px|OTA Packager12.png]] | ||
| + | |||
| + | ''Q4: Why do I receive the error tips of “No deploy file at this path” when choosing the source path?'' | ||
| − | + | A: Because the deploy file is not existed on this directory. We can only support the deployment file which stored in the source path directory. | |
| − | + | ''Q5: Can I pause the generation when the OTA package is creating?'' | |
| − | | + | A: Sorry. It doesn’t support right now. |
| + | [[Category:Pages with broken file links]] | ||
Latest revision as of 03:11, 16 October 2018
Contents
Introduction
Software Applications and Background.
Thank you for using OTAPackager. This software is a package tool for WISE-PaaS/OTA system. You can use this tool to generate an OTA package which can be identified by the WISE-PaaS/OTA system based on your original update resources.
Precautions
- For the operating system, it is suggested to use Windows7, 8 and 10 (32bit) which has been tested.
- The " Microsoft .NET Framework 4.5 should be installed.
Quickly Start
Note:
The following platform can be supported to generator the OTA package which only suitable for the specific paltform using this tool. When you selected the specific os and arch, the Preliminary platfrom detection will be excute when you deployed the update pacakges.
Windows7/8/10
Ubuntu-14.04
CentOS-6.5
Yocto x86 (Poky-1.7.1)
Yocto Risc(Poky-1.5.3)
If you not selected the supported arch and os, then the system info will be ignored when deploy the update packages using the OTA Agent.
For your convenience, some user cases are described in this document.
Single File
Case 1'': Only a single installation file included in the upgrade package
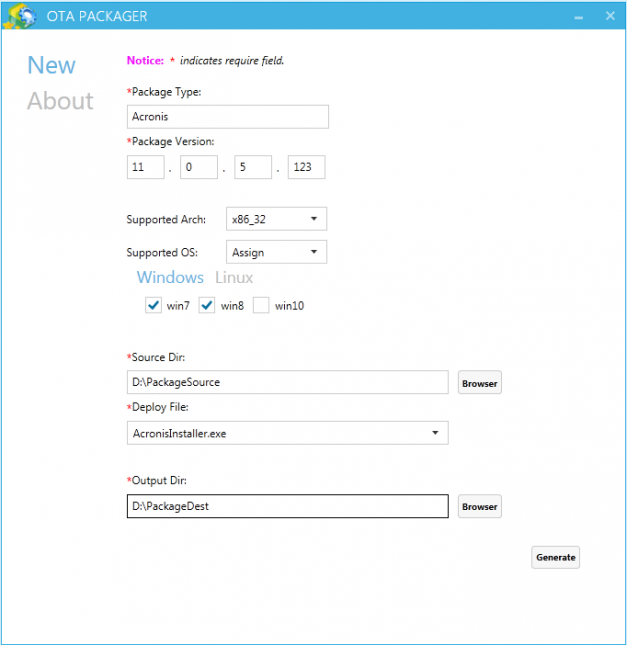
Platform: Windows 7 32bit Resource Files: AcronisIntaller.exe. To generate a new OTA package, please perform the following steps.
1) Create a new folder and the folder name is not limited. Input all of the resource files which are used to upgrade into this folder as shown below.
2) Find the OTAPackger.exe from the installer folder and start up.
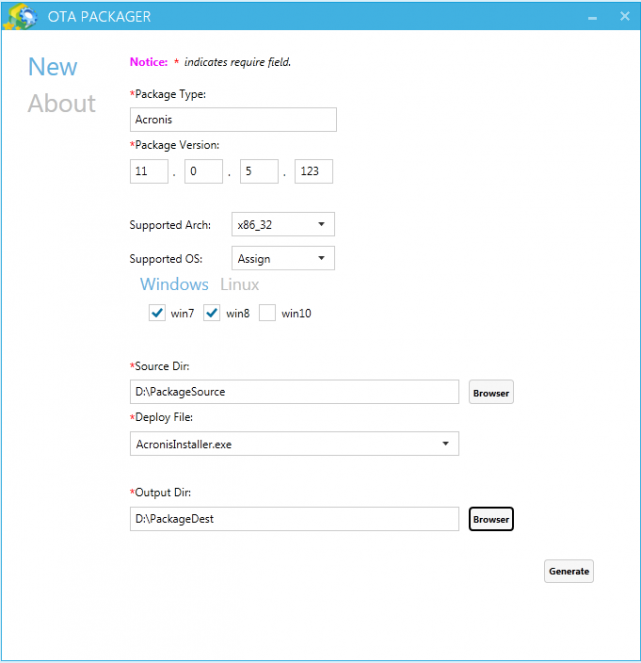
a) Please complete the required items according to the steps which are shown in the figure below on this page.
Please note that:
a) Output directory and input directory must be different.
b) Output directory can not be the sub-folder of input directly.
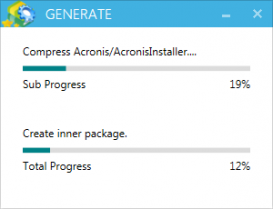
3) After confirming the above information, please click the “Generate” button to create a new OTA package. The progress is shown as follows:
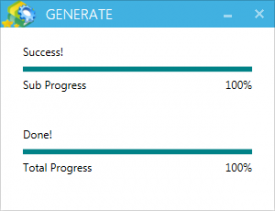
The following picture will pop up when the package is generated completely.
4) The target OTA package can be found in the output directory.
Note:Because the MD5 check-sum is added in the packaging process, two OTA packages will be generated with different name (only two different MD5) when you click the ”Generate” button repeatedly. In this sense, any OTA package is valid.
5) A simple OTA package can be generated after you follow the above steps completely.
Multiple files
Case 2: Multiple files which included in the upgrade package, and provide the installation guide by script Platform: Windows7 32bit Resource Files: Deploy.bat, configure.ini, AdvFundation.dll, communication.xml, play.avi To generate a new OTA package, please perform the following steps.
1) Create a new folder and the folder name is not limited. Input all of the resource files which are used to upgrade into this folder as shown below.
or like this:
Note: The locations of Deploy.bat file and other related files have a relation with the realization of Deploy scripts. Users should properly arrange the internal directory structure based on the scripting to make sure the scripts can be correctly executed. However, Deploy. bat file must be placed in the newly-created folder which is Package Source directory in the example.
2) Start up the OTAPackager.
3) Please complete the required items according to the steps which are shown in the figure below on this page.
4) After confirming the above information, please click the “Generate” button to create a new OTA package.
Download
FAQ
Q1: Is it necessary to put all installer files into a new folder?
A: It is not necessary. Please ensure that all the installer files are placed in the same directory. And the deployment file must be located in the top-level directory. You must select this folder, when you enter the input path. All files and subfolders will be packaged to OTA package.
Q2: What is the package type?
A: The different type of software is identified by Package Type. Different version of the same software should have the same package type.
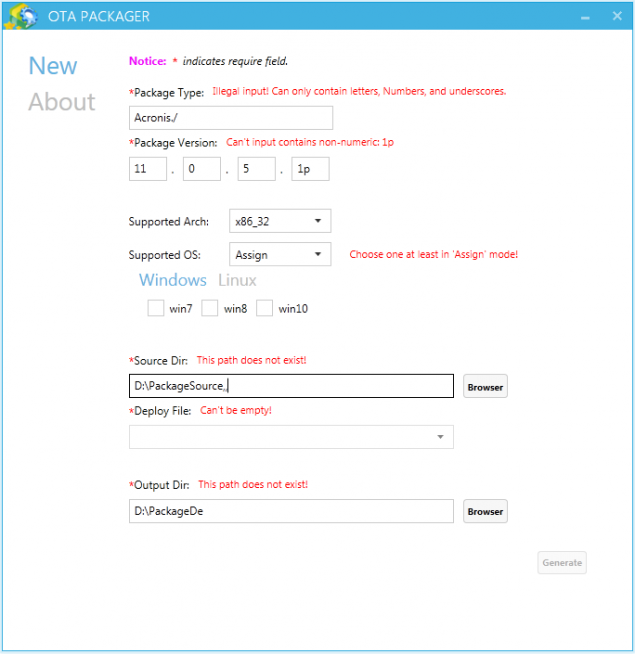
Q3: How to determine whether the input is legitimate?
A: The invalid input will be notified by appropriate message (shown below), and this tips will guide the user to complete the items correctly.
Q4: Why do I receive the error tips of “No deploy file at this path” when choosing the source path?
A: Because the deploy file is not existed on this directory. We can only support the deployment file which stored in the source path directory.
Q5: Can I pause the generation when the OTA package is creating?
A: Sorry. It doesn’t support right now.
