Difference between revisions of "IoTGateway/Node-Red"
(wsn node fix nodered control flow code error issue) |
Daniel.hung (talk | contribs) |
||
| Line 22: | Line 22: | ||
*wsn-gw | *wsn-gw | ||
*wsn-senhub | *wsn-senhub | ||
| + | |||
| + | ===Installation=== | ||
| + | You can install the [https://www.npmjs.com/package/node-red-contrib-wsn node-red-contrib-wsn] via NPM, or download it on [https://github.com/ADVANTECH-Corp/node-red-contrib-wsn GitHub]. | ||
===Usage=== | ===Usage=== | ||
| Line 29: | Line 32: | ||
[[File:open_nodered.jpg|800px]] | [[File:open_nodered.jpg|800px]] | ||
| − | |||
==wsn-gw Node== | ==wsn-gw Node== | ||
Revision as of 10:40, 22 September 2016
Advantech implements some Node-RED nodes for better development experience.
Contents
Node-RED for Alljoyn
We plan to provide three kinds of Node-RED nodes for Alljoyn feature.
- Action Handler
- Event Reader & Rule Engine
- ControlPanel Client
Installation
You can install the node-red-contrib-alljoyn via NPM, or download it on GitHub.
Usage
Please refer to README.
Demo
Node-RED for WSN
Wireless Sensor Network (WSN) is supported on Advantech IoT Gateway and all provided features are basically described by REST API respectively. For users to quickly access the WSN features and build the prototype control flow of application before knowing the detailed REST API manipulation and programming, we provide the following Node-RED nodes to easily read the information and access functions of WSN on Advantech IoT Gateway.
- wsn-gw
- wsn-senhub
Installation
You can install the node-red-contrib-wsn via NPM, or download it on GitHub.
Usage
- In the browser, enter Advantech IoT Gateway's IP address with Node-RED port 1880 to open Node-RED web page.
- On the left of the page, scroll down to find wsn-related nodes in Advantech section as depicted below.
- Drag and drop wsn-related nodes into Sheet to start building control flow.
wsn-gw Node
Node to get the information and set functions of a Advantech WSN gateway platform, triggered by an input message. Outputs a msg with msg.payload containing the JSON description of reading or result. During configuration, it will automatically detect available options for Network, Category, and Attribute in real time.
Configuration
- Drag and drop wsn-gw node into Sheet
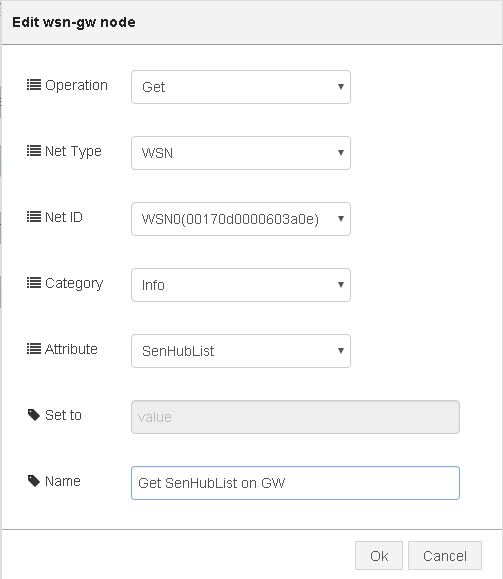
- Double click on the node to open Edit wsn-gw Node window for configuration as below
- Start from the top item in the window, it will automatically detect and list the available options currently.
Items in Edit Window
- Operation : Get or Set
- Net Type : Supported network types on the platform
- Net ID : List of available network interfaces of selected Net Type above. Options are listed in the format of :
| Interface Name(Interface MAC) |
|---|
| ex. WSN0(00170d0000010203) |
- Category : Class of Attributes
- Attribute : List of Attributes in selected Category above
- Set to : Place for entering value when Operation is Set
- Name : (optional) Place for entering the name of this node
Example: Get SensorHub List
This example shows how to build a control flow to get a list of sensorhub MAC address on selected network interface.
1. Build a flow using inject as input node to wsn-gw node, and debug as output node.
2. Double click on wsn-gw node to open Edit wsn-gw node window and configure the node as below
| Item | Value |
|---|---|
| Operation | Get |
| Net Type | WSN |
| Net ID | WSN0(your Interface MAC) |
| Category | Info |
| Attribute | SenHubList |
3. Connect nodes together and click on Deploy
4. Click on the input node and you will see the result in debug window
5. The output in the debug window is a JSON format string describing the result
{
    "StatusCode": 200,
    "Result": {
        "n": "SenHubList",
        "sv": "00170d0000603a0e,00170d0000602e5a,00170d0000304ab4,00170d000060339c",
        "asm":	"r"
    }
}
wsn-senhub Node
Node to get the information and set functions of a remote SensorHub (ex. WISE-1020) controlled by Advantech WSN gateway platform, triggered by an input message. Outputs a msg with msg.payload containing the JSON description of reading or result. During configuration, it will automatically detect available options for Network, on-line sensorhub, and Attribute in real time.
Configuration
- Drag and drop wsn-senhub node into Sheet
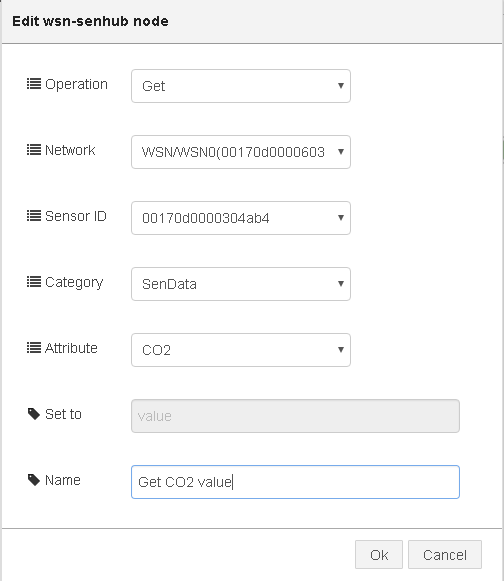
- Double click on the node to open Edit wsn-senhub Node window for configuration as below
- Start from the top item in the window, it will automatically detect and list the available options currently.
Items in Edit Window
- Operation : Get or Set
- NetWork : List of available network interfaces. Options are listed in the format of :
| Network Type/Interface Name(Interface MAC) |
|---|
| ex. WSN/WSN0(00170d0000010203) |
- Sensor ID : List of available SensorHub MAC address on network interface selected above.
- Category : Class of Attributes
- Attribute : List of Attributes in selected Category above
- Set to : Place for entering value when Operation is Set
- Name : (optional) Place for entering the name of this node
Example: Get CO2 Reading
This example shows how to build a control flow to get CO2 sensor reading on selected sensorhub.
1. Build a flow using inject as input node to wsn-senhub node, and debug as output node.
2. Double click on wsn-senhub node to open Edit wsn-senhub node window and configure the node as below
| Item | Value |
|---|---|
| Operation | Get |
| Network | WSN/WSN0(your Interface MAC) |
| Sensor ID | your CO2 sensorhub MAC |
| Category | SenData |
| Attribute | CO2 |
3. Connect nodes together and click on Deploy
4. Click on the input node and you will see the result in debug window
5. The output in the debug window is a JSON format string describing the result
{
    "SttatusCode": 200,
    "Result": {
        "n":	"CO2",
        "u":	"ppm",
        "v":	722,
        "min":	400,
        "max": 2000,
        "asm":	"r",
        "type": "d",
        "rt": "ucum.ppm",
        "st":	"ipso",
        "exten": ""
    }
}
WSN Sensor/Actuator Demo
Besides reading information, we can create more complex control flow using wsn-related nodes introduced above with native Node-RED nodes.
Here is a demo shows how to interact with sensor and actuator, and build a connection between them.
In this demo, a wsn-senhub node is used to retrieve the CO2 reading from a remote sensor hub. The CO2 reading is verified by the next node using pre-defined threshold value. The result of this judgement is then sent to a wsn-senhub node to turn on/off a fan which is controlled by another remote sensor hub.
- Control Flow Code
The code of the complete control flow in this demo is :
[{"id":"61ed35df.9e12cc","type":"inject","z":"1811f79d.e7ee08","name":"Go","topic":"","payload":"","payloadType":"none","repeat":"","crontab":"","once":false,"x":101,"y":96,"wires":[["1478e438.eb871c"]]},{"id":"dd51b7f2.22ae48","type":"function","z":"1811f79d.e7ee08","name":"Parse Output","func":"var jsonObj = JSON.parse(msg.payload);\nif(jsonObj.hasOwnProperty('Result')){\n msg.payload = jsonObj[\"Result\"][\"v\"];\n return msg;\n \n}\n//return msg;","outputs":"1","noerr":0,"x":434,"y":95,"wires":[["f927094.f06d8f8","cacb70b9.35349"]]},{"id":"f927094.f06d8f8","type":"switch","z":"1811f79d.e7ee08","name":"CO2 threashold","property":"payload","rules":[{"t":"gte","v":"1000"},{"t":"lt","v":"1000"}],"checkall":"true","outputs":2,"x":235,"y":262,"wires":[["bf362477.40c9d8","46dee3a7.b9211c"],["e7fc8654.180378","3d02f828.c2fd08"]]},{"id":"bf362477.40c9d8","type":"debug","z":"1811f79d.e7ee08","name":"Rule FanOn","active":false,"console":"false","complete":"payload","x":414,"y":205,"wires":[]},{"id":"5a4a76ec.a5b588","type":"debug","z":"1811f79d.e7ee08","name":"CO2 read raw","active":false,"console":"false","complete":"payload","x":435,"y":62,"wires":[]},{"id":"cacb70b9.35349","type":"debug","z":"1811f79d.e7ee08","name":"CO2 read","active":true,"console":"false","complete":"payload","x":628,"y":61,"wires":[]},{"id":"46dee3a7.b9211c","type":"change","z":"1811f79d.e7ee08","name":"Fan On","rules":[{"t":"set","p":"payload","to":"1"}],"action":"","property":"","from":"","to":"","reg":false,"x":414,"y":240,"wires":[["efeeb248.10115","67795763.9886a8"]]},{"id":"e7fc8654.180378","type":"change","z":"1811f79d.e7ee08","name":"Fan Off","rules":[{"t":"set","p":"payload","to":"0"}],"action":"","property":"","from":"","to":"","reg":false,"x":414,"y":274,"wires":[["1fd181af.e02e7e","67795763.9886a8"]]},{"id":"efeeb248.10115","type":"debug","z":"1811f79d.e7ee08","name":"Fan On Out","active":false,"console":"false","complete":"payload","x":596,"y":224,"wires":[]},{"id":"1fd181af.e02e7e","type":"debug","z":"1811f79d.e7ee08","name":"Fan Off out","active":false,"console":"false","complete":"payload","x":594,"y":292,"wires":[]},{"id":"196717b9.e698e8","type":"debug","z":"1811f79d.e7ee08","name":"Fan Set Result","active":false,"console":"false","complete":"payload","x":416,"y":472,"wires":[]},{"id":"3d02f828.c2fd08","type":"debug","z":"1811f79d.e7ee08","name":"Rule FanOff","active":false,"console":"false","complete":"payload","x":416,"y":308,"wires":[]},{"id":"67795763.9886a8","type":"function","z":"1811f79d.e7ee08","name":"Compare Previous Value","func":"context.prevStatus = context.prevStatus || -1;\n//node.log('prevStatus=' + context.prevStatus);\nif (msg.payload != context.prevStatus) {\n context.prevStatus = msg.payload;\n msg.payload = '{\"Action\":\"Set\",\"Value\":' + context.prevStatus + '}';\n return msg; \n} else {\n return null;\n}","outputs":1,"noerr":0,"x":639,"y":258,"wires":[["6594c6f5.9a6b38","fab95836.0546a8"]]},{"id":"6594c6f5.9a6b38","type":"debug","z":"1811f79d.e7ee08","name":"Set trigger","active":true,"console":"false","complete":"payload","x":223,"y":438,"wires":[]},{"id":"1478e438.eb871c","type":"wsn-senhub","z":"1811f79d.e7ee08","name":"","operNow":"Get","intfNow":"WSN/WSN0(00170d0000603a0e)","devNow":"00170d0000304ab4","topicNow":"SenData","attribNow":"CO2","setvalue":"","operSaved":"Get","intfSaved":"WSN/WSN0(00170d0000603a0e)","devSaved":"00170d0000304ab4","topicSaved":"SenData","attribSaved":"CO2","intfOpts":"<option value=\"WSN/WSN0(00170d0000603a0e)\">WSN/WSN0(00170d0000603a0e)</option>","devOpts":"<option value=\"00170d0000304ab4\">00170d0000304ab4</option><option value=\"00170d000060339c\">00170d000060339c</option><option value=\"00170d0000602e5a\">00170d0000602e5a</option>","topicOpts":"<option value=\"Info\">Info</option><option value=\"SenData\">SenData</option><option value=\"Net\">Net</option><option value=\"Action\">Action</option>","attribOpts":"<option value=\"Temperature\">Temperature</option><option value=\"Humidity\">Humidity</option><option value=\"CO2\">CO2</option>","x":253,"y":95,"wires":[["dd51b7f2.22ae48","5a4a76ec.a5b588"]]},{"id":"fab95836.0546a8","type":"wsn-senhub","z":"1811f79d.e7ee08","name":"","operNow":"Set","intfNow":"WSN/WSN0(00170d0000603a0e)","devNow":"00170d0000602e5a","topicNow":"SenData","attribNow":"Fan_2","setvalue":"","operSaved":"Set","intfSaved":"WSN/WSN0(00170d0000603a0e)","devSaved":"00170d0000602e5a","topicSaved":"SenData","attribSaved":"Fan 2","intfOpts":"<option value=\"WSN/WSN0(00170d0000603a0e)\">WSN/WSN0(00170d0000603a0e)</option>","devOpts":"<option value=\"00170d000060339c\">00170d000060339c</option><option value=\"00170d0000304ab4\">00170d0000304ab4</option><option value=\"00170d0000602e5a\">00170d0000602e5a</option>","topicOpts":"<option value=\"Info\">Info</option><option value=\"SenData\">SenData</option><option value=\"Net\">Net</option><option value=\"Action\">Action</option>","attribOpts":"<option value=\"Fan_1\">Fan 1</option><option value=\"Fan_2\">Fan 2</option><option value=\"Light\">Light</option>","x":225,"y":472,"wires":[["196717b9.e698e8"]]}]
To use this example code:
- Copy all the code
- In Node-RED page, click the function icon on the top-right corner
- Select Import -> Clipboard
- Paste the code in Clipboard and you can drag the complete control flow into the Sheet
- Demo Video
Connect WSN node with Freeboard
The output of wsn-related nodes could be redirected as the data source of freeboard. The following example shows how to get the remote CO2 reading and display it on freeboard.
Create URL
Build the control flow using native http as input node of wsn-senhub node, and http response node as output node.
As the result of this control flow, an URL : http://GatewayIP:1880/co2_reading is created for sending HTML request to get CO2 reading.
- Control Flow Code
The code of the complete control flow is :
[{"id":"4b342443.b4cbdc","type":"wsn-senhub","z":"36dfd115.c9202e","name":"","operNow":"Get","intfNow":"WSN/WSN0(00170d0000603a0e)","devNow":"00170d0000304ab4","topicNow":"SenData","attribNow":"CO2","setvalue":"0","operSaved":"Get","intfSaved":"WSN/WSN0(00170d0000603a0e)","devSaved":"00170d0000304ab4","topicSaved":"SenData","attribSaved":"CO2","intfOpts":"<option value=\"WSN/WSN0(00170d0000603a0e)\">WSN/WSN0(00170d0000603a0e)</option>","devOpts":"<option value=\"00170d000060339c\">00170d000060339c</option><option value=\"00170d0000304ab4\">00170d0000304ab4</option><option value=\"00170d0000602e5a\">00170d0000602e5a</option>","topicOpts":"<option value=\"Info\">Info</option><option value=\"SenData\">SenData</option><option value=\"Net\">Net</option><option value=\"Action\">Action</option>","attribOpts":"<option value=\"Temperature\">Temperature</option><option value=\"Humidity\">Humidity</option><option value=\"CO2\">CO2</option>","x":388.3333435058594,"y":89.33332824707031,"wires":[["1382358.fec7dca"]]},{"id":"417769.ffbe8898","type":"http in","z":"36dfd115.c9202e","name":"","url":"/co2_reading","method":"get","swaggerDoc":"","x":182,"y":89,"wires":[["4b342443.b4cbdc"]]},{"id":"1382358.fec7dca","type":"http response","z":"36dfd115.c9202e","name":"","x":561,"y":89,"wires":[]}]
Display Data in Freeboard
You can select the URL created above as the datasource. Then add a widget to display the sensor reading as dashboard.
- Freeboard Web Page
In the browser, open the Freeboard web page at http://GatewayIP:1880/freeboard/
- Add New DATASOURCE
1. Click ADD under DATASOURCES
2. Select a type for DATASOURCE : choose JSON on the list
3. Use http://GatewayIP:1880/co2_reading as URL of datasource
4. NAME for DATASOURCE : CO2_reading in this example
- Create Widget
1. Click ADD PANE
2. Click + to add new widget
3. Select a type for WIDGET : choose Gauge on the list
4. VALUE for WIDGET : click DATASOURCE, the NAME of our new created datasource is listed for selection (CO2_reading in this example)
5. Complete "VALUE" by selecting Result -> v on the list
6. Result


