Difference between revisions of "ROM-6881 How to configurate Static IP"
From ESS-WIKI
Xingxing.li (talk | contribs) |
Xingxing.li (talk | contribs) |
||
| Line 10: | Line 10: | ||
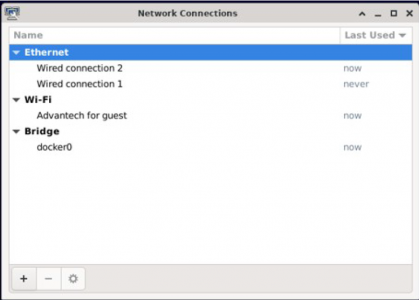
1. Click “Applications” -> “Settings” -> “Advanced Network Configration”. | 1. Click “Applications” -> “Settings” -> “Advanced Network Configration”. | ||
| − | [[File:ROM-6881 Eethernet.png|500x300px]] | + | [[File:ROM-6881 Eethernet.png|500x300px|ROM-6881 Eethernet.png]] |
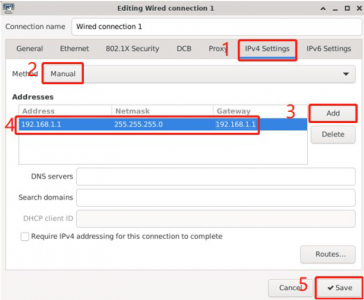
2. Double-click “Wired Connection 1” to configure it. | 2. Double-click “Wired Connection 1” to configure it. | ||
| − | [[File:ROM-6881 Ethernet wired connection.png|500x300px]] | + | [[File:ROM-6881 Ethernet wired connection.png|500x300px|ROM-6881 Ethernet wired connection.png]] |
| − | |||
== Configure to DHCP == | == Configure to DHCP == | ||
| Line 21: | Line 20: | ||
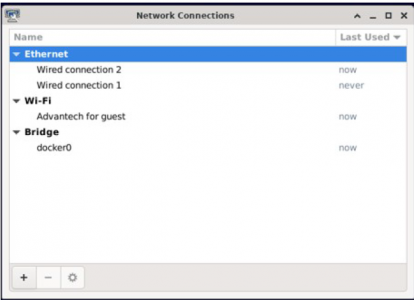
1. Click “Applications” -> “Settings -> “Advanced Network Configration”. | 1. Click “Applications” -> “Settings -> “Advanced Network Configration”. | ||
| − | [[File:ROM-6881 Network.png|500x300px]] | + | [[File:ROM-6881 Network.png|500x300px|ROM-6881 Network.png]] |
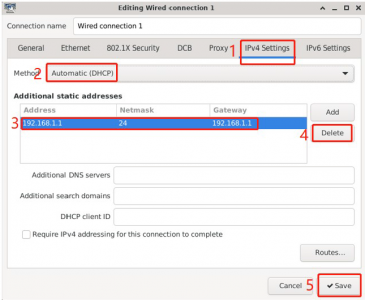
2. Double-click “Wired Connection 1” to configure it. | 2. Double-click “Wired Connection 1” to configure it. | ||
| − | [[File:ROM-6881 Ethernet IPV4.png|500x300px]] | + | [[File:ROM-6881 Ethernet IPV4.png|500x300px|ROM-6881 Ethernet IPV4.png]] |
| + | |||
| + | == Ethernet Test == | ||
| + | |||
| + | After connection, Ethernet will create a net point “eth0” and “eth1”. | ||
| + | <pre># #---- Test eth0 ----# # | ||
| + | # ping –I eth0 www.advantech.com | ||
| + | # #---- Test eth1 ----# # | ||
| + | # ping –I eth1 www.advantech.com | ||
| + | </pre> | ||
Latest revision as of 02:30, 5 January 2024
Ethernet
ROM-6881 supports two Ethernet ports : eth0/eth1. Both ports are using “DHCP”mode by default. The following configurations and tests are taking eth0 for example.
- The LAN signal of the core board ROM-6881 is connected to the SOM-DB2510 interface of the mainboard as LAN0 LAN1.
Configure to Static IP
1. Click “Applications” -> “Settings” -> “Advanced Network Configration”.
2. Double-click “Wired Connection 1” to configure it.
Configure to DHCP
1. Click “Applications” -> “Settings -> “Advanced Network Configration”.
2. Double-click “Wired Connection 1” to configure it.
Ethernet Test
After connection, Ethernet will create a net point “eth0” and “eth1”.
# #---- Test eth0 ----# #
# ping –I eth0 www.advantech.com
# #---- Test eth1 ----# #
# ping –I eth1 www.advantech.com


