Difference between revisions of "1. Using AndroidToool."
| Line 1: | Line 1: | ||
| − | + | ||
| − | + | New released images already included AndroidTool(or RKDevTool_Release)、USB Driver(DriverAssitant_vxxx.zip)and SDDisk Tool( SDDiskTool_vxxx.zip). | |
| − | + | ||
| − | + | If you get older images, please Download AndroidTool_vxxx.rar and SDDiskTool_vxxx.zip first. | |
| − | + | ||
| − | + | RK3399 Android 7.1: | |
| − | + | ||
| − | + | [https://github.com/ADVANTECH-Rockchip/rk3399_tools/tree/android_7.1.2_ks https://github.com/ADVANTECH-Rockchip/rk3399_tools/tree/android_7.1.2_ks] | |
| − | + | ||
| − | + | RK3399 Android 10.0 | |
| − | + | ||
| − | + | [https://github.com/ADVANTECH-Rockchip/rk3399_tools/tree/rk3399-androidQ10 https://github.com/ADVANTECH-Rockchip/rk3399_tools/tree/rk3399-androidQ10] | |
| − | + | ||
| − | + | RK3399 Debian 9.x : | |
| − | + | ||
| − | + | [https://github.com/ADVANTECH-Rockchip/linux_tools/tree/rk3399_linux_v231_risc https://github.com/ADVANTECH-Rockchip/linux_tools/tree/rk3399_linux_v231_risc] | |
| − | + | ||
| − | + | RK3399 Debian 10.x : | |
| − | + | ||
| − | + | [https://github.com/ADVANTECH-Rockchip/linux_tools/tree/rk3399_linux_v251_risc https://github.com/ADVANTECH-Rockchip/linux_tools/tree/rk3399_linux_v251_risc] | |
| − | + | ||
| − | + | '''Step1''' '''請先準備一條 USB 線材 和 Debug Cable ''' | |
| − | + | ||
| − | + | '''USB 線材''' | |
| − | + | ||
| − | + | [[File:RSB-4810 USB both.png|RTENOTITLE]] | |
| − | + | ||
| − | + | | |
| − | + | ||
| − | + | '''Debug Cable ''' | |
| − | + | ||
| − | + | [[File:RSB-3710 debug cable 2021-11-02 144650.jpg|RTENOTITLE]] | |
| − | + | ||
| − | + | '''Step2 '''Double click DriverInstall. | |
| − | + | ||
| − | + | [[File:Driver Assitant v5.11.png|RTENOTITLE]] | |
| − | + | ||
| − | + | '''Step3''' Enter into MASKROM mode . | |
| − | + | ||
| − | + | There are two ways to enter MASKROM . | |
| − | + | ||
| + | '''1. Hardware way to enter MASKROM and download''' | ||
| + | |||
| + | a ) Connect jumper cap J4 to Pin1 - Pin2(set USB-otg mode). | ||
| + | |||
| + | Note:Default jumper cap J4 Connect Pin2-Pin3 (Set USB-host mode) | ||
| + | |||
| + | [[File:RSB-4810 J4 setting.png|RTENOTITLE]] | ||
| + | |||
| + | b ) Connect one part of the USB cable to the USB port below and the other end to the computer. | ||
| + | |||
| + | [[File:RSB-4810 USB conjoint.png|RTENOTITLE]] | ||
| + | |||
| + | c ) Jump the J1 jumper cap to Pin1-Pin2, then switch on the 12V power supply. | ||
| + | |||
| + | [[File:RSB-4810 J1 setting.png|RTENOTITLE]] | ||
| + | |||
| + | d ) Then the burning tool will appear: a MASKROM word found. | ||
| + | |||
| + | Note:Suspend or shut down the virtual machine during this process; otherwise, the pop-up information may affect the burning results. | ||
| + | |||
| + | [[File:RSB-4810 RKTool MASKROM.png|RTENOTITLE]] | ||
| + | |||
| + | e ) Jump the J1 jumper cap back to Pin2-Pin3 and click "Execute" | ||
| + | |||
| + | [[File:RSB-4810 J1 setting 1.png|RTENOTITLE]] | ||
| + | |||
| + | [[File:RSB-4810 burning.png|RTENOTITLE]] | ||
| + | |||
| + | f ) Just wait patiently for the burning to finish. | ||
| + | |||
| + | [[File:RSB-4810 RKTool success.png|RTENOTITLE]] | ||
| + | |||
| + | '''2. Software way to enter MASKROM and download''' | ||
| + | |||
| + | When the device boot up to android or debian, you can use ADB or Debug console, send command "reboot loader" . | ||
| + | |||
| + | Or Press "ctrl + c" key when booting into uboot, until get the following information on debug console : | ||
| + | |||
| + | '''Android 7.1:''' | ||
<pre>Hit any key to stop autoboot: 0 | <pre>Hit any key to stop autoboot: 0 | ||
| − | rkboot # & | + | rkboot # <INTERRUPT> |
rkboot # loader</pre> | rkboot # loader</pre> | ||
| − | + | ||
| − | + | '''Debian 10.x:''' | |
<pre>Hit any key to stop autoboot: 0 | <pre>Hit any key to stop autoboot: 0 | ||
| − | rkboot # & | + | rkboot # <INTERRUPT> |
rkboot # rbrom</pre> | rkboot # rbrom</pre> | ||
| − | + | ||
| − | + | | |
| − | + | ||
| − | + | [[File:242.jpg|RTENOTITLE]] | |
| − | + | ||
| − | + | Click "Advantech Function" , then "Enter MASHROM" button to enter MASHROM mode . | |
| − | + | ||
| − | + | [[File:RK3288 upgrade Loader MASHROM.png|RTENOTITLE]] | |
| − | + | ||
| − | + | | |
| + | |||
| + | Select the image path. | ||
| + | |||
| + | [[File:2422.jpg|RTENOTITLE]] | ||
| + | |||
| + | Finish the update | ||
| + | |||
| + | [[File:24222.jpg|RTENOTITLE]] | ||
Revision as of 02:54, 28 March 2024
New released images already included AndroidTool(or RKDevTool_Release)、USB Driver(DriverAssitant_vxxx.zip)and SDDisk Tool( SDDiskTool_vxxx.zip).
If you get older images, please Download AndroidTool_vxxx.rar and SDDiskTool_vxxx.zip first.
RK3399 Android 7.1:
https://github.com/ADVANTECH-Rockchip/rk3399_tools/tree/android_7.1.2_ks
RK3399 Android 10.0
https://github.com/ADVANTECH-Rockchip/rk3399_tools/tree/rk3399-androidQ10
RK3399 Debian 9.x :
https://github.com/ADVANTECH-Rockchip/linux_tools/tree/rk3399_linux_v231_risc
RK3399 Debian 10.x :
https://github.com/ADVANTECH-Rockchip/linux_tools/tree/rk3399_linux_v251_risc
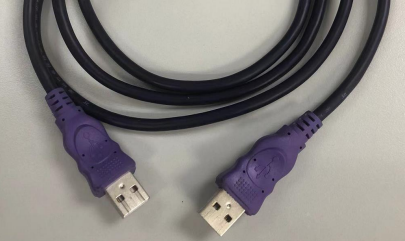
Step1 請先準備一條 USB 線材 和 Debug Cable
USB 線材
Debug Cable
Step2 Double click DriverInstall.
Step3 Enter into MASKROM mode .
There are two ways to enter MASKROM .
1. Hardware way to enter MASKROM and download
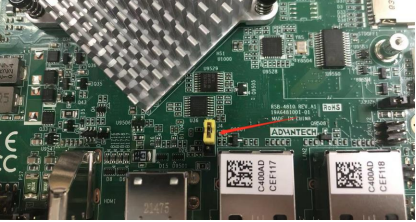
a ) Connect jumper cap J4 to Pin1 - Pin2(set USB-otg mode).
Note:Default jumper cap J4 Connect Pin2-Pin3 (Set USB-host mode)
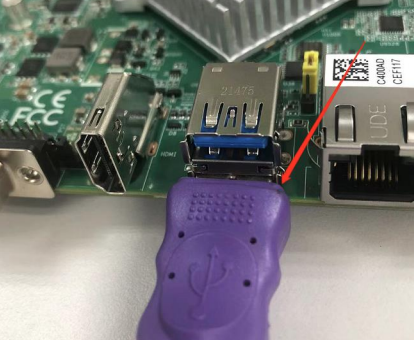
b ) Connect one part of the USB cable to the USB port below and the other end to the computer.
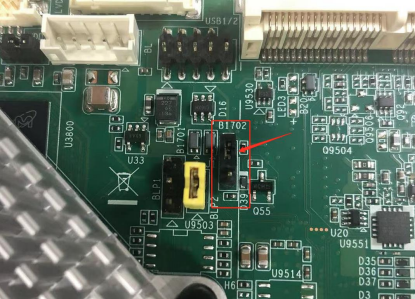
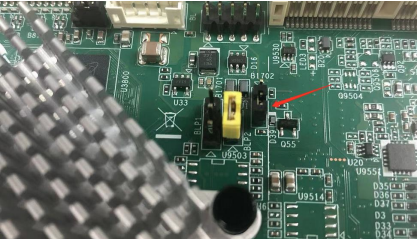
c ) Jump the J1 jumper cap to Pin1-Pin2, then switch on the 12V power supply.
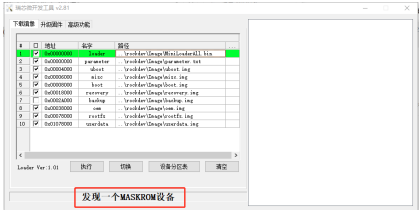
d ) Then the burning tool will appear: a MASKROM word found.
Note:Suspend or shut down the virtual machine during this process; otherwise, the pop-up information may affect the burning results.
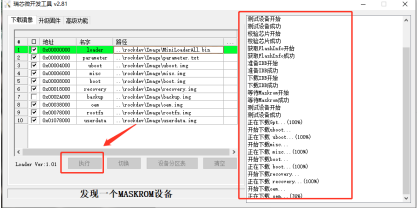
e ) Jump the J1 jumper cap back to Pin2-Pin3 and click "Execute"
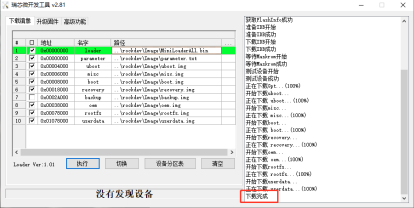
f ) Just wait patiently for the burning to finish.
2. Software way to enter MASKROM and download
When the device boot up to android or debian, you can use ADB or Debug console, send command "reboot loader" .
Or Press "ctrl + c" key when booting into uboot, until get the following information on debug console :
Android 7.1:
Hit any key to stop autoboot: 0
rkboot # <INTERRUPT>
rkboot # loader
Debian 10.x:
Hit any key to stop autoboot: 0
rkboot # <INTERRUPT>
rkboot # rbrom
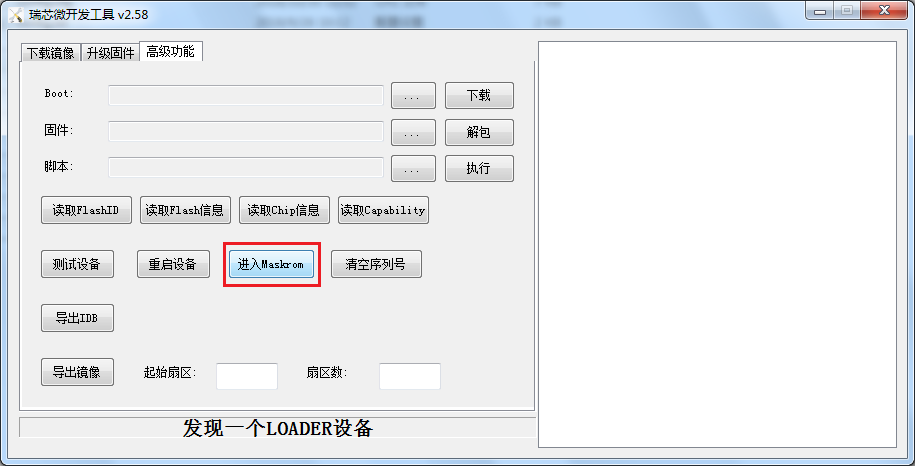
Click "Advantech Function" , then "Enter MASHROM" button to enter MASHROM mode .
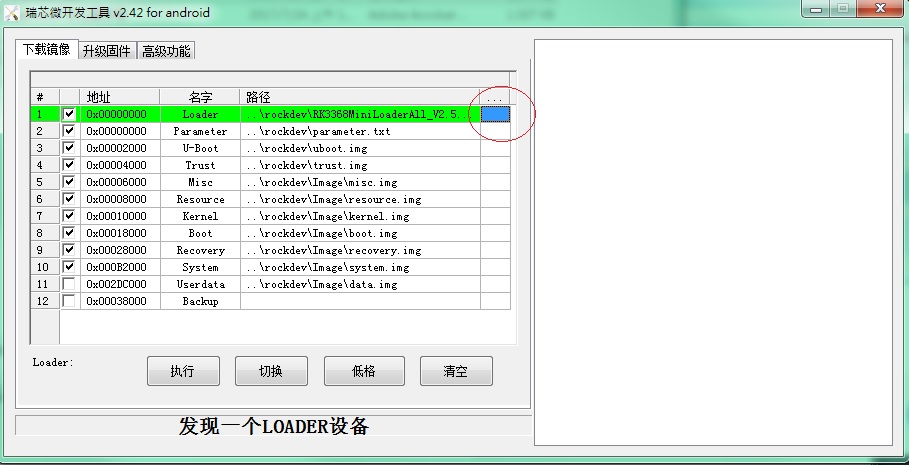
Select the image path.
Finish the update
