Difference between revisions of "IoTGateway/BSP/Linux/Quark/FAQ"
From ESS-WIKI
(Add ssh method) |
|||
| Line 53: | Line 53: | ||
<sub>To install image to SD Card .</sub> | <sub>To install image to SD Card .</sub> | ||
| − | *When you get the intel Quark image files, you will see the files list as below (ex. UBC-222) | + | * When you get the intel Quark image files.Unzip the image file , you will see the files list as below (ex. UBC-222) [[File:UBC-222 Image files.JPG]] |
| − | ** | + | *Please format your SD card to FAT32 |
| − | * | + | *Please copy all files from the sdcard folder to your SD card . |
| + | |||
| + | [[File:Sdcard files list.JPG]] | ||
| + | |||
| + | *When you have copied the all files to your SD card , you can use this SD card to boot up the UBC-222 Yocto system . | ||
| + | |||
| + | [[File:SD Card.JPG]] | ||
| + | |||
| + | *Use debug cable via Terminal tool , you can see the debug massage as below . | ||
| + | |||
| + | [[File:UBC-222 boot up.JPG]] | ||
| + | |||
| + | *Also you can use "ssh" to log into the Yocto system , but you need to know IP address of the Internet cable (ex . inet addr:172.22.16.154 ). | ||
| + | *You can use "Putty" tool to log into the device . | ||
| + | |||
| + | [[File:Putty connection.JPG]] | ||
| + | |||
| + | [[File:Ssh.JPG]] | ||
==Mini-PCIe== | ==Mini-PCIe== | ||
==UART== | ==UART== | ||
Revision as of 03:57, 23 November 2016
Compiling
GRUB
Please refer to the following sections for details
- Getting Started / Build Instructions / To build grub individually (LBV2)
Kernel
Please refer to the following sections for details
- Getting Started / Build Instructions / To build linux kernel individually (LBV2)
Application
Static busybox
The following steps demonstrate how to build the static busybox.
- Install cross tool chain
- To build all image files
- To build toolchain installer
- Setting up SDK
- Setting up cross compiling environment
- Install static linked libraries for cross compiling
- (Because the static linked libraries contained in cross toolchain installer are not full enough as contained in the yocto building environment.)
- $ pushd ${BSP_HOME}/${BDIR}/tmp/sysroots/quark && tar zcvf ~/static_lib.tgz `find ./ -name "*.a"` && popd
- (Copy ~/static_lib.tgz from docker container to home directory in local file system if needed)
- $ sudo tar xvf ~/static_lib.tgz -C /opt/iot-devkit/${POKY}/sysroots/i586-poky-linux --no-same-owner
- Unpack busybox tarball
- $ mkdir -p ~/code/test_quark
- $ tar xvf busybox-1.22.1.tar.bz2 -C ~/code/test_quark
- $ cd ~/code/test_quark/busybox-1.22.1
- Select the option, "Busybox Settings ---> Build Options---> [*] Build BusyBox as a static binary (no shared libs)"
- $ make menuconfig
- Exit and Save
- do compiling
- $ make
- Eventually, the two files, busybox and busybox_unstripped, are built and located in directory "~/code/test_quark/busybox-1.22.1".
SDcard image
To build from prebuilt image, please refer to the following sections for details.
- Getting Started / Introducing BSP / Prebuilt image (LBV2)
To build from BSP, please refer to the following sections for details.
- Getting Started / Build Instructions / To build all image files (LBV2)
To install image to SD Card .
- When you get the intel Quark image files.Unzip the image file , you will see the files list as below (ex. UBC-222)
- Please format your SD card to FAT32
- Please copy all files from the sdcard folder to your SD card .
- When you have copied the all files to your SD card , you can use this SD card to boot up the UBC-222 Yocto system .
- Use debug cable via Terminal tool , you can see the debug massage as below .
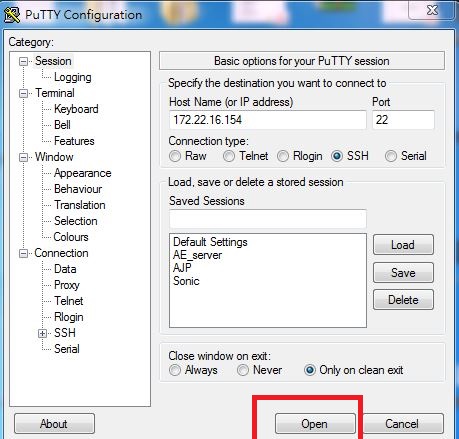
- Also you can use "ssh" to log into the Yocto system , but you need to know IP address of the Internet cable (ex . inet addr:172.22.16.154 ).
- You can use "Putty" tool to log into the device .


