Difference between revisions of "WISE-PaaS/Single Sign-On(SSO)"
Dylan.chang (talk | contribs) |
Dylan.chang (talk | contribs) |
||
| Line 96: | Line 96: | ||
*Maven Dependency | *Maven Dependency | ||
| − | * | + | |
| − | + | <pre>{<br/> "realm": "RMM",<br/> "realm-public-key":"MIIBIjANBgkqhkiG9w0BAQEFAAOCAQ8AMIIBCgKCAQEAgXyx5rl6laDJKt5vvz1lNYsrDgNHZKetagmr81IyvTuYpWQFwJwnai5pNQxfa6jgFBPiOg+pwD7jAfCgQghqWZFWVqPkL+Wt1PXEAXkg54yz9+oCrahsHZPoaQyWhTyf8StBqFUZurA7HkfRqPFINge5xo0jlkjVTcGUUTD/4HzEXc9tYdI1wqv9Ymd+eWG/uhYMu67DvzdNg/aIgxp5U7kYWZiyApjZH4ymP7fEWyFSSRSM/IwWKuW1Lc22w2nEU4RozZ5WF7QoOsjGB7ya62wwJN9UC+v+AgtUDy0VDkiDWruSz9pFQhTyWS1ITh9qoZerJdhu47eHPNKhoGVJpwIDAQAB",<br/> "auth-server-url": "[https://openidserver.redirectme.net:8443/auth https://openidserver.redirectme.net:8443/auth]",<br/> "ssl-required": "all requests",<br/> "client-id": "RMMClient",<br/> "public-client": true,<br/> "resource":"RMMClient"<br/>}</pre> | |
| + | |||
| + | *Obtaining User Entitlements | ||
| + | |||
| + | <pre>{<br/> "realm": "RMM",<br/> "realm-public-key":"MIIBIjANBgkqhkiG9w0BAQEFAAOCAQ8AMIIBCgKCAQEAgXyx5rl6laDJKt5vvz1lNYsrDgNHZKetagmr81IyvTuYpWQFwJwnai5pNQxfa6jgFBPiOg+pwD7jAfCgQghqWZFWVqPkL+Wt1PXEAXkg54yz9+oCrahsHZPoaQyWhTyf8StBqFUZurA7HkfRqPFINge5xo0jlkjVTcGUUTD/4HzEXc9tYdI1wqv9Ymd+eWG/uhYMu67DvzdNg/aIgxp5U7kYWZiyApjZH4ymP7fEWyFSSRSM/IwWKuW1Lc22w2nEU4RozZ5WF7QoOsjGB7ya62wwJN9UC+v+AgtUDy0VDkiDWruSz9pFQhTyWS1ITh9qoZerJdhu47eHPNKhoGVJpwIDAQAB",<br/> "auth-server-url": "[https://openidserver.redirectme.net:8443/auth https://openidserver.redirectme.net:8443/auth]",<br/> "ssl-required": "all requests",<br/> "client-id": "RMMClient",<br/> "public-client": true,<br/> "resource":"RMMClient"<br/>}</pre> | ||
== Components == | == Components == | ||
Revision as of 09:12, 13 January 2017
Single Sign-On (SSO) is part of Advantech WISE-PaaS cloud solution and plays an important role in the interoperability of Internet identity. It provides a central login mechanism.
OpenID Connect utilizes Keycloak which is an open source identity and access management for modern applications and services.
Contents
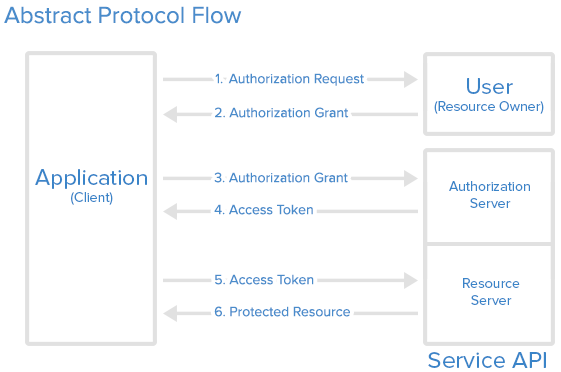
API Protocol Flow
WISE-PaaS/Single Sign-On use the OAuth 2.0 protocol for authentication and authorization.
- User/Resource owner : Who authorizes others to access Protected Resource. If the role is human, it means the end-user.
- Application/Client/Browse : An application ,client or a browser page represents the Resource Owner to access the Protected Resource.
- Authorize Server : The server issues the Access Token after user are authenticated. (WISE-PaaS/Single Sign-On server)
- Resource Server : The server hosting Protected Resource accept requests according to Access Token.
Here is a more detailed explanation of the steps in the diagram:
- The application requests authorization to access service resources from the user
- If the user authorized the request, the application receives an authorization grant
- The application requests an access token from the authorization server (API) by presenting authentication of its own identity, and the authorization grant
- If the application identity is authenticated and the authorization grant is valid, the authorization server (API) issues an access token to the application. Authorization is complete.
- The application requests the resource from the resource server (API) and presents the access token for authentication
- If the access token is valid, the resource server (API) serves the resource to the application
Features Overview
WISE-PaaS/Single Sign-On(SSO) which base on keycloak has the following features.
- Single-Sign On : Login once to multiple applications
- Standard Protocols : OpenID Connect, OAuth 2.0 and SAML 2.0
- Centralized Management : For admins and users
- Adapters : Secure applications and services easily
- High Performance : Lightweight, fast and scalable
- Clustering : For scalability and availability
- Themes : Customize look and feel
- Extensible : Customize through code
- Password Policies : Customize password policies
Implementation
WISE-PaaS provides a complete service for Single Sign-On. There are tree sections for developer to implement.
Settings on Authorization Server
Apply a manager account for OpenID Central Server
Please sen a request to WISE-Paas/OpenID Connect service manager by E-mail. And provide the following information
- Service name : [RMM] as your realm.
- Client name : [RMMClient] a client definition for a app to login in.
- User registration : [True/False] Enable/Disable user registeration.
- Administrator account : [RMMAdmin] Use this account to manage this realm. The default password is same as account name. Change password after first login
Setting your service on OpenID server
Login https://openidserver.redirectme.net:8443/auth/admin
Authorization Setting
- Authorization Enabled
- Create a Resource : Creating the resources that you want to protect
- Create a Permission : A permission associates the object being protected and the policies that must be evaluated to decide whether access should be granted.
- Create a Role : Use this type of policy to define conditions for your permissions where a set of one or more roles is permitted to access an object.
- Create a User : Craete a login account for SSO with role mapping of client.
- Evaluate : When designing your policies, you can simulate authorization requests to test how your policies are being evaluated with a json format result.
Get Client App setting
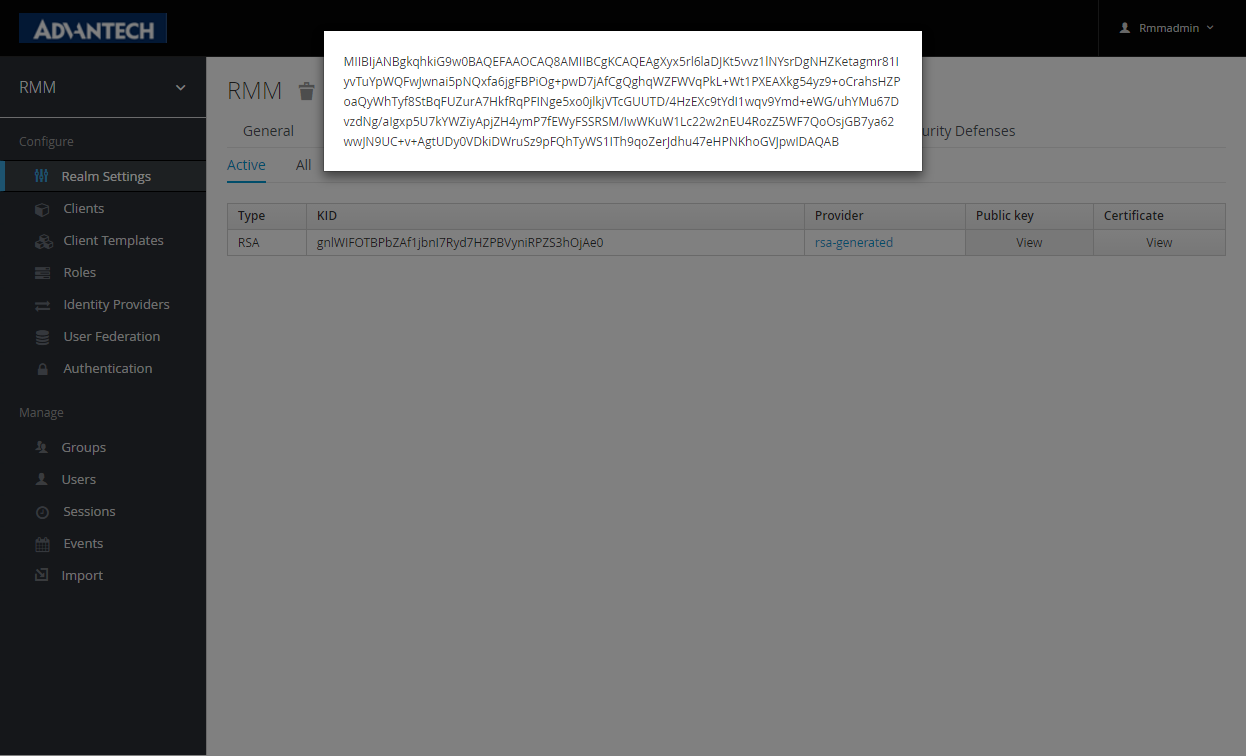
- Realm Public Key : Get the public key from Realms setting-> [Realm]->Keys-> Public key.
- Client Credentials Secret : Get Secrie from Clients->Credentials->Secret
Application for end user
- Copy the json , html sample code to your local web site.
- Modify json setting
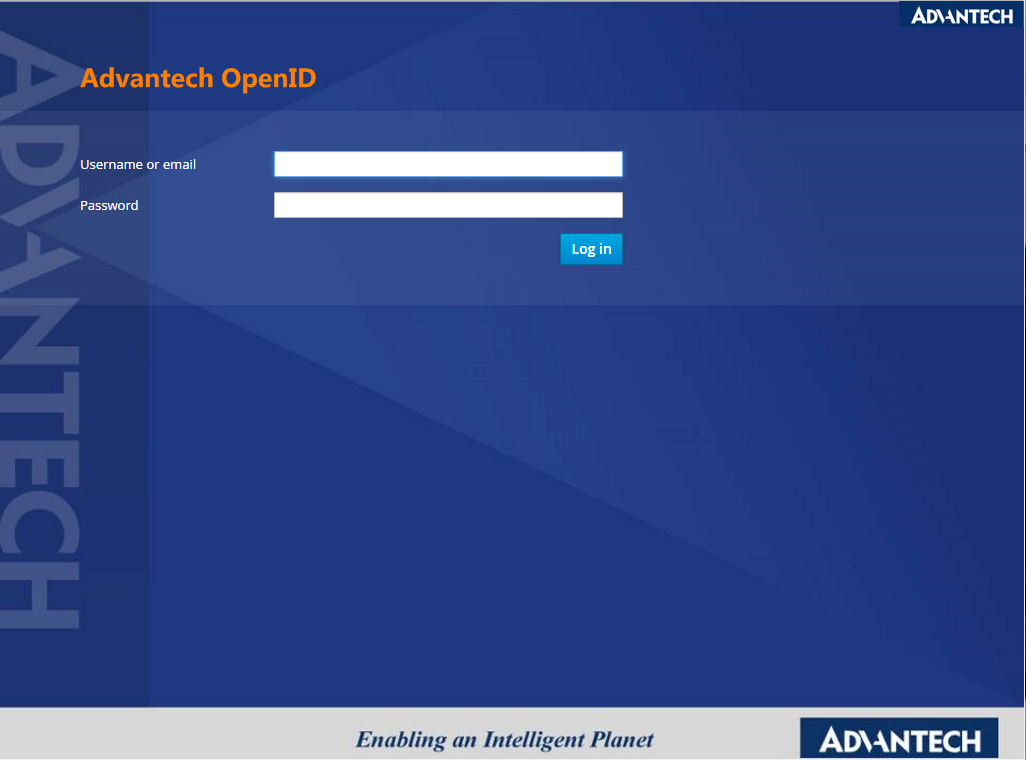
- Once the test HTML page is opened, it is automatically directed to OpenID Connect Server.
- While login success, it will automatically lead back to test page.
Verify Access Token on Resource Server
A Java Client Java example :
- Maven Dependency
<pre>{
"realm": "RMM",
"realm-public-key":"MIIBIjANBgkqhkiG9w0BAQEFAAOCAQ8AMIIBCgKCAQEAgXyx5rl6laDJKt5vvz1lNYsrDgNHZKetagmr81IyvTuYpWQFwJwnai5pNQxfa6jgFBPiOg+pwD7jAfCgQghqWZFWVqPkL+Wt1PXEAXkg54yz9+oCrahsHZPoaQyWhTyf8StBqFUZurA7HkfRqPFINge5xo0jlkjVTcGUUTD/4HzEXc9tYdI1wqv9Ymd+eWG/uhYMu67DvzdNg/aIgxp5U7kYWZiyApjZH4ymP7fEWyFSSRSM/IwWKuW1Lc22w2nEU4RozZ5WF7QoOsjGB7ya62wwJN9UC+v+AgtUDy0VDkiDWruSz9pFQhTyWS1ITh9qoZerJdhu47eHPNKhoGVJpwIDAQAB",
"auth-server-url": "https://openidserver.redirectme.net:8443/auth",
"ssl-required": "all requests",
"client-id": "RMMClient",
"public-client": true,
"resource":"RMMClient"
}</pre>
- Obtaining User Entitlements
<pre>{
"realm": "RMM",
"realm-public-key":"MIIBIjANBgkqhkiG9w0BAQEFAAOCAQ8AMIIBCgKCAQEAgXyx5rl6laDJKt5vvz1lNYsrDgNHZKetagmr81IyvTuYpWQFwJwnai5pNQxfa6jgFBPiOg+pwD7jAfCgQghqWZFWVqPkL+Wt1PXEAXkg54yz9+oCrahsHZPoaQyWhTyf8StBqFUZurA7HkfRqPFINge5xo0jlkjVTcGUUTD/4HzEXc9tYdI1wqv9Ymd+eWG/uhYMu67DvzdNg/aIgxp5U7kYWZiyApjZH4ymP7fEWyFSSRSM/IwWKuW1Lc22w2nEU4RozZ5WF7QoOsjGB7ya62wwJN9UC+v+AgtUDy0VDkiDWruSz9pFQhTyWS1ITh9qoZerJdhu47eHPNKhoGVJpwIDAQAB",
"auth-server-url": "https://openidserver.redirectme.net:8443/auth",
"ssl-required": "all requests",
"client-id": "RMMClient",
"public-client": true,
"resource":"RMMClient"
}</pre>
Components
[Please describe]
- OpenID Connect Server
- OpenID Connect Client
- OAuth 2.0 Server
- OAuth 2.0 Client
Document
Snapshot of Single Sign-On server setting
Open the https://openidserver.redirectme.net:8443/auth/admin and login with applied administrator account to config your realm before implement your client app.
- (Essential) Public key : OpenID server generate a unique key for client app identification. Copy the public key to json setting file include in the client app .
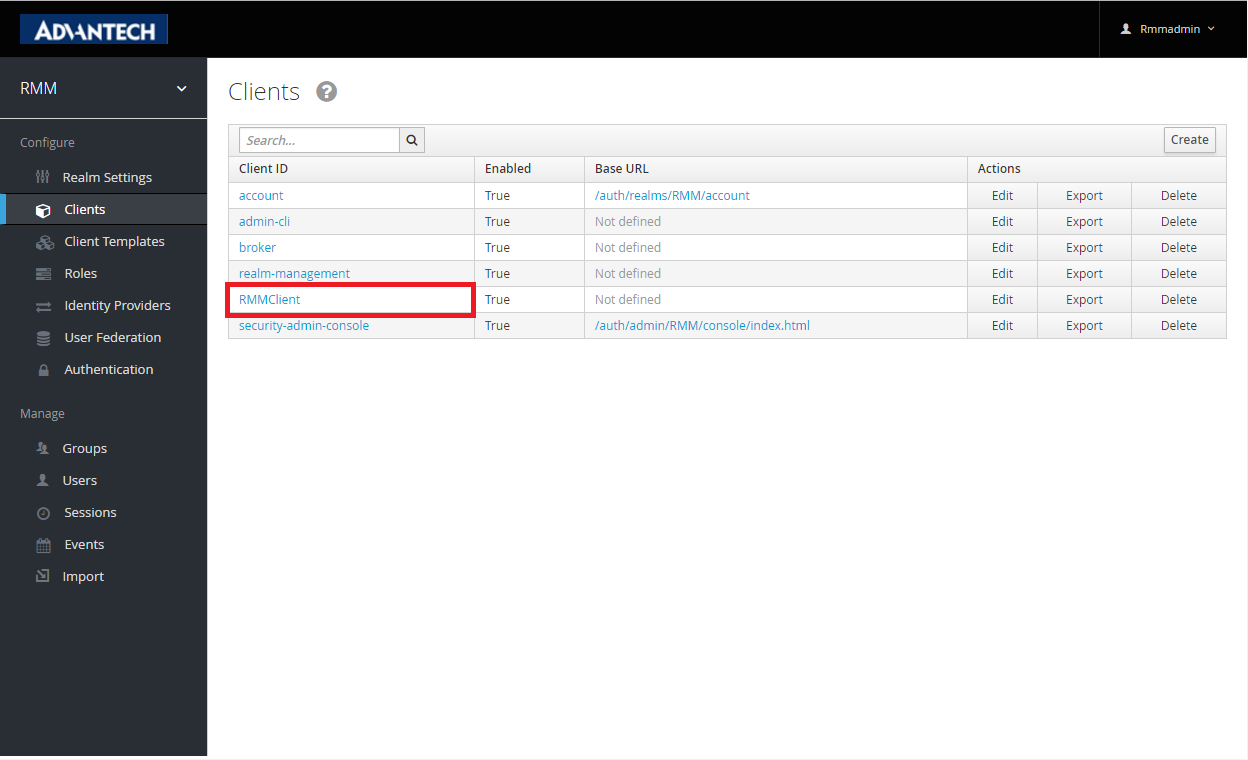
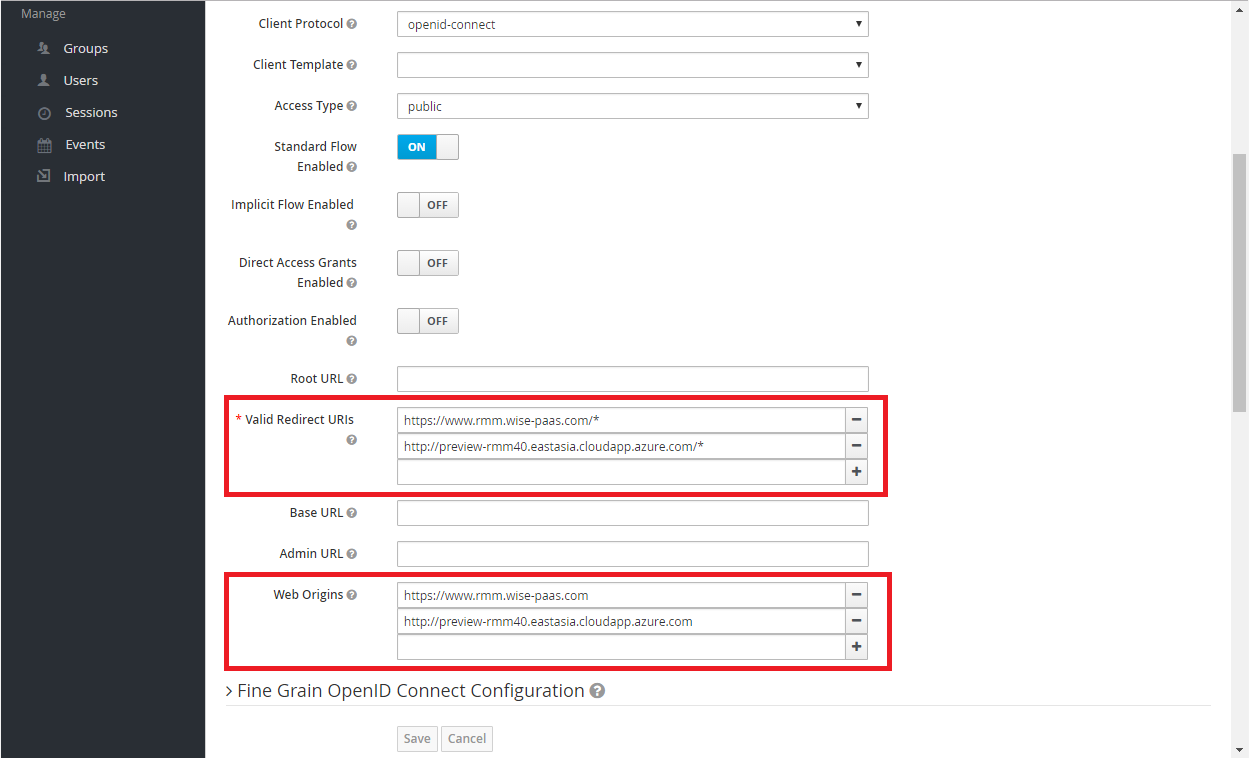
- (Essential) Valid Redirect URIs & Web Origins : Provide valid uri pattern for your client app. OpenID server would redirect to your client page while a successful login or logout. Your client page must be publicly accessible.
Click the "Client ID" to setting page
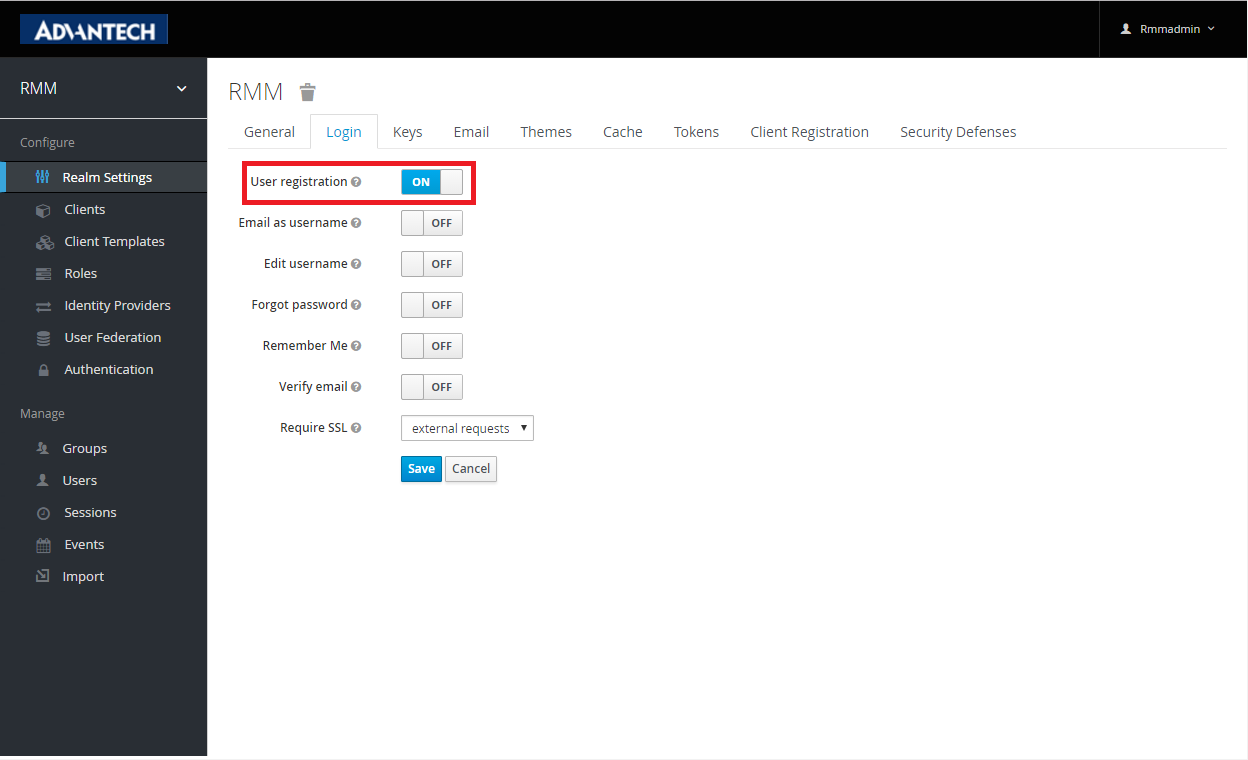
- (Optional) User registration : Enable/Disable user self registration. If turn off, you would need to create accounts for login.
Sample code
OpenID.json : Replace realm, realm-public-key, client-id, resource according to realm setting
{
  "realm": "RMM",
  "realm-public-key":"MIIBIjANBgkqhkiG9w0BAQEFAAOCAQ8AMIIBCgKCAQEAgXyx5rl6laDJKt5vvz1lNYsrDgNHZKetagmr81IyvTuYpWQFwJwnai5pNQxfa6jgFBPiOg+pwD7jAfCgQghqWZFWVqPkL+Wt1PXEAXkg54yz9+oCrahsHZPoaQyWhTyf8StBqFUZurA7HkfRqPFINge5xo0jlkjVTcGUUTD/4HzEXc9tYdI1wqv9Ymd+eWG/uhYMu67DvzdNg/aIgxp5U7kYWZiyApjZH4ymP7fEWyFSSRSM/IwWKuW1Lc22w2nEU4RozZ5WF7QoOsjGB7ya62wwJN9UC+v+AgtUDy0VDkiDWruSz9pFQhTyWS1ITh9qoZerJdhu47eHPNKhoGVJpwIDAQAB",
  "auth-server-url": "https://openidserver.redirectme.net:8443/auth",
  "ssl-required": "all requests",
  "client-id": "RMMClient",
  "public-client": true,
  "resource":"RMMClient"
}
TestOpenID.html : An example HTML login client for WISE-PaaSOpenID Connect
<html>
<head>
    <title>Customer View Page</title>
    <script src="https://openidserver.redirectme.net:8443/auth/js/keycloak.js"></script>
</head>
<body bgcolor="#E3F6CE">

<p>Goto: <a href="/product-portal">products</a> | <a href="#" onclick="keycloak.logout()">logout</a> | <a href="#" onclick="keycloak.accountManagement()">manage acct</a></p>

User <b id="subject"></b> made this request.
<p><b>User details (from <span id="profileType"></span>)</b></p>
<p>Username: <span id="username"></span></p>
<p>Email: <span id="email"></span></p>
<p>Full Name: <span id="name"></span></p>
<p>First: <span id="givenName"></span></p>
<p>Last: <span id="familyName"></span></p>

<script>
    var keycloak = Keycloak('openid/keycloak.json');
    var loadData = function () {
        document.getElementById('subject').innerHTML = keycloak.subject;
        if (keycloak.idToken) {
            document.getElementById('profileType').innerHTML = 'IDToken';
            document.getElementById('username').innerHTML = keycloak.idTokenParsed.preferred_username;
            document.getElementById('email').innerHTML = keycloak.idTokenParsed.email;
            document.getElementById('name').innerHTML = keycloak.idTokenParsed.name;
            document.getElementById('givenName').innerHTML = keycloak.idTokenParsed.given_name;
            document.getElementById('familyName').innerHTML = keycloak.idTokenParsed.family_name;
        } else {
            keycloak.loadUserProfile(function() {
                document.getElementById('profileType').innerHTML = 'Account Service';
                document.getElementById('username').innerHTML = keycloak.profile.username;
                document.getElementById('email').innerHTML = keycloak.profile.email;
                document.getElementById('name').innerHTML = keycloak.profile.firstName + ' ' + keycloak.profile.lastName;
                document.getElementById('givenName').innerHTML = keycloak.profile.firstName;
                document.getElementById('familyName').innerHTML = keycloak.profile.lastName;
            }, function() {
                document.getElementById('profileType').innerHTML = 'Failed to retrieve user details. Please enable claims or account role';
            });
        }
        //loginjwt
    };
    var loadFailure = function () {
        document.getElementById('customers').innerHTML = '<b>Failed to load data.  Check console log</b>';
    };
    var reloadData = function () {
        keycloak.updateToken(10)
                .success(loadData)
                .error(function() {
                    document.getElementById('customers').innerHTML = '<b>Failed to load data.  User is logged out.</b>';
                });
    }
    //keycloak.login({ redirectUri:  'login-required' });
    keycloak.init({ onLoad: 'login-required' })
        .success(reloadData)
        .error(function(errorData) {
            document.getElementById('customers').innerHTML = '<b>Failed to load data. Error: ' + JSON.stringify(errorData) + '</b>';
        });
</script>

<br><br>
<button onclick="reloadData()">Reload data</button>
</body>
</html>
