Difference between revisions of "ODBC Service"
| Line 64: | Line 64: | ||
<span style="font-size:medium;">'''Example :'''</span> | <span style="font-size:medium;">'''Example :'''</span> | ||
| − | <font size | + | <span style="font-size:medium;">''<u>'''<span style="background-color:#FFFF00;">Attention: Must have field of timestamp and set it in the first column in database.</span>'''</u>''</span> |
| − | <span style="font-size:medium;">''<u>'''<span style="background-color:#FFFF00;"> | + | <span style="font-size:medium;">''<u>'''<span style="background-color:#FFFF00;"></span>'''</u>''</span><font size="2">Database (CSV file)</font><span style="font-size:medium;">''<u>'''<span style="background-color:#FFFF00;"></span>'''</u>''</span> |
[[File:ODBC set config2.JPG|upright|ODBC set config2.JPG]] | [[File:ODBC set config2.JPG|upright|ODBC set config2.JPG]] | ||
Revision as of 07:24, 8 June 2018
Contents
Introduction
Open Database Connectivity (ODBC) is a standard API for access database. It design independent of database systems and operating systems.
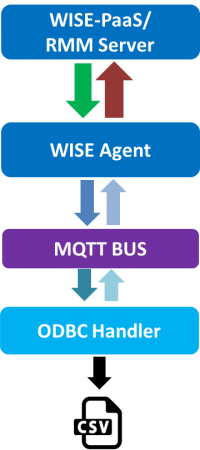
ODBC service can become multi-module interface. User just store data in csv file and ODBC handler can upload data to Cloud.
ODBC Service
ODBC service can easily upload data to the cloud. It will be load the config file and the last data of system record when the service does initialization. The last recorded data Compare with data of database (CSV file) to decide whether to retain index value or not. Every time new data is detected from database, the service will upload new data to cloud and record the last data that is prevent repeat to upload when the service is restarted.
User need observe the following points:
- Append data to database: User write data to database (CSV file) please add data after the last index.
- Add database (CSV file) is invalid at runtime service.
- Recycle: If user wants to clear data in database please start from the first index.
- Have need of timestamp item and put in the fisrt column about data of database.
- Don't prohibit reading permission when user write data to database.
How to
Installation
1.Double click Agent_ODBC_Handler_X.X.X.exe to install.
2.Click "Next" to continue the setup wizard.
3.Select installation folder then click "Next"
4.Click "Next" to begin the installation
5. complete the installation, click "Finish" to exit the setup wizard
Configuration
1.Use file explorer to open ODBC Service folder.(Default: C:\Program Files (x86)\Advantech\Agent_ODBC_Handler).
2.Edit the file ODBC_Handler.ini
3.Config the [Text] session.
FilePath: Set path of the database file (CSV file) location.
FieldName & FieldDataType: Define the data type of field name. FieldName is according to database (CSV file) to set. User arrangement according to "FieldName" item to give data type in "FieldDataType" item.
Support data type: timestamp, double, string, float, boolean.
Example :
Attention: Must have field of timestamp and set it in the first column in database.
Database (CSV file)
ODBC_Handler.ini
[Text]
FilePath=D:\txt
FieldName=TIME,No#1EC,No#1ph,No#2EC
FieldDataType=timestamp,double,float,string
4.Restart service of Agent_ODBC_handler.
5. Login RMM 3.3 site and turn on auto-report.
Json Data Format
{
    "ODBC_Handler": {
        "info": {
            "bn": "info",
            "e": [
                {
                    "n": "name",
                    "sv": "ODBC_Handler"
                },
                {
                    "n": "description",
                    "sv": "This service is ODBC Service"
                },
                {
                    "n": "version",
                    "sv": "1.1.0"
                }
            ]
        },
        "Setting": {
            "bn": "Setting",
            "e": [
                {
                    "n": "ODBCDriver",
                    "sv": "Microsoft Text Driver (*.txt; *.csv)"
                },
                {
                    "n": "ReadOnly",
                    "bv": false
                }
            ]
        },
        "Tables": {
            "bn": "Tables",
            "histdata": {
                "bn": "histdata",
                "e": [
                    {
                        "n": "TIME",
                        "sv": "2017-10-09 03:18:00"
                    },
                    {
                        "n": "No#1EC",
                        "v": 1
                    },
                    {
                        "n": "No#1ph",
                        "v": 5.930000
                    },
                    {
                        "n": "No#2EC",
                        "sv": "2.26"
                    }
                ]
            }
        },
        "opTS": {
            "$date": 1507490280000
        }
    }
}


