Difference between revisions of "OPC-UA Client"
| Line 1: | Line 1: | ||
| + | |||
= Introduction = | = Introduction = | ||
OPC Unified Architecture (OPC UA) is a machine to machine communication protocol for industrial automation developed by the OPC Foundation. | OPC Unified Architecture (OPC UA) is a machine to machine communication protocol for industrial automation developed by the OPC Foundation. | ||
| − | + | | |
= Features = | = Features = | ||
| Line 11: | Line 12: | ||
Feature: | Feature: | ||
| − | *Connection with multiple OPC-UA server and multiple Node ID. | + | *Connection with multiple OPC-UA server and multiple Node ID. |
| − | *Support anonymous authentication, username/password authentication. | + | *Support anonymous authentication, username/password authentication. |
| − | *Support individual node data update interval of subscription. | + | *Support individual node data update interval of subscription. |
| − | *Configurable node alias. | + | *Configurable node alias. |
| − | *Currently support up-link OPC-UA data to WISE-PaaS , not support down-link from WISE-PaaS. | + | *Currently support up-link OPC-UA data to WISE-PaaS , not support down-link from WISE-PaaS. |
| − | *Detailed features, please see [https://docs.google.com/spreadsheets/d/1hxUJgHvcPYq8f44gmVVmwUCddHhOPBflSRkSKR0H9Q4/edit?ts=5ca2bfc9#gid=348272669 https://docs.google.com/spreadsheets/d/1hxUJgHvcPYq8f44gmVVmwUCddHhOPBflSRkSKR0H9Q4/edit?ts=5ca2bfc9#gid=348272669] | + | *Detailed features, please see [https://docs.google.com/spreadsheets/d/1hxUJgHvcPYq8f44gmVVmwUCddHhOPBflSRkSKR0H9Q4/edit?ts=5ca2bfc9#gid=348272669 https://docs.google.com/spreadsheets/d/1hxUJgHvcPYq8f44gmVVmwUCddHhOPBflSRkSKR0H9Q4/edit?ts=5ca2bfc9#gid=348272669] |
| − | + | | |
= How to = | = How to = | ||
| Line 24: | Line 25: | ||
== Software Requirements == | == Software Requirements == | ||
| − | *MQTT broker | + | *MQTT broker |
| − | *.NET Framework 4.6 or above (Note, Windows 10 have already built-in .NET Framework 4.6) | + | *.NET Framework 4.6 or above (Note, Windows 10 have already built-in .NET Framework 4.6) |
== Installation == | == Installation == | ||
| Line 35: | Line 36: | ||
2. Double click the installer to launch the installer to install it to the machine. | 2. Double click the installer to launch the installer to install it to the machine. | ||
| − | + | | |
'''Debian:''' | '''Debian:''' | ||
| Line 43: | Line 44: | ||
2. Launch the installer to install it to the machine. | 2. Launch the installer to install it to the machine. | ||
| + | | ||
| − | + | | |
== Configuration == | == Configuration == | ||
| Line 50: | Line 52: | ||
Step 1. Go to "Plug-ins" / Plugin Config to select OPCUAClient Plug-in | Step 1. Go to "Plug-ins" / Plugin Config to select OPCUAClient Plug-in | ||
| − | [[File:Opcua config UtQlI7p.png|border|800x480px]] | + | [[File:Opcua config UtQlI7p.png|border|800x480px|Opcua config UtQlI7p.png]] |
Setp 2. Click "+" to add OPCUA project | Setp 2. Click "+" to add OPCUA project | ||
| − | [[File:Opcua config uNA2oIS.png|border|800x480px]] | + | [[File:Opcua config uNA2oIS.png|border|800x480px|Opcua config uNA2oIS.png]] |
Setp 3. Edit new OPCUA Project | Setp 3. Edit new OPCUA Project | ||
| − | [[File:Opcua config 4nAWV6Z.png|border|800x480px]] | + | [[File:Opcua config 4nAWV6Z.png|border|800x480px|Opcua config 4nAWV6Z.png]] |
| − | + | '''PROJECT NAME''': Enter a project name in unique | |
| − | + | '''ENDPOINT URL''': Endpoint URL of OPCUA Server | |
| − | |||
| − | + | [[File:Opcua config N19A761.png|border|800x480px|Opcua config N19A761.png]] | |
| − | + | ||
| − | + | '''SECURITY MODE''': None / Sign | |
| + | '''USER NAME''': Account of OPCUA Server | ||
| + | '''PASSWORD''': Password of OPCUA Server | ||
| + | |||
Setp 4. Click "+" to add Sensor Node | Setp 4. Click "+" to add Sensor Node | ||
| − | [[File:Opcua config bgenwaL.png|border|800x480px]] | + | [[File:Opcua config bgenwaL.png|border|800x480px|Opcua config bgenwaL.png]] |
Step 5. Edit Node Information | Step 5. Edit Node Information | ||
| − | [[File:Opcua config UeyMgDP.png|border|800x480px]] | + | [[File:Opcua config UeyMgDP.png|border|800x480px|Opcua config UeyMgDP.png]] |
| + | |||
| + | '''NODEID''': Node ID you'd like to monitor. | ||
| + | '''NODENAME''': Node name you'd like to show | ||
| + | '''INTERVAL(SEC)''': Subscribe/update interval in seconds | ||
| − | |||
| − | |||
| − | |||
Step 6. Click "+" to add multiple nodes | Step 6. Click "+" to add multiple nodes | ||
| − | [[File:Opcua config BlLUlTV.png|border|800x480px]] | + | [[File:Opcua config BlLUlTV.png|border|800x480px|Opcua config BlLUlTV.png]] |
| + | |||
Step 7. Click {{:./img/opcua-config-E03-edit.png}} to delete or edit sensor node info | Step 7. Click {{:./img/opcua-config-E03-edit.png}} to delete or edit sensor node info | ||
| − | [[File:Opcua config jDMeU3E.png|border|800x480px]] | + | [[File:Opcua config jDMeU3E.png|border|800x480px|Opcua config jDMeU3E.png]] |
| + | |||
Step 8. Click "Save" to complete node editing. | Step 8. Click "Save" to complete node editing. | ||
| − | [[File:Opcua config qYQ76Qq.png|border|800x480px]] | + | [[File:Opcua config qYQ76Qq.png|border|800x480px|Opcua config qYQ76Qq.png]] |
| + | |||
Setp 9. Click "Apply" to set and apply the new setting | Setp 9. Click "Apply" to set and apply the new setting | ||
| − | [[File:Opcua config 4A88VkH.png|border|800x480px]] | + | [[File:Opcua config 4A88VkH.png|border|800x480px|Opcua config 4A88VkH.png]] |
| + | |||
Setp 10. You can monitor OPCUA sensor nodes at "Plugin List". | Setp 10. You can monitor OPCUA sensor nodes at "Plugin List". | ||
| − | [[File:Opcua config 9TEBrJF.png|border|800x480px]] | + | [[File:Opcua config 9TEBrJF.png|border|800x480px|Opcua config 9TEBrJF.png]] |
| − | + | <br/><br/> | |
==== How to import plugin settings ==== | ==== How to import plugin settings ==== | ||
| Line 107: | Line 116: | ||
Step 1. Click Import button from OPCUAClient Configuration | Step 1. Click Import button from OPCUAClient Configuration | ||
| − | [[File:Opcua config YngfFAe.png|border|800x480px]] | + | [[File:Opcua config YngfFAe.png|border|800x480px|Opcua config YngfFAe.png]] |
| + | |||
Step 2. Select target file you like to import | Step 2. Select target file you like to import | ||
| − | [[File:Opcua config 4M3dBVW.png|border|800x480px]] | + | [[File:Opcua config 4M3dBVW.png|border|800x480px|Opcua config 4M3dBVW.png]] |
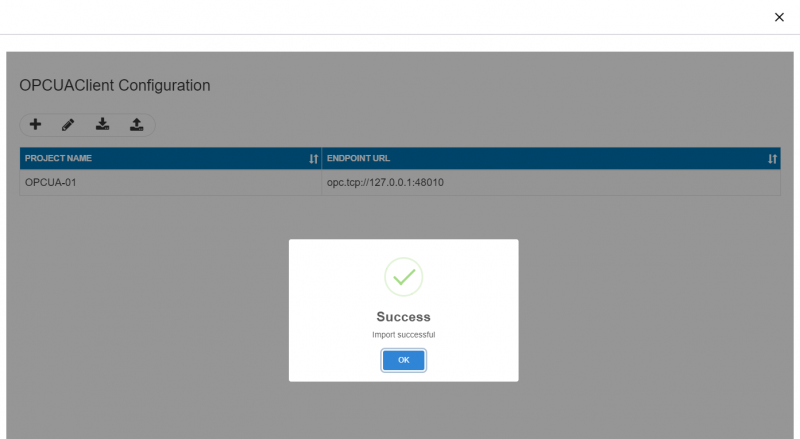
Import successful | Import successful | ||
| − | [[File:Opcua config V5bZgSz.png|border|800x480px]] | + | [[File:Opcua config V5bZgSz.png|border|800x480px|Opcua config V5bZgSz.png]] |
| + | |||
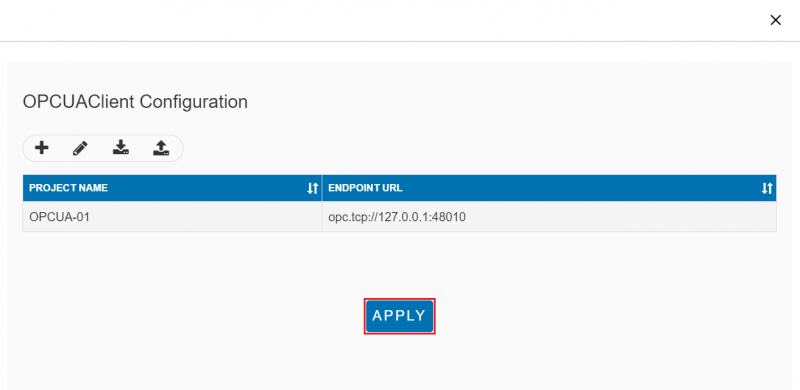
Step 3. Click APPLY to use imported configuration | Step 3. Click APPLY to use imported configuration | ||
| − | [[File:Opcua config R6EsxAJ.png|border|800x480px]] | + | [[File:Opcua config R6EsxAJ.png|border|800x480px|Opcua config R6EsxAJ.png]] |
| − | + | <br/><br/> | |
==== How to export plugin settings ==== | ==== How to export plugin settings ==== | ||
| Line 127: | Line 138: | ||
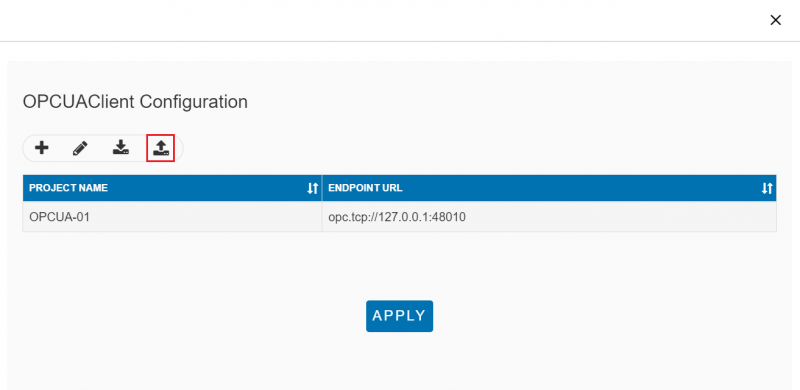
Step 1. Click Export button from OPCUAClient Configuration | Step 1. Click Export button from OPCUAClient Configuration | ||
| − | [[File:Opcua config cy8mrSR.png|border|800x480px]] | + | [[File:Opcua config cy8mrSR.png|border|800x480px|Opcua config cy8mrSR.png]] |
| + | |||
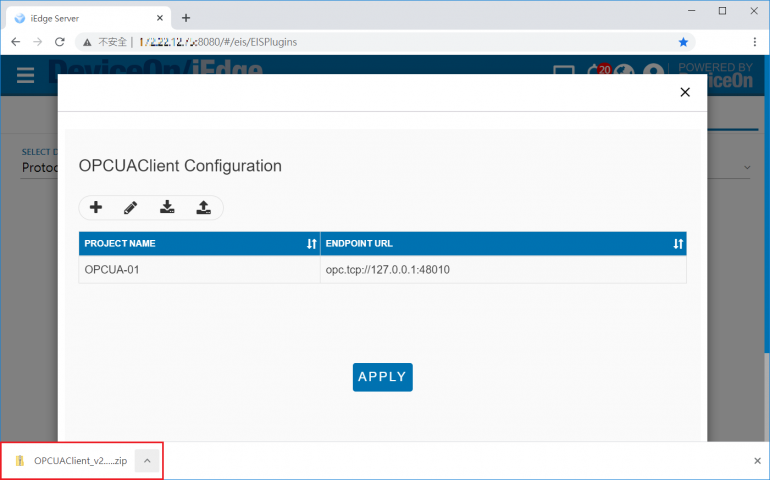
Step 2. Explore the exported file | Step 2. Explore the exported file | ||
| − | [[File:Opcua config D1OvcOS.png|border|800x480px]] | + | [[File:Opcua config D1OvcOS.png|border|800x480px|Opcua config D1OvcOS.png]] |
| + | |||
==== How to use RESTful API to get history data ==== | ==== How to use RESTful API to get history data ==== | ||
| − | + | <br/> | |
Example: | Example: | ||
<code>[http://172.22.12.84:8080//rmm/v1/data/devices/histdata?plugin=OPCUAClient&sensorId=/OPCUA-01/Node/Temperature&beginTs=2022-01-21%2017:30:00.000&endTs=2022-01-21%2017:35:00.000 http://172.22.12.84:8080//rmm/v1/data/devices/histdata?plugin=OPCUAClient&sensorId=/OPCUA-01/Node/Temperature&beginTs=2022-01-21%2017:30:00.000&endTs=2022-01-21%2017:35:00.000] </code> {{https://i.imgur.com/fqD2QRq.png}} <html><br/> <br/> </html> | <code>[http://172.22.12.84:8080//rmm/v1/data/devices/histdata?plugin=OPCUAClient&sensorId=/OPCUA-01/Node/Temperature&beginTs=2022-01-21%2017:30:00.000&endTs=2022-01-21%2017:35:00.000 http://172.22.12.84:8080//rmm/v1/data/devices/histdata?plugin=OPCUAClient&sensorId=/OPCUA-01/Node/Temperature&beginTs=2022-01-21%2017:30:00.000&endTs=2022-01-21%2017:35:00.000] </code> {{https://i.imgur.com/fqD2QRq.png}} <html><br/> <br/> </html> | ||
| + | |||
===== Use case ===== | ===== Use case ===== | ||
| Line 148: | Line 162: | ||
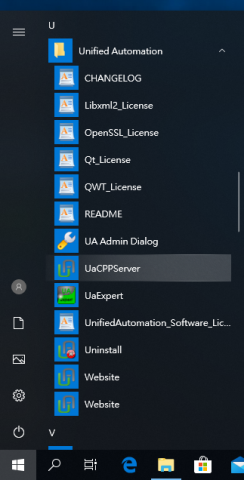
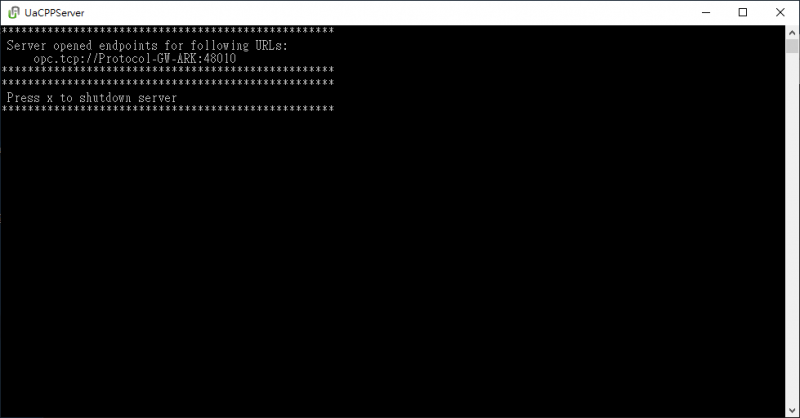
- Launch UaCppServer from Windows Start Menu. | - Launch UaCppServer from Windows Start Menu. | ||
| − | |||
| − | [[File:Opcua config g2edrDg.png|border|800x480px]] | + | [[File:Opcua config POK0jrK.png|border|800x480px|Opcua config POK0jrK.png]] |
| + | |||
| + | [[File:Opcua config g2edrDg.png|border|800x480px|Opcua config g2edrDg.png]] | ||
<HTML> | <HTML> | ||
| Line 166: | Line 181: | ||
1. Download Unified Automation C++ Demo Server from [https://www.unified-automation.com/downloads/opc-ua-servers.html https://www.unified-automation.com/downloads/opc-ua-servers.html] and install it to the server machine. | 1. Download Unified Automation C++ Demo Server from [https://www.unified-automation.com/downloads/opc-ua-servers.html https://www.unified-automation.com/downloads/opc-ua-servers.html] and install it to the server machine. | ||
| + | |||
2. Launch UaCppServer from Windows Start Menu. | 2. Launch UaCppServer from Windows Start Menu. | ||
[[File:Uacpp-demo-server-01.png|800x480px|Uacpp-demo-server-01.png]] | [[File:Uacpp-demo-server-01.png|800x480px|Uacpp-demo-server-01.png]] | ||
| − | |||
| Line 176: | Line 191: | ||
| − | + | {| border="1" cellpadding="1" cellspacing="1" style="width:500px;" | |
| − | {| border="1" | ||
|- | |- | ||
| style="width: 220px;" | '''Username''' | | style="width: 220px;" | '''Username''' | ||
| Line 188: | Line 202: | ||
| − | {| border="1" | + | {| border="1" cellpadding="1" cellspacing="1" style="width:500px;" |
|- | |- | ||
| style="width: 217px;" | '''Endpoint URL Format''' | | style="width: 217px;" | '''Endpoint URL Format''' | ||
| − | | style="width: 270px;" | opc.tcp:// | + | | style="width: 270px;" | opc.tcp://<Mancine Name or IP>:<Port> |
|- | |- | ||
| − | | style="width: 217px;" | '''Endpoint URL for this Demo''' | + | | style="width: 217px;" | '''Endpoint URL for this Demo''' |
| − | | style="width: 270px;" | opc.tcp://Protocol-Converter-GW:48010 | + | | style="width: 270px;" | opc.tcp://Protocol-Converter-GW:48010 |
|} | |} | ||
| − | {| border="1" | + | {| border="1" cellpadding="1" cellspacing="1" style="width:500px;" |
|- | |- | ||
| style="width: 217px;" | '''Node Nmae''' | | style="width: 217px;" | '''Node Nmae''' | ||
| style="width: 270px;" | '''Node ID''' | | style="width: 270px;" | '''Node ID''' | ||
|- | |- | ||
| − | | style="width: 217px;" | AirConditioner_1.Humidity | + | | style="width: 217px;" | AirConditioner_1.Humidity |
| − | | style="width: 270px;" | ns=3;s=AirConditioner_1.Humidity | + | | style="width: 270px;" | ns=3;s=AirConditioner_1.Humidity |
|- | |- | ||
| − | | style="width: 217px;" | AirConditioner_1.Temperature | + | | style="width: 217px;" | AirConditioner_1.Temperature |
| − | | style="width: 270px;" | ns=3;s=AirConditioner_1.Temperature | + | | style="width: 270px;" | ns=3;s=AirConditioner_1.Temperature |
|- | |- | ||
| − | | style="width: 217px;" | AirConditioner_2.Humidity | + | | style="width: 217px;" | AirConditioner_2.Humidity |
| − | | style="width: 270px;" | ns=3;s=AirConditioner_2.Humidity | + | | style="width: 270px;" | ns=3;s=AirConditioner_2.Humidity |
|- | |- | ||
| − | | style="width: 217px;" | AirConditioner_2.Temperature | + | | style="width: 217px;" | AirConditioner_2.Temperature |
| − | | style="width: 270px;" | ns=3;s=AirConditioner_2.Temperature | + | | style="width: 270px;" | ns=3;s=AirConditioner_2.Temperature |
|} | |} | ||
| + | | ||
| − | + | | |
| − | |||
4. Edit opcua-client.json to set up client configuration, for example: | 4. Edit opcua-client.json to set up client configuration, for example: | ||
| Line 244: | Line 258: | ||
5. Restart device-opcua-client service from Windows Task Manager. | 5. Restart device-opcua-client service from Windows Task Manager. | ||
| − | + | | |
= Release = | = Release = | ||
| Line 250: | Line 264: | ||
<span style="font-size:larger;">This is an overview that displays OPC-UA Service versions and some stats and numbers for each release.</span> | <span style="font-size:larger;">This is an overview that displays OPC-UA Service versions and some stats and numbers for each release.</span> | ||
| − | {| border="1" | + | {| border="1" cellpadding="1" cellspacing="1" style="width: 1292px;" |
|- | |- | ||
| style="width: 47px; text-align: center;" | <span style="font-size:larger;">Index</span> | | style="width: 47px; text-align: center;" | <span style="font-size:larger;">Index</span> | ||
| Line 265: | Line 279: | ||
<span style="font-size:medium;">2020/1/03</span> | <span style="font-size:medium;">2020/1/03</span> | ||
| − | | style="width: 78px; text-align: center;" | <span style="font-size:larger;">x86_64 CPU</span | + | | style="width: 78px; text-align: center;" | <span style="font-size:larger;">x86_64 CPU</span> |
| − | | style="width: 109px; text-align: center;" | <span style="font-size:larger;">Windows</span | + | | style="width: 109px; text-align: center;" | <span style="font-size:larger;">Windows</span> |
| style="width: 587px;" | | | style="width: 587px;" | | ||
<span style="font-size:medium;">1. Support Multiple OPCUA server.</span> | <span style="font-size:medium;">1. Support Multiple OPCUA server.</span> | ||
| − | <span style="font-size:medium;">2. Support Anonymous, Username/Password | + | <span style="font-size:medium;">2. Support Anonymous, Username/Password</span>security check.</span> |
<span style="font-size:medium;">3. Support individual node access interval configuration.</span> | <span style="font-size:medium;">3. Support individual node access interval configuration.</span> | ||
| − | <span style="font-size:medium;">4. Configurable node alias. | + | <span style="font-size:medium;">4. Configurable node alias.</span></span> |
<span style="font-size:larger;">[file://eossfs/ESS-Release/EdgeSense/Software/OPCUA_Client/Windows/2.0.1 OPCUA_Client_for_Windows_ReleaseNote_2.0.1.txt]</span> | <span style="font-size:larger;">[file://eossfs/ESS-Release/EdgeSense/Software/OPCUA_Client/Windows/2.0.1 OPCUA_Client_for_Windows_ReleaseNote_2.0.1.txt]</span> | ||
| Line 298: | Line 312: | ||
<span style="font-size:medium;">3. Support individual node access interval configuration.</span> | <span style="font-size:medium;">3. Support individual node access interval configuration.</span> | ||
| − | <span style="font-size:medium;">4. Configurable node alias. | + | <span style="font-size:medium;">4. Configurable node alias.</span></span> [file://eossfs/ESS-Release/EdgeSense/Software/OPCUA_Client/Debian OPCUA_Client_for_Debian_ReleaseNote_2.0.1.txt]</span> |
| style="width: 286px; text-align: center;" | <span style="font-size:larger;">[file://eossfs/ESS-Release/EdgeSense/Software/OPCUA_Client/Debian device-opcua-client-2.0.1-Debian_9.9-rk3399.run]</span> | | style="width: 286px; text-align: center;" | <span style="font-size:larger;">[file://eossfs/ESS-Release/EdgeSense/Software/OPCUA_Client/Debian device-opcua-client-2.0.1-Debian_9.9-rk3399.run]</span> | ||
| Line 307: | Line 321: | ||
<span style="font-size:medium;">2020/3/31</span> | <span style="font-size:medium;">2020/3/31</span> | ||
| − | | style="width: 78px; text-align: center;" | <span style="font-size:larger;">x86_64 CPU</span | + | | style="width: 78px; text-align: center;" | <span style="font-size:larger;">x86_64 CPU</span> |
| − | | style="width: 109px; text-align: center;" | <span style="font-size:larger;">Windows</span | + | | style="width: 109px; text-align: center;" | <span style="font-size:larger;">Windows</span> |
| style="width: 587px;" | | | style="width: 587px;" | | ||
<span style="font-size:medium;">1. Support Web UI configuration.</span> | <span style="font-size:medium;">1. Support Web UI configuration.</span> | ||
| Line 323: | Line 337: | ||
<span style="font-size:medium;">Coming Soon</span> | <span style="font-size:medium;">Coming Soon</span> | ||
| − | | style="width: 78px; text-align: center;" | <span style="font-size:larger;">x86_64 CPU</span | + | | style="width: 78px; text-align: center;" | <span style="font-size:larger;">x86_64 CPU</span> |
| − | | style="width: 109px; text-align: center;" | <span style="font-size:larger;">Windows</span | + | | style="width: 109px; text-align: center;" | <span style="font-size:larger;">Windows</span> |
| style="width: 587px;" | | | style="width: 587px;" | | ||
<span style="font-size:medium;">1. Support write node data.</span> | <span style="font-size:medium;">1. Support write node data.</span> | ||
Revision as of 08:57, 19 December 2022
Introduction
OPC Unified Architecture (OPC UA) is a machine to machine communication protocol for industrial automation developed by the OPC Foundation.
Features
EdgeSense OPC-UA Client aims to collect data from OPC-UA Server and control.
Feature:
- Connection with multiple OPC-UA server and multiple Node ID.
- Support anonymous authentication, username/password authentication.
- Support individual node data update interval of subscription.
- Configurable node alias.
- Currently support up-link OPC-UA data to WISE-PaaS , not support down-link from WISE-PaaS.
- Detailed features, please see https://docs.google.com/spreadsheets/d/1hxUJgHvcPYq8f44gmVVmwUCddHhOPBflSRkSKR0H9Q4/edit?ts=5ca2bfc9#gid=348272669
How to
Software Requirements
- MQTT broker
- .NET Framework 4.6 or above (Note, Windows 10 have already built-in .NET Framework 4.6)
Installation
Windows:
1. Download OPC-UA Client for Windows from Release Table.
2. Double click the installer to launch the installer to install it to the machine.
Debian:
1. Download OPC-UA Client for Debian from Release Table.
2. Launch the installer to install it to the machine.
Configuration
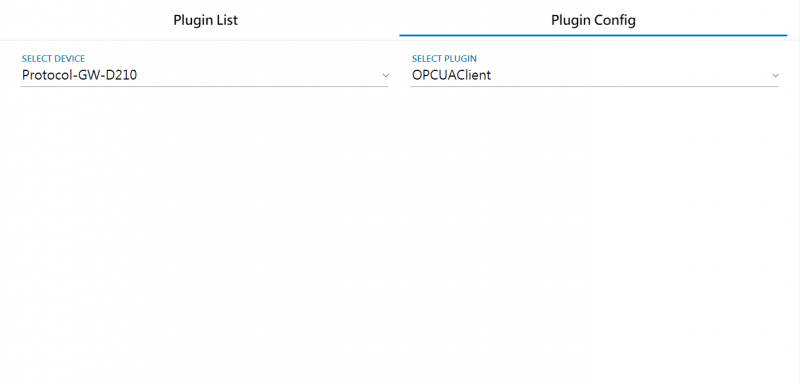
Step 1. Go to "Plug-ins" / Plugin Config to select OPCUAClient Plug-in
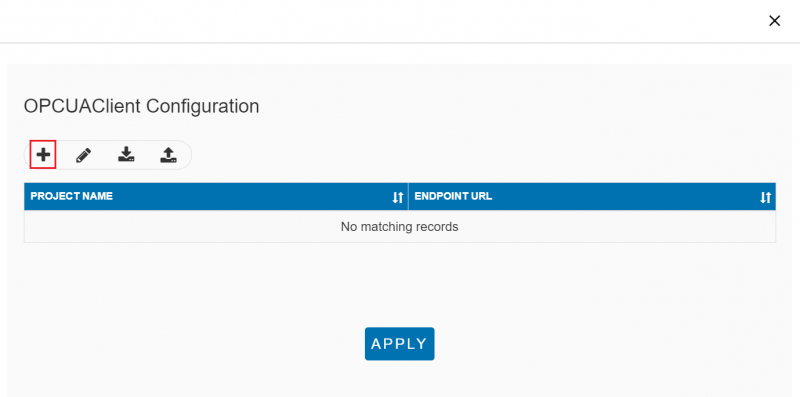
Setp 2. Click "+" to add OPCUA project
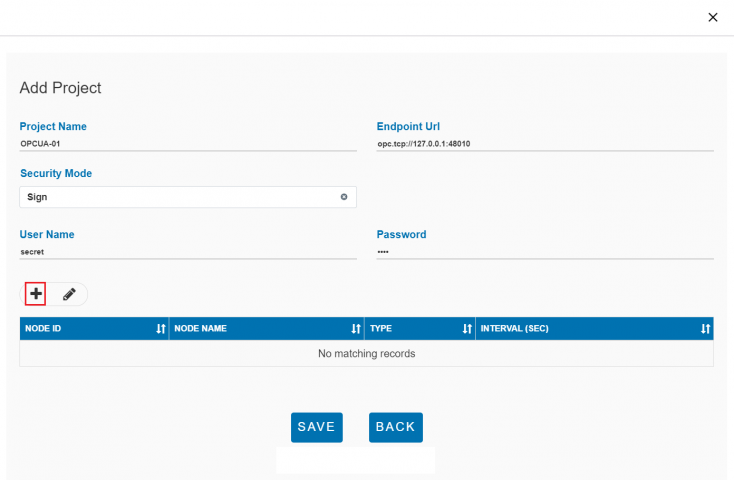
Setp 3. Edit new OPCUA Project
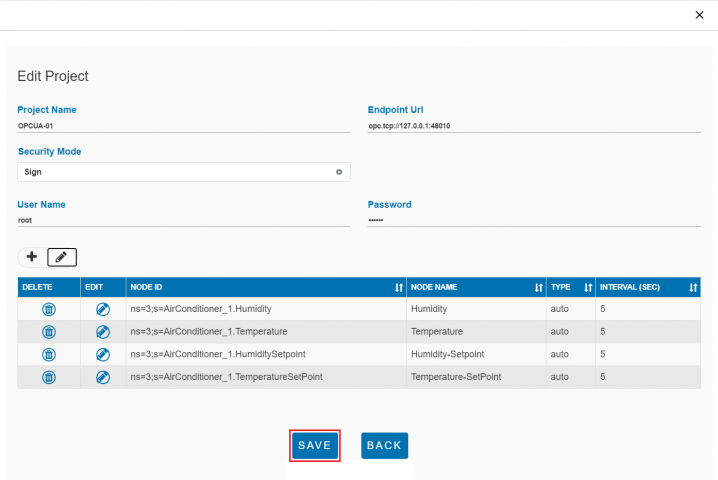
PROJECT NAME: Enter a project name in unique ENDPOINT URL: Endpoint URL of OPCUA Server
SECURITY MODE: None / Sign USER NAME: Account of OPCUA Server PASSWORD: Password of OPCUA Server
Setp 4. Click "+" to add Sensor Node
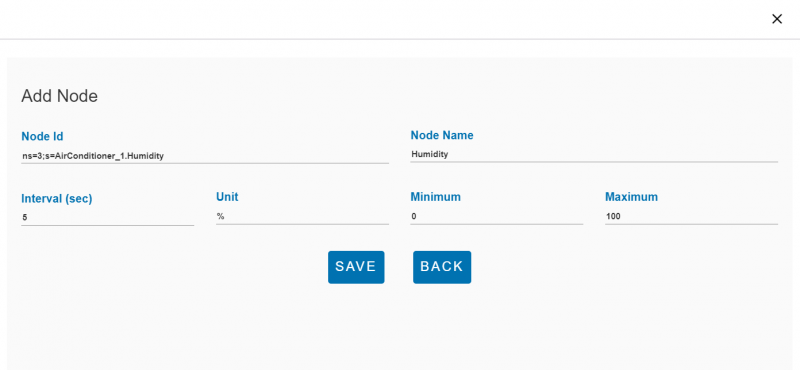
Step 5. Edit Node Information
NODEID: Node ID you'd like to monitor. NODENAME: Node name you'd like to show INTERVAL(SEC): Subscribe/update interval in seconds
Step 6. Click "+" to add multiple nodes
Step 7. Click {{:./img/opcua-config-E03-edit.png}} to delete or edit sensor node info
Step 8. Click "Save" to complete node editing.
Setp 9. Click "Apply" to set and apply the new setting
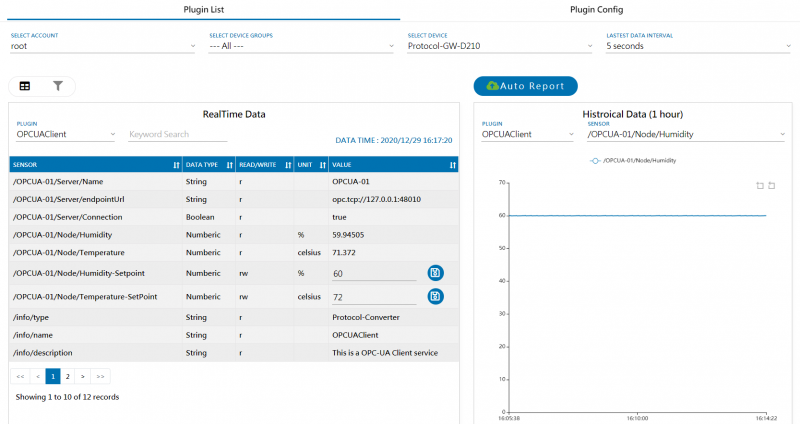
Setp 10. You can monitor OPCUA sensor nodes at "Plugin List".
How to import plugin settings
Step 1. Click Import button from OPCUAClient Configuration
Step 2. Select target file you like to import
Import successful
Step 3. Click APPLY to use imported configuration
How to export plugin settings
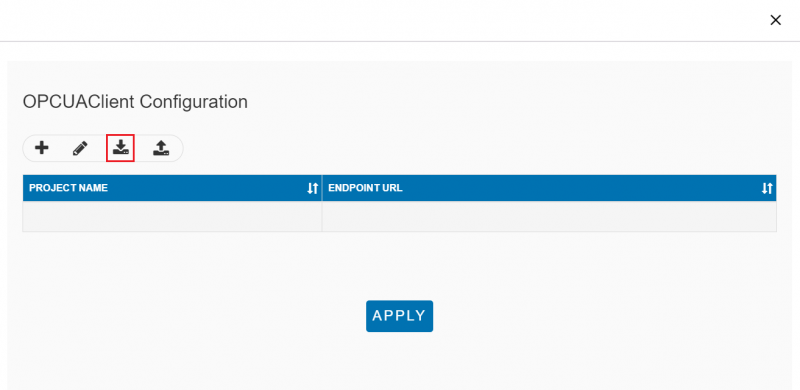
Step 1. Click Export button from OPCUAClient Configuration
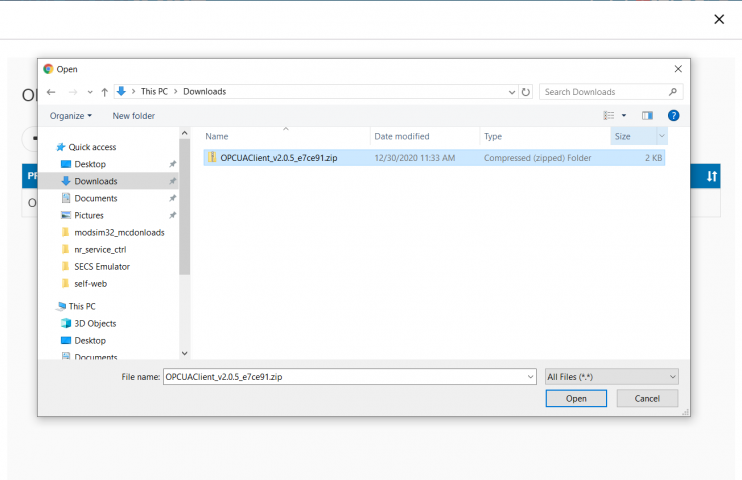
Step 2. Explore the exported file
How to use RESTful API to get history data
Example:
http://172.22.12.84:8080//rmm/v1/data/devices/histdata?plugin=OPCUAClient&sensorId=/OPCUA-01/Node/Temperature&beginTs=2022-01-21%2017:30:00.000&endTs=2022-01-21%2017:35:00.000 Template:Https://i.imgur.com/fqD2QRq.png <html>
</html>
Use case
Building Automation Server
 - Download Unified Automation C++ Demo Server from [link] and install it to the server machine.
 - Launch UaCppServer from Windows Start Menu.
<HTML>
- </HTML> <HTML>
- </HTML>Config OPCUAClient plugin as upper steps to complete the settings.<HTML>
- </HTML><HTML>
</HTML>
Demonstration
Connect a Unified Automation C++ Demo Server
1. Download Unified Automation C++ Demo Server from https://www.unified-automation.com/downloads/opc-ua-servers.html and install it to the server machine.
2. Launch UaCppServer from Windows Start Menu.
3. Config OPC-UA Client to connect to the Unified Automation C++ Demo Server, Username/Password, Endpoint URL and Node IDs are shown in below.
| Username | Password |
| root | secret |
| Endpoint URL Format | opc.tcp://<Mancine Name or IP>:<Port> |
| Endpoint URL for this Demo | opc.tcp://Protocol-Converter-GW:48010 |
| Node Nmae | Node ID |
| AirConditioner_1.Humidity | ns=3;s=AirConditioner_1.Humidity |
| AirConditioner_1.Temperature | ns=3;s=AirConditioner_1.Temperature |
| AirConditioner_2.Humidity | ns=3;s=AirConditioner_2.Humidity |
| AirConditioner_2.Temperature | ns=3;s=AirConditioner_2.Temperature |
4. Edit opcua-client.json to set up client configuration, for example:
{
    "OPCUA_Server":[
        {
            "Name": "OPCUA-UACPP-SERVER",
            "endpointUrl":"opc.tcp://Protocol-Converter-GW:48010",
            "userIdentity": {
                "userName": "root",
                "password": "secret"
            },
            "NodeIDList":[{"NodeId":"ns=3;s=AirConditioner_1.Humidity","Name":"AirConditioner_1.Humidity", "Type":"v", "Interval":2},
                          {"NodeId":"ns=3;s=AirConditioner_1.Temperature","Name":"AirConditioner_1.Temperature", "Type":"v", "Interval":2},
                          {"NodeId":"ns=3;s=AirConditioner_2.Humidity","Name":"AirConditioner_2.Humidity", "Type":"v", "Interval":2},
                          {"NodeId":"ns=3;s=AirConditioner_2.Temperature","Name":"AirConditioner_2.Temperature", "Type":"v", "Interval":2}
                        ]

        }
    ]
}
5. Restart device-opcua-client service from Windows Task Manager.
Release
This is an overview that displays OPC-UA Service versions and some stats and numbers for each release.
| Index | Version | Date | Platform | OS | Release Note | Installer |
| 1 | v2.0.1 |
2020/1/03 |
x86_64 CPU | Windows |
1. Support Multiple OPCUA server. 2. Support Anonymous, Username/Passwordsecurity check.</span> 3. Support individual node access interval configuration. 4. Configurable node alias.</span> |
device-opcua-client-2.0.1.exe |
| 2 | v2.0.1 |
Coming soon |
ARM CPU |
Debian |
1. Support Multiple OPCUA server. 2. Support Anonymous, Username/Password security check. 3. Support individual node access interval configuration. 4. Configurable node alias.</span> OPCUA_Client_for_Debian_ReleaseNote_2.0.1.txt</span> |
device-opcua-client-2.0.1-Debian_9.9-rk3399.run |
| 3 | v2.0.2 |
2020/3/31 |
x86_64 CPU | Windows |
1. Support Web UI configuration. 2. Use AdvSC to control service life cycle. |
device-opcua-client-2.0.2.exe |
| 4 | v2.0.3 |
Coming Soon |
x86_64 CPU | Windows |
1. Support write node data. 2. Support read array type node data. |
device-opcua-client-2.0.3.exe |
Above files are available at local server, please paste file's url in File Explorer to copy file. (How to access to EOSSFS file server )
