|
|
| Line 1: |
Line 1: |
| | + | |
| | = Introduction = | | = Introduction = |
| | | | |
| Line 7: |
Line 8: |
| | <span style="font-size:medium;">Modbus Service is a Windows/Linux system service for WISE Agent to read sensor data from Modbus device or write data into Modbus device. After sensor data are acquired, WISE Agent will upload the data to the WISE-PaaS Cloud.</span> | | <span style="font-size:medium;">Modbus Service is a Windows/Linux system service for WISE Agent to read sensor data from Modbus device or write data into Modbus device. After sensor data are acquired, WISE Agent will upload the data to the WISE-PaaS Cloud.</span> |
| | | | |
| | + | |
| | | | |
| − | | + | |
| − | | |
| | | | |
| | = Features = | | = Features = |
| Line 23: |
Line 24: |
| | *<font size="3">Support byte swap.</font> | | *<font size="3">Support byte swap.</font> |
| | *<span style="font-size:medium;">Support Modbus Coil, Descrete input, Input register & Holding register data.</span> | | *<span style="font-size:medium;">Support Modbus Coil, Descrete input, Input register & Holding register data.</span> |
| − | *<font size="3">Support maximal 10 links, 5 devices for each link, and 10 sensors for each device.</font> | + | *<font size="3">Support maximal 10 links, 5 devices for each link, and 10 sensors for each device.</font> |
| | | | |
| | = How to = | | = How to = |
| Line 43: |
Line 44: |
| | </pre> | | </pre> |
| | | | |
| − | | + | |
| | | | |
| | == Configuration == | | == Configuration == |
| − |
| |
| − |
| |
| − |
| |
| − |
| |
| | | | |
| | === How to config Model === | | === How to config Model === |
| Line 169: |
Line 166: |
| | | | |
| | | | |
| | + | |
| | | | |
| | ==== Config Modbus simulator ==== | | ==== Config Modbus simulator ==== |
| Line 222: |
Line 220: |
| | Step7. Config Modbus-Master | | Step7. Config Modbus-Master |
| | | | |
| − | *Config Modbus-Master plugin as upper steps to complete the settings. | + | *Config Modbus-Master plugin as upper steps to complete the settings. |
| | | | |
| − |
| |
| − |
| |
| − |
| |
| − |
| |
| − |
| |
| − |
| |
| − | = Release =
| |
| − |
| |
| − | <span style="font-size:larger">This is an overview that displays Modbus Service versions and some stats and numbers for each release.</span>
| |
| − |
| |
| − | {| style="width: 1203px" cellspacing="1" cellpadding="1" border="1"
| |
| − | |-
| |
| − | | style="width: 47px; text-align: center" | <span style="font-size:larger">Index</span>
| |
| − | | style="width: 63px; text-align: center" | <span style="font-size:larger">Version</span>
| |
| − | | style="width: 85px; text-align: center" | <span style="font-size:larger">Date</span>
| |
| − | | style="width: 78px; text-align: center" | <span style="font-size:larger">Platform</span>
| |
| − | | style="width: 103px; text-align: center" | <span style="font-size:larger">OS</span>
| |
| − | | style="width: 433px; text-align: center" | <span style="font-size:larger">Release Note</span>
| |
| − | | style="width: 357px; text-align: center" | <span style="font-size:larger">Installer</span>
| |
| − | |-
| |
| − | | style="width: 47px; text-align: center" | <span style="font-size:larger">1</span>
| |
| − | | style="width: 63px; text-align: center" | <span style="font-size:larger">v3.0.1</span>
| |
| − | | style="width: 85px; text-align: center" |
| |
| − | <font size="3">2020/01/21</font>
| |
| − |
| |
| − | | style="width: 78px; text-align: center" | <span style="font-size:larger">x86_64 CPU</span>
| |
| − | | style="width: 103px; text-align: center" | <span style="font-size:larger">Windows 10</span>
| |
| − | | style="width: 433px" |
| |
| − | *<span style="font-size:medium; text-align: left">Support connection for multiple Modbus slave.</span>
| |
| − | *<span style="font-size:medium; text-align: left">Support Modbus TCP and RTU in one configuration.</span>
| |
| − | *<span style="font-size:medium; text-align: left">Support individual read interval by connection.</span>
| |
| − | *<span style="font-size:medium; text-align: left">Support only get Modbus data.</span>
| |
| − |
| |
| − | | style="width: 357px" | <span style="font-size:larger">[file://eossfs/ESS-Release/EdgeSense/Software/Modbus-Master device-modbus-master-3.0.1.exe]</span>
| |
| − | |-
| |
| − | | style="width: 47px; text-align: center" | <span style="font-size:larger">2</span>
| |
| − | | style="width: 63px; text-align: center" | <span style="font-size:larger">v3.0.1</span>
| |
| − | | style="width: 85px; text-align: center" |
| |
| − | <font size="3">Coming soon</font>
| |
| − |
| |
| − | | style="width: 78px; text-align: center" | <span style="font-size:larger">ARM CPU</span>
| |
| − | | style="width: 103px; text-align: center" | <span style="font-size:larger">Debian</span>
| |
| − | | style="width: 433px" |
| |
| − | *<span style="font-size:medium; text-align: left">Support connection for multiple Modbus slave.</span>
| |
| − | *<span style="font-size:medium; text-align: left">Support Modbus TCP and RTU in one configuration.</span>
| |
| − | *<span style="font-size:medium; text-align: left">Support individual read interval by connection.</span>
| |
| − | *<span style="font-size:medium; text-align: left">Support only get Modbus data.</span>
| |
| − |
| |
| − | | style="width: 357px" | <span style="font-size:larger">[file://eossfs/ESS-Release/EdgeSense/Software/Modbus-Master device-modbus-master-3.0.1-Debian_9.9-rk3399.run]</span>
| |
| − | |-
| |
| − | | style="width: 47px; text-align: center" | <span style="font-size:larger">3</span>
| |
| − | | style="width: 63px; text-align: center" | <span style="font-size:larger">v3.0.2</span>
| |
| − | | style="width: 85px; text-align: center" |
| |
| − | <font size="3">2020/02/17</font>
| |
| − |
| |
| − | | style="width: 78px; text-align: center" | <span style="font-size:larger">x86_64 CPU</span>
| |
| − | | style="width: 103px; text-align: center" | <span style="font-size:larger">Windows 10</span>
| |
| − | | style="width: 433px" |
| |
| − | *<span style="font-size:medium; text-align: left">Support network link lost-reconnect feature.</span>
| |
| − | *<span style="font-size:medium; text-align: left">Support serial port link lost-reconnect feature.</span>
| |
| − | *<span style="font-size:medium; text-align: left">Support modbus slave lost-reconnect feature.</span>
| |
| − | *<span style="font-size:medium; text-align: left">Support resume from S3/S4 feature.</span>
| |
| − |
| |
| − | | style="width: 357px" | <span style="font-size:larger">[file://eossfs/ESS-Release/EdgeSense/Software/Modbus-Master device-modbus-master-3.0.2.exe]</span>
| |
| − | |-
| |
| − | | style="width: 47px; text-align: center" | <span style="font-size:larger">4</span>
| |
| − | | style="width: 63px; text-align: center" | <span style="font-size:larger">v3.0.2</span>
| |
| − | | style="width: 85px; text-align: center" |
| |
| − | <font size="3">2020/02/17</font>
| |
| − |
| |
| − | | style="width: 78px; text-align: center" | <span style="font-size:larger">ARM CPU</span>
| |
| − | | style="width: 103px; text-align: center" | <span style="font-size:larger">Debian</span>
| |
| − | | style="width: 433px" |
| |
| − | *<span style="font-size:medium; text-align: left">Support network link lost-reconnect feature.</span>
| |
| − | *<span style="font-size:medium; text-align: left">Support serial port link lost-reconnect feature.</span>
| |
| − | *<span style="font-size:medium; text-align: left">Support modbus slave lost-reconnect feature.</span>
| |
| − | *<span style="font-size:medium; text-align: left">Support resume from S3/S4 feature.</span>
| |
| − |
| |
| − | | style="width: 357px" | <span style="font-size:larger">[file://eossfs/ESS-Release/EdgeSense/Software/Modbus-Master device-modbus-master-3.0.2-Debian_9.9-rk3399.run]</span>
| |
| − | |-
| |
| − | | style="width: 47px; text-align: center" | <span style="font-size:larger">5</span>
| |
| − | | style="width: 63px; text-align: center" | <span style="font-size:larger">v3.0.7</span>
| |
| − | | style="width: 85px; text-align: center" |
| |
| − | <font size="3">2021/12/13</font>
| |
| − |
| |
| − | | style="width: 78px; text-align: center" | <span style="font-size:larger">x86_64 CPU</span>
| |
| − | | style="width: 103px; text-align: center" | <span style="font-size:larger">Windows 10</span>
| |
| − | | style="width: 433px" |
| |
| − | *<span style="font-size:medium; text-align: left">Support for importing Cermate INI file.</span>
| |
| − | *<span style="font-size:medium; text-align: left">Enhance program’s stablility and Modbus device compatibility.</span>
| |
| − |
| |
| − | | style="width: 357px" |
| |
| − | |-
| |
| − | | style="width: 47px; text-align: center" | <span style="font-size:larger">6</span>
| |
| − | | style="width: 63px; text-align: center" | <span style="font-size:larger">v3.0.7</span>
| |
| − | | style="width: 85px; text-align: center" |
| |
| − | <font size="3">2021/12/13</font>
| |
| − |
| |
| − | | style="width: 78px; text-align: center" | <span style="font-size:larger">x86_64 CPU</span>
| |
| − | | style="width: 103px; text-align: center" | <span style="font-size:larger">Ubuntu 18.04</span>
| |
| − | | style="width: 433px" |
| |
| − | *<span style="font-size:medium; text-align: left">Support for importing Cermate INI file.</span>
| |
| − | *<span style="font-size:medium; text-align: left">Enhance program’s stablility and Modbus device compatibility.</span>
| |
| − |
| |
| − | | style="width: 357px" |
| |
| − | |-
| |
| − | | style="width: 47px; text-align: center" | <span style="font-size:larger">7</span>
| |
| − | | style="width: 63px; text-align: center" | <span style="font-size:larger">v3.0.8</span>
| |
| − | | style="width: 85px; text-align: center" |
| |
| − | <font size="3">2022/08/19</font>
| |
| − |
| |
| − | | style="width: 78px; text-align: center" | <span style="font-size:larger">x86_64 CPU</span>
| |
| − | | style="width: 103px; text-align: center" | <span style="font-size:larger">Windows 10</span>
| |
| − | | style="width: 433px" |
| |
| − | *<span style="font-size:medium; text-align: left">Update log message.</span>
| |
| − |
| |
| − | | style="width: 357px" |
| |
| − | |-
| |
| − | | style="width: 47px; text-align: center" | <span style="font-size:larger">8</span>
| |
| − | | style="width: 63px; text-align: center" | <span style="font-size:larger">v3.0.8</span>
| |
| − | | style="width: 85px; text-align: center" |
| |
| − | <font size="3">2022/08/19</font>
| |
| − |
| |
| − | | style="width: 78px; text-align: center" | <span style="font-size:larger">x86_64 CPU</span>
| |
| − | | style="width: 103px; text-align: center" | <span style="font-size:larger">Ubuntu 20.04</span>
| |
| − | | style="width: 433px" |
| |
| − | *<span style="font-size:medium; text-align: left">Update log message.</span>
| |
| − |
| |
| − | | style="width: 357px" |
| |
| | | | |
| − | | + | |
| − | |}
| |
| − | | |
| − | <span style="font-size:larger">Above files are available at local server, please paste file's url in File Explorer to copy file. ([[EdgeSense_FAQ|How to access to EOSSFS file server]] )</span>
| |
Revision as of 03:51, 8 August 2023
Introduction
Modbus enables communication among many devices connected to the same network, for example, a system that measures temperature and humidity and communicates the results to a computer. Modbus is often used to connect a supervisory computer with a remote terminal unit (RTU) in supervisory control and data acquisition (SCADA) systems.
Many of the data types are named from its use in driving relays: a single-bit physical output is called a coil, and a single-bit physical input is called a discrete input or a contact.
Modbus Service is a Windows/Linux system service for WISE Agent to read sensor data from Modbus device or write data into Modbus device. After sensor data are acquired, WISE Agent will upload the data to the WISE-PaaS Cloud.
Features
EdgeSense Modbus-Master aims to collect data from Modbus Slave.
Feature:
- Support connection with multiple Modbus slave.
- Support access both Modbus TCP and RTU in one service.
- Support individual read interval by connection.
- Configurable sensor alias.
- Support byte swap.
- Support Modbus Coil, Descrete input, Input register & Holding register data.
- Support maximal 10 links, 5 devices for each link, and 10 sensors for each device.
How to
Installation
Windows:
1. Download Modbus-Master for Windows from Release Table.
2. Double click the installer to launch the installer to install it to the machine.
Debian:
1. Download Modbus-Master for Debian from Release Table.
2. Launch the installer to install it to the machine.
sudo ./device-modbus-master-3.0.1-Debian_9.9-rk3399.run
Configuration
How to config Model
Step 1. Go to "Plug-ins" / Plugin Config to select Modbus-Master Plug-in

Setp 2. From Modbus-Master Configuration, open Model Management tab, click "+" to add new Model.
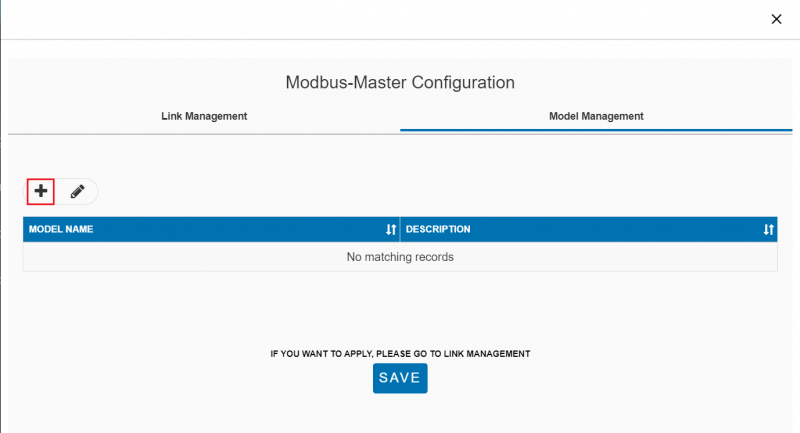
Setp 3. Input Model name and Description for new Model.
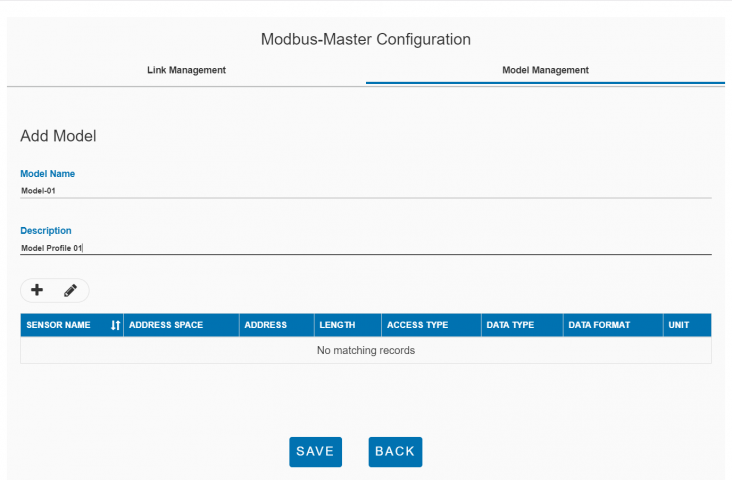
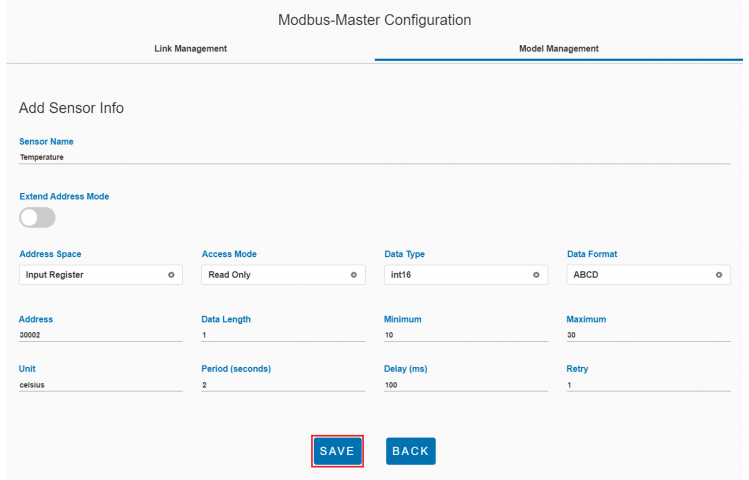
Step 4. Click "+" to add Sensor - Input Sensor Name - Select Address Space, Access mode, Data Type, Data Format and input Address, Data Length, Minimal/Maximal Value for new sensor's attributes. - Input below timing attributes. . Period (second) . Delay (ms, range: 0~1000ms) . Retry
- Click "Save" button to save the new sensor.
Step 5. Repeat Step 4 to add another sensor.

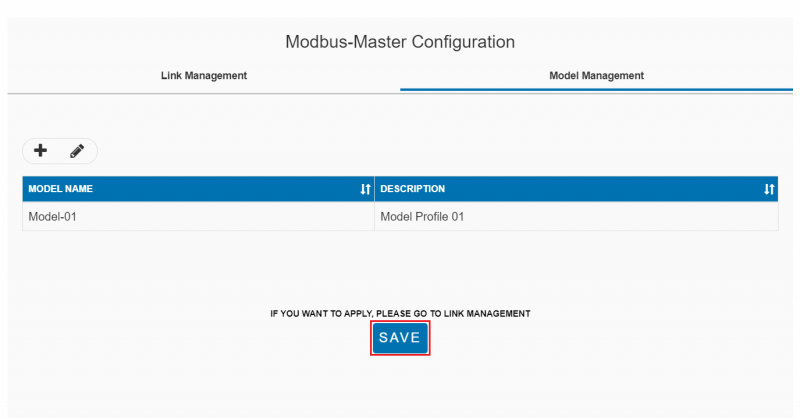
Step 6. Click "Save" button to save the new sensors.

Step 5. Click "Save" button to save the new model.
How to config Link
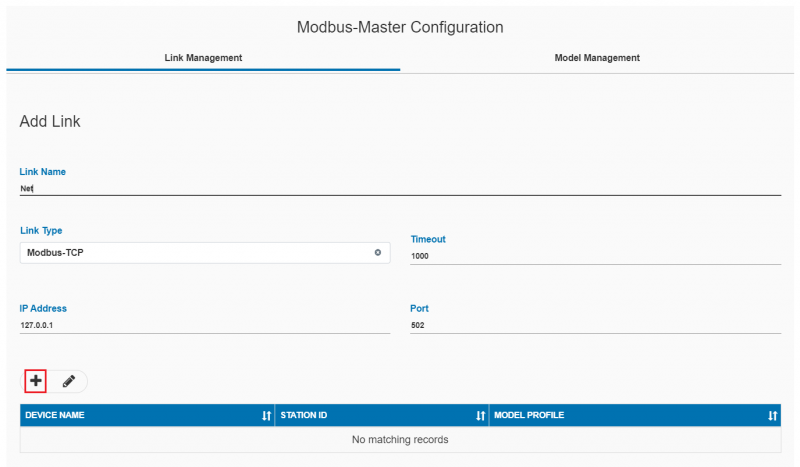
Step 1. From Modbus-Master Configuration, open Link Management tab, click "+" to add a new Link.

Step 2. Input Link Name, Link Type for the new Link.
for Modbus-TCP link, set parameters: - IP - Port
for Modbus-RTU link, set parameters: - COM port - Baudrate - Data bits - Stop bits - Parity mode
Click "+" icon to add a new device.
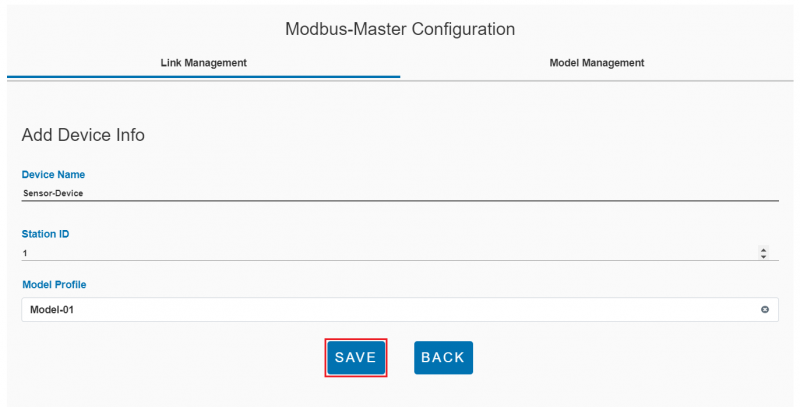
Step 3. Input Device Name, Station Id and select Model Profile for the new device. Model Profile should be added by upper Model Management steps.
Click "Save" button to save the new device.
Step 4. Click "Save" button to save the new link.
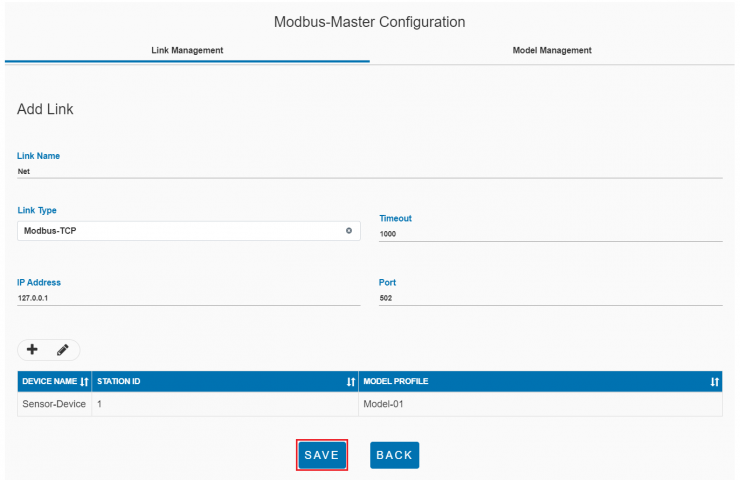
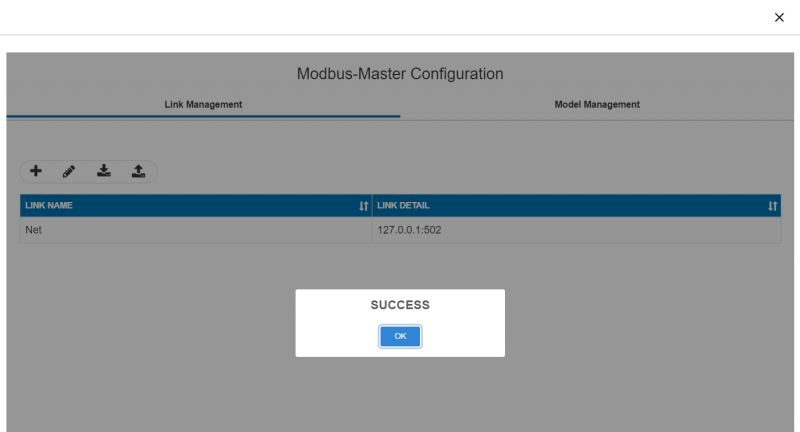
Step 5. Click "Apply" button to apply the new link.

Apply new settings Successfully

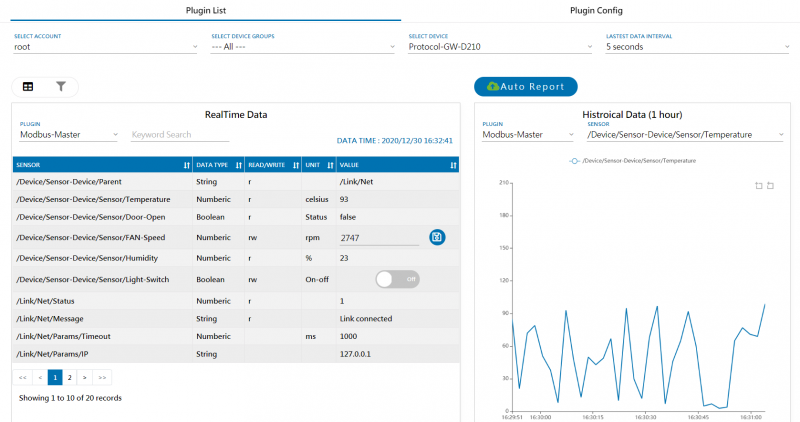
Step 6. Go to Plugin List and select Modbus-Master plugin, the new sensor will be shown in this page
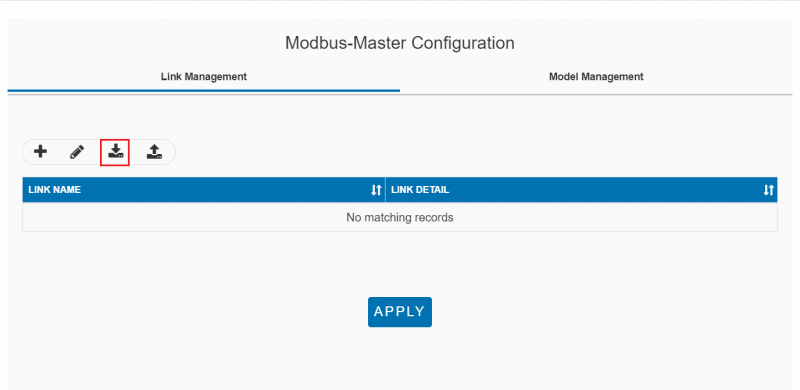
How to import plugin settings
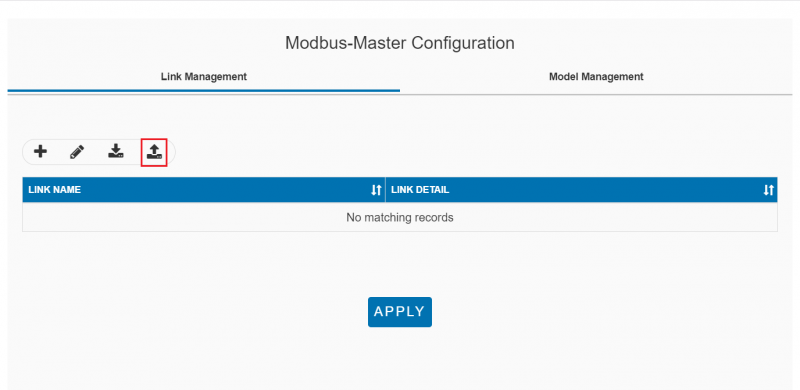
Step 1. Click Import button from Modbus-Master Configuration
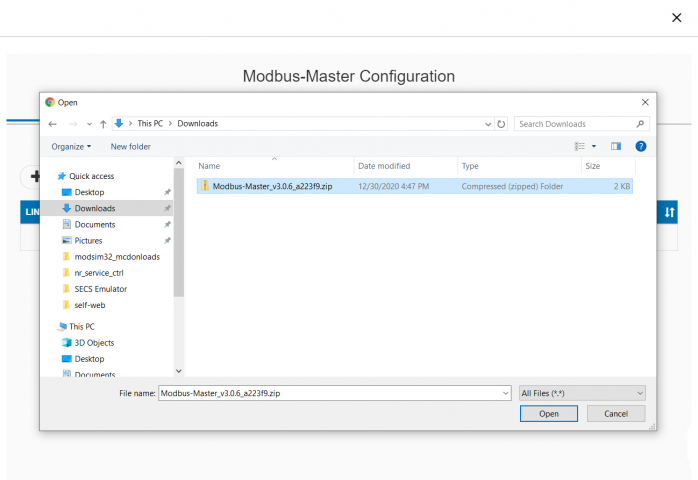
Step 2. Select target file you like to import
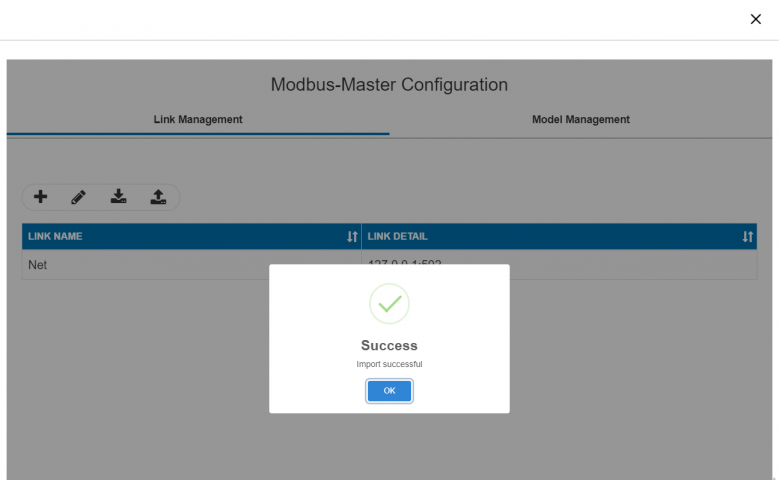
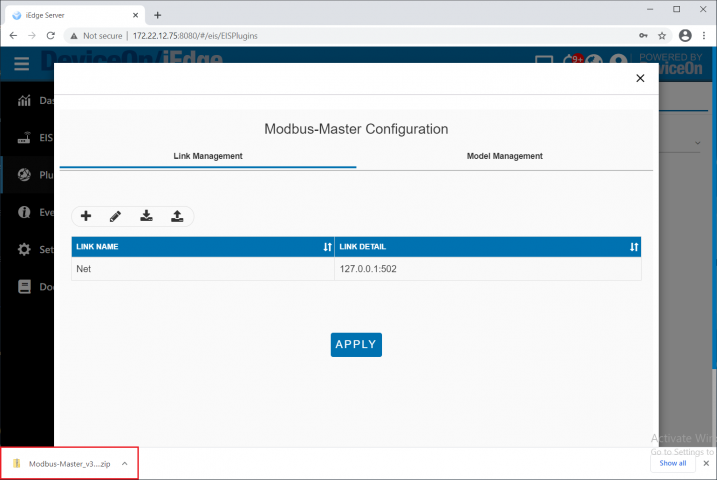
Import successful
Step 3. Click APPLY to use imported configuration
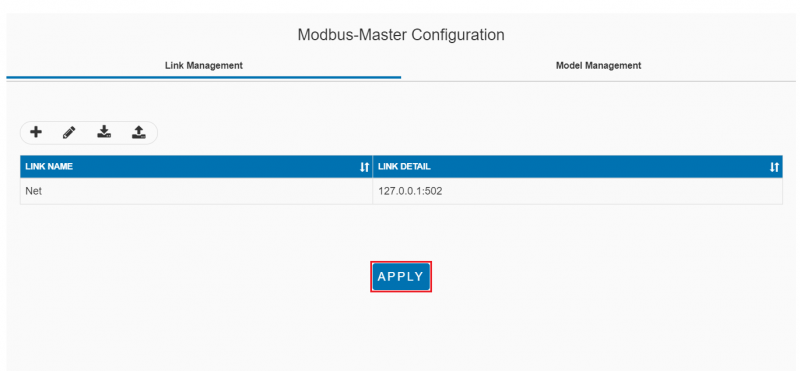
Apply new settings Successfully
How to export plugin settings
Step 1. Click Export button from Modbus-Master Configuration
Step 2. Explore the exported file
Use case
Connect and upload data for Modbus Temperature and Humidity sensor
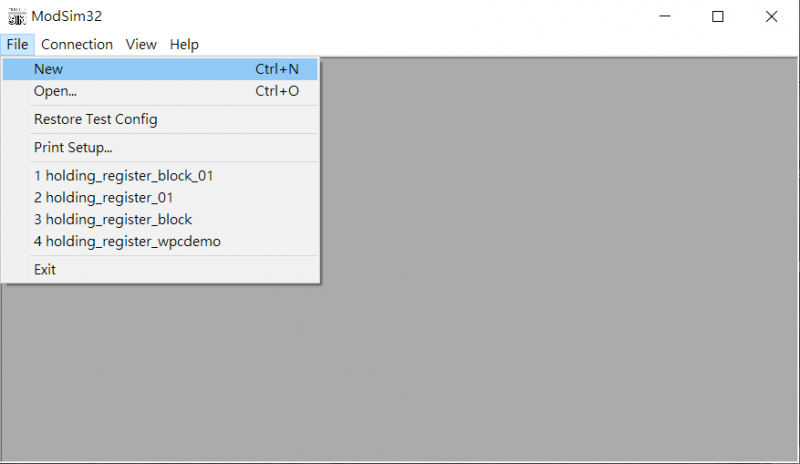
Use Modsim32 to simulate a modbus TCP device with a temperature sensor and a humidity sensor, config Modbus-Master to read these two sensors and upload iEdge cloud.
Config Modbus simulator
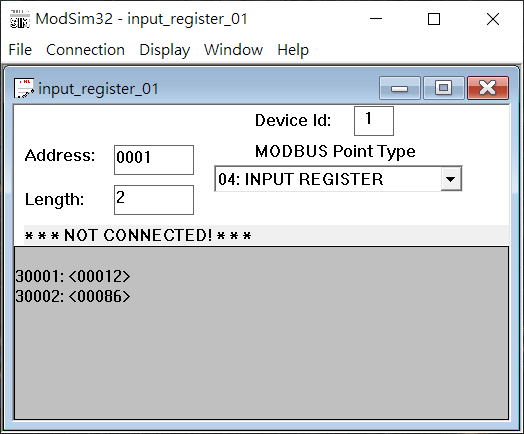
Step1. Open Modbus Simulator: Launch ModSim32 and click "New" in program menu to create a new simulator page.
Step2. Set parameter as below:
- Device Id: 1
- Address: 0001
- Length: 2
- Modbus Point Type: INPUT REGISTER
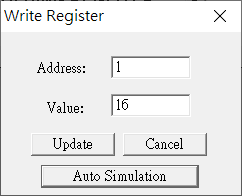
Step3. Enable Auto Simulation:
- Double click on the sensor address 30001
- Click "Auto Simulation"
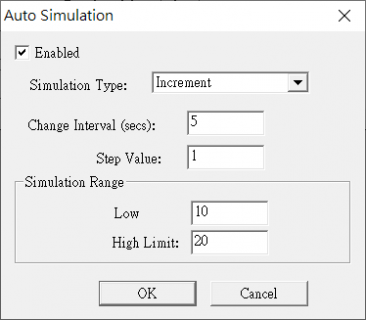
Step4. Set simulation parameters:
- Check "Enable"
- Simulation Type: Increment
- Change Interval (secs): 5
- Step VAlue: 1
- Low Limit: 10
- High Limit: 20
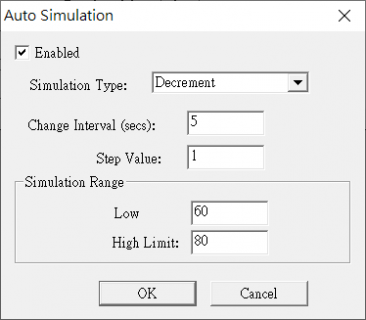
Step5. Do the same step for the address 30002 and set simulation parameter as below:
- Simulation Type: Decrement
- Change Interval (secs): 5
- Step VAlue: 1
- Low Limit: 60
- High Limit: 80
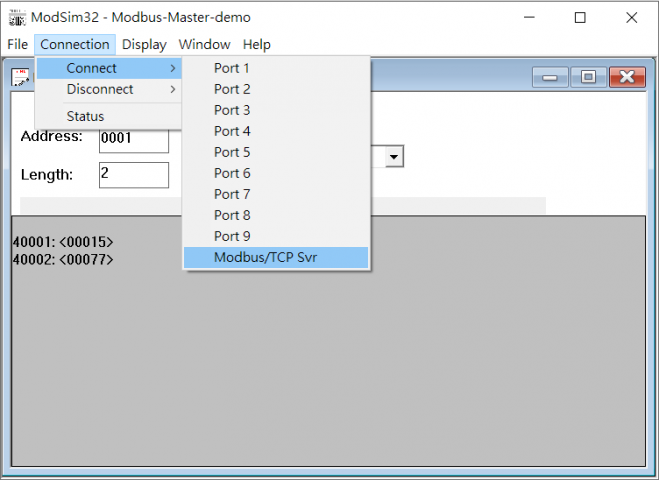
Step6. Set Connection to Modbus/TCP Svr:
- Click Connection
- Click Modbus/TCP Svr to simulate Modbus TCP connection
Step7. Config Modbus-Master
- Config Modbus-Master plugin as upper steps to complete the settings.


