Difference between revisions of "X86/Yocto BSP/QSG v1.2"
(Created page with " {{DISPLAYTITLE:x86 Yocto BSP v1.2 Quick Start Guide}} <div style="float:right; position:fixed; margin:0 1em 0 0; top5100px; right:10px; max-height: 400px; overflow: aut...") |
m (Modify Create_Install_Image.sh download path) |
||
| Line 103: | Line 103: | ||
== <span style="color:#0070c0">Create Install Image</span> == | == <span style="color:#0070c0">Create Install Image</span> == | ||
| − | Get the [https://www.dropbox.com/sh/ | + | Get the [https://www.dropbox.com/sh/omsi0ga8hqgltl6/AAD-uevWHqoyo_YDP9A4UrGua?dl=0 Create_Install_Image.sh](password is ProvidedByAdvantech), put it to the home directory and do the following commands |
<syntaxhighlight lang="bash"> | <syntaxhighlight lang="bash"> | ||
Latest revision as of 07:15, 25 September 2023
Host Machine
Recommended Host Machine specification:
• Intel® Core™ i7 processor (4 cores).
• Linux OS of choice for the Yocto Project build is Ubuntu 18.04 LTS OS or higher.
• Minimum of 32 GB Random Access Memory (RAM) and 800GB disk space.
• Minimum of SWAP size no less than your RAM size.
• High-speed network connectivity.
Install docker
sudo apt update
sudo apt install docker.io
systemctl status docker ## check if docker service is active
sudo usermod -aG docker $USER
sudo reboot
docker version ## check docker version
- Please refer to Docker Installation Guide for details
Install pre-built docker image
If you want to build docker image from scratch, please skip this section.
Please refer to this page to get the pre-built docker image tarball(password is ProvidedByAdvantech).
Then do the following command.(Remember to replace the ${DATE} with the exact date code)
docker load --input adv-x86-yocto-1.2-docker-image_${DATE}.tar.gz
Unpack Yocto BSP
You should replace the following ${BSP_TARBALL} with the exact tarball name.
tar xvf ${BSP_TARBALL} -C ~/
Build Docker Image
(The alternative way is to install the pre-built docker image.)
cd ~/adv-x86-yocto-1.2
scripts/build_docker_image.sh
Put Download Files (optional)
Please refer to this page to get downloads tarball(password is ProvidedByAdvantech).
Then do the following command to restore downloads to the specific directory.(Remember to replace the ${DATE} with the exact date code)
tar xvf adv-x86-yocto-1.2-downloads_${DATE}.tar -C ~/adv-x86-yocto-1.2/yocto/build/
Build Yocto Image
Start docker container
cd ~/adv-x86-yocto-1.2
./scripts/docker_run.sh
Start building yocto image
source ../intel-embedded-system-enabling/oe-init-build-env ./
bitbake -k mc:x86-adv-gui:advantech-image-gui
Or the script:
./init_build_vol.sh
- Please refer to FAQ.
Stop docker container
exit ## or logout
You can get the below files from the directory, ~/adv-x86-yocto-1.2/yocto/build/tmp-x86-adv-gui-glibc/deploy/images/intel-corei7-64/.
- advantech-image-gui-intel-corei7-64.wic
- advantech-image-gui-intel-corei7-64.wic.bz2
- advantech-image-gui-intel-corei7-64.wic.bmap
Create Install Image
Get the Create_Install_Image.sh(password is ProvidedByAdvantech), put it to the home directory and do the following commands
chmod +x ~/Create_Install_Image.sh
~/Create_Install_Image.sh
And you will get the compressed install image.
- advantech-image-gui-intel-corei7-64_install.wic.bz2
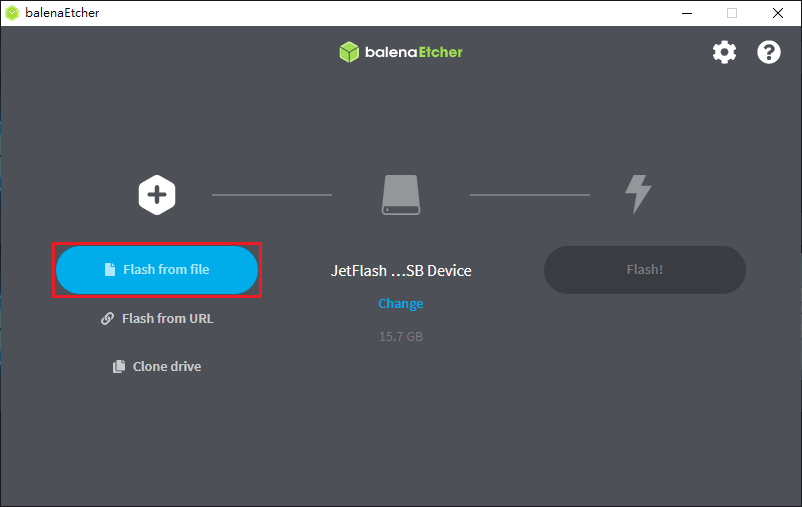
Create USB installer
- Put the advantech-image-gui-intel-corei7-64_install.wic.bz2 to windows computer.
- Extract advantech-image-gui-intel-corei7-64_install.wic.bz2 to advantech-image-gui-intel-corei7-64_install.wic.
- Plug USB drive to your computer.
- Download balenaEtcher.
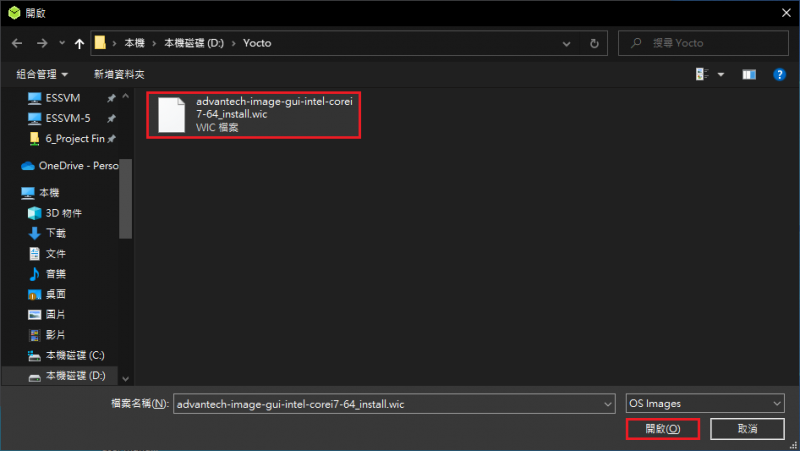
- Execute balenaEtcher, click “Flash from file“ to select the wic file, advantech-image-gui-intel-corei7-64_install.wic.
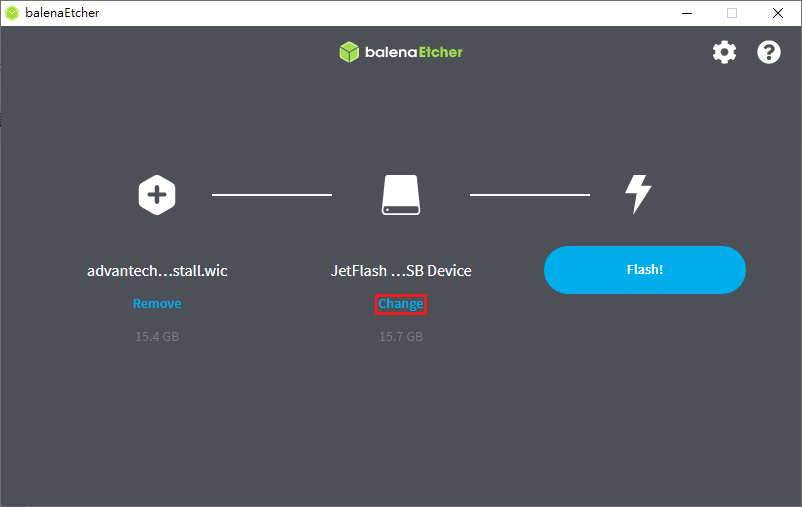
- Click “Change“ to select the USB drive which you want to flash, then click “Select(X)“

- Click “Flash!“
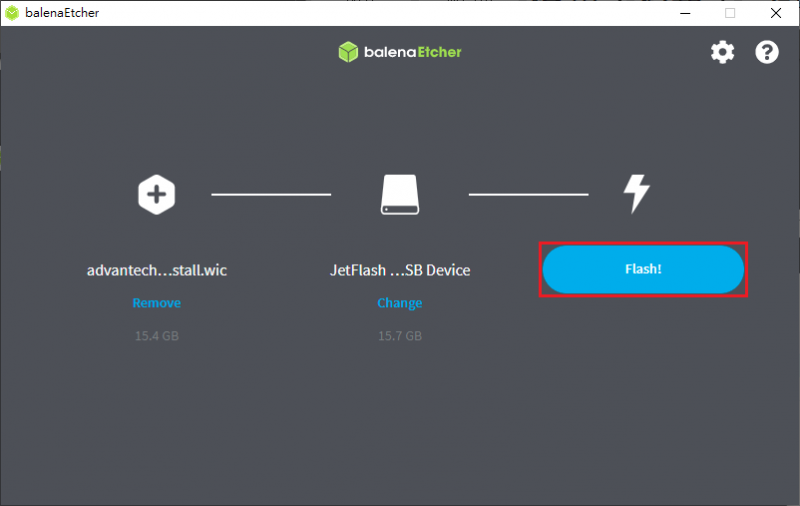
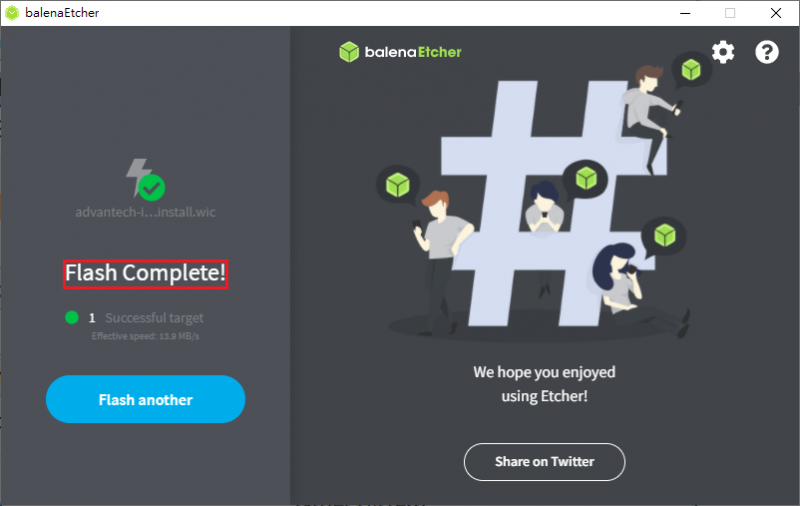
- While the “Flash Complete!” shows up, click “X” to close balenaEtcher.


Install to Target Device
- Plug USB installer to this system and boot from USB drive.
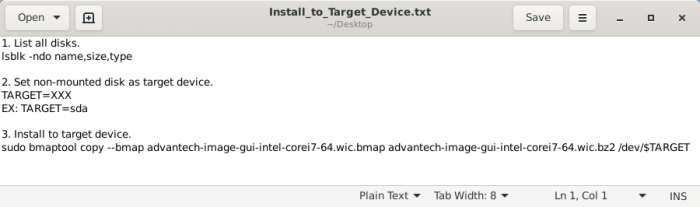
- Open the Install_to_Target_Device.txt on desktop for easily copy&paste command to "Terminal".
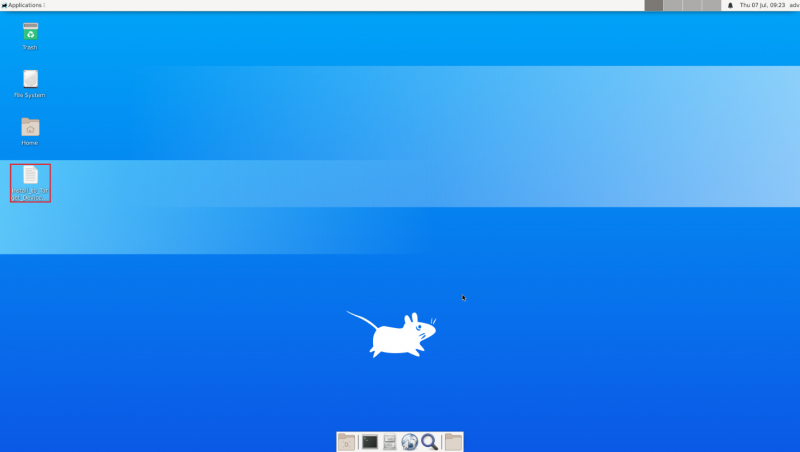
- Click "Terminal Emulator".

- Input the following command to show all disks .
lsblk -ndo name,size,type
- Input the following command to set which disk you would like to install.
TARGET=XXX ## XXX means exact disk you would like to install, e.g. sda
- Input the following command to flash image to target disk.
sudo bmaptool copy --bmap advantech-image-gui-intel-corei7-64.wic.bmap advantech-image-gui-intel-corei7-64.wic.bz2 /dev/$TARGET

- While system shows "bmaptool: info : 100% copied", turn off target device and remove USB drive.

- After reboot, system boot into Yocto.


Enable secure boot
- Boot to BIOS, go to “Security-> Secure Boot-> Key Management”.
Check all “Secure Boot variable” is “No Keys”. If all of them are not “No Keys”.
Select “Reset To Setup Mode-> Yes”, system will auto reboot and clear all keys.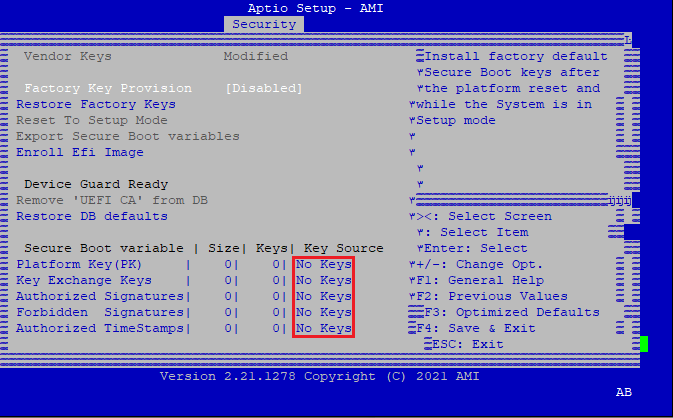

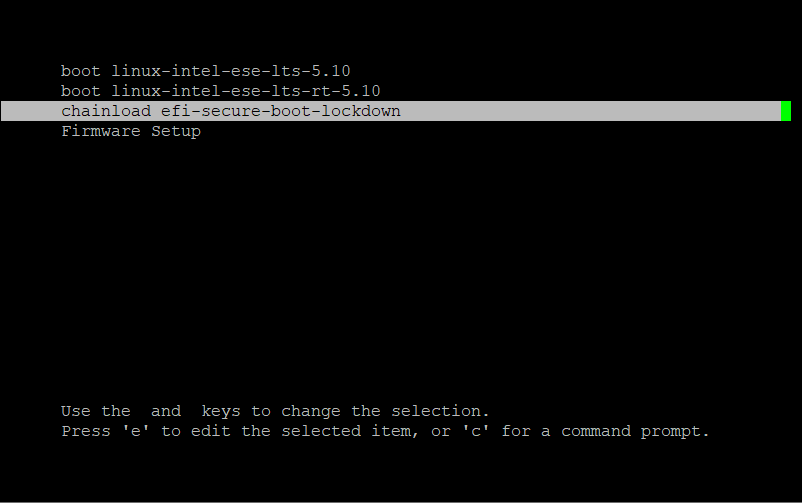
- Reboot system to OS, during boot menu, select “chainload efi-secure-boot-lockdown” then press enter.
- After sytem created Cert, it will reboot automactically.

- Boot to BIOS again, go to “Security-> Secure Boot” enable “Secure Boot.”
Go to “Save & Exit” select “Save Changes and Exit”, system will auto reboot.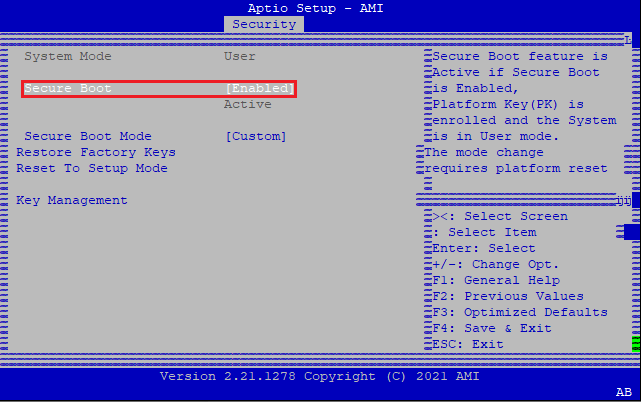
- Reboot system to OS, open Terminal and use command “sudo mokutil –sb-state”. You will see “SecureBoot enabled”.


