Difference between revisions of "RSB-3730 user guide"
Xingxing.li (talk | contribs) |
Xingxing.li (talk | contribs) |
||
| Line 203: | Line 203: | ||
| style="width: 137px;" | [http://ess-wiki.advantech.com.tw/wiki/index.php?title=Test_Report&action=edit&redlink=1 Test Report] | | style="width: 137px;" | [http://ess-wiki.advantech.com.tw/wiki/index.php?title=Test_Report&action=edit&redlink=1 Test Report] | ||
|} | |} | ||
| + | |||
=== '''系统更新方法(System update method)''' === | === '''系统更新方法(System update method)''' === | ||
| − | |||
| − | |||
| − | |||
| − | |||
| − | |||
| − | |||
| − | |||
| − | |||
| − | |||
| − | |||
| − | |||
| − | |||
| − | |||
| − | |||
| − | |||
'''Device Routes:''' | '''Device Routes:''' | ||
| Line 237: | Line 223: | ||
# diff data data1 | # diff data data1 | ||
# dd if=backup of=/dev/mmcblk1 bs=1 seek=4096</pre> | # dd if=backup of=/dev/mmcblk1 bs=1 seek=4096</pre> | ||
| + | |||
| + | '''Install the System from SD Card''' | ||
| + | |||
| + | 1. Copy imx-image-full-imx8mmrsb3730a2-xxxxxx.rootfs.sdcard package to your desk- top. use ubuntu OS.<br/> 2. Insert SD card to PC.<br/> 3. Make a bootable SD card. For example, the node of an SD card is /dev/sdv. | ||
| + | <pre># umount /dev/sdv* | ||
| + | # dd if=./imx-image-full-imx8mmrsb3730a2-xxxx.rootfs.sdcard \ | ||
| + | of=/dev/sdv bs=1M | ||
| + | # sync</pre> | ||
| + | |||
| + | 4. Insert SD card and copy imx-image-full-imx8mmrsb3730a1-xxxxxx.rootfs.sdcard to USB disk.<br/> 5. Insert USB disk and SD card then boot the whole system from SD card by changing SW1 to 1-2 ON.<br/> 6. Enter usb disk folder, make a bootable emmc. | ||
| + | <pre># cd /run/media/sda1/ | ||
| + | # umount /dev/mmcblk2* | ||
| + | # dd if=./imx-image-full-imx8mmrsb3730a2-xxxx.rootfs.sdcard \ | ||
| + | of=/dev/mmcblk2 bs=1M | ||
| + | # sync | ||
| + | </pre> | ||
== '''Linux基本使用方法(Linux Basic usage method)''' == | == '''Linux基本使用方法(Linux Basic usage method)''' == | ||
Revision as of 02:34, 13 November 2023
Contents
产品介绍(Product Presentation)
产品特性(Product Features)
- NXP i.MX 8M PLUS 4xA53@1.8GHz
- Integrate 2.3 TOPS NPU and extend 8-26 TOPS AI card
- 4kP30,1080p60 HEVC, H.264, VP9, VP8 decoding
- 1080p60 H.265, H.264 encoding
- 1xHDMI2.0
- 5xGbE LAN, 1xGbE Fiber
- USB3.0,USB2.0,RS232,RS485,CAN FD,SATA,SD
- 8 Channels Mic Array
- Support AI card/5G/4G/GPS/ Wi-Fi 5/Wi-Fi6/BT
- Support TPM,TCM
- Linux and, Andriod
- Embeded DeviceOn, DeviceOn.CommBridge
产品官网链接(Product official website link)
RSB-3730 - NXP i.MX 8M Mini Cortex-A53 2.5" SBC with UIO40-Express - Advantech
硬件接口说明(Hardware interface description)
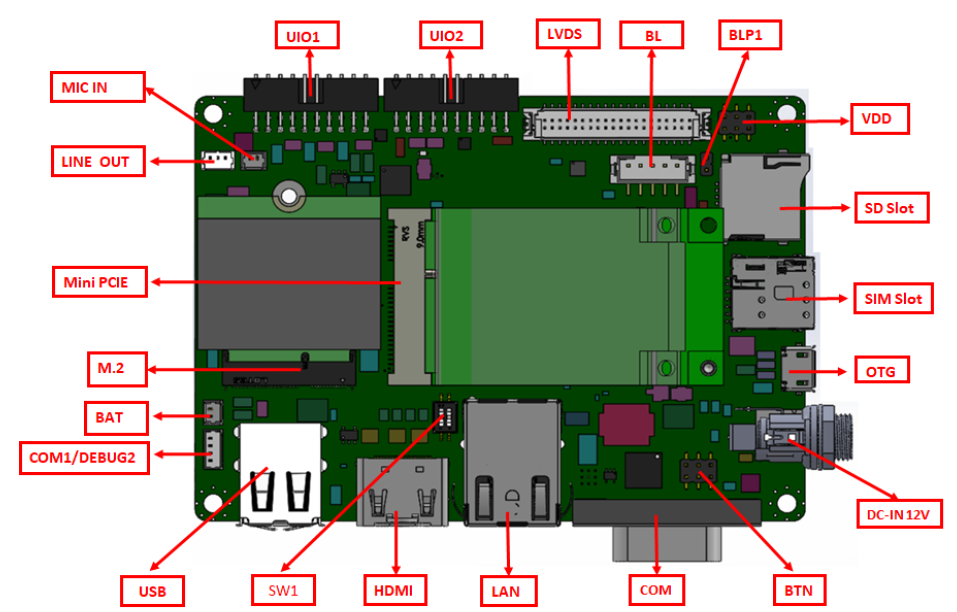
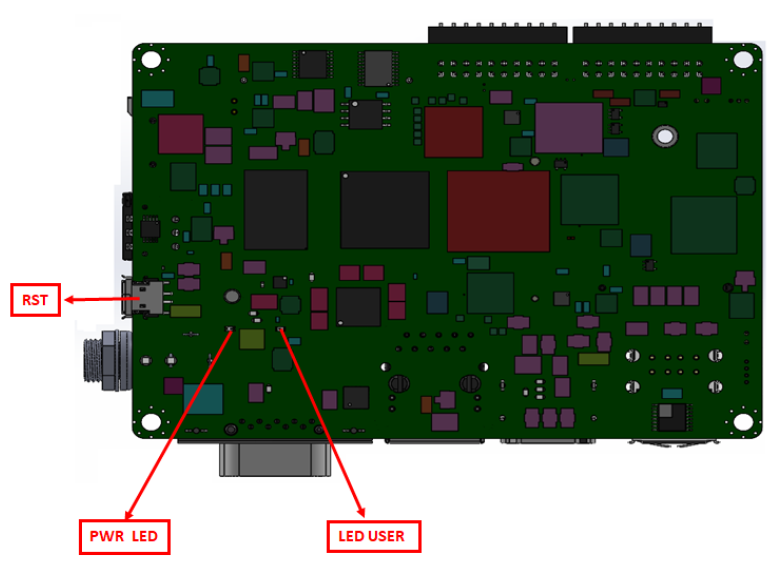
接口布局图 Board Layout
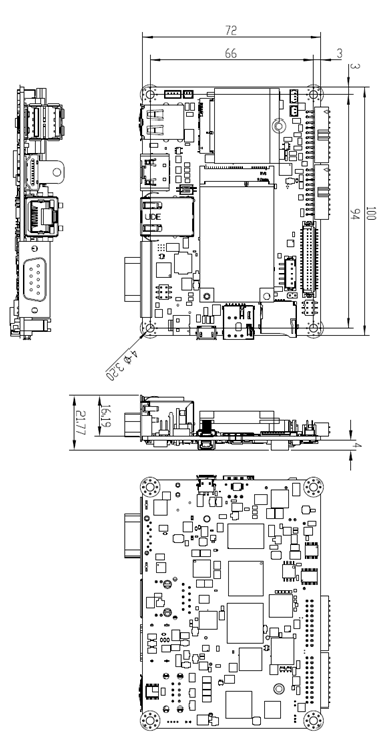
接口尺寸 Board Dimension
Jumper List
| Jumper list | |
| VDD | VDD 3.3V &5V LVDS VDD & Backlight power level select |
| BLP1 | LVDS Backlight power 12V select |
| SW1 | AT &ATX Mode select and boot mode select |
| BTN | Power Button |
Connector List
| COM1/DEBUG2 | Debug CONN |
| BAT | RTC CONN |
| M.2 | M.2 CONN |
| LINE OUT | LINE OUT CONN |
| MIC IN | MIC IN CONN |
| UIO1 | UIO1 |
| UIO2 | UIO2 |
| LVDS | LVDS CONN |
| SD | SD slot |
| SIM | SIM slot |
| OTG | OTG |
| DCIN | DC-IN JACK |
| USB1 | USB CONN |
| HDMI | HDMI CONN |
| COM | COM CONN |
| RST | RST CONN |
| LED | LED |
| Mini PCIE | Mini PCIE CONN |
| LAN1 | RJ45 LAN |
快速入门(Quick Start)
系统下载(OS Dowload)
Note: LIV= Yocto Linux, UIV=Ubuntu, DIV = Debian, AIV=Android
LBV=BSP, LIV= Image
LIV9=Yocto2.5, LIVA=Yocto3.0, LIVB=Yocto 3.3……
See more details :
Introduction of Released Image
| Product | Image Version | Release Date | Release Version | Release notes | Image Download | BSP Download Tag | Comment | SDK | Module | Test Report |
| RSB-3730 | VA1041 | 2023/04/23 | RTM | Release_Note |
Baidu Password:a887 |
imx8LBVA1041.xml |
2G RTM 4G N.A |
SDK | Modules | Test Report |
| RSB-3730 | VA1045 | 2023/05/06 | Alpha | Release_Note |
Baidu Password:a887 |
imx8LBVA1045.xml | 2G Alpha | SDK | Modules | Test Report |
| RSB-3730 | VA1045 | 2023/05/06 | RTM | Release_Note |
Baidu Password:a887 |
imx8LBVA1045.xml | 4G RTM | SDK | Modules | Test Report |
系统更新方法(System update method)
Device Routes:
eMMC:/dev/mmcblk2
SD: /dev/mmcblk1
QSPI: /dev/mtd0
For example:SD test
# dd if=/dev/urandom of=data bs=1 count=1024
# dd if=/dev/mmcblk1 of=backup bs=1 count=1024 skip=4096
# dd if=data of=/dev/mmcblk1 bs=1 seek=4096
# dd if=/dev/mmcblk1 of=data1 bs=1 count=1024 skip=4096
# diff data data1
# dd if=backup of=/dev/mmcblk1 bs=1 seek=4096
Install the System from SD Card
1. Copy imx-image-full-imx8mmrsb3730a2-xxxxxx.rootfs.sdcard package to your desk- top. use ubuntu OS.
2. Insert SD card to PC.
3. Make a bootable SD card. For example, the node of an SD card is /dev/sdv.
# umount /dev/sdv*
# dd if=./imx-image-full-imx8mmrsb3730a2-xxxx.rootfs.sdcard \
of=/dev/sdv bs=1M
# sync
4. Insert SD card and copy imx-image-full-imx8mmrsb3730a1-xxxxxx.rootfs.sdcard to USB disk.
5. Insert USB disk and SD card then boot the whole system from SD card by changing SW1 to 1-2 ON.
6. Enter usb disk folder, make a bootable emmc.
# cd /run/media/sda1/
# umount /dev/mmcblk2*
# dd if=./imx-image-full-imx8mmrsb3730a2-xxxx.rootfs.sdcard \
of=/dev/mmcblk2 bs=1M
# sync


