Difference between revisions of "ROM-6881 How to use GPIO"
From ESS-WIKI
Xingxing.li (talk | contribs) |
Xingxing.li (talk | contribs) |
||
| Line 1: | Line 1: | ||
| − | = Configuration = | + | == Configuration == |
The RK3588 bank/bit notation for GPIOs must be formed as "GPIO<GPIO_bank>_<gpio_bit>" | The RK3588 bank/bit notation for GPIOs must be formed as "GPIO<GPIO_bank>_<gpio_bit>" | ||
| Line 68: | Line 68: | ||
| style="width: 186px;" | 113 | | style="width: 186px;" | 113 | ||
|} | |} | ||
| + | |||
| + | == SOM-DB2510 Setting GPIO == | ||
| + | |||
| + | 1. Before the test, jump the GPIO0_0-GPIO0_6 and GPIO0_10 Jumper on the baseplate to 1-2. | ||
| + | |||
| + | 2. Short-circuit GPIO signals on CN9 with cable | ||
| + | |||
| + | [[File:SOM-DB2510 CN9.PNG]] | ||
= Test = | = Test = | ||
| Line 86: | Line 94: | ||
<pre># echo 1 > /sys/class/gpio/gpio493/value | <pre># echo 1 > /sys/class/gpio/gpio493/value | ||
</pre> | </pre> | ||
| − | |||
Unexport GPIO0 | Unexport GPIO0 | ||
| Line 103: | Line 110: | ||
*none: Disable interrupt on both edges | *none: Disable interrupt on both edges | ||
| − | + | == GPIO Test == | |
GPIO0 and GPIO1 are taken as an example: Connect GPIO0 and GPIO1 | GPIO0 and GPIO1 are taken as an example: Connect GPIO0 and GPIO1 | ||
Revision as of 07:52, 3 January 2024
Configuration
The RK3588 bank/bit notation for GPIOs must be formed as "GPIO<GPIO_bank>_<gpio_bit>"
The numeric value of GPIO is calculated as follows:
32 x (gpio_bank) + gpio_bit
gpio_bit : A0~A7 0-7 B0~B7 8-15 C0~C7 16-23 D0~D7 24-31
E.g. GPIO3_A0 becomes 96
ROM-6881
| GPIO Number | GPIO formed | Numeric Representation |
| GPIO0 | Ext-GPIO0 P00 | 493 |
| GPIO1 | Ext-GPIO0 P01 | 494 |
| GPIO2 | Ext-GPIO0 P02 | 495 |
| GPIO3 | Ext-GPIO0 P03 | 496 |
| GPIO4 | Ext-GPIO0 P04 | 497 |
| GPIO5 | GPIO4_B5 | 141 |
| GPIO6 | Ext-GPIO0 P05 | 498 |
| GPIO7 | Ext-GPIO0 P06 | 499 |
| GPIO8 | Ext-GPIO0 P07 | 500 |
| GPIO9 | GPIO4_A0 | 128 |
| GPIO10 | GPIO3_C0 | 112 |
| GPIO11 | GPIO3_C1 | 113 |
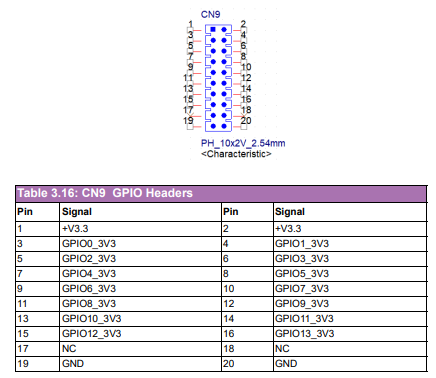
SOM-DB2510 Setting GPIO
1. Before the test, jump the GPIO0_0-GPIO0_6 and GPIO0_10 Jumper on the baseplate to 1-2.
2. Short-circuit GPIO signals on CN9 with cable
Test
Here we take GPIO0 of ROM-6881 as an example.
Export GPIO then you can use control GPIO from userr space through sysfs.
Export GPIO0
# echo 493 > /sys/class/gpio/export
Set GPIO direction to in/out
# echo "out" > /sys/class/gpio/gpio493/direction
Set GPIO value 0/1 if GPIO pin define is output
# echo 1 > /sys/class/gpio/gpio493/value
Unexport GPIO0
# echo 493 > /sys/class/gpio/unexport
Used as IRQ signal
Note:You have to configure GPIO to input
# echo "rising" > /sys/class/gpio/gpio493/edge
- rising: Trigger on rising edge
- falling: Trigger on falling edge
- both: Trigger on both edges
- none: Disable interrupt on both edges
GPIO Test
GPIO0 and GPIO1 are taken as an example: Connect GPIO0 and GPIO1
- Export GPIO0 and GPIO1
# echo 493 > /sys/class/gpio/export
# echo 494 > /sys/class/gpio/export
- Set GPIO0 to output and GPIO1 to input
# echo "out" > /sys/class/gpio/gpio493/direction
# echo "in" > /sys/class/gpio/gpio494/direction
- Change GPIO0 to 1 and read GPIO1 value
# echo 1 > /sys/class/gpio/gpio493/value
# cat /sys/class/gpio/gpio494/value
1
- Change GPIO0 to 0 and read GPIO1 value
# echo 0 > /sys/class/gpio/gpio493/value
# cat /sys/class/gpio/gpio494/value
0
