Difference between revisions of "IoTGateway/BSP/Linux/TI/Yocto LBVC User Guide"
| Line 20: | Line 20: | ||
Generally,for Linux development, you’ll need a host PC running Linux. In the development with the Advantech SDK, it is strongly recommend to use Ubuntu 22.04 LTS as the developing environment. This is because we have successfully tested our BSP on this OS version. Please install the Ubuntu 22.04 LTS on your PC/NB in advance. | Generally,for Linux development, you’ll need a host PC running Linux. In the development with the Advantech SDK, it is strongly recommend to use Ubuntu 22.04 LTS as the developing environment. This is because we have successfully tested our BSP on this OS version. Please install the Ubuntu 22.04 LTS on your PC/NB in advance. | ||
| − | |||
| − | |||
| − | |||
| − | |||
| − | |||
| − | |||
| − | |||
| − | |||
| − | |||
| − | |||
| − | |||
| − | |||
| − | |||
| − | |||
| − | |||
| − | |||
| − | |||
=== <span style="color: rgb(0, 112, 192);">Docker install and setting</span> === | === <span style="color: rgb(0, 112, 192);">Docker install and setting</span> === | ||
Revision as of 07:27, 10 July 2024
Contents
Introduction
This page provides the steps to build the Processor SDK and individual components from source. The Processor SDK build is based on the Arago Project which provides a set of layers for OpenEmbedded and the Yocto Project targeting TI platforms.
This page will provide the basic steps required to recreate the Processor SDK along with a reference of Processor SDK specific configurations, build targets, and target devices. Also, tips and suggestions are provided along with links for more in-depth information.
Getting Start
Prerequisites
Host Setup
Generally,for Linux development, you’ll need a host PC running Linux. In the development with the Advantech SDK, it is strongly recommend to use Ubuntu 22.04 LTS as the developing environment. This is because we have successfully tested our BSP on this OS version. Please install the Ubuntu 22.04 LTS on your PC/NB in advance.
Docker install and setting
If you don't have docker in your system, then you can follow the below steps to install docker and run it first.
To install Docker Engine on your platform please refer to Docker Installation Guide for details.
To pull ubuntu 22.04 image from Docker Hub
To create container
Build Steps
The following example shows how to download the Advantech Yocto BSP from GitHub.
For this example, a directory called yocto_bsp is created for the project.
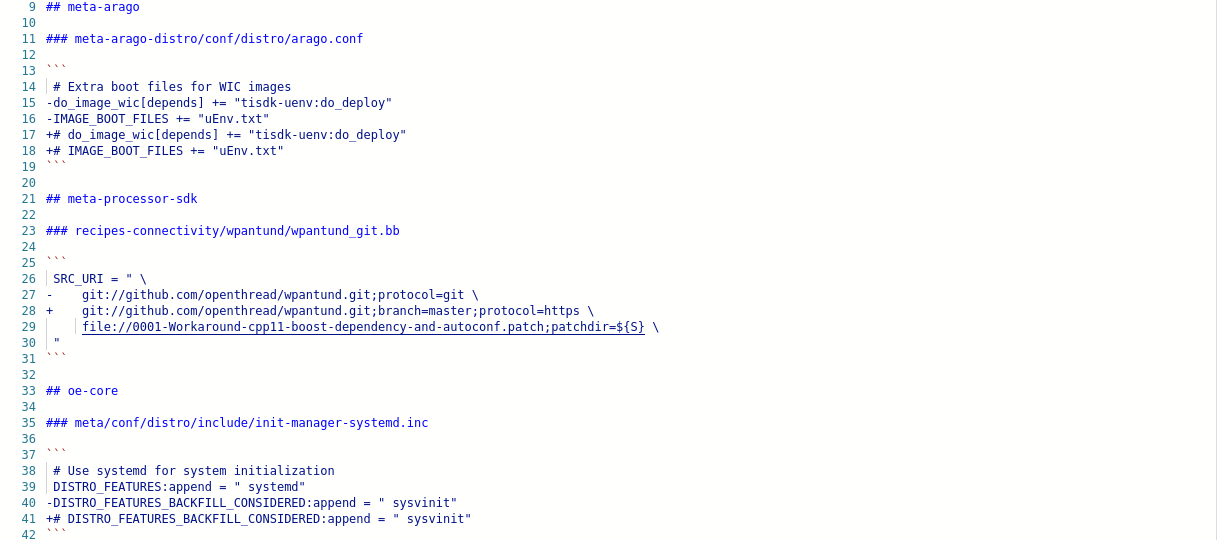
After repo sync finished. Please modify the following meta files below:

The final command below build the tisdk-default-image, which is the Processor SDK image with arago filesystem.
Your tisdk-default-image tar.xz image will be generated in the deploy-ti directory. Use Processor SDK Linux Create SD Card to flash this image on the SD-Card.
Attention:
You may be experience the following issue:

Add CONNECTIVITY_CHECK_URIS = "" in build/conf/local.conf, aim at skipping connectivity checks.
Processor SDK Build Reference
The following sections provide information for configuration, build options, and supported platforms of the Processor SDK.
Layer Configuration
Processor SDK uses the following oe-layertool-setup configs to configure the meta layers.
Build Options
Images
In addition to individual components packages, the following table provides a list of build targets supported. These are the <target> used in the command:
The "Build Output" is given relative to the deploy-ti directory.
|
Target |
Build Output |
Description |
|
tisdk-core-bundle |
images/<machine>/tisdk-core-bundle-<machine>.tar.xz |
Full SDK |
|
tisdk-default-image |
images/<machine>/tisdk-default-image-<machine>.tar.xz |
Target Filesystem |
|
u-boot-ti-staging |
images/<machine>/u-boot-<machine>.img images/<machine>/MLO-<machine> |
u-boot |
|
linux-ti-staging |
images/<machine>/zImage-<machine>.bin images/<machine>/zImage-<machine>.dtb |
kernel |
Platforms
The following platforms are supported in Processor SDK. These are the <machine> in the command:
|
MACHINE |
Supported Product |
| am335xepcr3220a1 |
EPC-R3220A1 |
RT Support
Processor SDK Linux supports RT Linux Kernel for the following machines. Use the command below to make the RT builds:
|
MACHINE |
Supported Product |
| am335xepcr3220a1 |
EPC-R3220A1 |
Command
Build command
Take uboot as an example:
The MLO and u-boot.img will be located in the directory, ./arago-tmp-default-glibc/work/am335xepcr3220a1-oe-linux-gnueabi/u-boot-ti-staging.
When the target is tisdk-core-bundle, MLO, u-boot.img, zImage, devicetree file, filesystem and full SDK will compiled.
Recipes
Recipe Basics
One or more recipes can be specified for the <target> for greater granularity of recipe development and debug. Specifying a recipe name, minus the version (if the version is appended to the name), will build the recipe and all its dependencies.
For example, the command below builds only the opencl recipe and all the dependencies it defines.
After the bitbake command above is successfully done, arago-tmp-default-glibc/work/<machine>-linux-gnueabi/opencl directory will be available including the original source code under the git folder, independent shared objects (.so files) under packages-split folder, and IPKs under deploy-ipks folder.
Forced Re-compilation
When needed, source code under the work directory (e.g.,arago-tmp-default-glibc/work/<machine>-linux-gnueabi/<target>/[version]/git) can be modified. After the modification is done, run the following commands to force recompilation with the new code and rebuilding of the recipe, e.g.,
Take uboot as an example:
Installing Package
To install a modified and rebuilt package, copy the new IPKs from the deploy-ipks folder (e.g., arago-tmp-default-glibc/work/a<machine>-linux-gnueabi/opencl/[version]/deploy-ipks) to the target system and then run the following command to install the IPKs:
Cleaning a Built Recipe
A built recipe can be cleaned using:
or
Take uboot as an example:
The cleansstate task will clean recipe's work directory and remove the recipe's output from the dependency tree used by other recipe's during compilation.
Create a Linux System Boot Media
Our motherboard generally supports from SD card and onboard flash. This section will take EPC-R3220 as an example to introduce how to make a system boot media.
Create a Linux System SD Card
Copy full SDK(tisdk-core-bundle-<machine>.tar.xz) package to your desktop
The create-sdcard.sh script can be run from any location but must be run with root permissions. This usually means using the sudo command to start execution of the script.
Select SD card Device:
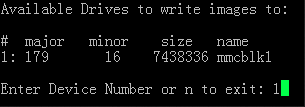
The first step of the script will ask you to select the drive representing the SD card that you want to format. In most cases your host root file system drive has been masked off to prevent damage to the host system. When prompted enter the device number corresponding to the SD card. For example if the output looks like:
You would enter 2 to select the sdd device.
Select number of partitions which ask you how many partitions you want to create for SD card:
Whether to continue:
Select Pre-built System image:
There is no multiple rootfs tarball, user does not need to make a manual selection. Select tisdk-default-image-XXX.tar.xz(XXX represents machine name, e.g. am335xepcr3220a1) as default, due to filesystem directory include one *.tar.xz tarball here.
If you need to transfer whole system to on-board flash, please press y followed by Enter.
While "[Operation Finished]" shows up means the transferring is finished.
Then insert the Linux system SD card to EPC-R3220, it will boot up with Linux environment.
Boot from Onboard Flash
If you have already get a Linux system SD card and the last step of make process selected "y", you can refer to the following steps to burn the system to the onboard flash.
Please insert the Linux system SD card to EPC-R3220, and then power up. It boot from the SD card.
Select eMMC:
Select number of partitions:
Partition completion. Continue the burning system or not?
If “y” was pressed, the system will be burned to eMMC.
While "[Operation Finished]" shows up means the burning is finished.
Then you can boot from onboard flash without SD card.
Debug console information
If you want to see debug message from device, you need to prepare for hardware device and software tool.
Preparing for hardware device
- The following URL provides information about the debug port slot and the debug port line for each device
Preparing for software tool
- You need to prepare the debug console tool. For example: "minicom" tool or "putty" tool.
- Baud rate: 115200
Local development
All instructions in this guide are based on Ubuntu 22.04 LTS developing environment. Please install the Ubuntu 22.04 LTS on your PC/NB in advance.
Set up Build Environment
Perform the following command in terminal console
After run sdk-install.sh, Rules.make and linux-devkit which is toolchain sdk directory will be gernerated.
Rebuild sources
Using the top-level makefile in the SDK root directory. For example:
Rebuilds all components in the SDK:
Configures and builds the kernel:
Clean the builds for the kernel:
If you want to copy the compiled module to the specified directory:
Please specifying the installation directory in the Rules.make file firstly
Then executing the following instructions:
Install the Kernel Modules
Install the kernel Image and Device Tree binaries
Note: make linux_modules_install will create a directory tree in DESTDIR from that location like lib/modules/<uname -r>/ which will contain the dynamic modules corresponding to this version of the kernel, make linux_install will copy the kernel image and device tree binaries to the specified directory.
Builds u-boot, u-boot-spl and MLO:
Clean the builds for u-boot, u-boot-spl and MLO:
Customization
Package addition
To add vsftpd & crontab
- Navigate to the directory where tisdk-default-image.bbappend located
$ cd ${BSP_HOME}/sources/meta-advantech2/meta-ti-adv/recipes-core/images/
- Add following line to tisdk-default-image.bbappend
IMAGE_INSTALL += " cronie vsftpd "
- Then, follow the Build Steps above to generate the image.


