IoT Data Ingestion
Contents
Azure
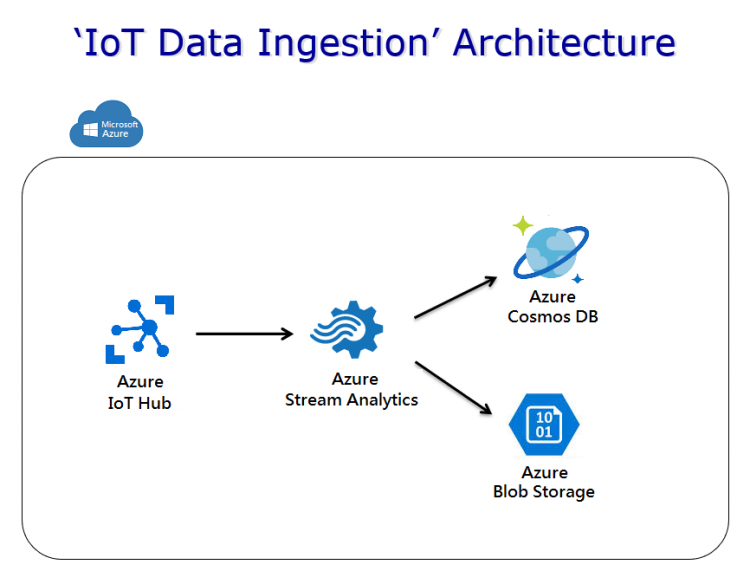
In this section, we will introduce steps to insert data from an Azure IoT Hub to different Azure data stores. We assume that device messages are already received by an Azure IoT Hub. If not, you can refer to Protocol Converter with Node-RED section, which is designed to ingest IoT data from edge devices to the Azure IoT Hub.
When an Azure IoT Hub receives messages, we use Azure Stream Analytics job to dispatch the received data to other Azure services. In this case, we will ingest data into Azure CosmosDB and Azure Blob Storage.
The IoT Hub we're using to receive messages here is named "azurestart-hub". All Azure resources used in this section are stored in single Azure resource group named "azurestart-rg".
Create storage to save ingested IoT data
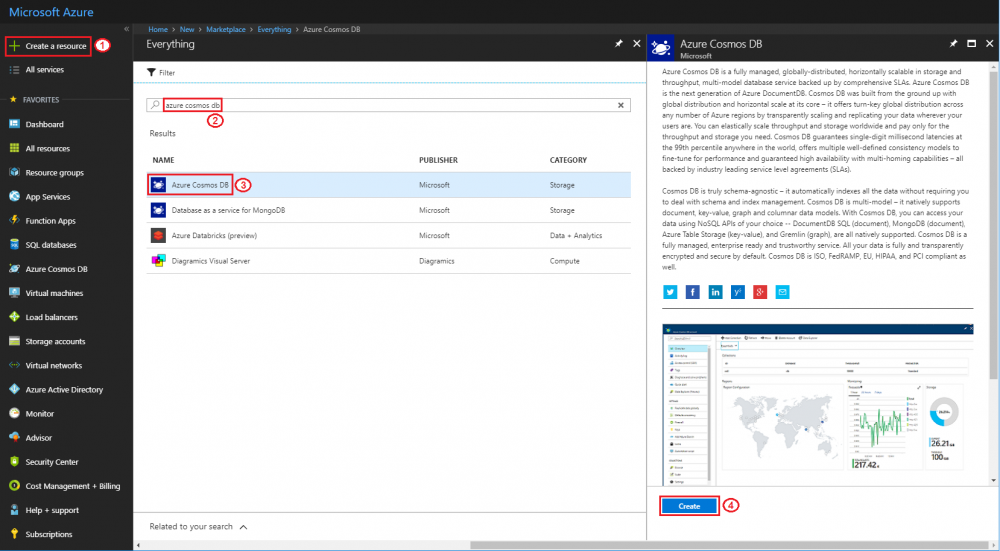
Step 1: Login to Azure portal and create an Azure CosmosDB
- Search "azure cosmos db" and create new one
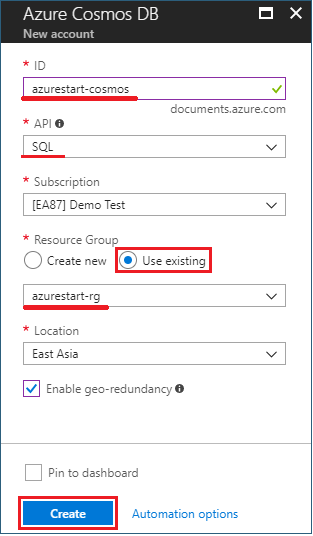
- ID: azurestart-cosmos
- API: select "SQL"
- Resource Group: click "Use existing" and select "azurestart-rg"
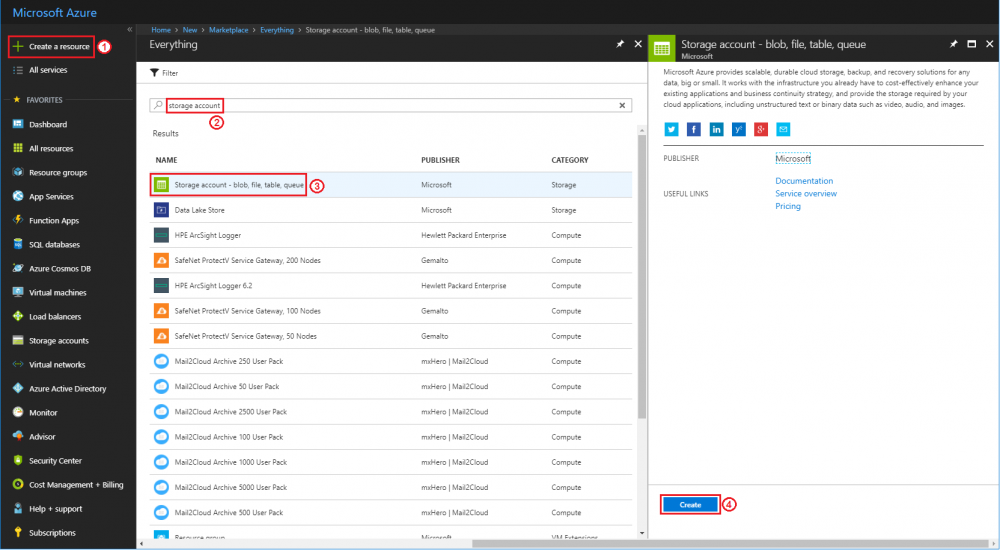
Step 2: Create an Azure Blob Storage
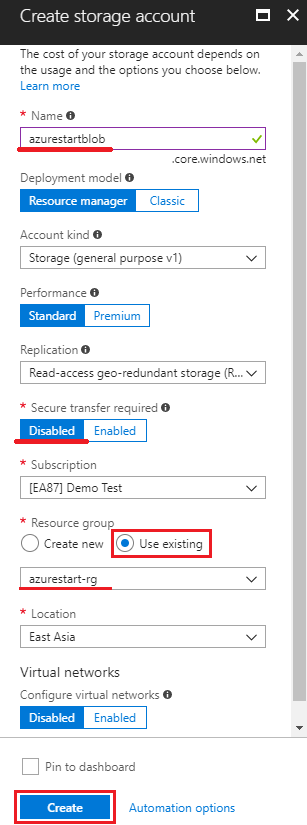
- Search “storage account” and create new one
- Name: azurestartblob
- Secure transfer required: Disabled
- Resource Group: click "Use existing" and select "azurestart-rg"
Connect Azure IoT hub to Azure storage
Step 1: Login to Azure portal and create a Stream Analytics job
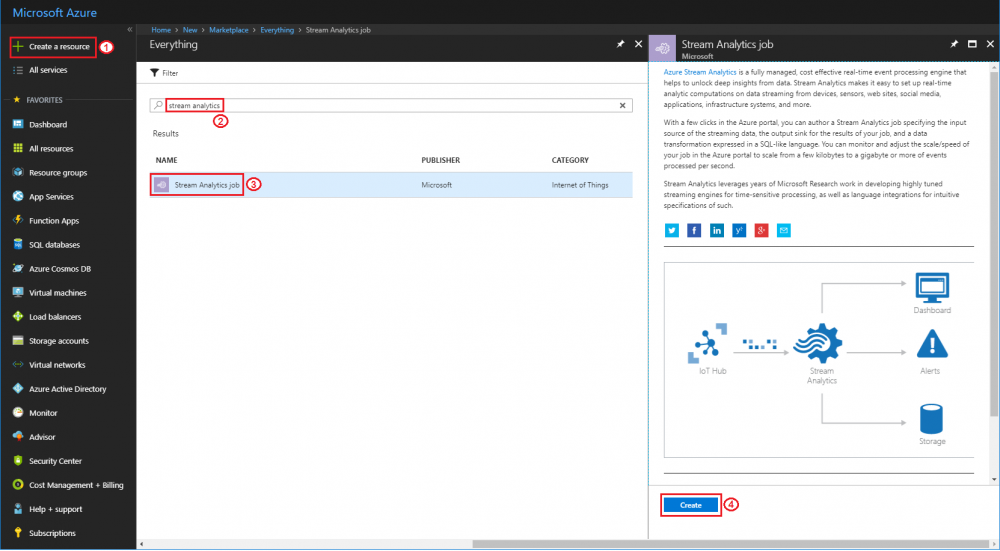
- Search "stream analytics" and create new one
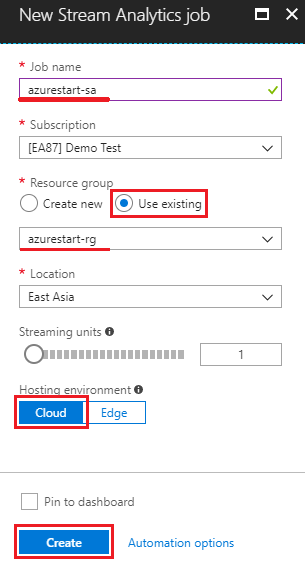
- Job name: azurestart-sa (for example)
- Resource Group: click "Use existing" and select "azurestart-rg"
- Hosting environment: Cloud
Step 2: Set input of stream analytics job
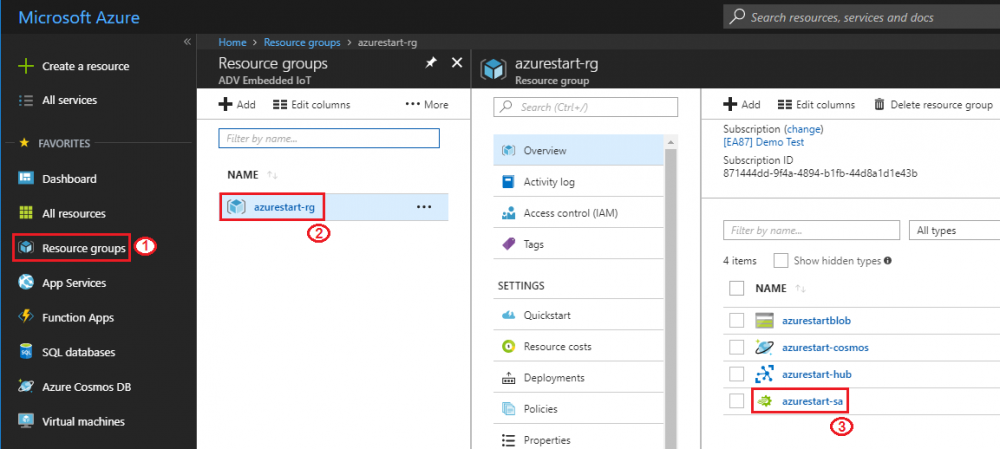
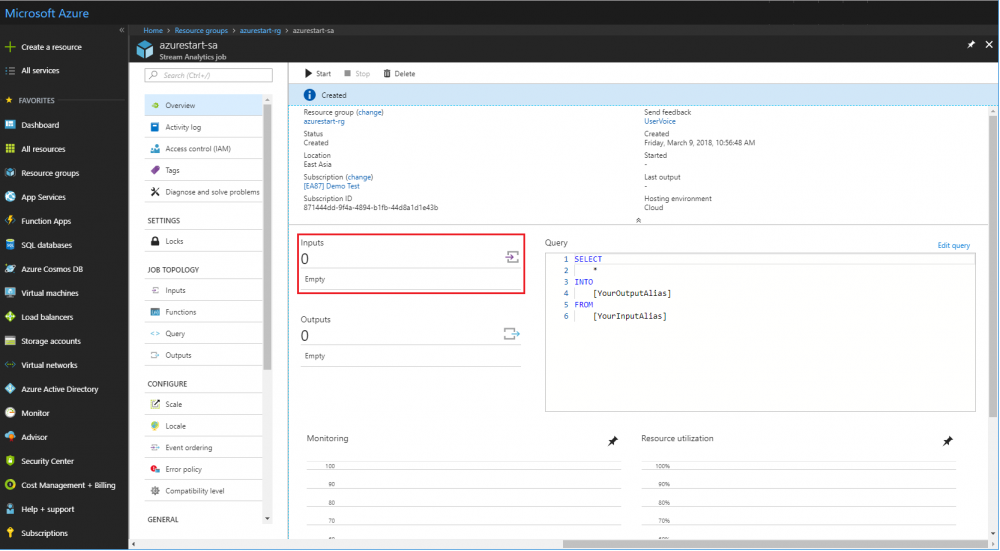
- Open "azurestart-sa" created at last step: Resource groups → azurestart-rg → azurestart-sa
Step 2.1: Add IoT hub input
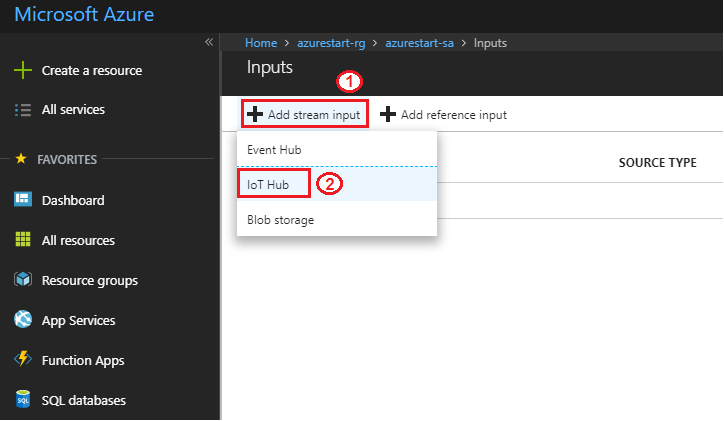
- Click "Inputs"
- "Add stream input" → "IoT Hub"
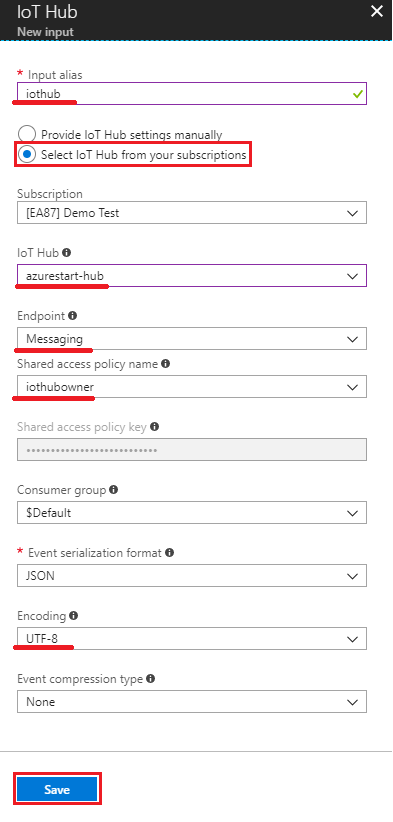
- Input alias: iothub
- Choose "Select IoT Hub from your subscriptions"
- IoT hub: azurestart-hub
- Endpoint: Messaging
- Shared access policy name: iothubowner
- Encoding: UTF-8
Step 3: Set outputs of stream analytics job
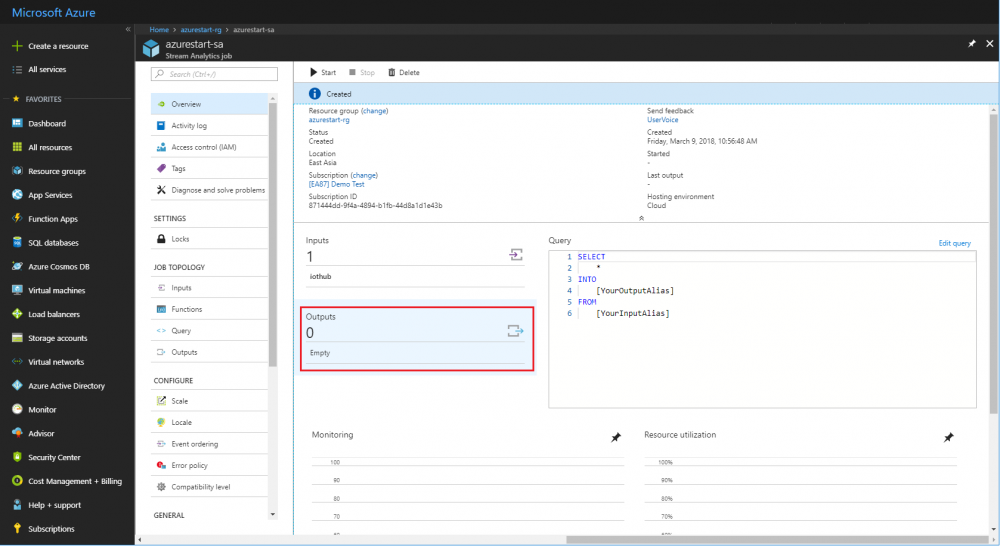
- Open "azurestart-sa" created at last step: Resource groups → azurestart-rg → azurestart-sa
Step 3.1: Add blob storage output
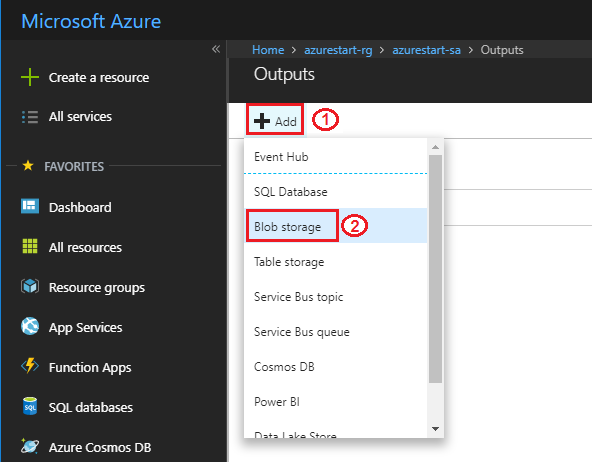
- Click "Outputs"
- "Add" → "Blob storage"
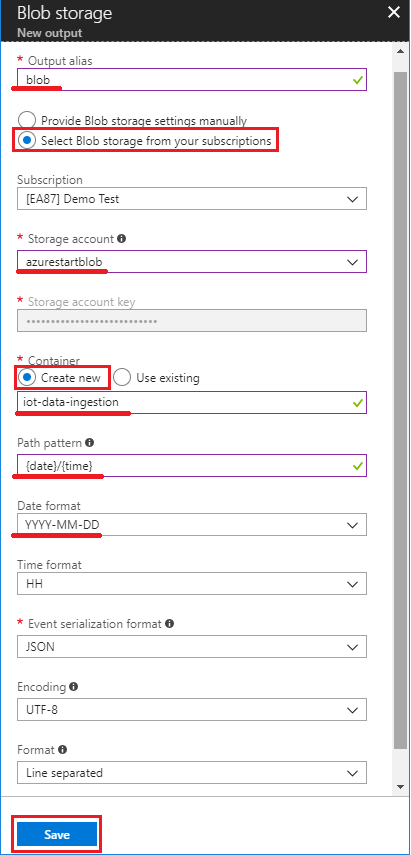
- Output alias: blob
- Choose "Select Blob storage from your subscriptions"
- Storage account: azurestartblob
- Container: choose "Create new" and input "iot-data-ingestion"
- Path pattern: {date}/{time}
- Date format: YYYY-MM-DD
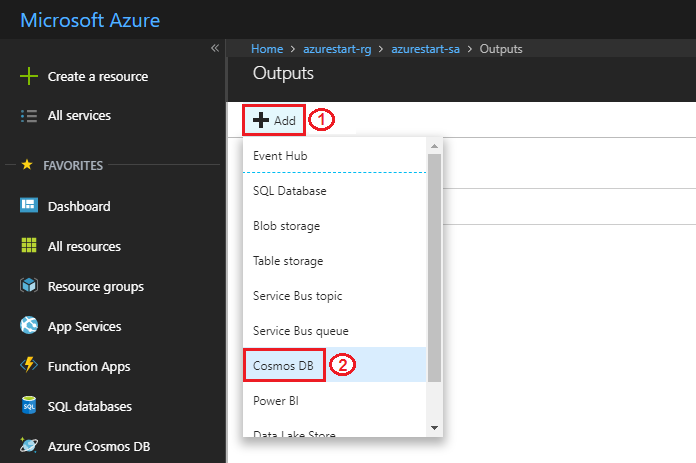
Step 3.2: Add cosmos DB output
- "Add" → "Cosmos DB"
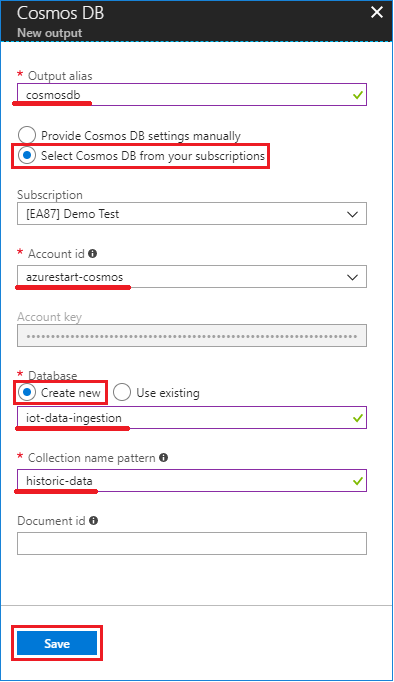
- Output alias: cosmosdb
- Choose "Select Cosmos DB from your subscriptions"
- Account id: azurestart-cosmos
- Database: choose "Create new" and input "iot-data-ingestion"
- Collection name pattern: historic-data
Step 4: Set query of stream analytics job and start it
- Open "azurestart-sa" created at last step: Resource groups → azurestart-rg → azurestart-sa
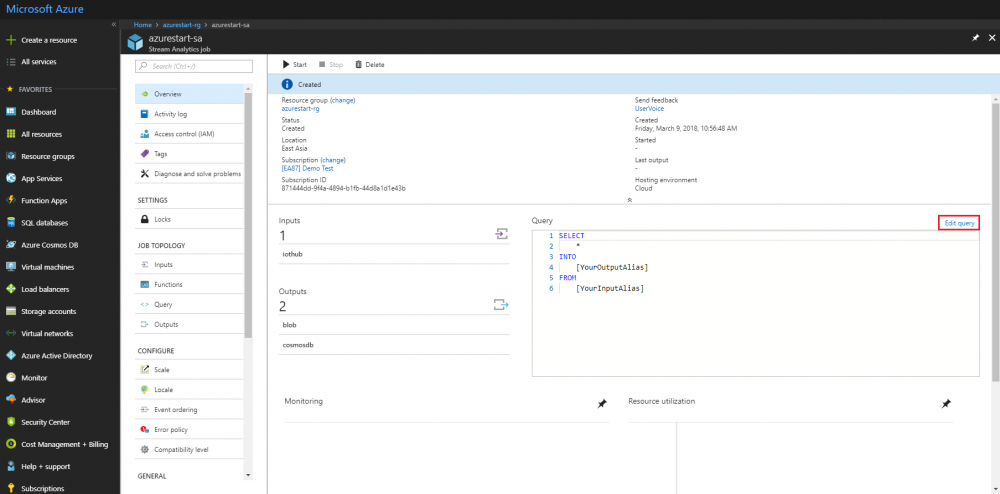
- Click "Edit query"
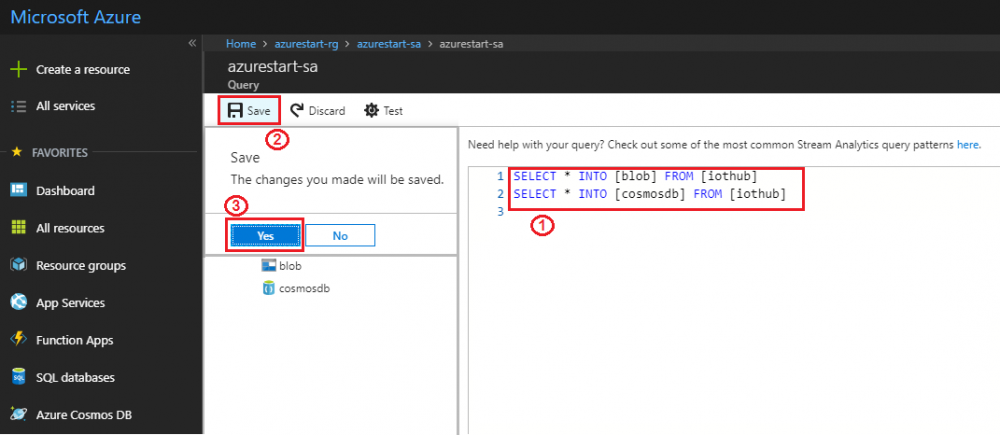
- Copy following stream analytics query statements, paste to the text area and click "Save"
        SELECT * INTO [blob] FROM [iothub]
        SELECT * INTO [cosmosdb] FROM [iothub]
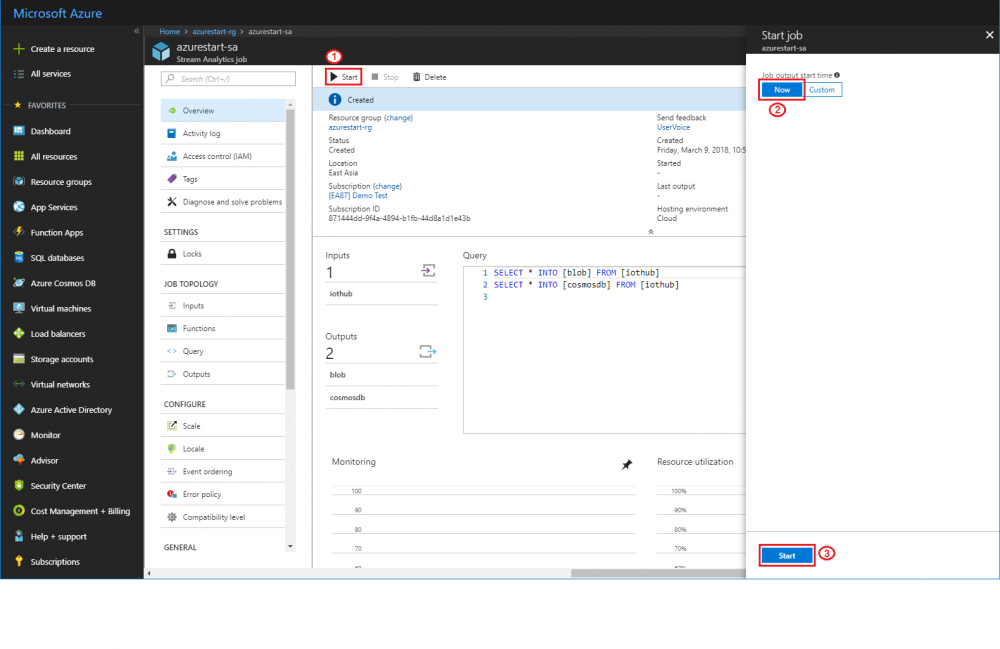
- Back to "azurestart-sa" page, click "Start", then select "Now" for job output start time.
- Click "start" to run stream analytics job, it may take a few seconds.
Verify the saved data in Azure storage
Make sure the Azure IoT hub is still received data from IoT Devices.
Step 1: Confirm data in Azure blob storage
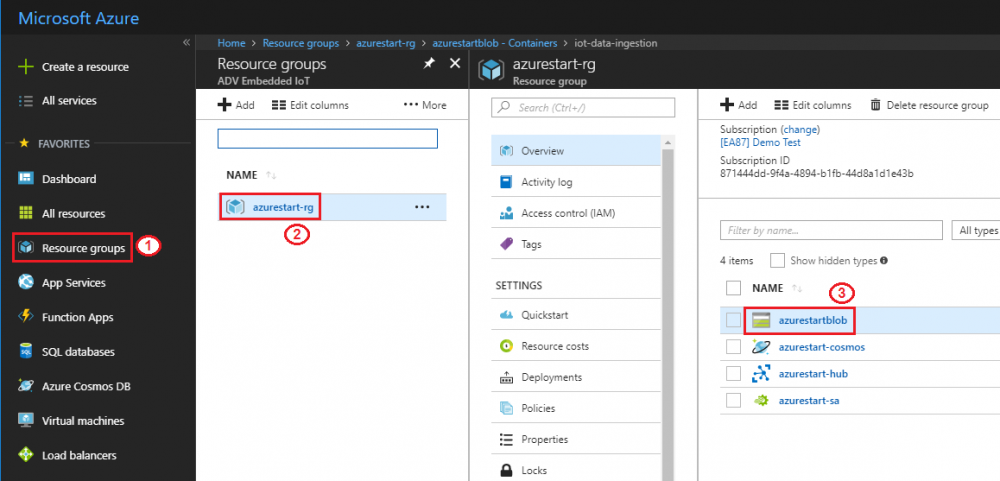
- Go to "azurestart-blob": Resource groups → azurestart-rg → azurestart-blob
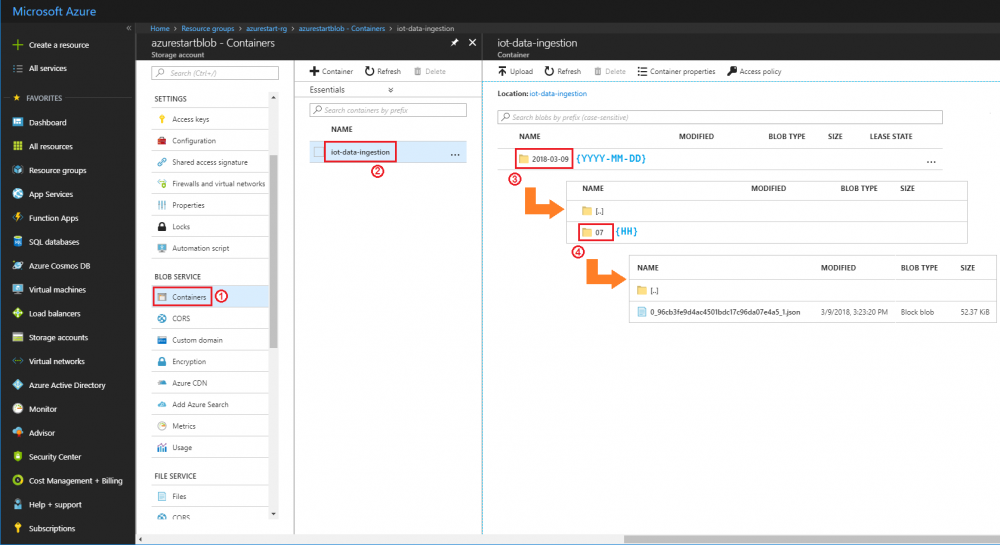
- "Containers" → "iot-data-ingestion", we can see a folder in container is named as pattern "YYYY-MM-DD". The ingested data will be saved in files under folder {YYYY-MM-DD}/{HH}
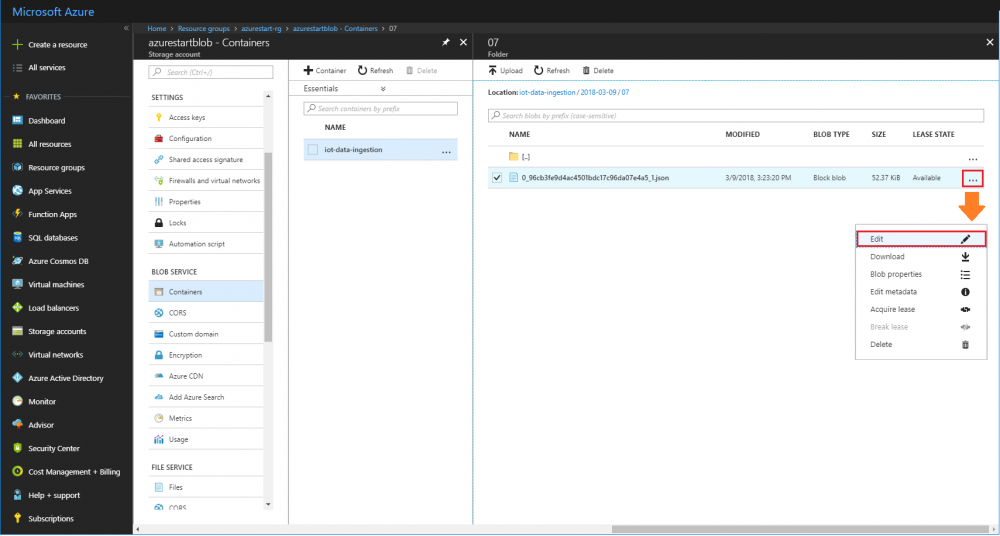
- Click the context menu icon "…" → "Edit"
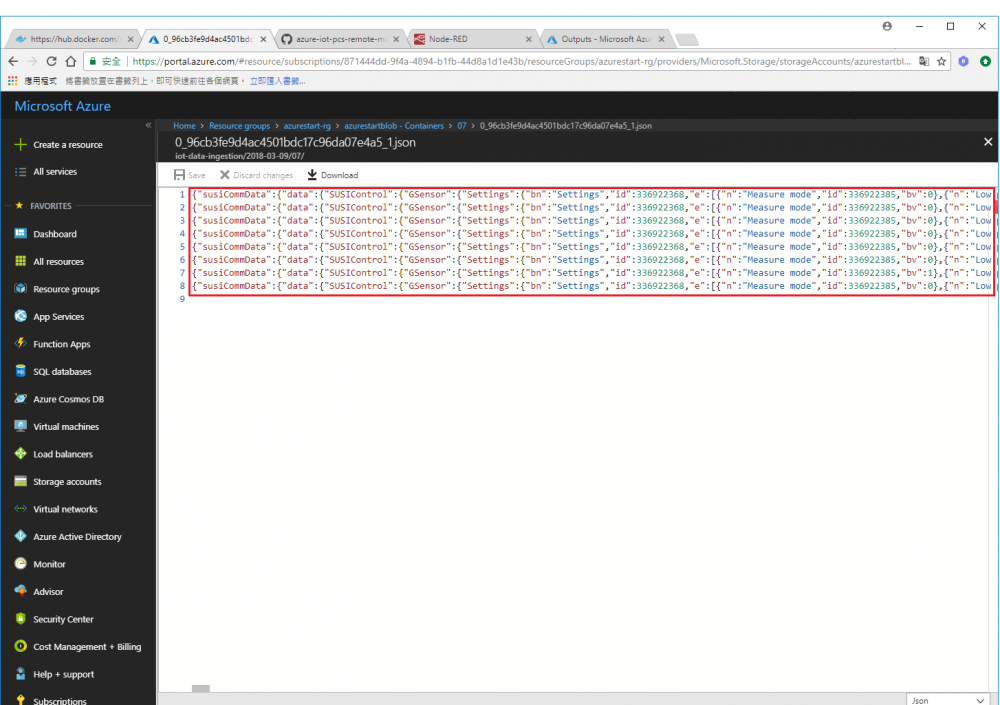
- We can see the received messages are saved line by line in the selected .json file
Step 2: Confirm data in Azure cosmos DB
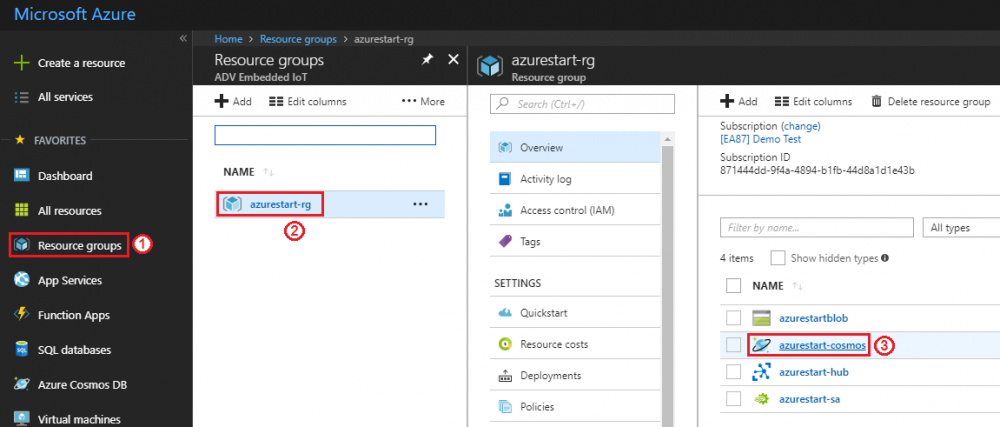
- Go to "azurestart-cosmos": Resource groups → azurestart-rg → azurestart-cosmos
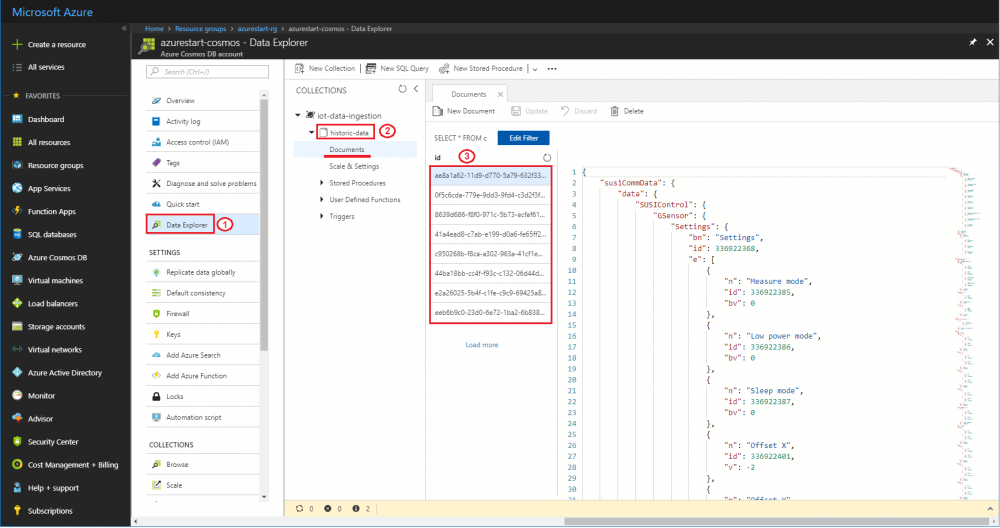
- Data Explorer → historic-data → Documents: Each document in Cosmos DB represents one message received by Azure IoT hub. Click “id” to show the message content.
AWS
In this section, you can get experience using the AWS IoT Rule Engine to insert data to different AWS storage. You can refer to refer to Protocol Converter with Node-RED section which is designed to ingest IoT data to AWS IoT.
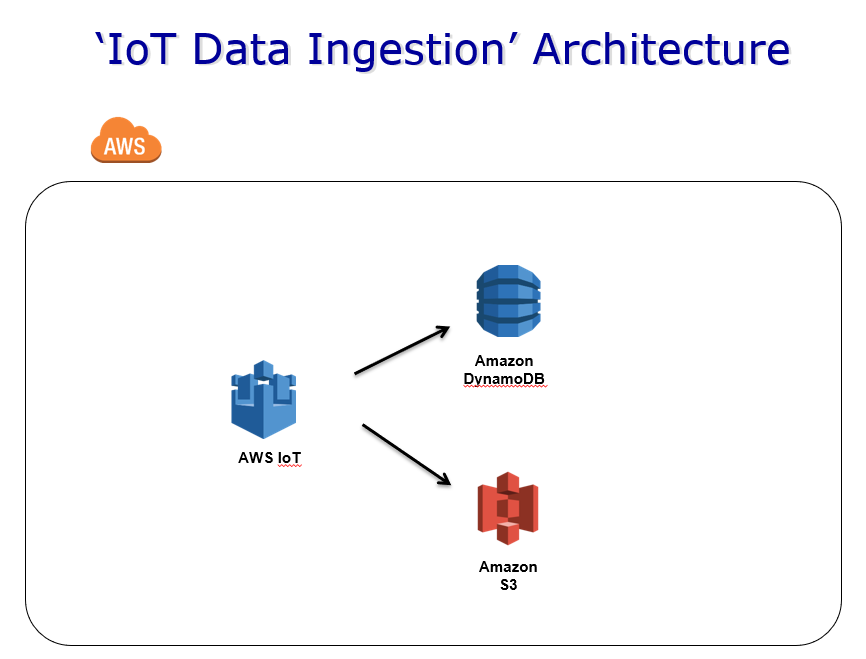
When you receive IoT data from AWS IoT. You can use Rule Engine to connect to another AWS service. In this case we will send IoT data to AWS S3 and DynamoDB
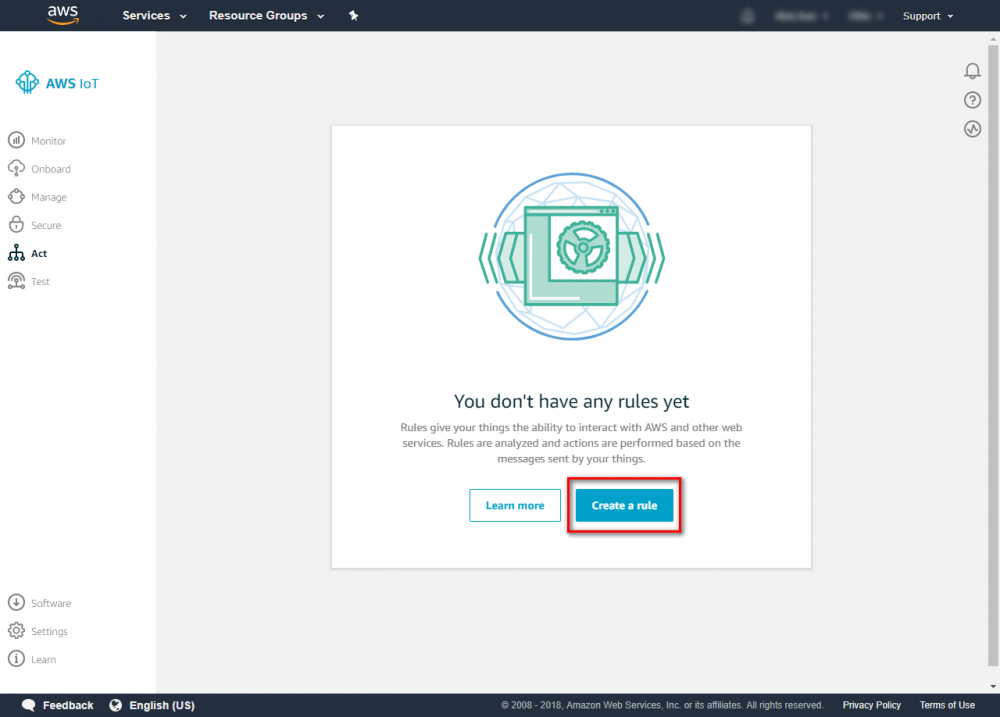
Step 1. Go to the AWS IoT console and click "Act" and click "Create a rule".
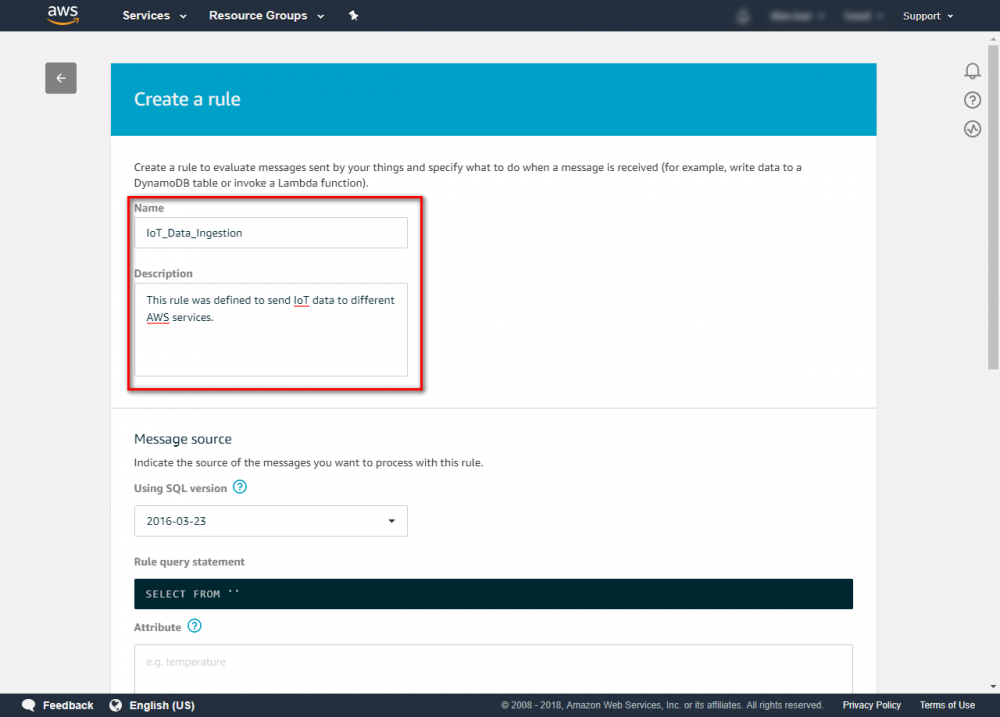
Step 2. Enter {your rule name} and {description}
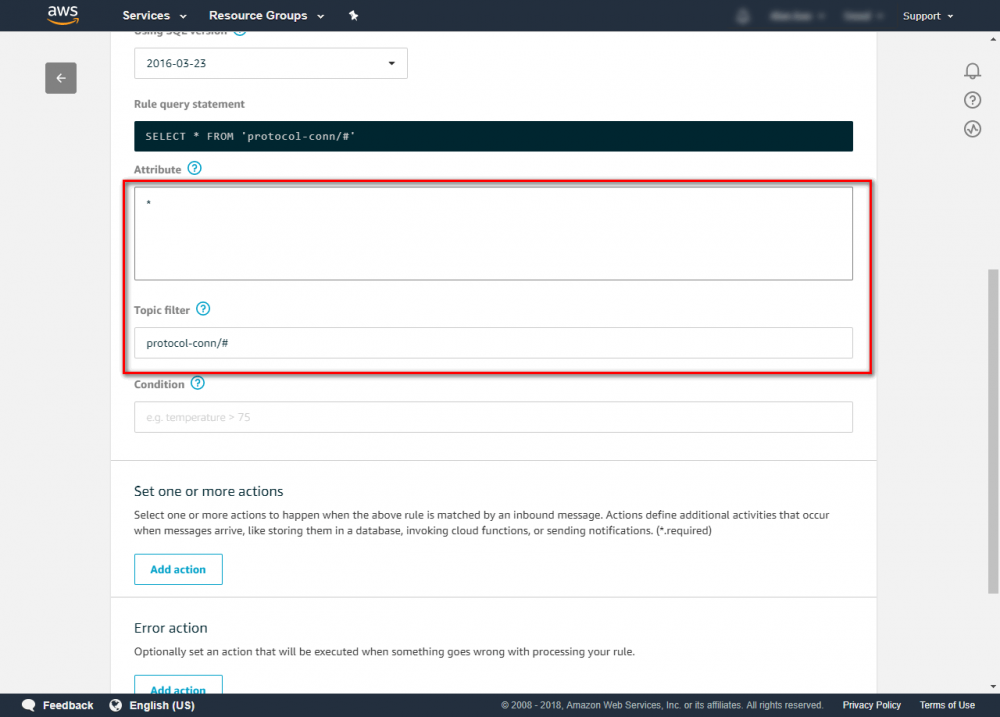
Step 3. Configure the rule as follows: Attribute : * Topic Filter: {your AWS IoT publish Topic}. The topic which used in Protocol Converter is “protocol-conn/{Device Name}/{Handler Name}”. In this case, we use wildcard # to get all message More Topic information can be found at
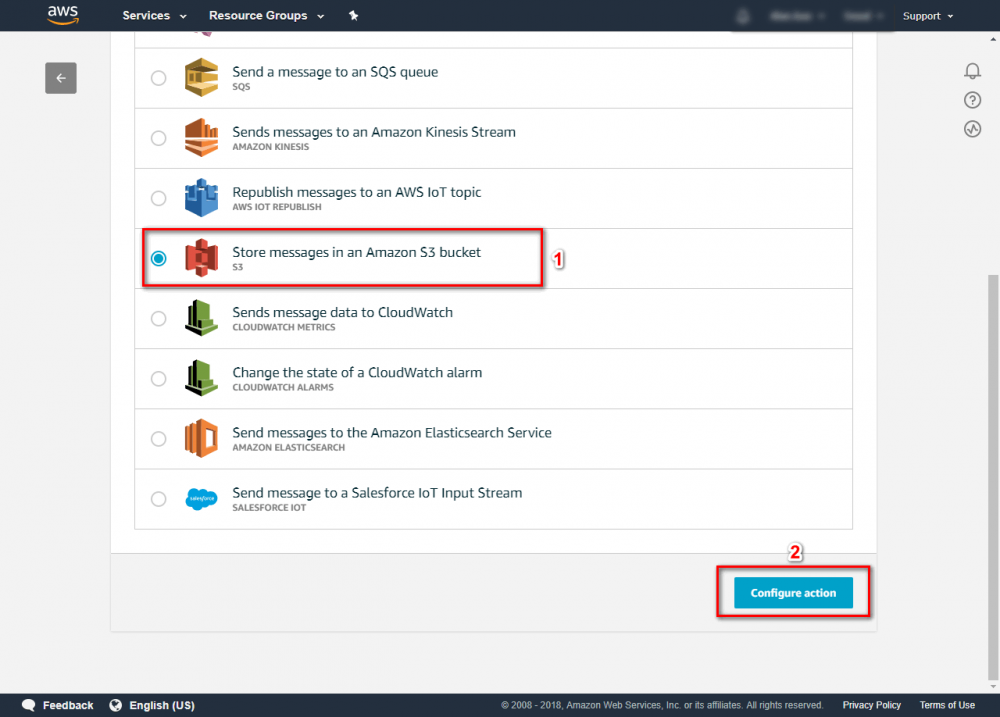
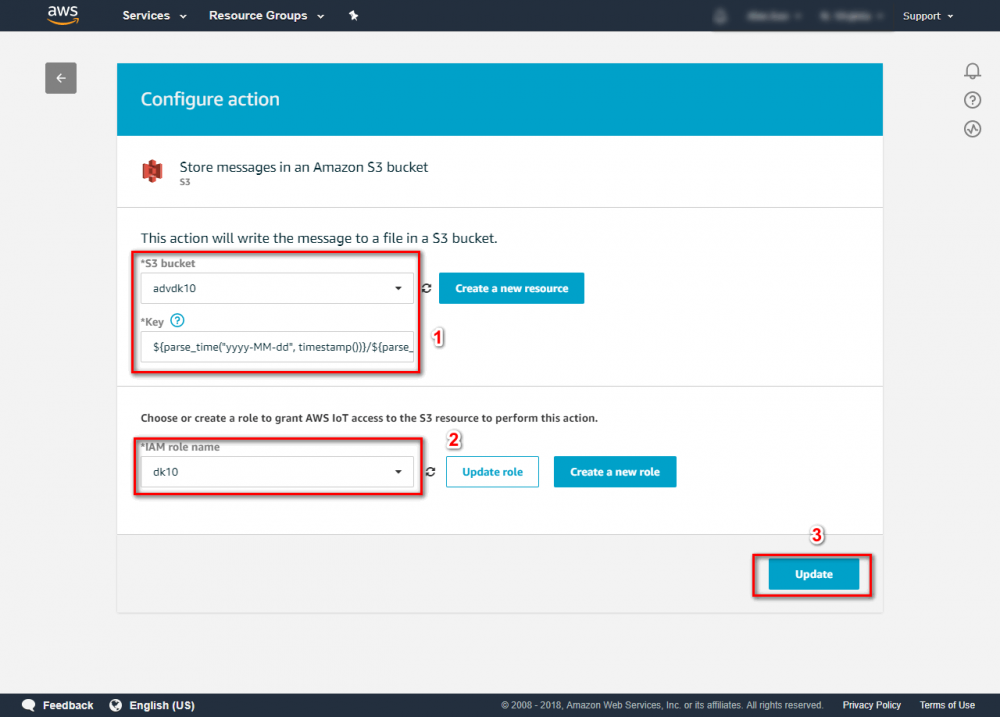
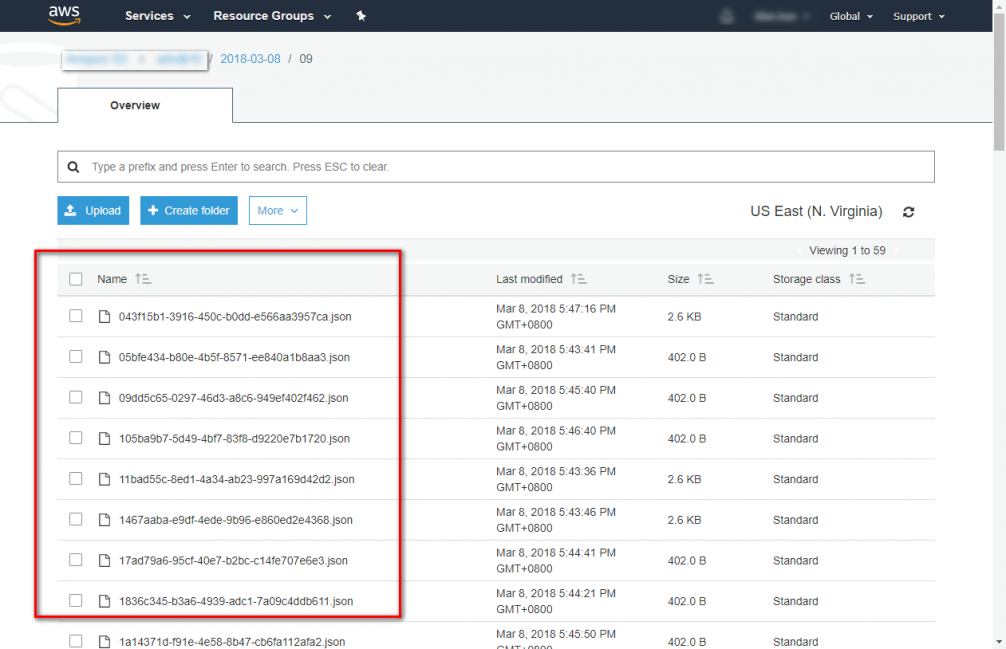
Step 4. Click "Add action" to store message in S3 bucket. Select “Store messages in an Amazon S3 bucket”→click“Configure action” more rule engine information can be found atStep 5. Under "configure action", you need to choose a S3 bucket. If you don’t have any one, you can click “Create a new resource” to create one. In this case, we store data to json format and assort by data and hour. You can use SQL wildcard parse_time () and timestamp() to assort store folder and using newuuid() as filename.
${parse_time("yyyy-MM-dd", timestamp())}/${parse_time("HH", timestamp())}/${newuuid()}.json
More AWS IoT SQL Reference information can be found at
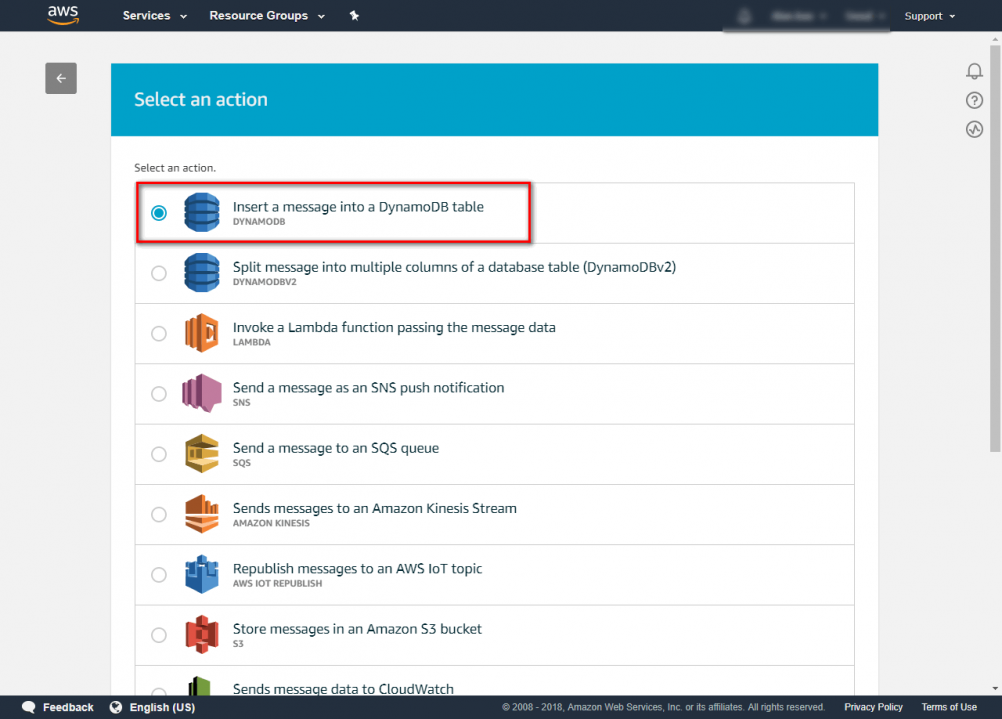
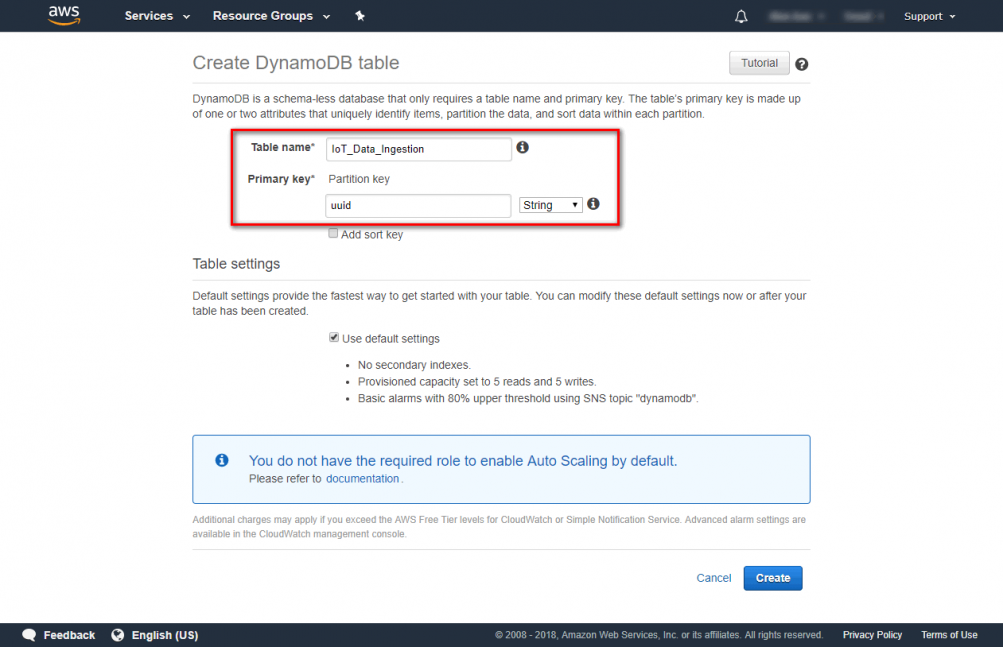
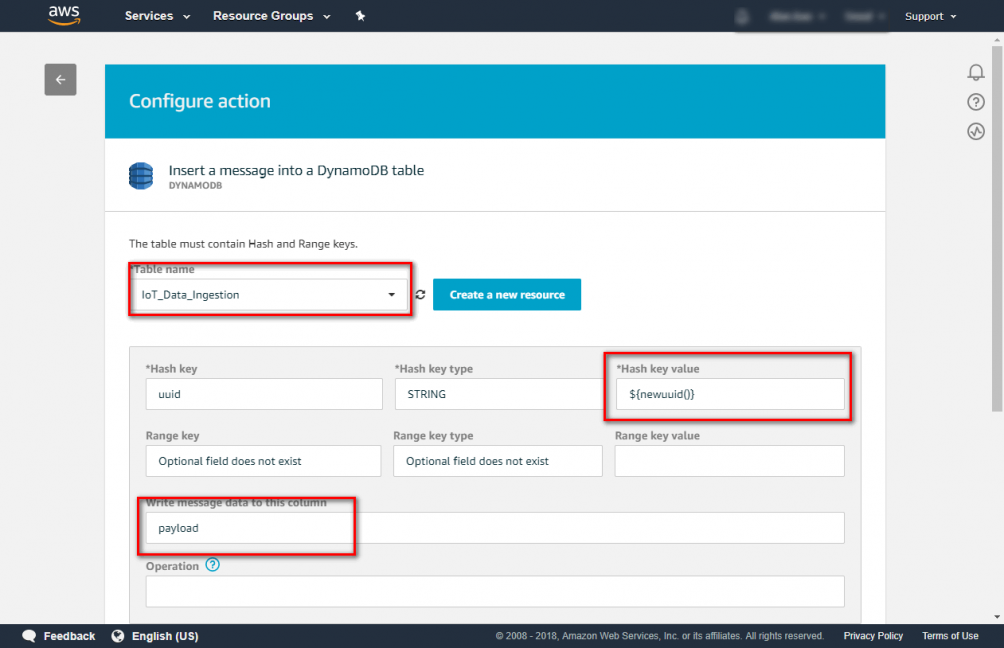
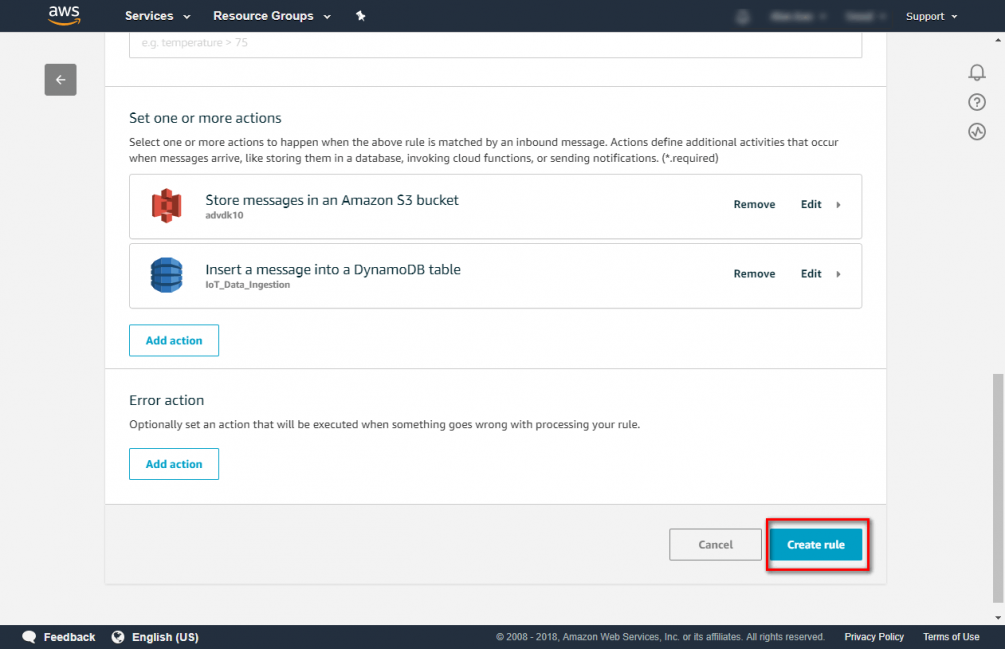
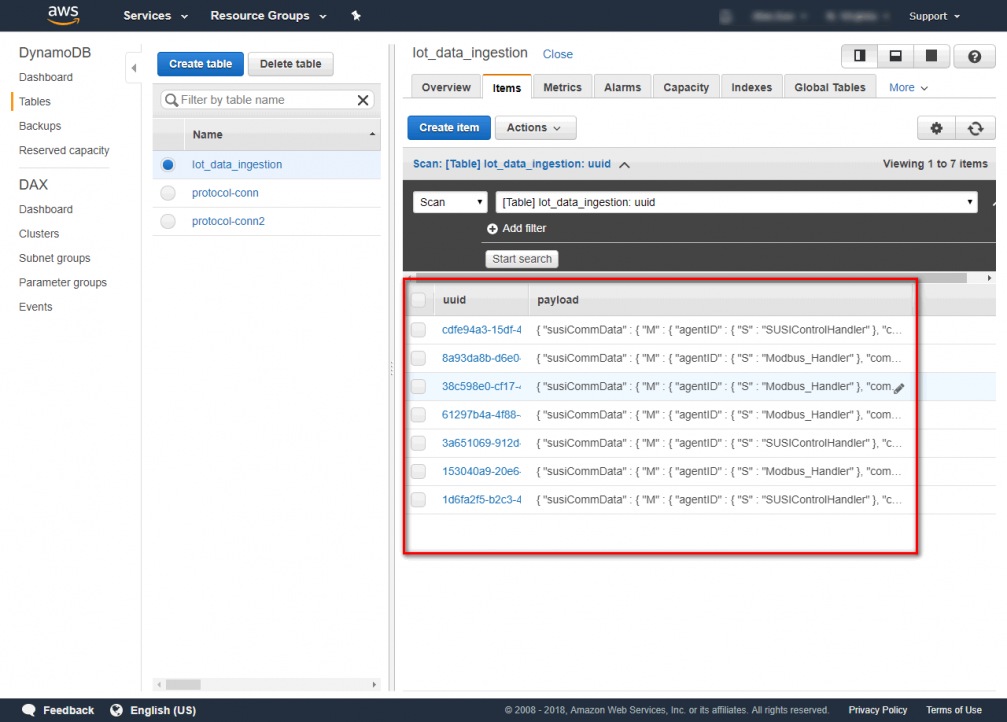
You need to choose a role which has permission can access AWS S3. After finishing the settings, click "Update". Step 6. Click“add action” to connect DynamoDB Step 7. Select“Insert a message into a DynamoDB Table”→click“configure action” Step 8. Choose a DynamoDB table. If don't have DynamoDB table, you can click“Create a new resource” to create a table. In this case. We create a DynamoDB table called ”IoT_Data_Ingestion” with a primary key “uuid”. Step 9. Choose “IoT_Data_Ingestion” and enter Hash key value and Write message data to this column. Hash key value ${newuuid()} Write message data to this column payload you need to choose a role which has permission can access AWS DynamoDB. After setting click update. Step 10. After finishing setting click “Create rule” Step 11. Now you can publish your message and check S3 and DynamoDB.