AIM-Linux/BSP/Qualcomm/RISC QCS Yocto LE1.1 ROM2860
Contents
Introduction
This document describes how to work with the RISC and Qualcomm LE GA1.1 Board Support Package (BSP) release.
Yocto Version
Yocto 4.0.18
Kernel Version
Kernel 6.6.28
Meta Build ID
QCM6490.LE.1.0-00218-STD.PROD-1
Docker Install and BSP Download
Pull docker images
$ sudo docker pull advrisc/u20.04-qcslbv2:latest
Run docker example
$ mkdir -p /home/bsp/myLinux
$ sudo docker run --privileged -it --name qclinux -v /home/bsp/myLinux:/home/adv/BSP:rw advrisc/u20.04-qcslbv2 /bin/bash
adv@7cc0fa834366:~$ sudo chown adv:adv -R BSP
Download BSP
You need to get the ADV_GIT_TOKEN by contacting the PM or AE of ROM-2860.
$ cd /home/adv/BSP
$ git config --global credential.helper 'store --file ~/.my-credentials'
$ echo "https://AIM-Linux:${ADV_GIT_TOKEN}@dev.azure.com" > ~/.my-credentials
$ repo init -u https://dev.azure.com/AIM-Linux/risc_qcs_linux_le_1.1/_git/manifest -b main -m adv-6.6.28-QLI.1.1-Ver.1.1_robotics-product-sdk-1.1.xml
$ repo sync -c -j12
Get and Unzip the Download Files
LIV11 yocto downloads file:[ downloads.qcs6490.le.1.1.r00041.0.tar ]
$ cd /home/adv/BSP
$ tar -zxvf downloads.qcs6490.le.1.1.r00041.0.tar
Build Instructions
Source env
$ source scripts/env.sh
Build All Images
$ scripts/build_release.sh -all
- Output ufs images: build-qcom-robotics-ros2-humble/tmp-glibc/deploy/images/qcm6490/qcom-robotics-full-image
- Output emmc images: build-qcom-robotics-ros2-humble/tmp-glibc/deploy/images/qcm6490/qcom-robotics-full-image-emmc
Build All Images individually
1. Build ADSP Image
$ scripts/build_release.sh -adsp
2. Build AOP Image
$ scripts/build_release.sh -aop
3. Build CDSP Image
$ scripts/build_release.sh -cdsp
4. Build BOOT(XBL) Image
$ scripts/build_release.sh -boot
5. Build TZ Image
$ scripts/build_release.sh -tz
6. Generate Firmware Prebuilds
$ scripts/build_release.sh -common
7. Build YOCTO Image
$ scripts/build_release.sh -yocto
Build yocto images
$ cd /home/adv/BSP
$ MACHINE=qcm6490 DISTRO=qcom-robotics-ros2-humble source setup-robotics-environment
$ devtool modify qps615
$ ../qirp-build qcom-robotics-full-image
Recovery & Rescue
Using windows PCAT or Qualcomm Download (QDL) tool to flash software images to the device.
Emergency download (EDL) mode
Connect the Micro USB (EDL) to your linux host computer.
Windows PCAT Tool
Install the QPST_QFIL and Qualcomm_USB_Driver
Download and install the following files on the Windows OS (Windows 10 Test OK):
- QPST_QFIL: qpst.win.2.7_installer_00496.2.zip
- Qualcomm_USB_Driver: QUD.WIN.1.1 Installer_10065.1.zip
Note: If you can't get these files, please contact PM or AE to get these files.
Get the official images and unzip
Release image URL: OS Support List (based on Ubuntu 20.04 - LU 1.0)
Unzip command example:
$ sudo tar -zxvf 2860A1AIM37UIV10059_emmc_2024-03-14.tgz
Enter 9008 download mode
- Connect the Micro USB (EDL) to your host computer.
- Forced Recovery: The SW2 switch to 1-on.
- Flash EMMC: the SW1 switch to 1-off, 2-on
- Flash UFS: the SW1 switch to 1-on, 2-on
- Connect the adapter and power on the device
Use the QFIL to flash image
EMMC
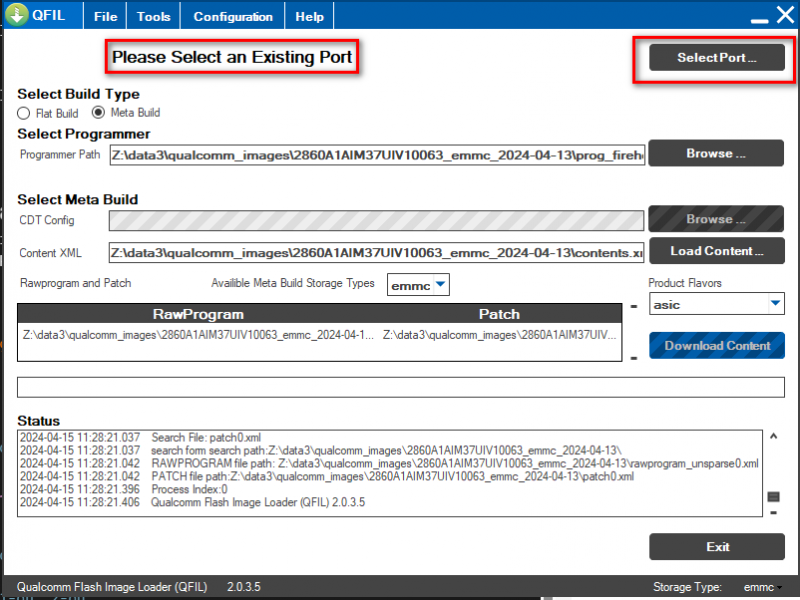
- Open QFIL tool and click the "Select Port"
- Select the "Qualcomm HS-USB QDloader 9008"
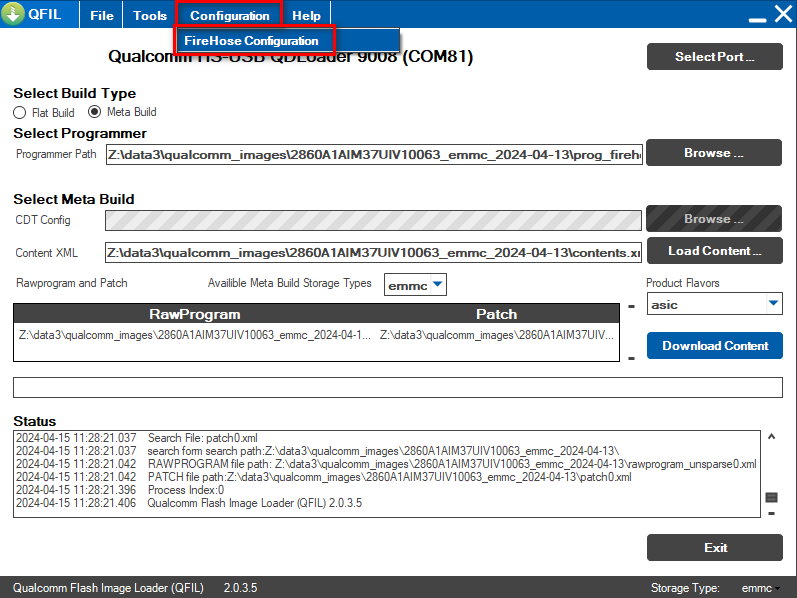
- 1.Click the "Configuration"
- 2.Click the "FireHose Configuration"
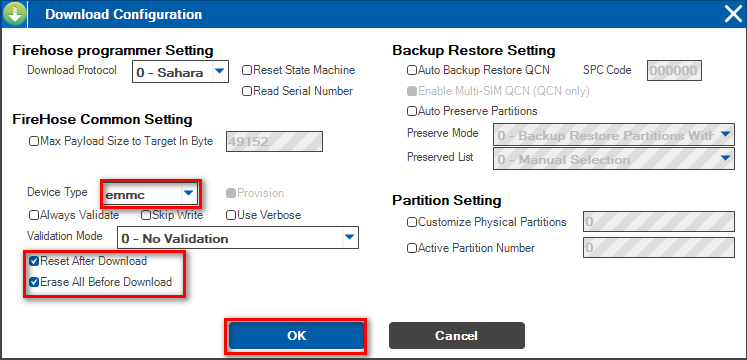
- 1.Select the "Device Type" to "emmc"
- 2.Select the "Reset After Download"
- 3.Select the "Erase All Before Download"
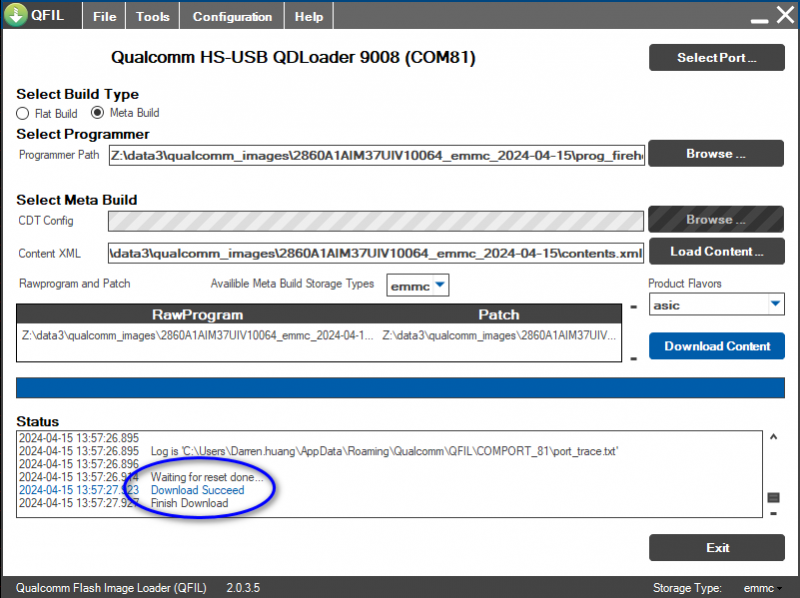
- 1.Select the "Availible Meta Build Storage Types" to "emmc"
- 2.Select the "Select Build Type" to "Meta Build"
- 3.Click the "Load Content" and Select the contents.xml file of emmc
- 4.Click the "Download Content"
- Finish Download
- You can power off the device and power on it again
UFS
Need to do the Provision when using it for the first time
- Open QFIL tool and click the "Select Port"
- Select the "Qualcomm HS-USB QDloader 9008"
- 1.Click the "Configuration"
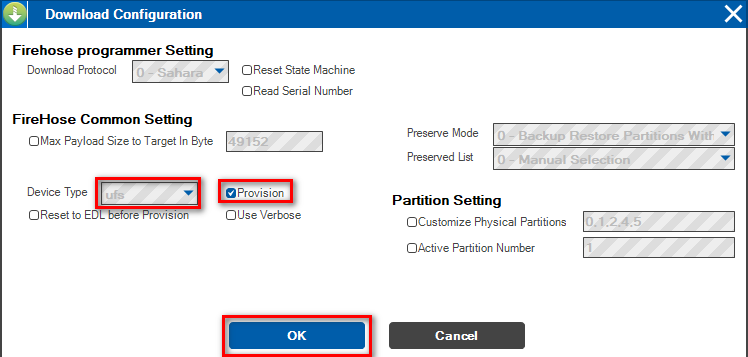
- 2.Click the "FireHose Configuration"
- 1.Select the "Device Type" to "ufs"
- 2.Select the "Provision"
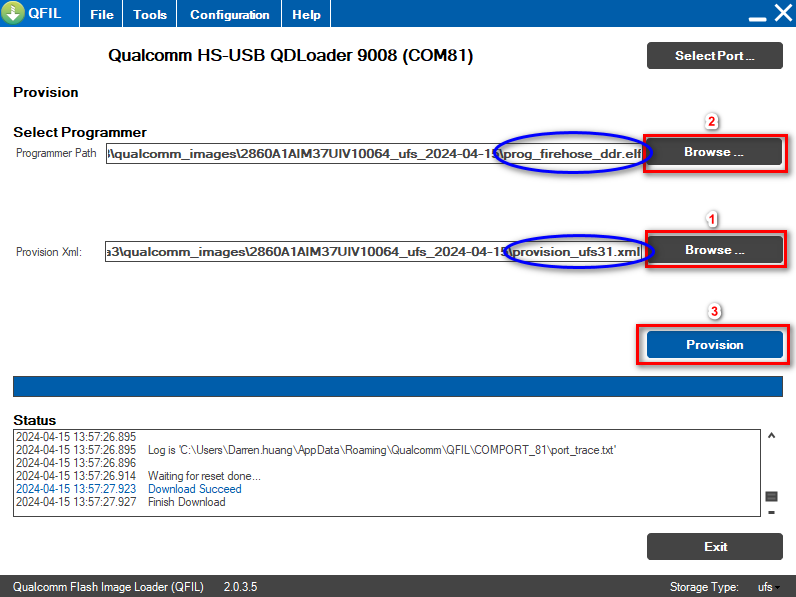
- 1.Select the "provision_ufs31.xml" file
- 2.Select the "prog_firehose_ddr.elf" programmer file
- 3.Click the "Provision"
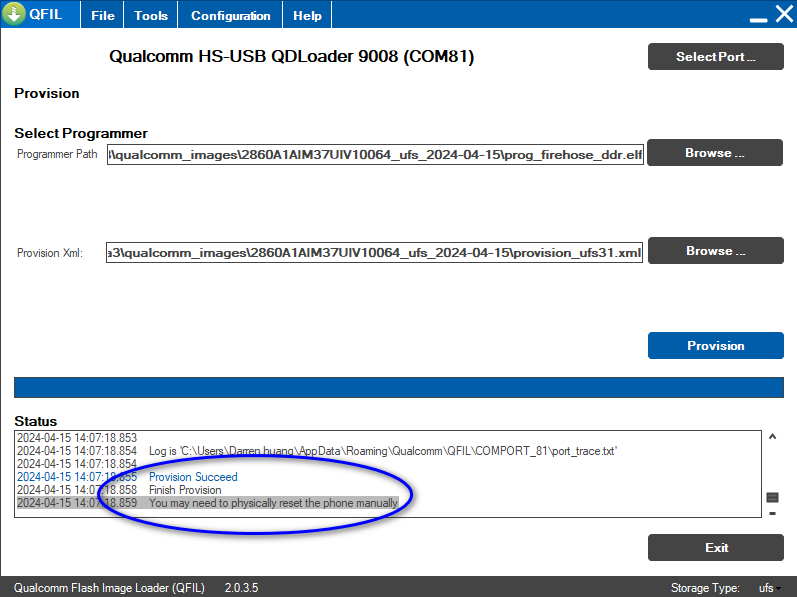
- Finish Provision
- You can power off the device and power on it again
- 1.Click the "Configuration"
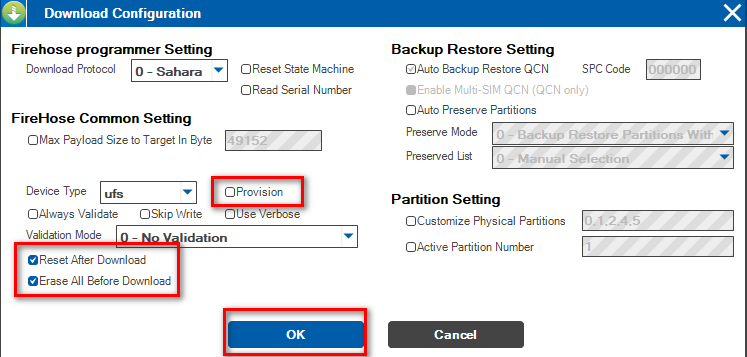
- 2.Click the "FireHose Configuration"
- 1.Deselected the "Provision"
- 2.Select the "Reset After Download"
- 3.Select the "Erase All Before Download"
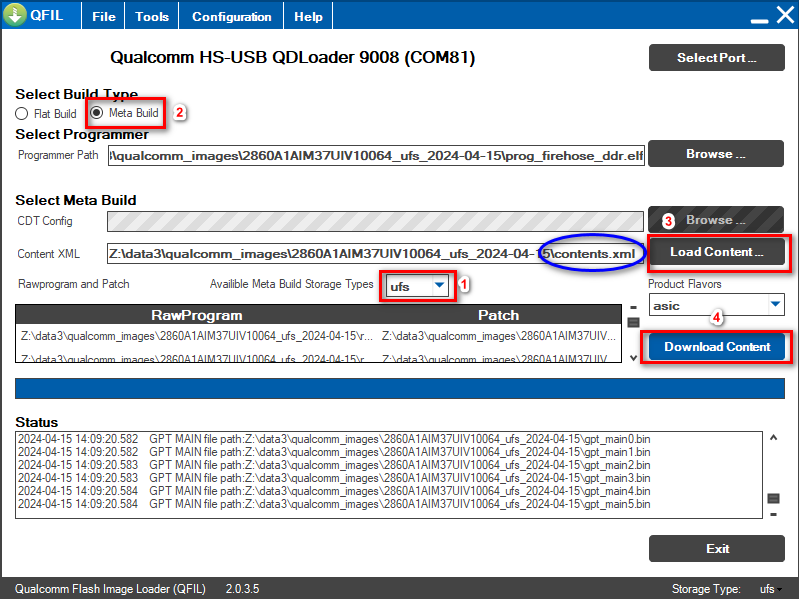
- 1.Select the "Availible Meta Build Storage Types" to "ufs"
- 2.Select the "Select Build Type" to "Meta Build"
- 3.Click the "Load Content" and Select the contents.xml file of ufs
- 4.Click the "Download Content"
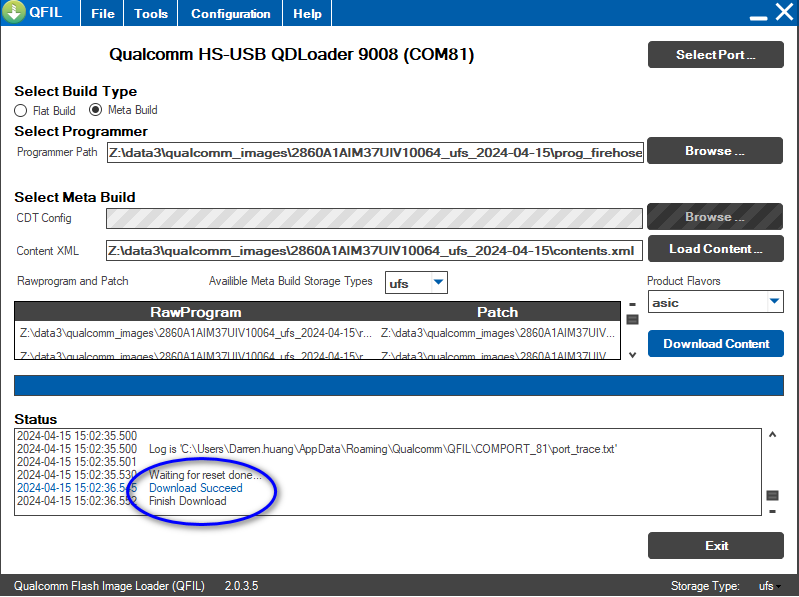
- Finish Download
- You can power off the device and power on it again
Fastboot
- Micro USB: ROM-ED92 USB0
Connect the ROM-ED92 USB0 to host computer and set the Micro USB to peripheral mode.
# echo "peripheral" > /sys/devices/platform/soc/a600000.ssusb/mode
Enter the fastboot mode
adv@adv-desktop:~$ adb devices
List of devices attached
2e8c656e        device

adv@adv-desktop:~$ adb root
restarting adbd as root

adv@adv-desktop:~$ adb reboot bootloader

adv@adv-desktop:~$ fastboot devices
2e8c656e        fastboot
Use the fastboot to flash the kernel boot image
adv@adv-desktop:~$ fastboot flash boot_a qti-ubuntu-robotics-image-qcs6490-odk-boot.img
target reported max download size of 805306368 bytes
sending 'boot_a' (24420 KB)...
OKAY [  0.790s]
writing 'boot_a'...
OKAY [  0.144s]
finished. total time: 0.935s

adv@adv-desktop:~$ fastboot flash boot_b qti-ubuntu-robotics-image-qcs6490-odk-boot.img
target reported max download size of 805306368 bytes
sending 'boot_b' (24420 KB)...
OKAY [  0.827s]
writing 'boot_b'...
OKAY [  0.133s]
finished. total time: 0.960s
Use the fastboot to flash the kernel dtbo image
adv@adv-desktop4:~$ fastboot flash dtbo_a dtbo.img
target reported max download size of 805306368 bytes
sending 'dtbo_a' (12330 KB)...
OKAY [  0.427s]
writing 'dtbo_a'...
OKAY [  0.070s]
finished. total time: 0.497s

adv@adv-desktop4:~$ fastboot flash dtbo_b dtbo.img
target reported max download size of 805306368 bytes
sending 'dtbo_b' (12330 KB)...
OKAY [  0.422s]
writing 'dtbo_b'...
OKAY [  0.061s]
finished. total time: 0.483s
