AIR 020 Development
Contents
Flash Mac Address
GBE in eeprom
$ sudo ./eeprom $SOC $mac_address
Where SOC
  186 : TX2-NX
  194 : XavierNX
  210 : Nano
Intel I210
$ sudo -s
$ BDF=`lspci | grep 210 | awk '{print $1}'`
$ setpci -s $BDF COMMAND=0007
Get NIC
$./EepromAccessTool
Flash I210 address with mac_address = D4E5F6123456 ( If mac address = D4:E5:F6:12:34:56 )
$ ./EepromAccessTool -nic=<NIC> -f=Dev_Start_I210_Copper_NOMNG_8Mb_A2_3.25_0.03.hex -mac=$mac_address
Cold reboot the device.
Tools
Test Command
JP5.1.0
CAN
$ modprobe can
$ modprobe can-dev
$ modprobe mttcan
$ ip link set can0 type can bitrate 500000
$ ip link set can0 up
$ ip link set can1 type can bitrate 500000
$ ip link set can1 up
In other terminal, run below command
$ candump can1
then run
$ cansend can0 123#abcdabcd
WatchDog
root@linux:/home/ubuntu$ sudo -s
root@linux:/home/ubuntu# sync; sleep 2; sync; echo c > /proc/sysrq-trigger
TPM
Pre-install TPM-tools
$ sudo apt install --yes tpm2-tools
(1)產生randon code
root@linux:/home/ubuntu# tpm2_getrandom --hex 20
(2) 對指定檔案 msg.dat 加密
root@linux:/home/ubuntu# tpm2_createprimary -C p -c platform_primary.ctx
root@linux:/home/ubuntu# tpm2_create -C platform_primary.ctx -G rsa2048 -u key.pub -r key.priv
root@linux:/home/ubuntu# tpm2_load -C platform_primary.ctx -u key.pub -r key.priv -c key.ctx
root@linux:/home/ubuntu# echo "my test" >msg.dat
root@linux:/home/ubuntu# tpm2_rsaencrypt -c key.ctx -o msg.enc msg.dat
root@linux:/home/ubuntu# cat msg.enc
root@linux:/home/ubuntu# tpm2_rsadecrypt -c key.ctx -o msg.ptext msg.enc
root@linux:/home/ubuntu# cat msg.ptext
root@linux:/home/ubuntu# cat msg.dat
(3) 將資料儲存至 tpm 內存
root@linux:/home/ubuntu# tpm2_nvdefine -Q 0x1500031 -C o -s 32 -a "ownerread|policywrite|ownerwrite"
root@linux:/home/ubuntu# echo "write_tpm_adv" >  adv.data
root@linux:/home/ubuntu# tpm2_nvwrite -Q 0x1500031 -C o -i adv.data
root@linux:/home/ubuntu# tpm2_nvread -Q 0x1500031 -C o -s 32 -o read.data
root@linux:/home/ubuntu# cat read.data
(4) 確認已經寫入儲存區域
root@linux:/home/ubuntu# tpm2_nvreadpublic > nv.out
root@linux:/home/ubuntu# cat nv.out
Error
ERROR: Esys_NV_DefineSpace(0x14C) - tpm:error(2.0): NV Index or persistent object already defined
ERROR: Failed to create NV index 0x1500031.
fixed
root@linux:/home/ubuntu# tpm2_nvundefine 0x1500031
RTC
DUT AC on:
1. Power on DUT and boot into OS.
2. Connect a LAN cable from the DUT to DHCP server.
3. Get a dynamic IP from DHCP server.
4. Type cmd to disable ntp service in DUT.
# sudo timedatectl set-ntp false
5. Synchronize system time and RTC time with NTP server.
# ntpdate tock.stdtime.gov.tw <===安裝ntpdate方式: $sudo apt-get install ntpdate <enter>
# hwclock -w
6. Keep the DUT on for 24 hours.
7. Synchronize system time and RTC time with NTP server again and check inaccuracies.
# ntpdate tock.stdtime.gov.tw && hwclock -s &&ntpdate -u tock.stdtime.gov.tw
Camera
The imx219 mode:
Size: Discrete 3280x2464 Interval: Discrete 0.048s (21.000 fps)
Size: Discrete 3280x1848 Interval: Discrete 0.036s (28.000 fps)
Size: Discrete 1920x1080 Interval: Discrete 0.033s (30.000 fps)
Size: Discrete 1640x1232 Interval: Discrete 0.033s (30.000 fps)
Size: Discrete 1280x720 Interval: Discrete 0.017s (60.000 fps)
Preview command:
3280x2464
$ gst-launch-1.0 nvarguscamerasrc ! 'video/x-raw(memory:NVMM), width=3280, height=2464, format=NV12, framerate=21/1' ! nv3dsink
3280x1848
$ gst-launch-1.0 nvarguscamerasrc ! 'video/x-raw(memory:NVMM), width=3280, height=1848, format=NV12, framerate=28/1' ! nv3dsink
1920x1080
$ gst-launch-1.0 nvarguscamerasrc ! 'video/x-raw(memory:NVMM), width=1920, height=1080, format=NV12, framerate=29/1' ! nv3dsink
1640x1232
$ gst-launch-1.0 nvarguscamerasrc ! 'video/x-raw(memory:NVMM), width=1640, height=1232, format=NV12, framerate=29/1' ! nv3dsink
1280x720
$ gst-launch-1.0 nvarguscamerasrc ! 'video/x-raw(memory:NVMM), width=1280, height=720, format=NV12, framerate=59/1' ! nv3dsink
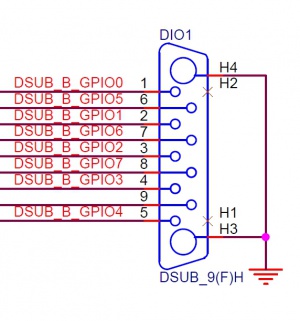
GPIO Expander
1).Switch to root
ubuntu@localhost:~ sudo -s
2).Commnad : where <GPIO> : gpio number and <LEVEL> : high(1)/low(0)
Xavier NX JetPack 4.x:
For example, pull up GPIO1 to high.
root@localhost:/home/ubuntu# echo 393 > /sys/class/gpio/export
root@localhost:/home/ubuntu# echo out > /sys/class/gpio/gpio393/direction
root@localhost:/home/ubuntu# echo 1 > /sys/class/gpio/gpio393/value
Xavier NX JetPack 5.1:
For example, pull up GPIO1 to high.
root@localhost:/home/ubuntu# echo 419 > /sys/class/gpio/export
root@localhost:/home/ubuntu# echo out > /sys/class/gpio/PN.01/direction
root@localhost:/home/ubuntu# echo 1 > /sys/class/gpio/PN.01/value
UART
RS-232
Xavier-NX
COM1 : COM1_SW1 OFF-OFF-OFF-OFF
stty -F /dev/ttyTHS1 speed 115200 raw -echo
cat /dev/ttyTHS1 &
echo "1234" > /dev/ttyTHS1
COM2 : COM2_SW1 OFF-OFF-OFF-OFF
stty -F /dev/ttyTHS0 speed 115200 raw -echo
cat /dev/ttyTHS0 &
echo "1234" > /dev/ttyTHS0
RS-422
Xavier-NX
COM1 : COM1_SW1 ON-OFF-ON-OFF
COM2 : COM2_SW1 ON-OFF-ON-OFF
COM2 -> COM1
stty -F /dev/ttyTHS1 speed 115200
stty -F /dev/ttyTHS0 speed 115200
cat /dev/ttyTHS1 &
echo "1234" > /dev/ttyTHS0
COM1 -> COM2
stty -F /dev/ttyTHS0 speed 115200
stty -F /dev/ttyTHS1 speed 115200
cat /dev/ttyTHS0 &
echo "1234" > /dev/ttyTHS1
RS-485
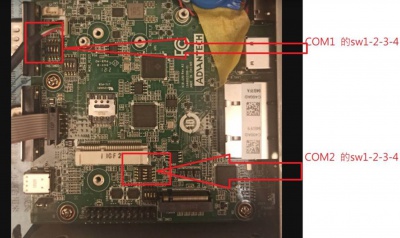
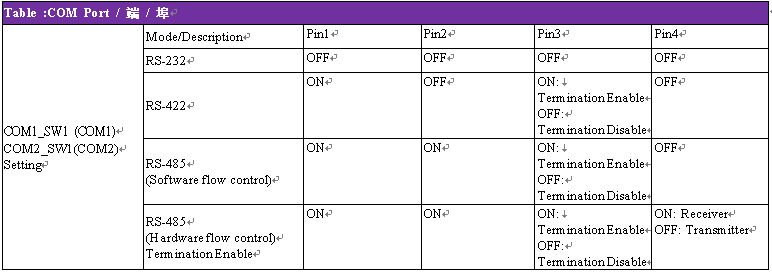
Need to adjust the COM port SW1 as shown below.
COM1 : COM1_SW1
COM2 : COM2_SW1

Xavier-NX
COM1 : /dev/ttyTHS1
COM2 : /dev/ttyTHS0
[Hardware flow control]
COM2 -> COM1
COM1_SW1 ON-ON-ON-ON, COM2_SW1 ON-ON-ON-OFF
stty -F /dev/ttyTHS1 speed 115200
stty -F /dev/ttyTHS0 speed 115200
cat /dev/ttyTHS1 &
echo "1234" > /dev/ttyTHS0
COM1 -> COM2
COM1_SW1 ON-ON-ON-OFF, COM2_SW1 ON-ON-ON-ON
stty -F /dev/ttyTHS0 speed 115200
stty -F /dev/ttyTHS1 speed 115200
cat /dev/ttyTHS0 &
echo "1234" > /dev/ttyTHS1
[Software flow control]
COM1_SW1/COM2_SW1 ON-ON-OFF-OFF
COM2 -> COM1
UART0_RTS (103) : gpio-482 (PX.06)
echo 482 > /sys/class/gpio/export
echo out > /sys/class/gpio/PX.06/direction
stty -F /dev/ttyTHS1 speed 115200
stty -F /dev/ttyTHS0 speed 115200
cat /dev/ttyTHS1 &
echo 1 > /sys/class/gpio/PX.06/value
echo "1234" > /dev/ttyTHS0
echo 0 > /sys/class/gpio/PX.06/value
COM1 -> COM2
UART1_RTS (207) : gpio-447 (PR.04)
echo 447 > /sys/class/gpio/export
echo out > /sys/class/gpio/PR.04/direction
stty -F /dev/ttyTHS1 speed 115200
stty -F /dev/ttyTHS0 speed 115200
cat /dev/ttyTHS0 &
echo 1 > /sys/class/gpio/PR.04/value
echo "1234" > /dev/ttyTHS1
echo 0 > /sys/class/gpio/PR.04/value
Reference
JP 4.5.1 / JP 4.6.1
AIR-020-RS-485
Calculate GPIO value from pin number


