Category:Editor
From ESS-WIKI
IoT Data Ingestion
Prerequisites:
- AWS account
- this example use service which is region in US East (N. Virginia).
Cloud Environment Setups
Step 1.Return the AWS console and go to IAM menu.

Step 2.Click “user” menu

Step 3.Click “Add user” button

Step 4.Enter your user name. In this example user name is “Adv_test”.→ chose Programmatic access → Click “Next Permissions” button.

Step 5.Click 

Step 6.Choose AdministratorAccess → Click “Next: Review” button

Step 7.Click “Create user”

Step 8.Download the credentials. This is the last time these credentials will be available to download.
Step 9.Click “Download .csv” button

Device Environment Setups
In this section, you will install Advantech Node-Red tool for and Configurate the setting to connect AWS IoT
- click on desktop to open NodeRED in web browser

Set up edge device environment
- Copy following NodeRED flow and import it into NodeRED:
[{"id":"d652f017.65e74","type":"tab","label":"Protocol Connector ","disabled":false,"info":""},
{"id":"bec4e2f6.b7b83","type":"mqtt in","z":"d652f017.65e74","name":"Data Recieved","topic":"/cagent/admin/+/deviceinfo","qos":"2","broker":"22aa981b.46a50c","x":150,"y":132,"wires":[["5651a33f.5722bc","cd4723c3.e1624"]]},{"id":"cd4723c3.e1624","type":"debug","z":"d652f017.65e74","name":"","active":true,"console":"false","complete":"payload","x":340,"y":112,"wires":[]},
{"id":"f7640bf7.c78ab8","type":"comment","z":"d652f017.65e74","name":"Send Protocol Connector  Sensor Data to AWS IoT","info":"","x":260,"y":69.36331176757812,"wires":[]},
{"id":"f6c0c463.1d1928","type":"comment","z":"d652f017.65e74","name":"Send Auto-Report Request to Internal MQTT","info":"","x":220,"y":296,"wires":[]},
{"id":"5651a33f.5722bc","type":"function","z":"d652f017.65e74","name":"messgae topic","func":"var device_id = 'DK10';\nvar plugin_id = msg.topic.replace(/^\\/cagent\\/admin\\/|\\/deviceinfo$/g, \"\");\nmsg.topic = 'protocol-conn/' + device_id + '/' + plugin_id;\nreturn msg;","outputs":1,"noerr":0,"x":350,"y":157.10000610351562,"wires":[["bb0580c5.75a24"]]},{"id":"b74f9d97.3e912","type":"mqtt out","z":"d652f017.65e74","name":"Auto-Report Request","topic":"","qos":"0","retain":"false","broker":"22aa981b.46a50c","x":692.0001220703125,"y":401,"wires":[]},
{"id":"828deeb3.bd324","type":"mqtt in","z":"d652f017.65e74","name":"Handler Registered","topic":"/cagent/admin/+/agentinfoack","qos":"2","broker":"22aa981b.46a50c","x":160,"y":364.8398742675781,"wires":[["8e87ec7b.6487b"]]},
{"id":"8e87ec7b.6487b","type":"function","z":"d652f017.65e74","name":"pakcage auto report command","func":"var auto_rpt_msg = function(device) {\n    return {\n        topic: \"/cagent/admin/\" + device + \"/agentcallbackreq\",\n        payload: {\n            \"susiCommData\": {\n                \"commCmd\": 2053,\n                \"requestItems\": {\"All\":{}},\n                \"autoUploadIntervalSec\": 10,\n                \"handlerName\": \"general\"\n            }\n        }\n    };\n};\n\nvar registered = context.get(\"registered\") || [];\nvar dev_id = msg.topic.replace(/^\\/cagent\\/admin\\/|\\/agentinfoack$|\\/notify$/g, \"\");\nvar is_reg_msg = (\n    msg.topic.endsWith(\"agentinfoack\") && JSON.parse(msg.payload).susiCommData.status\n);\nvar msg_out = (is_reg_msg || (!~registered.indexOf(dev_id)))? auto_rpt_msg(dev_id) : null;\n\nif(!~registered.indexOf(dev_id)) {\n    registered.push(dev_id);\n}\n\ncontext.set(\"registered\", registered);\nreturn msg_out;\n","outputs":1,"noerr":0,"x":418.0195617675781,"y":401.00390625,"wires":[["b74f9d97.3e912"]]},{"id":"b06132d0.4baf6","type":"mqtt in","z":"d652f017.65e74","name":"Handler Heartbeat","topic":"/cagent/admin/+/notify","qos":"2","broker":"22aa981b.46a50c","x":157,"y":438,"wires":[["8e87ec7b.6487b"]]},
{"id":"bb0580c5.75a24","type":"AWS IotData","z":"d652f017.65e74","aws":"20e9a430.34135","operation":"Publish","thingName":"","topic":"","payload":"","endPoint":"","name":"","x":535,"y":156.75,"wires":[[]]},{"id":"22aa981b.46a50c","type":"mqtt-broker","z":"","broker":"127.0.0.1","port":"1883","clientid":"","usetls":false,"compatmode":true,"keepalive":"60","cleansession":true,"willTopic":"","willQos":"0","willPayload":"","birthTopic":"","birthQos":"0","birthPayload":""},
{"id":"20e9a430.34135","type":"amazon config","z":"","name":"AWS","region":"us-east-1"}]
- Switch to Protocol Connector tab and double click “IotData Publish” node to set device configuration.
- Click
 button
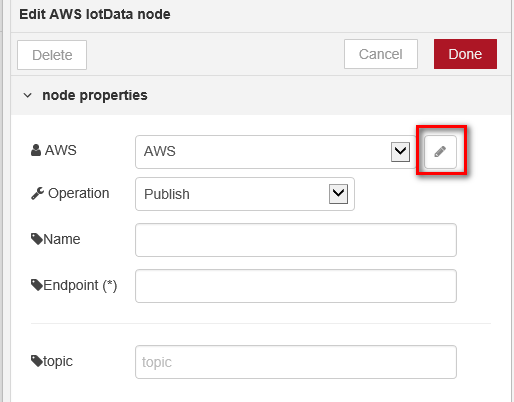

- Enter the Access Id and Secret Key which is on credentials .csv file.

- Enter the Name “IoT Pubilsh” and Endpoint

- You can find endpoint in AWS IoT console.

- Check your message topic on the "message topic' function node


- Enter {your devie id} in device_id, you can choose {your device id} which you want.
[[File:2018-02-13 152702.png|center|2018-02-13_152702.png]]
- Click
 to finish edge device environment setups.

- Click NodeRED “Debug” tab, the sent messages will be displayed.

- Go back to AWS IoT menu
- click “Test” and enter Subscription topic click

- For more information, see https://docs.aws.amazon.com/iot/latest/developerguide/topics.html

- if your settings is correct, then you can see the message in this area.

Pages in category "Editor"
The following 168 pages are in this category, out of 168 total.
A
- ACG Projects
- AdvancedInstaller
- Advantech ROS2 Suite
- AIM-Linux/BSP/Qualcomm/RISC QCS Linux 00011.1
- AIM-Linux/BSP/Qualcomm/RISC QCS Linux 00011.1 qualcomm series
- AIM-Linux/BSP/Qualcomm/RISC QCS Yocto LE1.1 ROM2860
- AIM-Linux/EPC-R2860
- AIMLinux/BSP/Linux/MT8395/flashimage
- Alleantia Project
- Android 7.1.2
- Android 7.1.2 Tools
- Ansible Note
- ARM mbed-Cloud
- ASR-A501 ROS2
D
E
- E-Ink Project
- EC-Projects
- Edge AI SDK/User Guide rc
- Edge AI Server-EdgeSense
- Edge AI Suite
- Edge AI Suite/AI System/EI-53
- Edge Sense
- Edge Sense Knowledge Sharing
- Edge Sense LoRa GW Solution internal
- Edge Sense Service base on MQTT BUS
- Edge Service Installation
- Edge Services
- EdgeSense Coding Style and Rule
- EdgeX
- EdgeX Handler
- EdgeX-EdgeSense
- EnOcean Link Solution Grafana Demo
- EnOcean Link Solution internal
- EPD-132 Development User Manual
- ESL-ZigBee
H
I
- IAlarm
- Industry Protocol Converter
- Install Kubeflow with KSonnet
- Intel AI Solution
- Internal
- Internal Used
- Internal Used/OTA Idea Quark
- Introduce to DeviceService & Protocol
- Introduce to EdgeX
- IoTGateway/BSP/Linux/Linux BSP User Guide DeviceOn
- IoTGateway/BSP/Linux/Quark/KT Project
- IoTGateway/BSP/Linux/Quark/KT Project/SDcard image
- IoTGateway/Machine Learning
- IoTGateway/Security/Certificates
M
P
R
- ReyaxSol 0 0 1
- ReyaxSol 0 0 2
- ReyaxSol 0 0 3
- ReyaxSol 1.0.0-rc1
- ReyaxSol 1.0.0-rc2
- ReyaxSol 1.0.0-rc3
- ReyaxSol 1.0.0-rc4
- ReyaxSol 1.0.0-rc5
- ReyaxSol 1.0.0-rc6
- RK ALL ROS2 Test
- ROM-5720
- ROS 2 Suite
- ROS2 Suite
- ROS2 Suite Advantech ROS2 Data Format
- ROS2 Suite Camera
- ROS2 Suite DBMS ROS2
- ROS2 Suite DeviceOn
- ROS2 Suite Gazebo
- ROS2 Suite IMU
- ROS2 Suite Installation
- ROS2 Suite Lidar
- ROS2 Suite Modbus-Master Node
- ROS2 Suite OPCUAClient Node
- ROS2 Suite Q&A
- ROS2 Suite rqt console
- ROS2 Suite rqt graph
- ROS2 Suite RViz
- ROS2 Suite Sensors
- ROS2 Suite SUSI Node
- ROS2 Suite/AI/OpenVINO
- ROS2 Suite/Camera
- ROS2 Suite/IMU
- ROS2 Suite/Lidar
- Rule Engine
- Run a TensorFlow Docker Sample
S
- Scikit-learn Kernel SVM
- Scikit-learn KNN(K Nearest Neighbors)
- Scikit-learn Linear SVM
- Scikit-learn Logistic Regression
- Scikit-learn Random Forest
- Scikit-learn Sample Code
- Server List
- Setup EdgeX in Win10
- SI test DS100
- SSD Flash Failure Prediction
- Support CUDA in docker
- SW Service/x86 Yocto
- SysVinit in bb file