Alleantia Service
Contents
Introduction
Alleantia’s IOT SCADA Software implements easily complete supervisory and control systems for industrial devices, single machine and sensors. Expandable without programming, with a native Web architecture and extended functionalities of integrazione for external applications.
Through MQTT Service , IoT SCADA application can publish data collected from different devices and sensors on a listening MQTT broker. The exchange through MQTT protocol happens according to publish/subscribe type, indicating with publisher a device that can publish the data on a specific broker, and subscriber a device that can “subscribe” to a broker to receive different messages from the publishers.
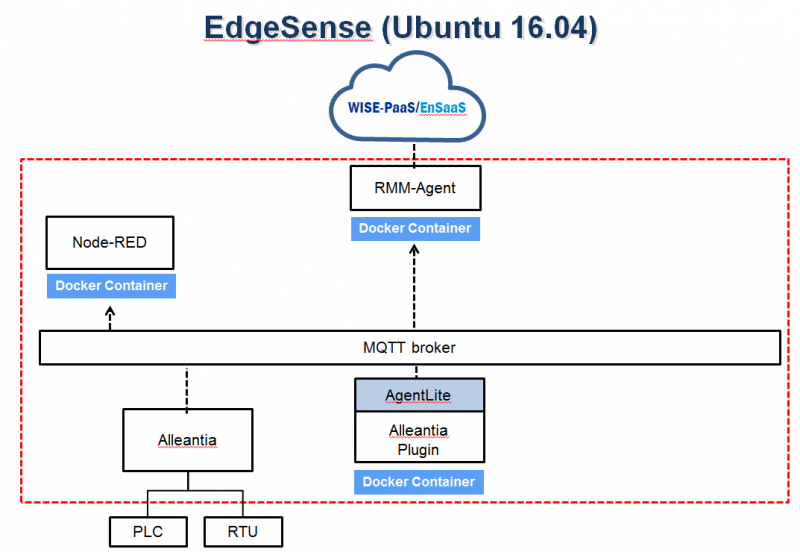
For the purpose of the integration with WISE-PaaS/EdgeSense, sensor data that collected by Alleantia’s IOT SCADA software can publish to MQTT broker for WISEAgent Alleantia-Plugin to subscribe, after WISEAgent receive the data, it will be transfer them to WISE-PaaS/EdgeSense.
System Architecture
Windows Platform:
Linux Platform:
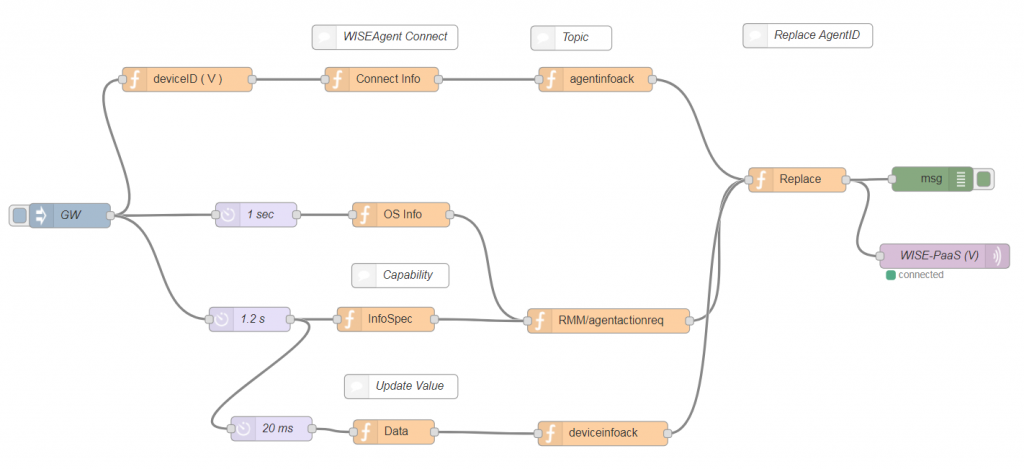
Data Simulator
Node-RED Flow chart
Download Node-RED Flow chart File: Alleantia Simulator Flow.zip
How to
Alleantia IoT SCADA software Installation & Configuration
Installation and Configuration
User Manual: http://ess-wiki.advantech.com.tw/wiki/images/4/45/Alleantia_ISC_User_Manual_ENG.pdf
MQTT Service Configuration
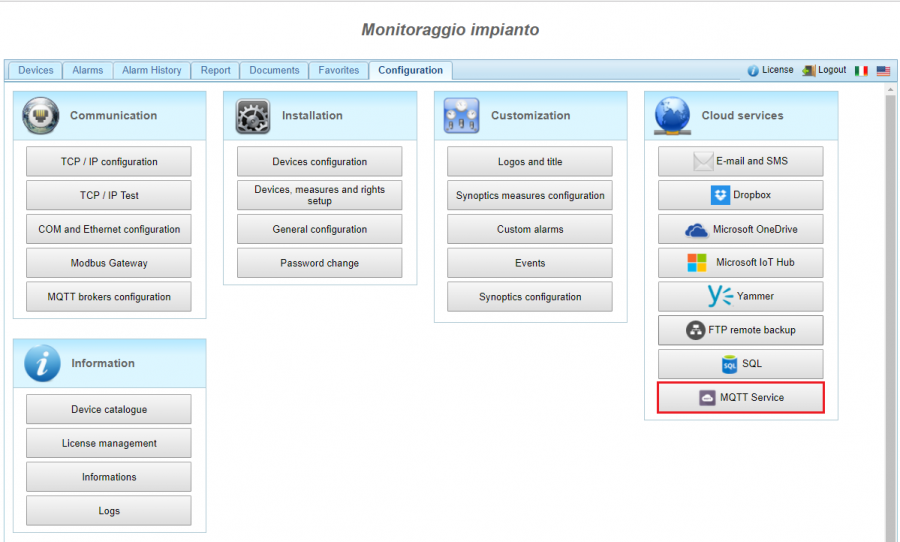
1. Click MQTT Service from Alleantia IoT SCADA main screen.
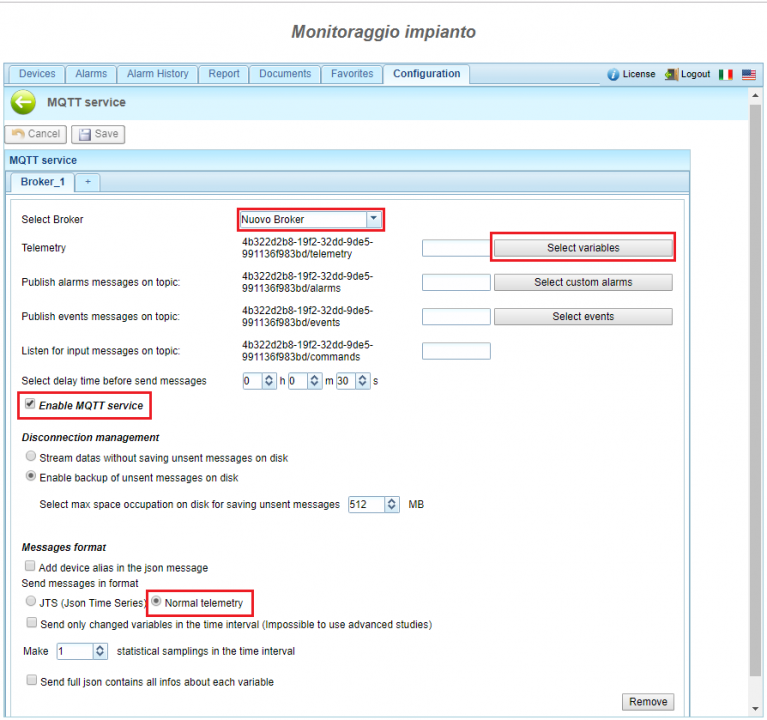
2. Select Nuovo Broker at MQTT service screen.
3. Check "Enable MQTT service" to activate MQTT function.
4. Select the format "Normal Telemetry" for the message to send to MQTT broker.
5. Click "Select variables" to select what sensors data you like to publish to MQTT broker.
6. Click "Select custom alarms" to select what alarms you like to publish to MQTT broker.
7.Click "Select events to select what events you like to publish to MQTT broker.
8. Click "Save" to apply your configuration.
EI-PaaS Agent 1.0.X Installation & Configuration
Installation
1. Open and login WISE-PaaS/EdgeSense Portal by using your user id and password.
2. Select "Settings" - "System" from function list to open "System Management" page.
3. Select "Agent Credential" from top-right pull-down menu.
4. Click "Download" to get agent and install it to your gateway.
5. Input IoTKey and Credential URL when installing.
Configuration
1. Double click the icon "ServerSetting" on desktop and set password for your agent.
2. Set "Device Name" for your gateway.
3. The fields "Credential URL" and "IoTKey" are as the same value that you assigned when installing.
4. Select "Enable SSL" if your network suppport SSL.
5. Select "Assign to Account" if this gateway is assigned to your account.
6. Click "Save" to apply your change or "Cancel" to exit the configuration.
7. Open WISE-PaaS/EdgeSense Portal and add your gateway from "Device" page.
Alleantia-Plugin Installation & Configuration
Installation
1.Double click Agent_AlleantiaHandler_X.X.X.exe to install.
2.Click "Next" to continue the setup wizard.
3.Select installation folder then click "Next".
4.Click "Next" to begin the installation.
5. complete the installation, click "Finish" to exit the setup wizard.
Configuration
1. Open the file AlleantiaHandler.ini from Agent_AlleantiaHandler installation folder, for example: C:\Program Files (x86)\Advantech\Agent_AlleantiaHandler\AlleantiaHandler.ini.
2. Edit [Platform] session's parameters and save the modification:
SerialNumber= [Serial number of Alleantia IoT SCADA software, the number should as same as devId]
PrefixDevId= [Prefix string for devId]
PrefixVarId= [Prefix string for varId]
3. Edit [MQTT_Broker] session's parameters and save the modification:
IP= [IP address of MQTT broker]
Port= [Port of MQTT broker]
4. Open Windows Task Manager and switch to [Service] tab, restart Agent_AlleantiaHandler service.
Example:
[Platform]
SerialNumber=acbdef123-1234-5678-9012-998877665500
PrefixDevId=devId_
PrefixVarId=varId_

[MQTT_Broker]
IP=127.0.0.1
Port=1883
JSON Data Format
{
  "AlleantiaHandler": {
    "Plugin": {
      "bn": "Plugin",
      "e": [
        {
          "n": "Version",
          "sv": "1.0.1",
          "asm": "r"
        },
        {
          "n": "Description",
          "sv": "This service is Alleantia SCADA Service",
          "asm": "r"
        }
      ]
    },
    "info": {
      "bn": "info",
      "e": [
        {
          "n": "devSn",
          "sv": "4b322d2b8-19f2-32dd-9de5-991136f983bd",
          "asm": "r"
        }
      ]
    },
    "devId_1": {
      "bn": "devId_1",
      "e": [
        {
          "n": "varId_5",
          "v": 0,
          "asm": "r"
        },
        {
          "n": "varId_16",
          "bv": false,
          "asm": "rw"
        }
      ],
      "opTS": {
        "$date": 0
      }
    },
    "devId_2": {
      "bn": "devId_2",
      "e": [
        {
          "n": "varId_1",
          "bv": false,
          "asm": "r"
        },
        {
          "n": "varId_6",
          "bv": false,
          "asm": "r"
        }
      ],
      "opTS": {
        "$date": 0
      }
    }
  }
}
Use Case
...
Release
| Index | Version |
Date |
Platform |
OS |
Release Note |
| 1 | 1.0.1 | 2018/09/26 | x86_64 CPU |
Windows |
Release-note_Agent_AlleantiaHandler_v1.0.1.txt |


