Configuring Nexus as a Helm repo
What we will do:
– create a private (hosted) repository for our own package
– create a proxy repository pointing to stable helm repo server (https://kubernetes-charts.storage.googleapis.com) for 'kubernetes'or other private repo.
I suggest you create a new blob store for each new repo you want to create. That way, the data for every repo will be in a different folder in /nexus-data.
But this is not mandatory for it to work.
Contents
private repo
A repository for Helm repo that your team creates.
Create a new Helm (hosted) repository and configure it like:
proxy repo
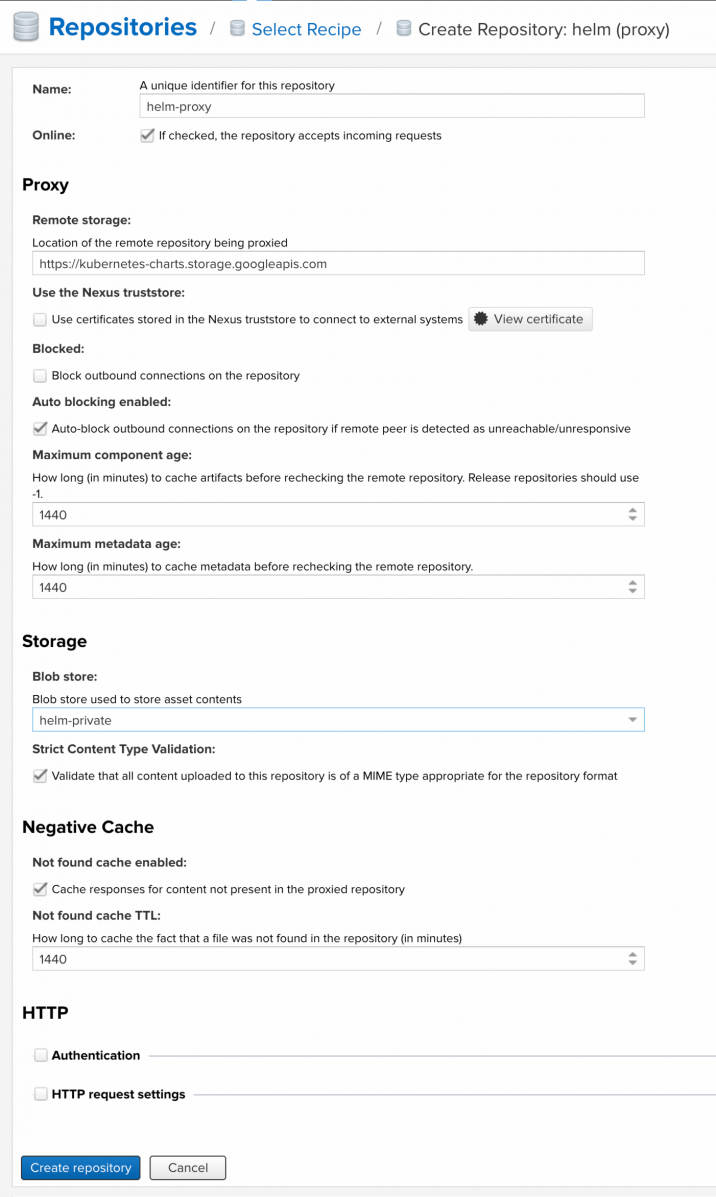
A repository that proxies everything you download from the official repository, Kubeapps Hub. Next time you download the same dependency, it will be cached in your Nexus.
Create a new Helm (proxy) repository and configure it like:
Configuring Helm for private repository
Configuring Helm to use Nexus Repository is fairly easy! Once you have Helm up and running you'll want to run a command similar to the following:
$ helm repo add nexusrepo http://localhost:8081/repository/helm-proxy/$ helm install nexusrepo/mongodbCreate a package
What is a helm chart? It is basically a set of templates and a file containing variables used to fill these templates. Let’s have a look at an example. I assume that you already have Helm installed and configured at this point.
To start working on a chart, Helm uses a simple command create:
$ helm create my-app
my-app/
├── charts
├── Chart.yaml
├── templates
│     ├── deployment.yaml
│     ├── _helpers.tpl
│     ├── ingress.yaml
│     ├── NOTES.txt
│     └── service.yaml
└── values.yaml
2 directories, 7 files
$ cat my-app/Chart.yaml
apiVersion: v1
appVersion: "1.0"
description: A Helm chart for Kubernetes
name: my-app
version: 0.1.0
$ cat << HELM > my-app/templates/cm.yaml
apiVersion: v1
data:
nginx.conf: |
events {
worker_connections 1024;
}
http {
server {
listen 80;
location / {
return 200 "===============================\n\n This is your helm deploy! \n\n===============================\n";
}
}
}
kind: ConfigMap
metadata:
name: nginx-config
HELM
volumes:
- name: config
  configMap:
    name: nginx-config
volumeMounts:
- name: config
  mountPath: /etc/nginx/nginx.conf
  subPath: nginx.conf
This will generate all templates with variables and show the output. Now that we know everything is OK, we can deploy the chart:
helm install my-app --name=my-app-name
Then check that Service and Deploy have been created and curl our Service:
$ kubectl get svc
NAME TYPE CLUSTER-IP EXTERNAL-IP PORT(S) AGE
my-app-name-my-app ClusterIP 10.100.56.254 <none> 80/TCP 44m
$ curl 10.100.56.254
===================
This is your helm deploy!
===================
Congratulations! We have created and deployed our first Helm chart.
Additionally, you can create a package:
$ helm package my-app
This command creates an archive like my-app-0.1.0.tgz — now you can share your chart with others. For instance, you can upload this file to Helm repository, which we are going to do now.

