Linux BSP build User Guide (LSDK20.12)
Contents
Linux BSP Version
Ubuntu 18.04
Kernel 5.4.47
Released Image
Download flex-installer
$ wget https://www.nxp.com/lgfiles/sdk/lsdk2012/flex-installer && chmod +x flex-installer && sudo mv flex-installer /usr/bin
Build Environment on Host
If you don't have docker in your system, then you can follow the below steps to install docker and run it first.
Pull Ubuntu 18.04 from Azure Container Registry
$ docker pull riscswacr.azurecr.io/u18.04-ls1046albv1:latest
Run/Create Docker Container
$ docker run -it --name ${CONTAINER_NAME} --privileged -v ${WORK_SPACE}:/home/adv/flexbuild_lsdk2012:rw riscswacr.azurecr.io/u18.04-ls1046albv1 /bin/bash
Get BSP
Download BSP from Azure DevOps
The following example shows how to download the Advantech LSDK flexbuilder from DevOps. (Execute in Docker container)
For this example, a directory called adv-release-bsp is created for the project.
    $ cd adv-release-bsp
    $ git clone https://AIM-Linux@dev.azure.com/AIM-Linux/flexbuild_lsdk2012/_git/flexbuild_lsdk2012
Product
ROM-8720S1
ROM-8720P1
- Following we will take ROM-8720S1 as an example in Build/Flash Image sections.
Build Images
These commands are execute in Docker environment.
Composite Firmware
Type with QSPI, eMMC and SD
    $ cd flexbuild_lsdk2012
    $ source setup.env
    $ flex-builder -i mkfw -m ls1046arom8720_s1 -b qspi
    $ flex-builder -i mkfw -m ls1046arom8720_s1 -b emmc
    $ flex-builder -i mkfw -m ls1046arom8720_s1 -b sd
Root File System
$ flex-builder -i mkrfs -m ls1046arom8720_s1 -r ubuntu:main -a arm64
Boot Partition
$ flex-builder -i mkbootpartition -a arm64
Flash Images
These operations process in linux local host
Bootable SD card :
    $ cd adv-release-bsp/flexbuild_lsdk2012/build/images/
    $ flex-installer -i pf -d /dev/sda
    $ flex-installer -f firmware_ls1046arom8720_s1_uboot_sdboot.img -b bootpartition_LS_arm64_lts_5.4_xxxxxxxxxxxx.tgz -r rootfs_lsdk2012_ubuntu_main_arm64.tgz -d /dev/sda
    $ sync
Rootfs and Boot-Partition in USB
    $ cd adv-release-bsp/flexbuild_lsdk2012/build/images/
    $ flex-installer -i pf -d /dev/sdx
    $ flex-installer -b bootpartition_LS_arm64_lts_5.4_xxxxxxxxxxxx.tgz -r rootfs_lsdk2012_ubuntu_main_arm64.tgz -d /dev/sdx
    $ sync
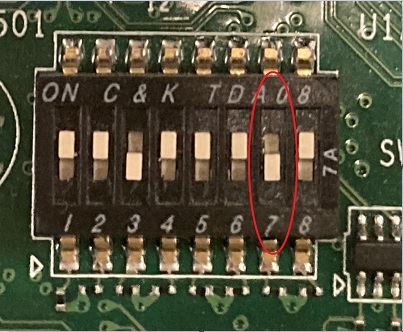
Boot Mode
| QSPI Mode | MMC mode |

|

|
Flash Image to eMMC
Step 1. Burn In Boot-Loader to QSPI Flash
You need a bootable SD card (follow above section), and switch boot mode to SD mode.
Insert your SD card and follow below flow in U-boot console.
Set FTP Server IP
$ setenv serverip 172.22.31.153
Request IP Address
$ dhcp
Try to Ping FTP Server
$ ping 172.22.31.153
Load U-boot Firmware Image
$ tftp $load_addr firmware_ls1046arom8720_s1_uboot_qspiboot.img
Install Image to QSPI (32MB)
    $ sf probe 0:0
    $ sf erase 0 0x2000000 && sf write $load_addr 0 0x2000000
Shutdown, unplug SD card, switch to QSPI mode, plugin the prepared USB disk and power on the board again.
Boot into U-boot console again and flush the eMMC
    $ mmc erase 0 0x8000
    $ boot
Boot into rootfs with USB disk
Create FTP Temp Folder
    $ mkdir /media/mytftp
    $ cd /media/mytftp
Request IP Address
The network interface in here is fml-mac9 :
    $ ifconfig fm1-mac9 up
    $ dhclient -i fm1-mac9
    $ ping 172.22.31.153
Download Images from FTP
    $ tftp -m binary 172.22.31.153 -c get "bootpartition_LS_arm64_lts_5.4_xxxxxxxxxxxx.tgz"
    $ tftp -m binary 172.22.31.153 -c get "firmware_ls1046arom8720_s1_uboot_emmcboot.img"
    $ tftp -m binary 172.22.31.153 -c get "rootfs_lsdk2012_ubuntu_main_arm64.tgz"
Initial eMMC Partitions
$ flex-installer -i pf -d /dev/mmcblk0
Install Images
    $ flex-installer -f firmware_ls1046arom8720_s1_uboot_emmcboot.img -b bootpartition_LS_arm64_lts_5.4_xxxxxxxxxxxx.tgz -r rootfs_lsdk2012_ubuntu_main_arm64.tgz -d /dev/mmcblk0
    $ sync
* Finally, shutdown and restart after switch boot mode back to SD mode.
Program Boot-Loader
After flash eMMC complete (by flex-installer). If you want to update boot-loader only, just put composite firmware image in your tftp path and execute following commands.
    $ tftp $load_addr firmware_ls1046arom8720_s1_uboot_emmcboot.img
    $ mmc dev 0
    $ mmc write $load_addr 8 $IMAGE_SIZE
* IMAGE_SIZE = tftp-download-size / 512 (block size)
Linux Kernel and Device Tree Update
Compile kernel and device tree first :
$ flex-builder -c linux -a arm64
Copy image and dtb file to boot partition mount point :
    $ cp linux/arch/arm64/boot/Image ${boot_partition}
    $ cp linux/arch/arm64/boot/Image.gz ${boot_partition}
    $ cp linux/arch/arm64/boot/dts/freescale/fsl-ls1046a-rom8720-s1.dtb ${boot_partition}
    $ sync
System Recovery
This section provides detail procedures of restoring the eMMC image.
If you destroy the onboard flash image by accident, you can recover a system following these steps.
- Recovery by SD card & USB disk
1. Copy 8720S1AIM30UIV00009_2022-08-12_img.tar.gz package to your desktop.
2. Insert SD card to PC
3. Make a bootable sd card
    $ tar xzvf 8720P1AIM30UIV00009_2022-08-12_img.tar.gz
    $ cd ls1046arom8720_p1.out/
    $ sudo flex-installer -i pf -d /dev/sdg
    $ sudo flex-installer -f firmware_ls1046arom8720_p1_uboot_sdboot.img -b bootpartition_LS_arm64_lts_5.4_202208120200.tgz -r rootfs_lsdk2012_ubuntu_main_arm64.sdcard.tgz -d /dev/sdg
    $ sync
4. Insert USB disk to PC
5. Burn root filesytem in USB disk
6. Insert SD card and Boot from SD.
7. Burn bootloader to QSPI