WSN-Device SDK
Contents
Introduction
- WSN-Device SDK is a layer to define the topology and behavior of sensor network. A complete device represented in WSN-Device SDK includes one virtual gateway, one sensor connectivity interface and several sensor devices. WSN-Device SDK provides a form-like array which we call it infospec array to define tha parameters of sensor device. And a form-like data array updates your real time data. So, you can easy to represent your device by creating several arrays.
Design intention
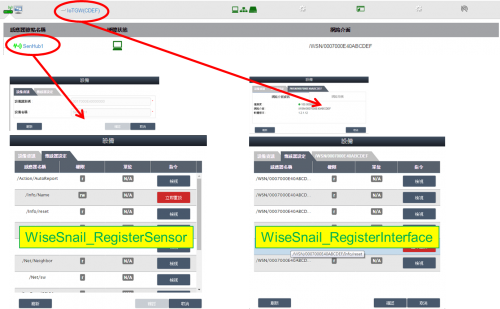
- We refer the data handle flow on Wise-PaaS to design a data layout like right picture. There are two arrays, interface and sensor device, to implement the behavior of gateway. Each variable array includes several tags. A tag is a variable to indicate the parameter on interface or sensor device. So, we have two register functions and assign into two arrays to generate tags.
Hardware requirements
CPU architecture
- x86
- arm
Minimum ram size
- 256kb and above.
OS
- Windows ( x86 )
- Ubuntu ( 14.04, 16.04 )
- Yocto ( 1.5.3 Dora )
- OpenWRT
Source Code
GitHub
https://github.com/ADVANTECH-Corp/WiseSnail.git
Source tree
| inc | header files |
| library | includes AdvJSON, AdvLog, WiseCore |
| sample | a simple sample to test library. |
| source | source files |
Build WSN-Device SDK
Build WSN-Device SDK in Windows
Install Visual Studio 2015 or above.
Open WiseSnail\project\VS2015\WiseSnail\WiseSnail.sln with Visual Studio.
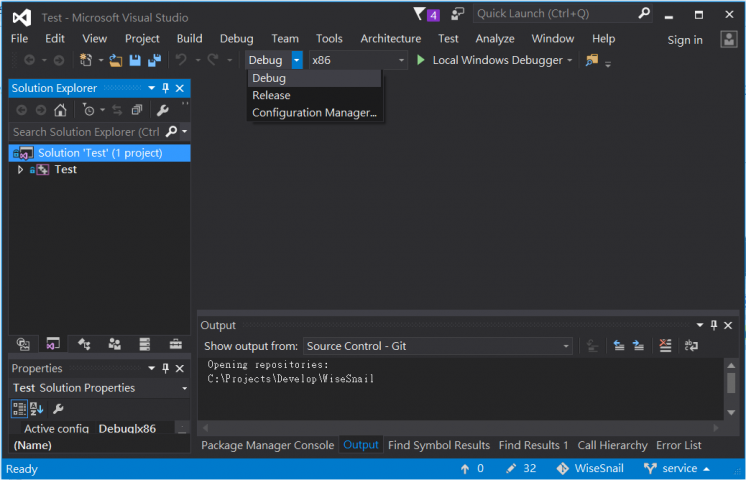
Change Solution Configurations to Release and change Solution Platforms to x86.
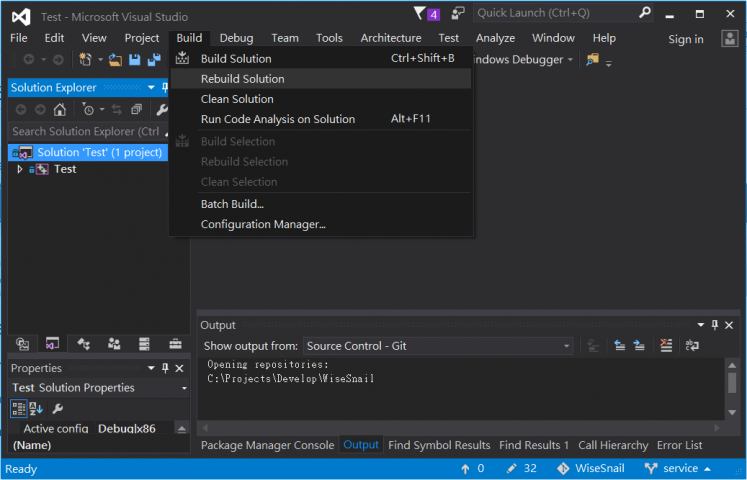
Then go Build Solution.
Build WSN-Device SDK in Ubuntu 16.04
Install development tools
$ sudo apt update
$ sudo apt -y install git build-essential automake autoconf libtool cmake libmosquitto-dev
Install Eclipse Paho MQTT C client library
$ sudo apt update
$ sudo apt -y install libssl-dev doxygen graphviz
$ git clone https://github.com/eclipse/paho.mqtt.c.git
$ cd paho.mqtt.c
$ make
$ make html
$ sudo make install
Build WiseSnail
$ git clone https://github.com/ADVANTECH-Corp/WiseSnail.git
$ cd WiseSnail/script/Ubuntu-1604
$ ./build_wisesnail.bash
Then, WiseSnail library, header file and sample program (test) will be installed at release folder.
$ ls -1 WiseSnail/release/
libAdvJSON.so
libAdvJSON.so.0
libAdvJSON.so.0.0.0
libAdvLog.so
libAdvLog.so.0
libAdvLog.so.0.0.0
libWiseCarrier_MQTT_Mosquitto.so
libWiseCarrier_MQTT_Mosquitto.so.0
libWiseCarrier_MQTT_Mosquitto.so.0.0.0
libWiseCarrier_MQTT_Paho.so
libWiseCarrier_MQTT_Paho.so.0
libWiseCarrier_MQTT_Paho.so.0.0.0
libWiseCore_MQTT.so
libWiseCore_MQTT.so.0
libWiseCore_MQTT.so.0.0.0
libWiseSnail.so
libWiseSnail.so.0
libWiseSnail.so.0.0.0
test
WiseSnail.h
Configure
- Optional
| --disable-paho | Disable Paho support. |
| --disable-mosquitto | Disable Mosquitto support. |
- Compile
- You can perform the following steps to build this library.
|
./configure |
- Compile script
- This script combines compile steps and version control handling.
|
./snailconf.sh |
- Build sample
- Enter the folder of sample,and make it directly. You can change the MQTT library by editing makefile.
Capability
#define MAX_DEVICES 16     //The Maximum number of sensor device
#define MAX_ITEMS 16       //The Maximum number of sensor value
#define MAX_CMDS 16        //The Maximum number of command that can be processed in one second.
Structures
Data Type
| Description We provide several types to describe the type of data. |
    WISE_VALUE  //for numeric value
    WISE_FLOAT  //for floating point
    WISE_STRING //for string
    WISE_BOOL   //for boolean
    WISE_CUSTOMIZE          //for a customize value, use the following type definition
        WISE_BASE64         // a base64 format data.
|
Infospec
| Description The infospec structure defines your parameters in sensor device. Those parameter structures will represented in Wise-Paas like a tag. It includes two callback function pointers. You can use the callback pointers to define your own get and set function. The button on Wise-Paas for GPIO will be differed from whether the set function is assigned or not. If the set function is assigned, the value is writable by users on Wise-Paas. |
    struct WiseSnail_InfoSpec{
      WiseSnail_DataType type;
      char *name;
      char *unit;
      union {
        float value;
        char *string;
        WiseSnail_RAW *raw;
      };
      float min;
      float max;
      char *resourcetype;
      WiseSnail_SetValue setValue;
      WiseSnail_GetValue getValue;
      WiseSnail_FormatType format;
    };
|
| Example |
    {
      WISE_VALUE,                  //WiseSnail_DataType
      "Temperature",               //name
      "Cel",                       //unit
      0,                           //value or string
      -100,                        //min
      200,                         //max
      "ucum.Cel",                  //resourcetype, optional
      NULL,                        //set function
      NULL                         //get function
    }
|
Data
| Description The data structure defines your value you want to update in sensor device. The cliendId and infomation is for internal used and will be assigned while your callback function(like set) is called. |
    struct WiseSnail_Data{
      WiseSnail_DataType type;
      char *name;
      union {
        float value;
        char *string;
        WiseSnail_RAW *raw;
      };
      WiseSnail_FormatType format;
      char *clientId;              //internal
      WiseSnail_InfoSpec *info;    //internal
    }
|
| Example |
    {
      WISE_VALUE,                  //WiseSnail_DataType
      "Temperature",               //name
      100                          //value or string
    }
|
Callbacks
| Set Callback |
typedef int (*WiseSnail_SetValue)(WiseSnail_Data *data); |
| Get Callback |
typedef int (*WiseSnail_GetValue)(WiseSnail_Data *data); |
| Sleep callback |
typedef void (*WiseSnail_SleepOneSecond)(void); |
Functions
Initial & Uninitial
- WiseSnail_Init
| void WiseSnail_Init(char *productionName, char *wanIp, unsigned char *parentMac, WiseSnail_InfoSpec *infospec, int count); |
| Parameter | Description |
|---|---|
| productionName | Name for device. |
| wanIp | Ip address. |
| parentMac | The mac address of parent device. |
| infospec | Optional parameter array. |
| count | The size of infospec. |
- WiseSnail_Uninit
| void WiseSnail_Uninit(); |
| Parameter | Description |
|---|---|
| None | None |
Register
- WiseSnail_RegisterInterface
- One instance only includes one interface.
| void WiseSnail_RegisterInterface(char *ifMac, char *ifName, int ifNumber, WiseSnail_InfoSpec *infospec, int count); |
| Parameter | Description |
|---|---|
| ifMac | The mac address of interface. |
| ifName | The name of interface. |
| ifNumber | The index number of interface. |
| infospec | Interface parameter array. |
| count | The size of infospec. |
- WiseSnail_RegisterSensor
- The maximum number of sensor devcie, please refer to MAX_DEVICES.
| void WiseSnail_RegisterSensor(char *deviceMac, char *defaultName, WiseSnail_InfoSpec *infospec, int count); |
| Parameter | Description |
|---|---|
| deviceMac | The mac address of sensor device. |
| defaultName | The default name of sensor device. |
| infospec | Sensor device parameter array. |
| count | The size of infospec. |
Connect
- WiseSnail_Connect
| int WiseSnail_Connect(char *server_url, int port, char *username, char *password, WiseSnail_InfoSpec *infospec, int count); |
| Parameter | Description |
|---|---|
| server_url | The address of mqtt broker. |
| port | The port of mqtt broker. |
| username | The username of mqtt broker.("" for none) |
| password | The password of mqtt broker.("" for none) |
| infospec | Connect parameter array. |
| count | The size of infospec. |
Update
- WiseSnail_Update
- You can update your data from this function by assigning a data array.
| void WiseSnail_Update(char *deviceMac, WiseSnail_Data* data, int count); |
| Parameter | Description |
|---|---|
| deviceMac | The mac of device which you will update. |
| data | Data array. |
| count | The size of data. |
Main Handle Loop function
- WiseSnail_MainLoop
- This is a very important function. It includes main logic and error handling. The interval of sleepOneSec must be one second.
- You also can run an external timer, but this function must be executed per one second.
- This is a very important function. It includes main logic and error handling. The interval of sleepOneSec must be one second.
| void WiseSnail_MainLoop(WiseSnail_SleepOneSecond sleepOneSec); |
| Parameter | Description |
|---|---|
| sleepOneSec | a callback function for sleep one second. |
Sample Program
Prerequest
| Item | Windows | Ubuntu 16.04 | Remark |
| Complier Tools | apt-get install autoconf automake gcc-multilib libssl-dev |
| |
| WISEAgent | Download from WISE-PaaS/EdgeSense Portal, Settings Page. |
Ask support AE to get latest WISEAgent | |
| API-GW | Download Link | Download Link | |
| MQTT Broker | Download Link | Download Link |
|
Sample Code Overview
(pseudo code)
WiseSnail_InfoSpec interface[] = {
		{
				WISE_BOOL,
				"/Info/reset",
				"",
				0,
				0,
				1,
				"",
				Reset
		}
};

void SetGPIO_1(WiseSnail_Data*data) {
    printf("(GPIO 1) = %d\r\n",data->value);
}

void SetGPIO_2(WiseSnail_Data*data) {
    printf("(GPIO 2) = %d\r\n",data->value);
}
void SetSHName(WiseSnail_Data*data) {
      printf("( SHName ) = %s\r\n", data->string);
}


WiseSnail_InfoSpec infospec[] = {
		{
				WISE_STRING,
				"/Info/Name",
				"",
				"SenHub1",  // Device Name of SenHub (*)
				0,
				0,
				"",
				SetSHName
		},
		{
				WISE_VALUE,			//type
				"Temperature",	    //name
				"Cel",				//unit
				0,				    //value[union]
				-100,				//min
				200,				//max
				"ucum.Cel"			//resourceType
		},
		{
				WISE_VALUE,			//type
				"Humidity",			//name
				"%",				//unit
				0,				    //value[union]
				0,				    //min
				100,				//max
				"ucum.%"			//resourceType
		},
                {
		        	WISE_IO_BOOL,
                        	"GPIO1",
                        	"",
                        	0,
                        	0,
                        	1,
                        	"",
                        	SetGPIO_1
                },
                {
                        	WISE_IO_BOOL,
                        	"GPIO2",
                        	"",
                        	0,
                        	0,
                        	1,
                        	"",
                        	SetGPIO_2
		}
};

WiseSnail_Data data[] = {
		{
				WISE_VALUE,			//type
				"Temperature",			//name
				100				//value
		},
		{
				WISE_VALUE,			//type
				"Humidity",			//name
				55				//value
		}
};

void sleepOneSecond() {
	sleep(1);
}

#define SERVER_ADDRESS "rmm.wise-paas.com"

int main() {
	//initial
	WiseSnail_Init("IotGW",NULL, NULL, NULL, 0);
	WiseSnail_RegisterInterface("000E4CAB1234", "Ethernet", 0, interface, 1);

	if(WiseSnail_Connect(SERVER_ADDRESS, 1883, "", "", NULL, 0) == 0) {
		//
		// no succesful connection to broker
		//
		return -1;
	} else {
		WiseSnail_RegisterSensor("000E4C000000", "OnBoard", infospec, sizeof(infospec)/sizeof(WiseSnail_InfoSpec));
	}

	int count = 0;
	int second = 0;
	for(;;) {
		if(second == 0) {
			/*HDC1050_GetSensorData(&Temperature, &Humidity);
			  data[0].value = Temperature;
			  data[1].value = Humidity;
			*/

			if(data[0].value < 100) {
				data[0].value++;
			} else {
				data[0].value = 0;
			}

			if(data[1].value < 100) {
				data[1].value++;
			} else {
				data[1].value = 0;
			}

			printf("\r\n****** \033[33mSend update.\033[0m ******\r\n");
			WiseSnail_Update("000E4C000000", data, 2);
		count++;
		}

		WiseSnail_MainLoop(sleepOneSecond);
		second = (second+1)%5;
	}
	return 0;
}
Get Project
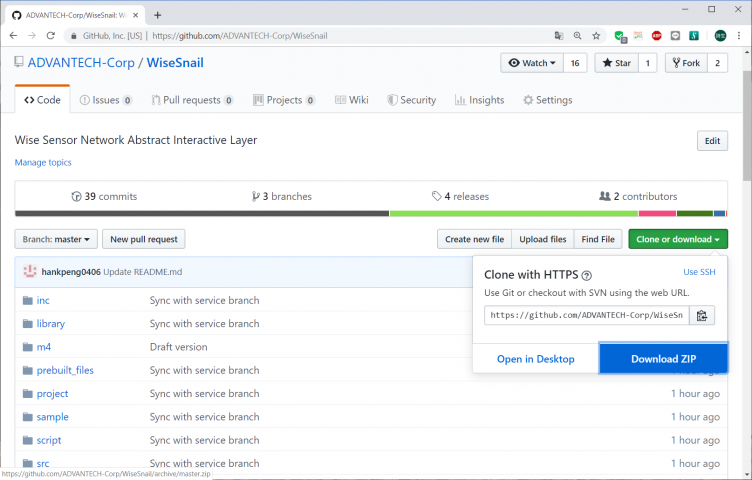
1. Open WiseSnail project URL: https://github.com/ADVANTECH-Corp/WiseSnail.git
2. Download ZIP of WiseSnail project and unzip it to your local storage, for example: "C:\Projects\WiseSnail"
Compile Sample Code
Windows
1. Install prerequest packages that listed in Prequested Packages session.
2. Open \WiseSnail\project\VS2015\WiseSnail\Test.sln from Visual Studio menu.
3. Change Solution Platform to "x86".
4. Rebuild Solution.
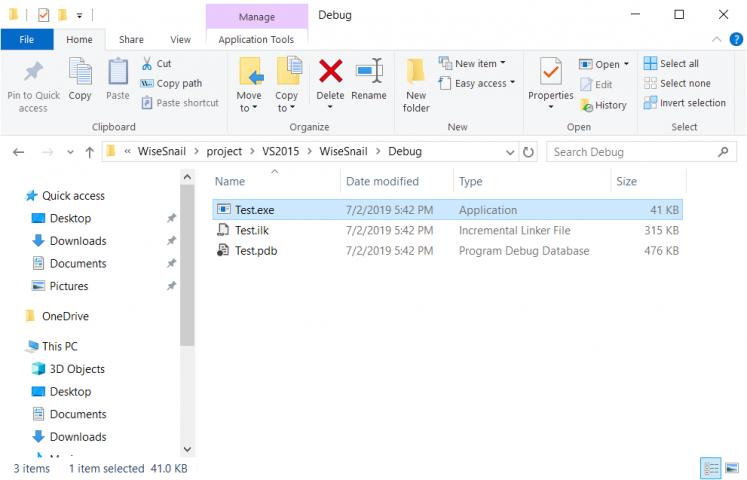
5. After sample program rebuilt, open Debug (or Release) folder to check if the output file Test.exe is created.
Ubuntu 16.04
Refer to build WSN-AgentLite .
Run Sample Code
Windows
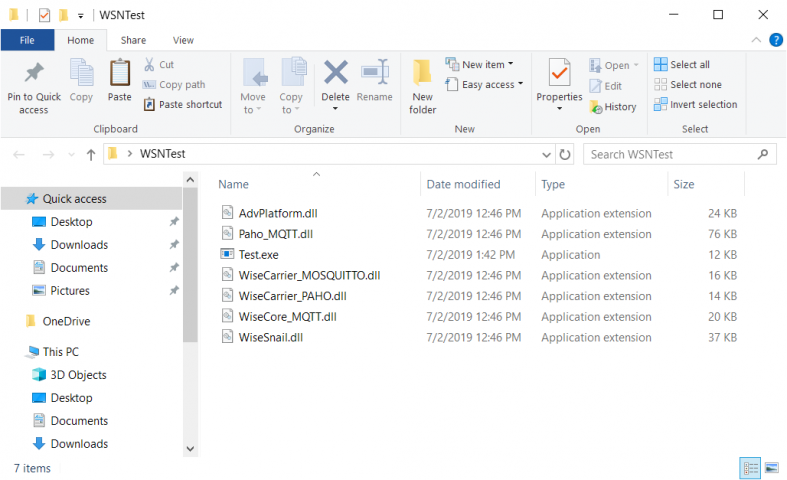
1. Create a new folder named WSNTest on Desktop (or any folder you like)
2. Copy all DLL files in the folder \WiseSnail\prebuilt_files\ and put sample program Test.exe together in the same folder.
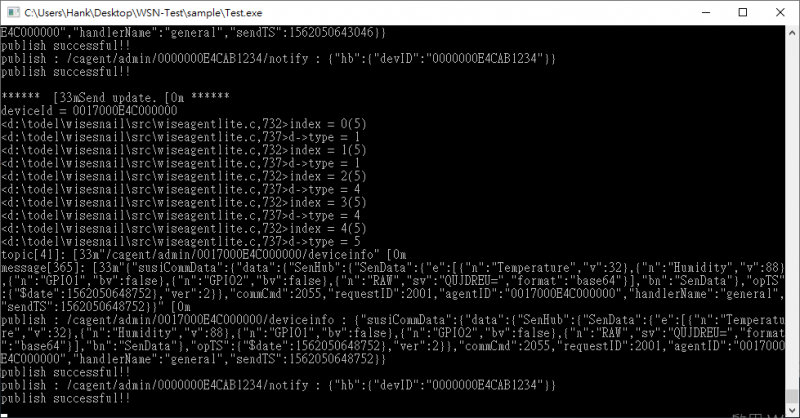
3. Double click "Test.exe" to run sample program, the simulated sensor data will start uploading.
Ubuntu 16.04
After build WSN-AgentLite, sample program (test) will be installed at release folder.
$ cd WiseSnail/release
$ ./test
WISE-PaaS/EdgeSense with WSN SenHub
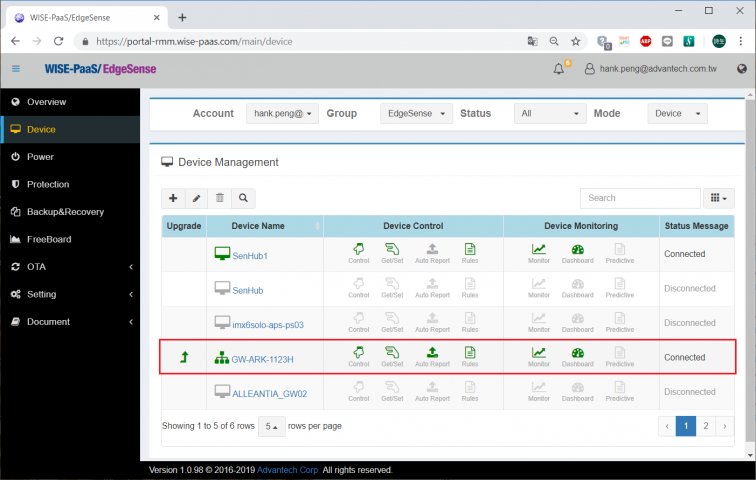
1. Open WISE-PaaS/EdgeSense Portal and login using your account.
2. Click "+Add" to add your device to WISE-PaaS/EdgeSense.
3. Click on your device name, for example "GW-ARK-1123H".
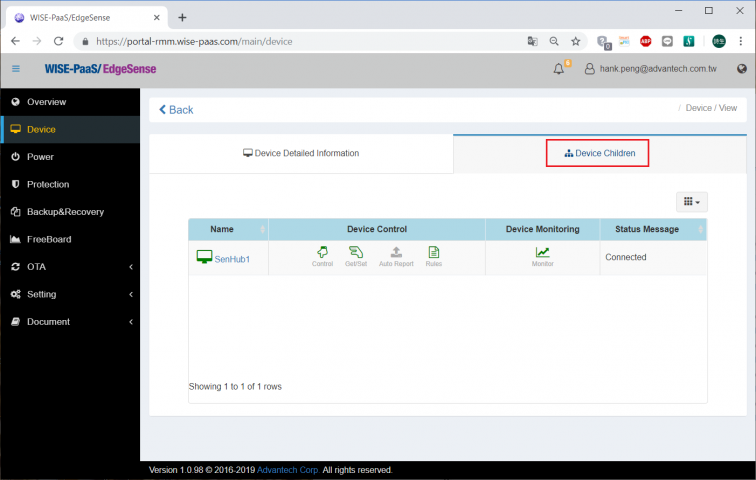
4. Click on "Device Children" to open the page.
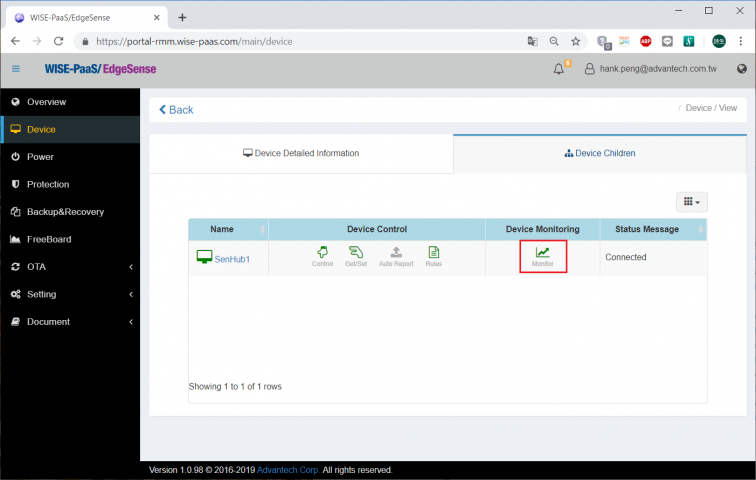
5. Click on "Monitor" icon to check sensor hub list.
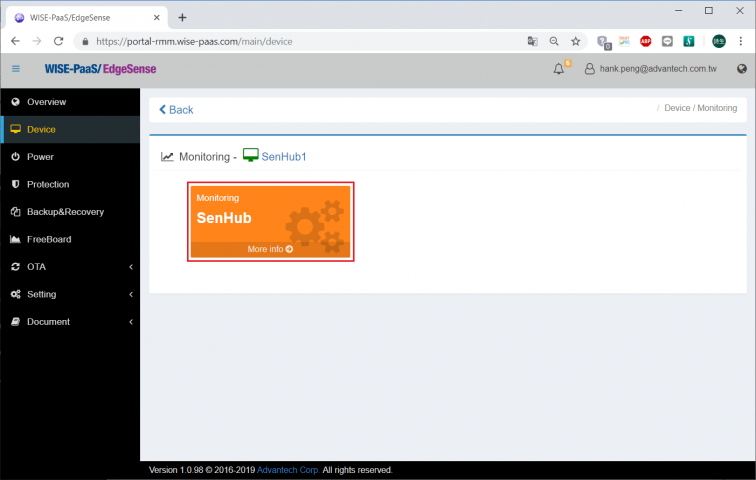
6. Click on SenHub icon to check sensor data.
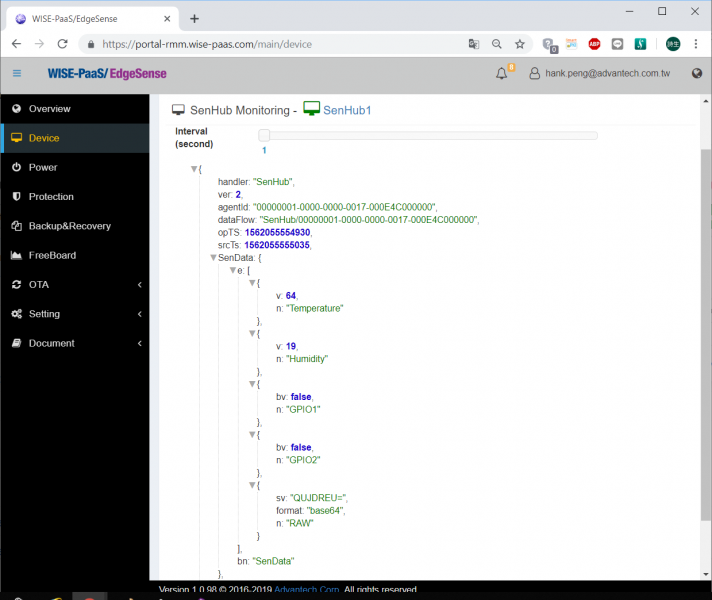
7. In this page, you can find all sensors that you uploaded.
