Advantech Robotic Suite/DeviceOn
Contents
Introduction
In distributed robotic systems where robots are deployed in different locations or environments, remote central management becomes crucial. It enables remote monitoring, configuration, diagnostics, control, software update, and truoubleshoot issues, eliminating the need for physical access to each robot. Remote control and teleoperation allow operators to manipulate robot movements and perform tasks from a distance. Remote management also facilitates collaboration by enabling experts to remotely assist and provide guidance. Advantech DeviceOn is a remote central management system for robots.
DeviceOn
DeviceOn is a remote central management system that allows user to connect their robotics to DeviceOn and remotely monitor, control, and maintain.
DeviceOn integrates information from various devices, making it convenient for users to analyze and monitor results for a large number of robotic devices.
It is essential to effectively manage, monitor, and control thousands of connected devices while ensuring uninterrupted service. Devices must work properly and securely after they have been deployed.
More information please refer to DeviceOn
Device Management
When your device is onboarded and is managed by DeviceOn, you could view, edit device basic information, remote control, and retrieve sensor data on your devices. Nine sub items under Device, Device List contain device name, upgrade status, power management and etc. Device Monitoring to give device loading at present. To remote diagnostic and debug through Remote Control. Next, all of plugin sensor data from Device Data. To grouping your device through the Device Group. For batch real-time or schedule control through Task defined. Rule Engine to set a threshold rule for your devices data in real-time.
Container Management
ROS 2 Suite offers container framework for simplifies the development, deployment, and management of ROS Applications systems.
DeviceOn Container Managemnet help ROS developer and operator to deploy, monitor, and manage each container on different devices. You can manage and monitor the health of containers within minutes. Container Management function also provide a variety of container restart strategies for you to set the restart policy. Through the dashboard, you can quickly understand the running status of the container in the managed device. In addition, for container developers.
Azure Container Repository allows you to build, store, and manage container images and artifacts in a private registry for all types of container deployments. Use Azure container registries with your existing container development and deployment pipelines. Azure Container Registry is supported as a public cloud solution in the DeviceOn and support Harbor as a private cloud container repository. For more detailed information and operation steps, please refer to DeviceOn Manual - Container Management Section .
How to
In this section, we will instrduct you how to register a new account form DeviceOn trial portal and setup your edge device to connect to DeviceOn trial portal. After your edge device is managed in DeviceOn trial portal, you can find it is listed in the DeviceOn Device List, you can easily monitor it's status and deploy ROS2 node into it.
Register for DeviceOn Trial Portal
DeviceOn Trial Portal: https://deviceon-trial.wise-paas.com/
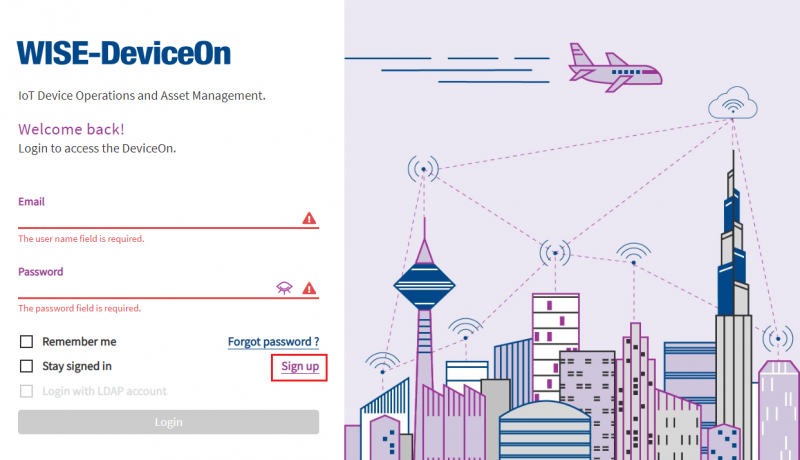
Step1. Register a new account from DeviceOn Trial Protal. [ Sign up ]
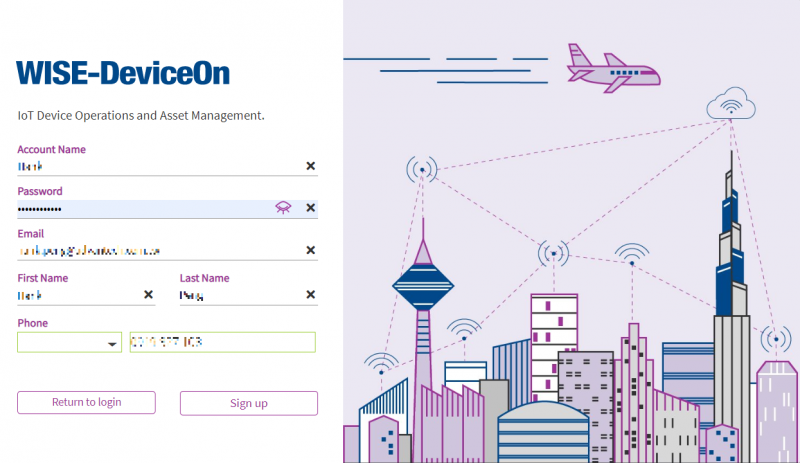
Step 2. Fill the basic information
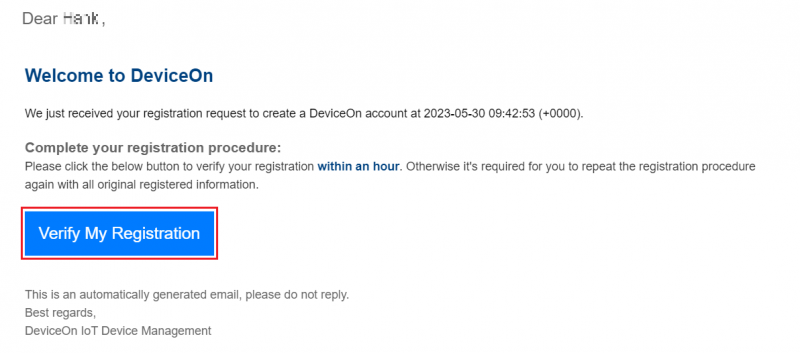
Step3. Verify account from DeviceOn Account Registration e-mail.
Step 4. Logon DeviceOn with your Account & Password
Setup WISE-Agent
NOTE:
(1). WISE-Agent support DeviceOn Container Management function start from version 1.4.45, to make sure your WISE-Agent's version before below steps.
(2). For ARM base platforms, WISE-Agent is provide by project, please contact PM (Nathan.Wang@advantech.com.tw) to get support for this function.
Step1. Login DeviceOn Trial Portal.
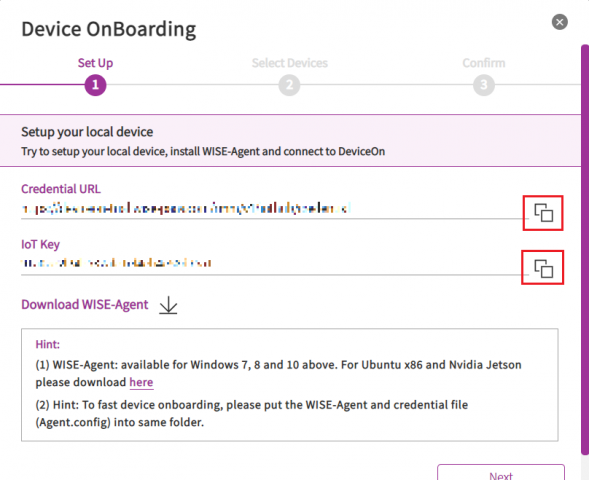
Step2. Click on Add device icon, you can find Credential URL and IoT Key are list in this page. you will be prompt to input these two strings in the following WISE-Agent setup steps.
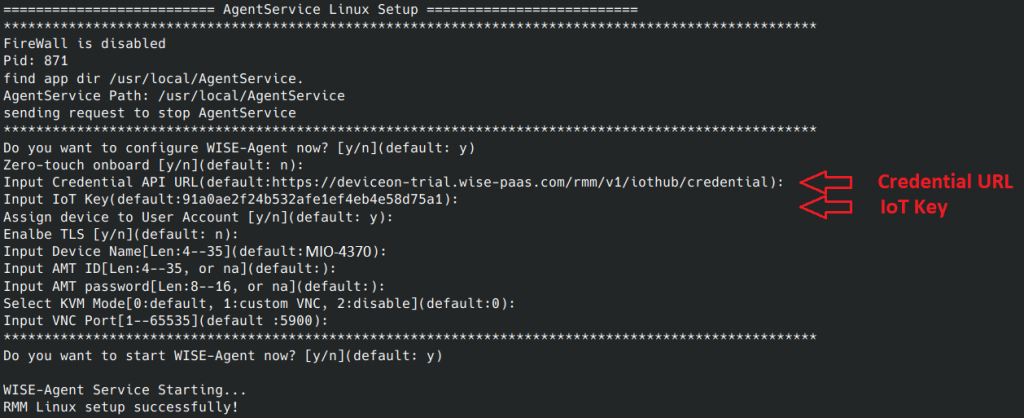
Step3. Launch WISE Agent setup program.
cd /usr/local/AgentService
sudo ./setup.sh
Step4. Copy Credential URL from DeviceOn Trial portal and paste it to the WISE Agent setup program while it is prompt to input.
Step5. Copy IoT Key from DeviceOn Trial portal and paste it to the WISE Agent setup program while it is prompt to input.
Step6. Finish the setup with default settings, then WISE-Agent Service will restart to connect to DeviceOn trial portal.
(You can refer to Edge Installation & Onboarding to get more detail description about install WISE-Agent and setup WISE-Agent for connecting to DeviceOn.)
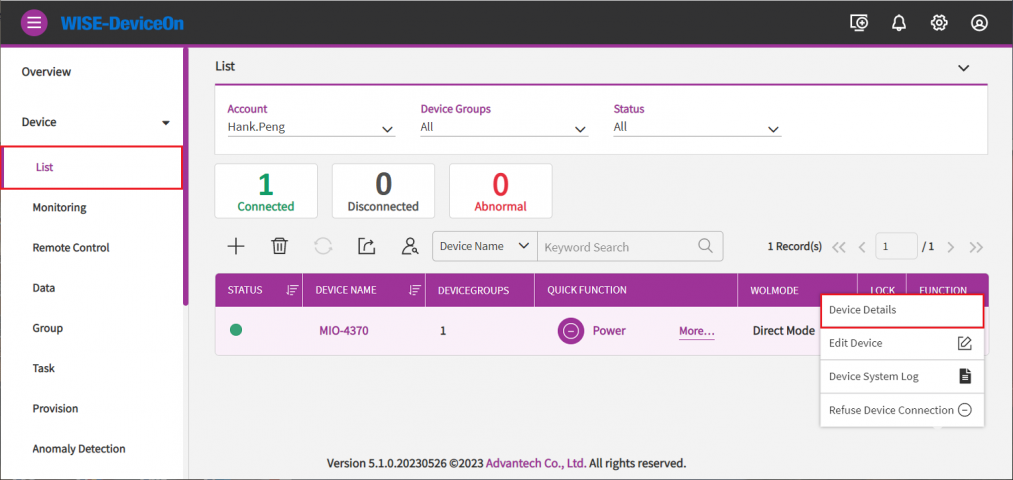
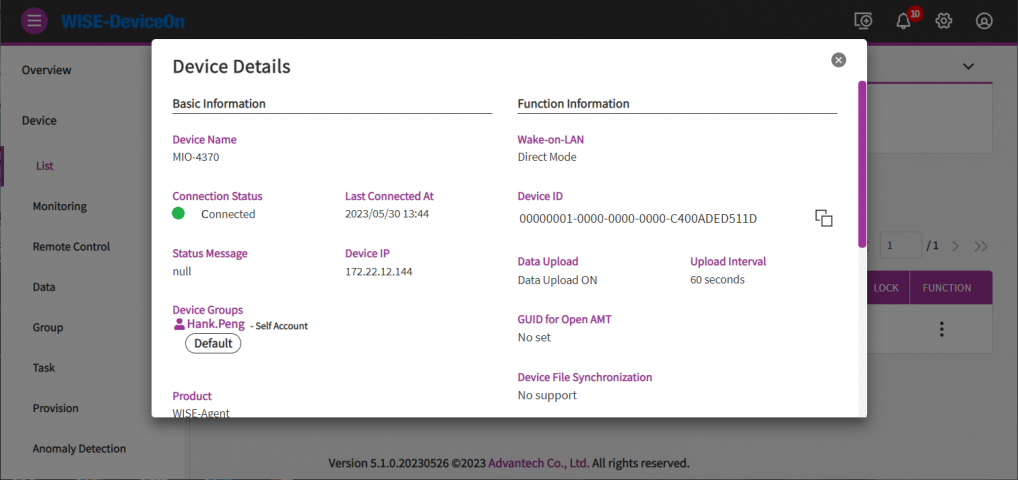
Step7. From "Device List" table of DeviceOn trial portal, click on device name or device details to get device information.
You could get the device detail information such as, device IP, version, MAC, Memory, BIOS, operation system in this page.
Container Registry
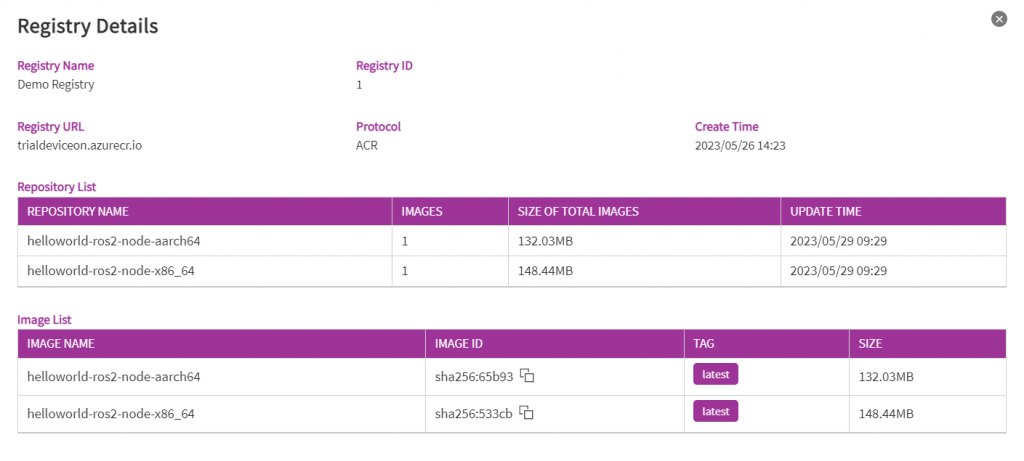
Helloworld ROS2 node is a sample ROS2 node container for this demonstration, it is already pre-upload to the DeviceOn Container Registry. You can find it is located in the "Demo Registry" of DeviceOn Registry List.
Click on the registry name "Demo Registry", you can see how many containers in the container registry are available for you to deploy.
ROS2 Node Deployment
Below steps will introduce you to deploy a ROS2 container to your edge device.
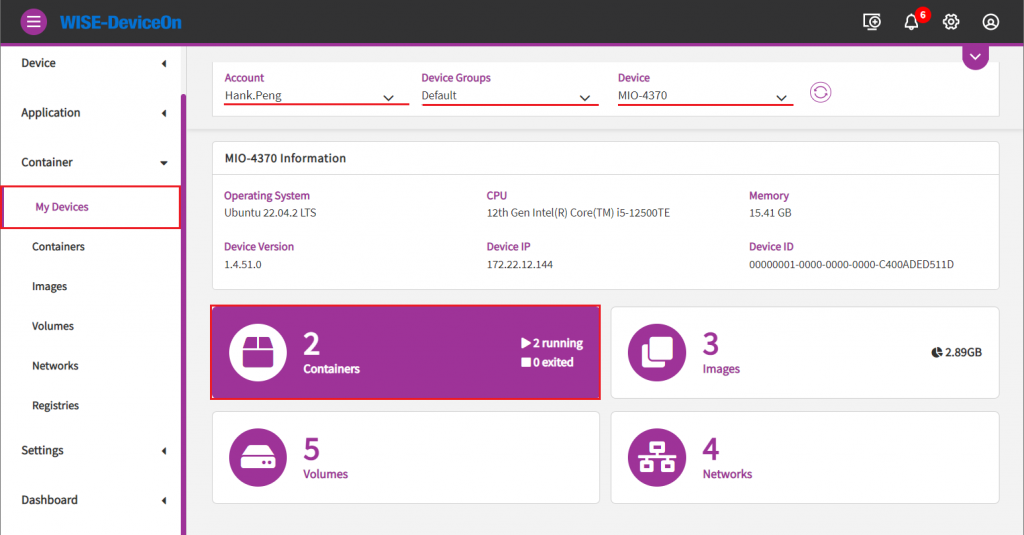
Step1. From left side bar, open "My Devices" page from "Container" function and then:
- Choose your device group.
- Choose your device from your device group.
- Click on Containers icon to see container list in this device.
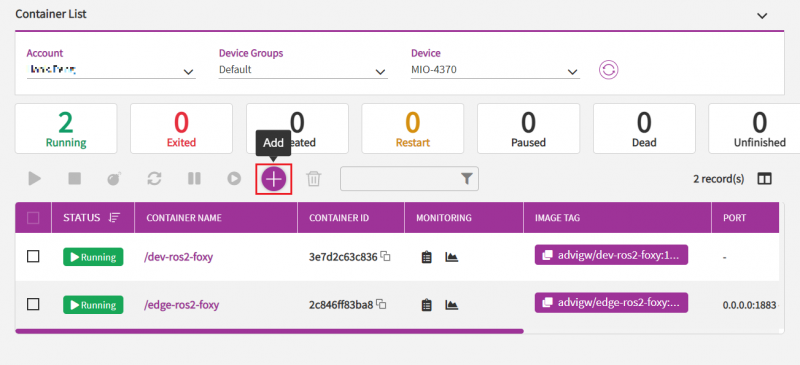
Step2. Click "Add" icon to go into add container page.
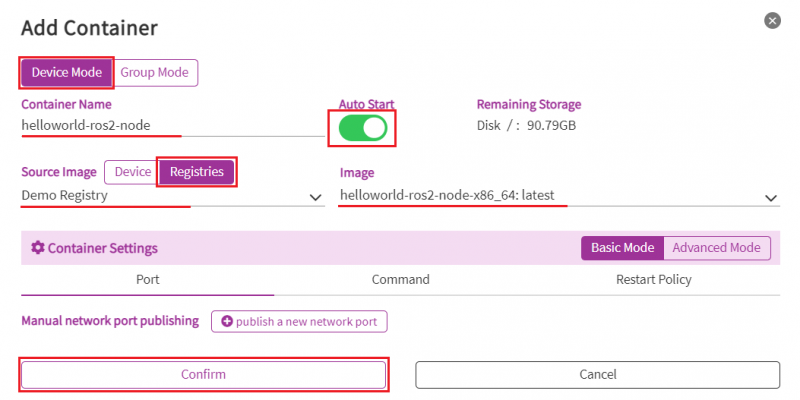
Step3. In the "Add Container" page, select parameters like below and then click "Confirm" to start deploy helloworld-ros2-node to your device.
- Mode: Device Mode
- Container Name: <Give a container name by yourdelf>.
- Auto Start: On
- Source Image: Registries
- Registry: Demo Registry
- Image: helloworld-ros2-node-<platform-architecture>
| Platform Architecture | Container Type |
| Intel x86_64 | helloworld-ros2-node-x86_64 |
| ARM | helloworld-ros2-node-aarch64 |
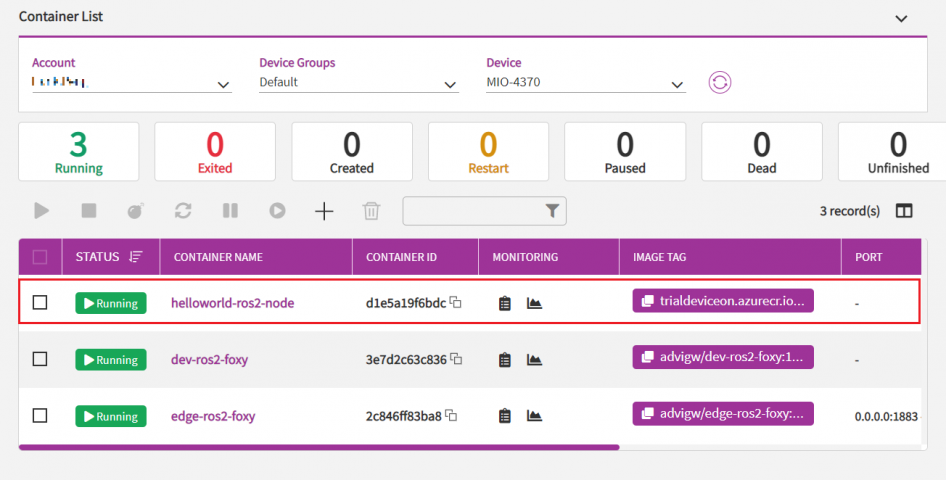
After the operation completed, you can see the container is deployed into your device and status of helloworld-ros2-node is running.
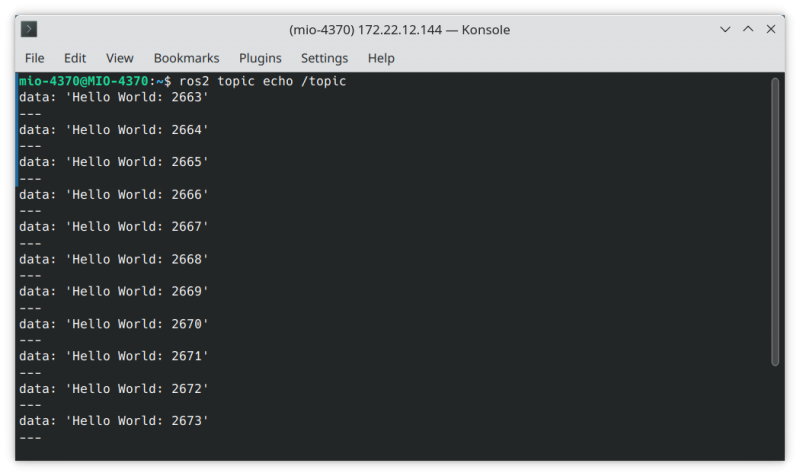
Step5. Now, helloworld-ros2-node is running and publishing "Hello World: <count>" message continuously, To subscribe the data that helloworld-ros2-node published, open a terminal from your device and execute below command:
1. Setup ROS2 environmant variables:
$ source /opt/ros/${ROS_DISTRO}/setup.bash
2. Subscribe the topic of helloworld node:
$ ros2 topic echo /topic
Result:
data: 'Hello World: 2663'
---
data: 'Hello World: 2664'
---
data: 'Hello World: 2665'
---
data: 'Hello World: 2666'
---
data: 'Hello World: 2667'
---
data: 'Hello World: 2668'
---
data: 'Hello World: 2669'
---
NOTE:
- For the user first time to deploy helloworld-ros2-node, it will take several minutes to complete the deployment.
- Before you start/stop container from DeviceOn Container List, please make sure the STATUS of container is updated completely.
