ROM-6881 How to debug
Contents
USB2UART Bridge
There are plenty types of usb to uart bridge in the market . Most of them use the following chip :
Hardware PIN define
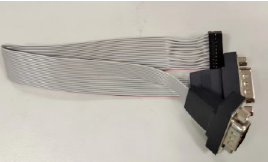
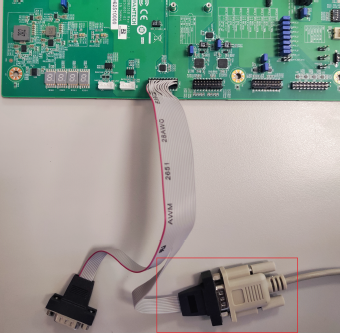
1. Connect debug port cable (1701200220) to COM2_4 on SOM-DB2510.
2. Connect it to your PC with USB to UART Cable.
| Item | P/N | Picture |
| Debug Port Cable | 1701200220 | 
|
Debug Port Settings
ROM-6881 can communicate with a host server using serial cables. Common serial
communication programs such as HyperTerminal, Tera Term, or PuTTY can be used
in this case. The example below describes the serial terminal setup using HyperTerminal
on a Windows host:
1. Connect ROM-6881 with your PC using a serial cable.
2. Open HyperTerminal on your Windows PC, and select the settings demonstrated
in the photo below.
3. Insert power adapter to DC jack and power up the board. The Debug console
log will be displayed on the terminal screen.
Debug on windows
Install usb2uart adapter's driver. Connect adapter to PC , you will find COM port like :
Putty is very populate tool on Windows. Download putty here.
Run PUTTY.exe, select Connection type of "Serial" , input COM port found in Device Manager.
Set Parameter like :
Then Click "Open" to start debug console.
Debug on Ubuntu
"Kermit" and "MiniCom" are very famous tools on Ubuntu.
Connect adapter to PC , find COM port :
$ ls /dev/ttyUSB*
/dev/ttyUSB0
Kermit
Install Kermit :
sudo apt-get update
sudo apt-get install ckermit
Config Kermit :
vi $HOME/.kermrc;
Input the following content :
set line /dev/ttyUSB0
set speed 115200
set carrier-watch off
set handshake none
set flow-control none
robust
set file type bin
set file name lit
set rec  pack 1000
set send pack 1000
set window 5
Note :
Change "/dev/ttyUSB0" according your system, Use Command "ls /dev/ttyUSB*" .
Run kermit
sudo kermit
MiniCom
Install MiniCom:
sudo apt-get update
sudo apt-get install minicom
Run MiniCom
$ sudo minicom
Welcome to minicom 2.7
OPTIONS: I18n
Compiled on Jan  1 2014, 17:13:19.
Port /dev/ttyUSB0, 15:57:00
Press CTRL-A Z for help on special keys
According the tips, press CTRL-A, then press Z to show help.
  +-------------------------------------------------------------------+
                          Minicom Command Summary                      |
  |                                                                    |
  |              Commands can be called by CTRL-A <key>                |
  |                                                                    |
  |               Main Functions                  Other Functions      |
  |                                                                    |
  | Dialing directory..D  run script (Go)....G | Clear Screen.......C  |
  | Send files.........S  Receive files......R | cOnfigure Minicom..O  |
  | comm Parameters....P  Add linefeed.......A | Suspend minicom....J  |
  | Capture on/off.....L  Hangup.............H | eXit and reset.....X  |
  | send break.........F  initialize Modem...M | Quit with no reset.Q  |
  | Terminal settings..T  run Kermit.........K | Cursor key mode....I  |
  | lineWrap on/off....W  local Echo on/off..E | Help screen........Z  |
  | Paste file.........Y  Timestamp toggle...N | scroll Back........B  |
  | Add Carriage Ret...U                                               |
  |                                                                    |
  |             Select function or press Enter for none.               |
  +--------------------------------------------------------------------+
According the tips, press O to show configuration.
 +-----[configuration]------+
           | Filenames and paths      |
           | File transfer protocols  |
           | Serial port setup        |
           | Modem and dialing        |
           | Screen and keyboard      |
           | Save setup as dfl        |
           | Save setup as..          |
           | Exit                     |
           +--------------------------+
Press "↓", move cursor to "Serial port setup" to Config parameter.
Then press "A"-"G" to set relative content as following :
 +-----------------------------------------------------------------------+
   | A -    Serial Device      : /dev/ttyUSB0                              |
   | B - Lockfile Location     : /var/lock                                 |
   | C -   Callin Program      :                                           |
   | D -  Callout Program      :                                           |
   | E -    Bps/Par/Bits       : 115200 8N1                                |
   | F - Hardware Flow Control : No                                        |
   | G - Software Flow Control : No                                        |
   |                                                                       |
   |    Change which setting?                                              |
   +-----------------------------------------------------------------------+
When configuration is done, back to choose "Save setup as dfl" to save as default configuration.


