Setting-up QtCreator to cross compile for iMX6 series
From ESS-WIKI
Prerequisites
All operations in this guide are based on Ubuntu 12.04 LTS 64bit only.
First please install Ubuntu 12.04 LTS 64bit* with minimum 2GB memory.
* ubuntu-12.04.1-desktop-amd64.iso
Installing required packages
Please login and perform the following commands:
$ sudo apt-get install ssh
$ sudo apt-get install ia32-libs libx11-dev:i386 libreadline6-dev:i386 \
libgl1-mesa-glx:i386 zlib1g-dev:i386 uuid-dev:i386 liblzo2-dev:i386 \
libncurses5-dev:i386
$ sudo apt-get install \
bison build-essential ccache dpkg flex gcc g++ gettext intltool \
libarchive-zip-perl libfreetype6-dev libdbus-glib-1-dev liborbit2-dev \
libxml2-dev libx11-dev libgtk2.0-dev liblzo2-2 libtool m4 \
patch rpm tcl uboot-mkimage uuid zlib1g zlib1g-dev \
git gnupg flex bison gperf build-essential  zip \
curl libc6-dev libncurses5-dev x11proto-core-dev libx11-dev:i386 \
libreadline6-dev:i386 libgl1-mesa-glx:i386 libgl1-mesa-dev g++-multilib \
mingw32 tofrodos python-markdown libxml2-utils xsltproc zlib1g-dev:i386 \
gcc-4.6 g++-4.6 cpp-4.6 gcc-4.6-multilib uuid-dev liblzo2-dev \
uboot-mkimage libarchive-zip-perl \
wget git-core unzip texinfo gawk diffstat build-essential chrpath \
sed cvs subversion coreutils texi2html \
docbook-utils python-pysqlite2 help2man make gcc g++ \
desktop-file-utils libgl1-mesa-dev libglu1-mesa-dev mercurial \
autoconf automake groff curl lzop asciidoc xterm
$ sudo apt-get install libncurses5-dev:i386 liblzo2-dev:i386 uuid-dev:i386
$ sudo ln -s /usr/lib/i386-linux-gnu/mesa/libGL.so.1 /usr/lib/i386-linux-gnu/libGL.so
$ tar zcvf ~/usr_lib_i386-linux-gnu_for_Building_Android_KK.tar.gz \
/usr/lib/i386-linux-gnu/{libuuid.a,libuuid.so,liblzo2.so,liblzo2.a}
$ sudo apt-get install uuid-dev liblzo2-dev
$ sudo tar zxvf ~/usr_lib_i386-linux-gnu_for_Building_Android_KK.tar.gz -C /
Installing JDK
Please download "jdk-6u45-linux-x64.bin" manually, put it to directory ~/FILES/ and perform the following commands:
$ cd /usr/lib
$ sudo ~/FILES/jdk-6u45-linux-x64.bin
$ sudo mkdir jvm
$ cd jvm
$ sudo mv ../jdk1.6.0_45 .
$ cd jdk1.6.0_45/
$ sudo update-alternatives --install /usr/bin/java    java    /usr/lib/jvm/jdk1.6.0_45/jre/bin/java    2
$ sudo update-alternatives --install /usr/bin/javac   javac   /usr/lib/jvm/jdk1.6.0_45/bin/javac   2
$ sudo update-alternatives --install /usr/bin/jar     jar     /usr/lib/jvm/jdk1.6.0_45/bin/jar     2
$ sudo update-alternatives --install /usr/bin/javap   javap   /usr/lib/jvm/jdk1.6.0_45/bin/javap   2
$ sudo update-alternatives --install /usr/bin/javadoc javadoc /usr/lib/jvm/jdk1.6.0_45/bin/javadoc 2
$ sudo update-alternatives --config javap
$ sudo update-alternatives --config javadoc
$ sudo update-alternatives --config java
$ sudo update-alternatives --config javac
$ sudo update-alternatives --config jar
$ cd ~/
$ sudo sh -c "echo "JAVA_HOME=/usr/lib/jvm/jdk1.6.0_45" >> /etc/environment"
Installing cross toolchain
Please use bitbake command to build one toolchain installer or get a pre-built one.
Qt4 SDK
- Please perform following command to make toolchain installer.
$ bitbake fsl-image-x11 -c populate-sdk
- Please change working directory to where installer located and perform the following command.
$ sudo ./poky-eglibc-x86_64-fsl-image-x11-cortexa9hf-vfp-neon-toolchain-qt4-1.5.3.sh
Qt5 SDK
- Please perform following command to make toolchain installer.
$ bitbake fsl-image-x11-qt5 -c populate-sdk
- Please change working directory to where installer located and perform the following command.
$ sudo ./poky-eglibc-x86_64-fsl-image-x11-qt5-cortexa9hf-vfp-neon-toolchain-1.5.3.sh
Working within QtCreator 3 (Qt4/Qt5)
Installing the QtCreator
Please download "qt-creator-opensource-linux-x86_64-3.1.2.run", put it to directory ~/FILES/ and install it by following command:
$ ~/FILES/qt-creator-opensource-linux-x86_64-3.1.2.run
Starting the QtCreator
$ source /opt/poky/1.5.3/environment-setup-cortexa9hf-vfp-neon-poky-linux-gnueabi
$ cd ~/qtcreator-3.1.2/
$ bin/qtcreator
- The QtCreator's main window shows up.
- Check QtCreator's version by using "Help" -> "About Qt Creator".


Configuring the Cross-Compiler Options
- Bring up the options dialog using "Tools" -> "Options..."
- Select the "Devices" page on the left, and click "Add..."
- Select "Generic Linux Device" and click "Start Wizard".
- Specify proper settings and click "Next>"
- Click "Finish"
- Device test finished successfully. Click "Close".

- If device test failed, please go back to specify proper settings.

- (It is necessary to set a blank password at least, null password does not work.)

- (It means device's IP is incorrect or some network issues occured.)
- Click "Apply"
- Select the "Build & Run" page on the left, switch to "Compilers" tab, drop down "Add" menu and choose "GCC".
- Name the compiler as "iMX6 GCC"
- Click "Browse..." to select "/opt/poky/1.5.3/sysroots/x86_64-pokysdk-linux/usr/bin/arm-poky-linux-gnueabi/arm-poky-linux-gnueabi-g++"
- Click "Apply"
- Switch to the "Debuggers" tab
- Click "Add"
- Name the debugger as "iMX6 gdb"
- Click "Browse..." to select "/opt/poky/1.5.3/sysroots/x86_64-pokysdk-linux/usr/bin/arm-poky-linux-gnueabi/arm-poky-linux-gnueabi-gdb"
- Click "Apply"
- Switch to the "Qt Versions" tab.
- For Qt4, check if the "Qt 4.8.5 (System)" is auto detected in "Manual" item ?

- For Qt5, check if the "Qt 5.2.1 in PATH (qt5)" is auto detected in "Manual" item ?

- If not, click "Add..." to choose the proper qmake.
- Click "Apply"
- For Qt4

- For Qt5

- Switch to the "Kits" tab.
- Click "Add".
- Name the kit as "iMX6 toolchain"
- Specify the correct "Device Tpye", "Compiler", "Debugger" and "Qt version"
- Click "Browse..." to select "/opt/poky/1.5.3/sysroots/cortexa9hf-vfp-neon-poky-linux-gnueabi" as sysroot
- Click Apply
- For Qt4

- For Qt5

- Click OK to finalize the configuration.
- Invoke the options dialog again to make sure the "iMX6 toolchain" is default kit.


Creating the Project
- Bring up "New" dailog using "File" -> "New File or Project..."
- Select "Applications" -> 'Qt Widgets Application"
- Click "Choose..."
- Use "hello_qt" as name
- Create in "/home/adv/qt"
- Click "Next"
- Uncheck "Desktop" and check "IMX6 toolchain"
- Click "Next".
- Use default settings for "Class Information"
- Click "Next"
- Use default settings for "Project Management"
- Click "Finish"
- Double click "hello_qt.pro" to switch to editor window
- In new project it is necessary to add following two lines into qt project file.
target.path = .
INSTALLS += target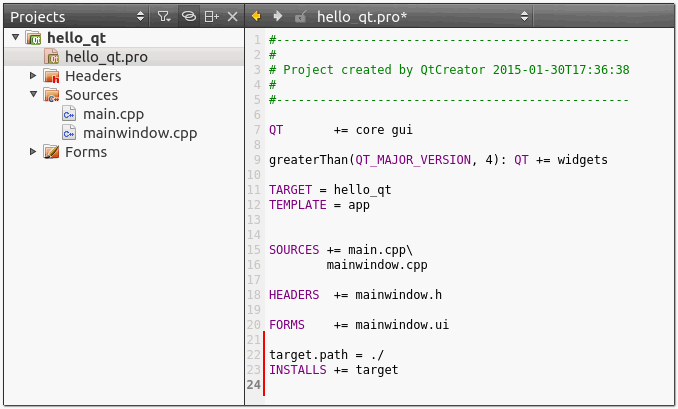
- Press "Ctrl+S" to save file.
- Double click "mainwindow.ui" to switch to Design mode
- Drag & drop one Label widget on main form, use property editor on the right side to change text and font size
- Save all project files using "File" -> "Save All"


Building the Project
- Switch to "Projects" mode
- Check if "build configuration" is set to "Debug".
- Check if "Files to deploy" is correct
- Switch to "Edit" mode
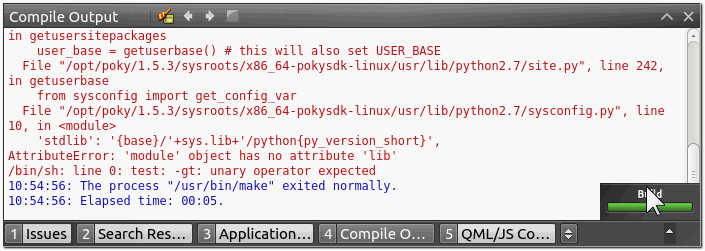
- Click "Build" using context menu of project "hello_qt"
- The green "Build" bar means no error occured.
- Press "Alt+4" to show "Compile Output".
- For Qt4
- For Qt5


Deploying the Application
- Click "Deploy" using context menu of project hello_qt
- The green "Deploy" bar indicates no error occured.
- For Qt4

- For Qt5


Debugging the Application
- Click debug icon to start debugging.
- Press "Alt+3" to show "Application Output"
- For Qt4

- For Qt5

- The "hello_qt" shows up on primary display.
- Click "stop" to stop debugging.
- The deafult desktop returns back.
- For Qt4

- For Qt5


Working within QtCreator 2 (Qt4 only)
Installing the QtCreator
Please download "qt-creator-linux-x86_64-opensource-2.8.1.run", put it to directory ~/FILES/ and install it by following command:
$ ~/FILES/qt-creator-linux-x86_64-opensource-2.8.1.run
Starting the QtCreator
$ source /opt/poky/1.5.3/environment-setup-cortexa9hf-vfp-neon-poky-linux-gnueabi
$ cd ~/qtcreator-2.8.1/
$ bin/qtcreator
- The QtCreator's main window shows up.
- Check QtCreator's version by using "Help" -> "About Qt Creator".


Configuring the Cross-Compiler Options
- Bring up the options dialog using "Tools" -> "Options..."
- Select the "Devices" page on the left, and click "Add..."
- Select "Generic Linux Device" and click "Start Wizard".
- Specify proper settings and click "Next>"
- Click "Finish"
- Device test finished successfully. Click "Close".
- If device test failed, please go back to specify proper settings.
- (It is necessary to set a blank password at least, null password does not work.)
- (It means device's IP is incorrect or some network issues occured.)
- Click "Apply"
- Select the "Build & Run" page on the left, switch to "Compilers" tab, drop down "Add" menu and choose "GCC".
- Name the compiler as "iMX6 GCC"
- Click "Browse..." to select "/opt/poky/1.5.3/sysroots/x86_64-pokysdk-linux/usr/bin/arm-poky-linux-gnueabi/arm-poky-linux-gnueabi-g++"
- Click "Apply"
- Switch to the "Qt Versions" tab.
- Check if the "Qt 4.8.5 in PATH (System)" is auto detected in "Manual" item ?

- If not, click "Add..." to choose the proper qmake.
- Click "Apply"
- Switch to the "Kits" tab.
- Click "Add".
- Name the kit as "iMX6 toolchain"
- Specify the correct "Device Tpye", "Compiler", "Debugger" and "Qt version"
- Click "Browse..." to select "/opt/poky/1.5.3/sysroots/cortexa9hf-vfp-neon-poky-linux-gnueabi" as sysroot
- Click "Edit" to select "/opt/poky/1.5.3/sysroots/x86_64-pokysdk-linux/usr/bin/arm-poky-linux-gnueabi/arm-poky-linux-gnueabi-gdb" as Debugger
- Click "Apply"
- Click OK to finalize the configuration.
- Invoke the options dialog again to make sure the "iMX6 toolchain" is the default kit.


Creating the Project
- Bring up "New" dailog using "File" -> "New File or Project..."
- Select "Applications" -> 'Qt Gui Application"
- Click "Choose..."
- Use "hello_qt" as name
- Create in "/home/adv/qt"
- Click "Next"
- Uncheck "Desktop" and check "IMX6 toolchain"
- Click "Next".
- Use default settings for "Class Information"
- Click "Next"
- Use default settings for "Project Management"
- Click "Finish"
- Double click "hello_qt.pro" to switch to editor window
- In new project it is necessary to add following two lines into qt project file.
target.path = .
INSTALLS += target
- Press "Ctrl+S" to save file.
- Double click "mainwindow.ui" to switch to Design mode
- Drag & drop one Label widget on main form, use property editor on the right side to change text and font size
- Save all project files using "File" -> "Save All"


Building the Project
- Switch to "Projects" mode
- Check if "build configuration" is set to "Debug".
- Check if "Files to deploy" is correct
- Switch to "Edit" mode
- Click "Build" using context menu of project "hello_qt"
- The green "Build" bar means no error occured.
- Press "Alt+4" to show "Compile Output".
Deploying the Application
- Click "Deploy" using context menu of project hello_qt
- The green "Deploy" bar indicates no error occured.
Debugging the Application
- Click debug icon to start debugging.
- Press "Alt+3" to show "Application Output"
- The "hello_qt" shows up on primary display.
- Click "stop" to stop debugging.

- Debugging has finished.

- The deafult desktop returns back.
