RK3399 DevOps
Contents
- 1 Android BSP Version
- 2 Build Environment on Host
- 3 Run Docker example
- 4 Getting Android Source Code
- 5 Build Instructions
- 6 Build U-boot
- 7 Build Kernel
- 8 Build Android
- 9 Push all image to rockdev folder
- 10 ADB
- 11 Create OTA zip
- 12 How to do about update DS100 and DS100L Platform?
- 13 How to do about test LAN1 and LAN2?
- 14 How to do about update form USB or SD card?
- 15
- 16 SD Card Update Solution
- 17 Modules
- 18 Change Host/Client in OTG port?
Android BSP Version
Android 7.1.2
Build Environment on Host
Currently, we adopt Docker as build environment.
You can get the latest version of advrisc/u16.04-imx6abv5 Docker image for developing Rockchip RK3399 projects.
Docker command:
docker pull advrisc/u16.04-imx6abv5:20170523
Run Docker example
Step1 Run docker container (example)
$ docker run -it --name android_n7 -v /home/bsp/myandroid:/home/adv/BSP:rw advrisc/u16.04-imx6abv5:20170523 /bin/bash
Step2 In container, change the user. (example)
adv@7cc0fa834366:~$ sudo chown adv:adv -R BSP
Getting Android Source Code
To pull down the Android source tree to your working directory from the repositories as specified in the default manifest
$ mkdir myandroid
$ mkdir bin
$ cd myandroid/
$ curl https://storage.googleapis.com/git-repo-downloads/repo > ../bin/repo
==================================================================================================
If you get the error message error [Errno 101] Network is unreachable you can try :
$ git clone https://gerrit-googlesource.lug.ustc.edu.cn/git-repo
$ cp -a git-repo/repo ../bin
==================================================================================================
$ chmod a+x ../bin/repo
$ ../bin/repo init -u https://AIM-Linux@dev.azure.com/AIM-Linux/Rockchip/_git/android-manifest -b android-7.1.2_r6_deviceon_root_rtl8822ce
$ ../bin/repo sync
Build Instructions
$ export JAVA_HOME=/usr/lib/jvm/java-8-openjdk-amd64
$ export PATH=$JAVA_HOME/bin:$PATH
$ export CLASSPATH=.:$JAVA_HOME/lib:$JAVA_HOME/lib/tools.jar
Build U-boot
$ cd u-boot
$ make rk3399_box_defconfig
$ make ARCHV=aarch64 -j12
Build Kernel
Build for DS-100 platform
$ cd kernel
$ make ARCH=arm64 rockchip_ds100_defconfig
$ make ARCH=arm64 rk3399-ds100.img -j16
Build for DS-100Lite platform
$ cd kernel
$ make ARCH=arm64 rockchip_ds100l_defconfig
$ make ARCH=arm64 rk3399-ds100l.img -j16
Build for DS-211 platform
$ cd kernel
$ make ARCH=arm64 rockchip_ds211_defconfig
$ make ARCH=arm64 rk3399-ds211.img -j16
Build Android
$ source build/envsetup.sh
$ lunch rk3399_box-userdebug
$ make -j4 2>&1 | tee build-log.txt
Push all image to rockdev folder
$ ./mkimage.sh
All image in rockdev/Image-rk3399_box ./mkimage.sh at previous step will repack boot.img and system.img, and copy other related image files to the rockdev/Image-rk3399_box/ directory. The common image files are listed below:
# boot.img : Android's initramfs, to initialize and mount system partition.
# kernel.img : Kernel image.
# misc.img : Misc partition image, to switch boot mode and pass parameter in recovery mode.
# recovery.img : Recovery mode image.
# resource.img : Resource image, containing boot logo and kernel's device tree info.
# system.img : System partition image with ext4 filesystem format.
# trust.img :File about sleep
# RK3399MiniLoaderAll_V1.05.bin :Loader
# uboot.img :uboot
ADB
1. Download adb tool in Windows system. Download path : *Platform-tools-windows
2. Check ADB : adb devices
3. ADB Connect : adb shell
Create OTA zip
Step1 After Build Android, you will be create image for OTA update.
$ ./mkimage.sh ota
Step2 Package the update.zip
$ make otapackage
Step3Rename the out/target/product/rk3399_box/rk3399_box-ota-eng.adv.zip to update.zip
$mv out/target/product/rk3399_box/rk3399_box-ota-eng.adv.zip update.zip
Step4Copy the update.zip to SD or USB disk.
Step5Follow Android update.
How to do about update DS100 and DS100L Platform?
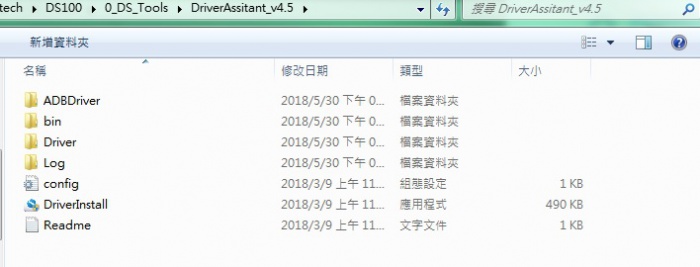
Download AndroidTool_Release_v2.42.zip and DriverAssitant_v4.5.zip
https://github.com/ADVANTECH-Rockchip/rk3399_tools/tree/android_7.1.2
Step1 Connect with the OTG port and PC.
DS100Lite
DS100
Step2 Double click DriverInstall.
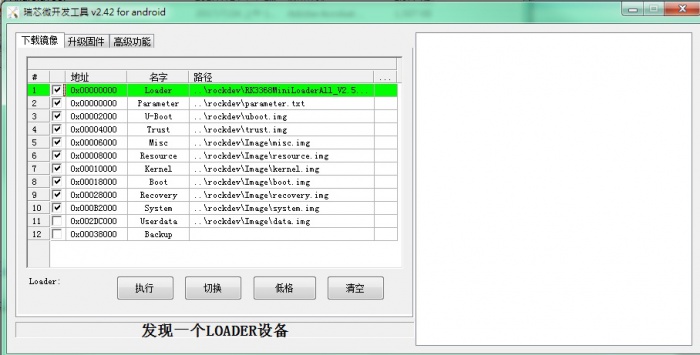
Step3 ADB or Debug console, send command "reboot bootloader"
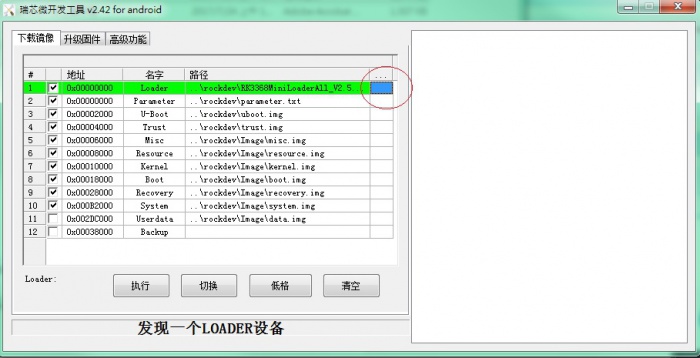
Step4 Select the image path.
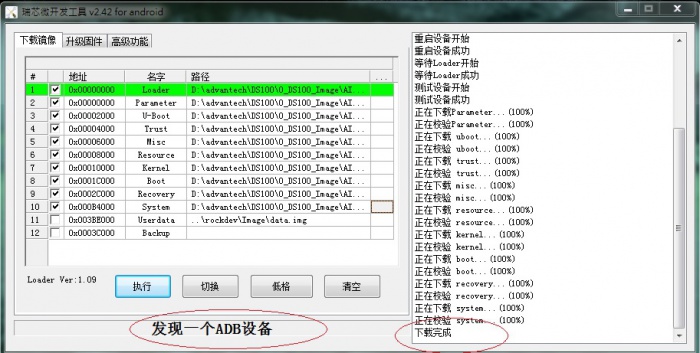
Step5 Finish the update
How to do about test LAN1 and LAN2?
DS100 : LAN1 support DHCP , LAN2 support Static IP
LAN2 setting static ip example
$ ip rule add from all lookup main pref 9999
$ ifconfig eth1 172.12.1.2 netmask 255.255.0.0
How to do about update form USB or SD card?
Step1 Create the OTA update.zip
$ cd ~/rk3399/
$ make -j4
$ make otapackage -j4
$ ./mkimage.sh ota
Step2 Rename rk3399/out/target/product/rk3399_box/rk3399_box-ota-eng.adv.zip to update.zip Step3 Copy to the SD or USB disk
$ mv rk3399_box-ota-eng.adv.zip update.zip
Step4 Insert the USB to DS100 or DS100Lite
Step5 Choose the Install
Step6
Step7
SD Card Update Solution
RK3399 provide the tools for create the SD Card Update Solution.
Step1 Download tool Linux_rockdev_2015-06-17_for_RK3399.zip and SD_Firmware_Tool._v1.46.zip.
Download path : https://github.com/ADVANTECH-Rockchip/rk3399_tools/tree/android_7.1.2
Step2 Copy the Linux_rockdev_2015-06-17_for_RK3399.zip to Linux OS PC and Unzip it. You will get the rockdev folder.
$ unzip Linux_rockdev_2015-06-17_for_RK3399.zip
$ cd rockdev
$ sudo chmod -R 755 *
Step3 Create the new system image and boot image and revoery image. "./mkimage.sh ota"
$ cd ~/rk3399/
$ make -j4
$ ./mkimage.sh ota
Step4 Copy the "MiniLoaderAll.bin parameter.txt uboot.img trust.img misc.img kernel.img resource.img boot.img recovery.img system.img" to rockdev/Image Step5 Modify the MiniLoader.bin path. (./rkImageMaker -RK330C Image/MiniLoaderAll.bin Image/update.img update.img -os_type:androidos || pause)
$ cd rockdev
$ vim mkupdate.sh
Step6 Run mkupdate.sh
$ ./mkupdate.sh
Step7 Get ok message : Making update.img OK. 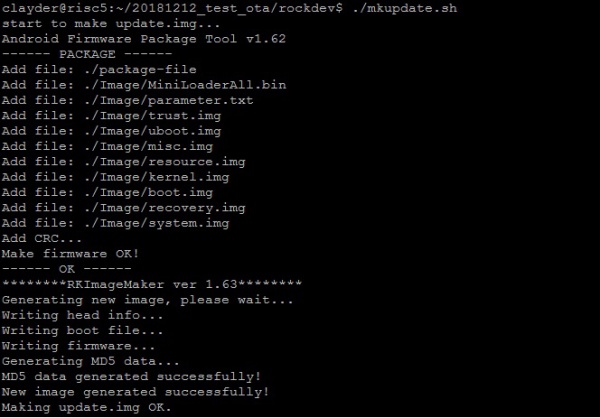
Step8 Unzip SD_Firmware_Tool._v1.46.zip in Windows OS and Copy the update.img to SD_Firmware_Tool
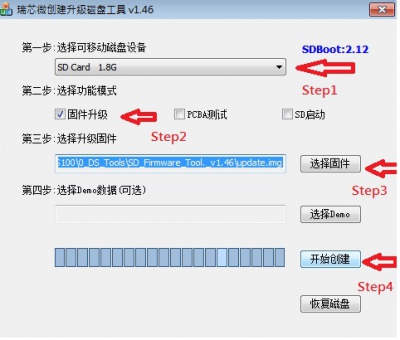
Step9 Please follow the picture (Red word).
Step1 Choose the SD device.
Step2 Choose the "firmware update"
Step3. Choose the update.img path
Step4. Create the update SD
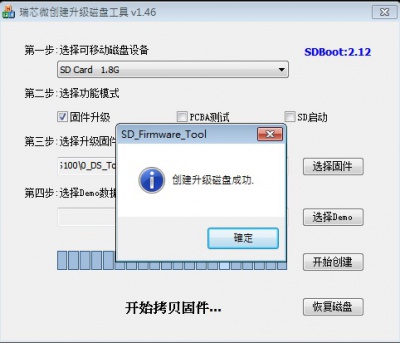
Step10 Create the Update SD card Success
Step11 Please power off in DS100Lite.
Step12 Insert the SD card.
Step13 Power on in DS100Lite.
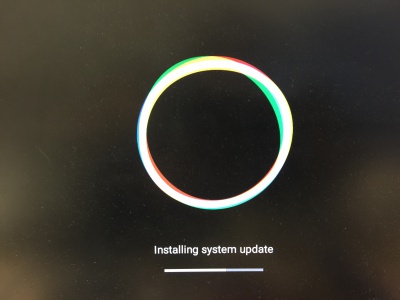
Step14 Installing system update
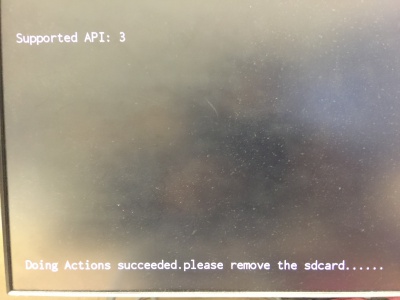
Step15 Please Remove the SD Card when DS100Lite show the message "Doing Action succeeded. please remove the sdcard......".
Step16 Reset DS100Lite.


