Difference between revisions of "AIR-030"
From ESS-WIKI
| Line 57: | Line 57: | ||
== Flash Image == | == Flash Image == | ||
| − | <pre>sudo ./flash.sh -d rootfs/boot/tegra234-air030.dtb jetson-agx-orin-devkit mmcblk0p1 | + | |
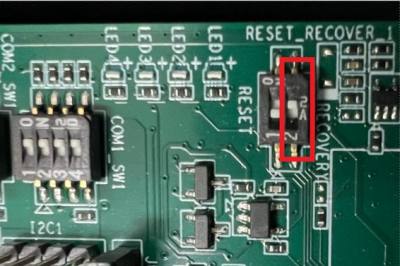
| + | Change the SW2 to ON and press power button.<br/> [[File:Recovery BT.png|400px|Air030 recovery button.jpg]]<br/> Connect a linux OS host wired AIR-030 with usb-otg cable.<br/> In the Host PC, make sure the AIR-030 (<span style="color:#0070c0">'''NVidia Corp'''</span>) has detectd. | ||
| + | <pre>[ubuntu@linux 11:55:43 ~]$ lsusb | ||
| + | Bus 002 Device 002: ID 8087:8000 Intel Corp. | ||
| + | Bus 002 Device 001: ID 1d6b:0002 Linux Foundation 2.0 root hub | ||
| + | Bus 001 Device 003: ID 0bda:0161 Realtek Semiconductor Corp. Mass Storage Device | ||
| + | Bus 001 Device 024: ID 0955:7223 NVidia Corp. | ||
| + | Bus 001 Device 002: ID 8087:8008 Intel Corp. | ||
| + | </pre> | ||
| + | |||
| + | For 32GB<br/> 1.Extract image | ||
| + | <pre>$ tar -zxvf air030_image_XXXXXX.tar.gz | ||
| + | </pre> | ||
| + | |||
| + | 2.Flash image | ||
| + | <pre>$ cd bootloader | ||
| + | $ sudo -s | ||
| + | # source flashcmd.txt | ||
| + | </pre> | ||
| + | |||
| + | For Jackpack 5.1.1<br/> 1.Extracted tarball file | ||
| + | <pre>$ sudo tar -zxvf air030_image_XXXXXX.tar.gz | ||
| + | $ cd Linux_for_Tegra | ||
| + | </pre> | ||
| + | |||
| + | 2. Flash | ||
| + | <pre>$ sudo ./flash.sh -d rootfs/boot/tegra234-air030.dtb jetson-agx-orin-devkit mmcblk0p1 | ||
</pre> | </pre> | ||
Revision as of 10:18, 23 May 2023
Contents
Linux BSP Version
Ubuntu 20.04
Kernel 5.10.104
Released Image
Build Environment on Host
Currently, we adopt Docker as build environment.
You can get the latest version of advrisc/u18.04-imx8lbv1 Docker image for developing nVidia jetson projects.
Docker command:
$ docker pull advrisc/u18.04-imx8lbv1
Run Docker example
Step1 Run docker container (example)
sudo docker run -it --name jetson_linux_risc -v /home/bsp/myLinux:/home/adv/BSP:rw --privileged advrisc/u18.04-imx8lbv1:latest /bin/bash
Step2 In container, change the user. (example)
adv@7cc0fa834366:~$ sudo chown adv:adv -R BSP
Dependncy Library
Please install library in the HOST outside of docker if you get Exec format error.
$sudo apt-get install qemu-user-static
Getting Linux Source Code
$ export GIT_SSL_NO_VERIFY=1
$ cd ~/BSP
$ mkdir jetson_linux_risc
$ cd jetson_linux_risc
$ git config --global user.name "Your Name"
$ git config --global user.email you@example.com
Jetpack 5.0.2 / L4T 35.1.0
$ repo init -u https://AIM-Linux@dev.azure.com/AIM-Linux/risc_nvidia_jetson/_git/manifest -m air030_3510.xml
Jetpack 5.1.1 / L4T 35.3.1
$ repo init -u https://AIM-Linux@dev.azure.com/AIM-Linux/risc_nvidia_jetson_35.3.1/_git/manifest -m air030.xml
Public Board
Jetpack 5.0.1 / L4T 34.1.1
$ repo init -u https://AIM-Linux@dev.azure.com/AIM-Linux/risc_nvidia_jetson/_git/manifest -m 3411.xml
$ repo sync
Build Image
$ sudo ./scripts/build_release.sh -v <VERSION>
Flash Image
Change the SW2 to ON and press power button.

Connect a linux OS host wired AIR-030 with usb-otg cable.
In the Host PC, make sure the AIR-030 (NVidia Corp) has detectd.
[ubuntu@linux 11:55:43 ~]$ lsusb
Bus 002 Device 002: ID 8087:8000 Intel Corp.
Bus 002 Device 001: ID 1d6b:0002 Linux Foundation 2.0 root hub
Bus 001 Device 003: ID 0bda:0161 Realtek Semiconductor Corp. Mass Storage Device
Bus 001 Device 024: ID 0955:7223 NVidia Corp.
Bus 001 Device 002: ID 8087:8008 Intel Corp.
For 32GB
1.Extract image
$ tar -zxvf air030_image_XXXXXX.tar.gz
2.Flash image
$ cd bootloader
$ sudo -s
# source flashcmd.txt
For Jackpack 5.1.1
1.Extracted tarball file
$ sudo tar -zxvf air030_image_XXXXXX.tar.gz
$ cd Linux_for_Tegra
2. Flash
$ sudo ./flash.sh -d rootfs/boot/tegra234-air030.dtb jetson-agx-orin-devkit mmcblk0p1