EPM-880 Application Notes
Contents
EPM-880 Application Notes
This application provide user a way that image full update and carousel mode for EPM-880 panel display. user configure xml file follow setting rule.
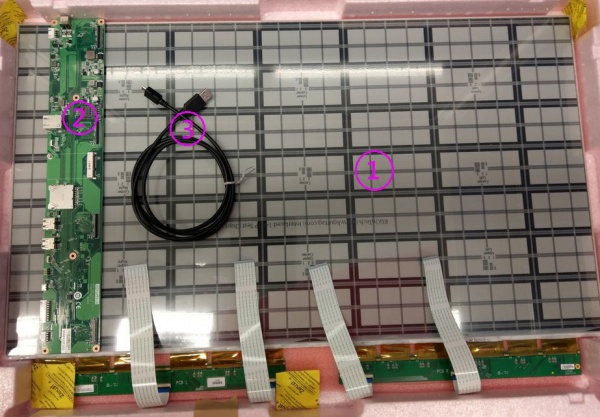
Components LIST
|
Item |
Description |
|---|---|
| 1 | 32” EPAPER |
| 2 | EPM-880 PCBA |
| 3 | cable |
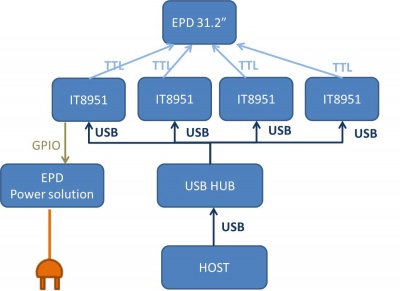
SYSTEM ARCHITECURE
System support
We has been tested on host operating system as below
- Windows (windows 10)
- Ubuntu 18.04
- Ubuntu 22.04
Waveform mode
There are six Waveform mode for image update and short name as below table. The mode parameter will use in update command.
| mode 0 | mode 1 | mode 2 | mode 3 | mode 4 | mode 5 |
| INIT | DU | GC16 | GCC16 | A2 | GL16 |
INIT(Global update WF) :
-
-
-
- Initialize is used to completely clear the display, if it's left in an unknown state (i.e. if the previous image has been lost by a re-boot)
-
-
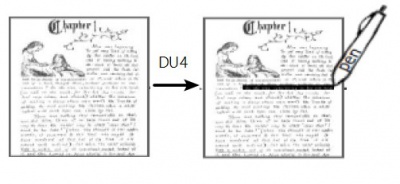
DU(Local update WF) :
-
-
-
- Direct update Non-flashing waveform that can be used to update. it can update any changed graytone pixel to black or white only.
-
-
GC16(Global update WF) :
-
-
-
- Grayscale clear, 16 levels A "flashy" waveform used for 16 level grayscale images. All the pixels are updated or cleared
-
-
GCC16( Global clear update WF) :
-
-
-
- Grayscale Clear, 16 Levels A "more flashy" waveform used for 16 level grayscale images. All the pixels are updated or cleared.
- This provides the best image appearance.
-
-
A2(Local update WF) :
-
-
-
- animation, 2 Levels is a non-flashing waveform that can be used for fast updates and simple animation.
- This wave form support black & white updates only.
- image quality and ghosting is reduced in exchange for the response time.
-
-
GL16(Local update WF when white to white , Global update when 16 gray levels) :
-
-
-
- The GL16 waveform is used to update anti-aliased text with reduced flash. GL16 should bed used only with Full Display Update..
- The entire display except pixels staying in white will update as the new image is written. The GL16 waveform has 16 unique gray levels.
-
-
Push image application
Hardware prepare
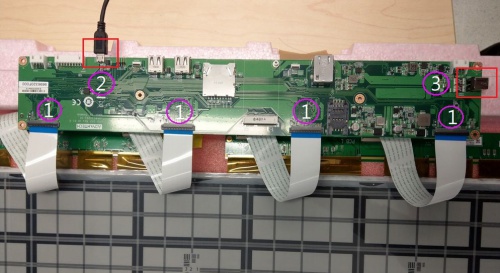
1. Connected EPD FPC to mainboard
2. Connected micro USB cable to mainboard USB2(CN2) , usb port connect to computer usb port which installed windows or linux ubuntu
3. Connected 12V power cable to mainboard.
EPD Application
EPD application drive control board refresh image and it’s a simple sample code for demo how to display picture on EPD panel. It’s only support windows 10 and Ubuntu platform.
EPD Package Download
2. Ubuntu v18.04 EPD Application
3. Ubuntu v22.04 EPD Application
Software prepare
Before execute EPD application, it must install program driver in different OS system is different methods.
Windows
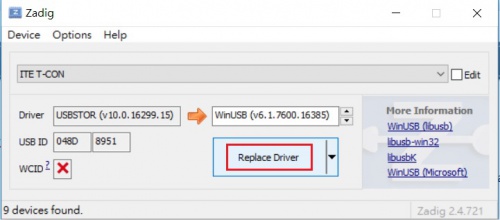
1. Download USB driver too ”zadig USB tool” on internet, user could search key word “zadig USB tool” on google search, and execute this software.
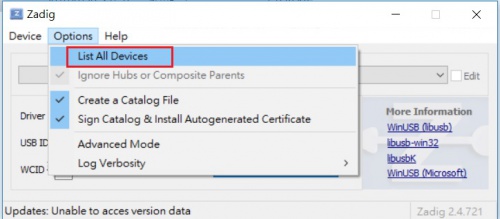
2. Check EPM-880 control board has connected to host computer and execute zadig.exe . Execute zadig.exe and First click Option->List All Devices on zadig usb too.It will scan how many devices in host computer
3. Select ITE T-CON appeared in list and click Replace Driver button , waiting installation until success
4.Repeat step 3 replace others ITE T-CON driver, there are total 4 ITE T-CON drivers.
Linux Ubuntu
Driver library install steps and command line based on Ubuntu 18.04 as below:
- Caution: user must firstly follow all steps to install driver library properly before execute EPD application, otherwise, error message will pop up
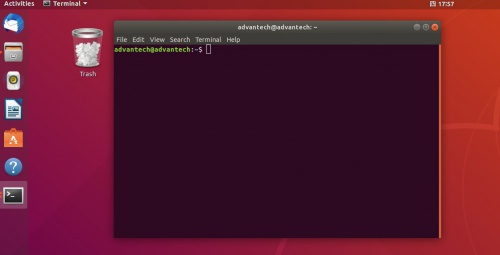
1.Open command line in Ubuntu.
2. Refresh system
$ sudo apt-get update
$ sudo apt-get upgrade
3. Installed libusb 1.0.0
sudo apt-get install libusb-1.0-0-dev
4. Installed OpenCV dependency package
$ sudo apt-get install build-essential cmake git libgtk2.0-dev pkg-config libavcodec-dev libavformat-dev libswscale-dev
$ sudo apt-get install python3.5 python3-numpy libtbb2 libtbb-dev
$ sudo apt-get install libjpeg-dev libpng-dev libtiff5-dev libdc1394-22-dev libeigen3-dev libtheora-dev libvorbis-dev libxvidcore-dev libx264-dev sphinx-common libtbb-dev yasm libfaac-dev libopencore-amrnb-dev libopencore-amrwb-dev libopenexr-dev libgstreamer-plugins-base1.0-dev libavutil-dev libavfilter-dev libavresample-dev
$ sudo apt-get install software-properties-common
$ sudo apt-get install python-software-properties
$ sudo add-apt-repository "deb http://security.ubuntu.com/ubuntu xenial-security main"
$ sudo apt update
$ sudo apt install libjasper1 libjasper-dev libtiff-dev
5. Download OpenCV 2.4.13.4 source code from OpenCV official release.
6. Build OpenCV library. Untar source code to path /opt/ and then user can discover the untar file /opt/opencv-2.4.13.4. below example we change to root and create file path /opt/release but it should depend on user's environment.
$ sudo su
$ mkdir release
$ cd release
/opt/opencv-2.4.13.4 is assumptive path that is openCV source code path. user input command in path /opt/release.
$ cmake -D BUILD_TIFF=ON -D WITH_CUDA=OFF -D ENABLE_AVX=OFF -D WITH_OPENGL=OFF -D WITH_OPENCL=OFF -D WITH_IPP=OFF -D WITH_TBB=OFF -D BUILD_TBB=ON -D WITH_EIGEN=OFF -D WITH_V4L=OFF -D WITH_VTK=OFF -D BUILD_TESTS=OFF -D BUILD_PERF_TESTS=OFF -D CMAKE_BUILD_TYPE=RELEASE -D CMAKE_INSTALL_PREFIX=/usr/local -D OPENCV_EXTRA_MODULES_PATH=/opt/opencv_contrib/modules /opt/opencv-2.4.13.4/
$ make -j4
$ make install
Check OpenCV version
$ pkg-config --modversion opencv
Create ld file in /etc/ld.so.conf.d/opencv.conf
$ sudo vi /etc/ld.so.conf.d/opencv.conf
then add content as blow
/usr/local/lib/ then save file
Refresh ld command
$ sudo ldconfig -v
Driver library install steps and command line based on Ubuntu 22.04 as below:
- sudo apt-get install libusb-1.0-0-dev
- sudo apt-get install libopencv-dev
- sudo cp ezxml_lib/libezxml.so /usr/lib/x86_64-linux-gnu/
XML File Configure
The setting.xml include image and display attributes. EPD application program depend on setting.xml to find and refresh image. First should open setting.xml in page file and content is as below.
 <?xml version="1.0"?>
 <epd_config>
   <epd name="EPD 31.2">
       <color>KW</color>
       <image_path>D:\application\photoImg\</image_path>
       <image_name>
         <full_update>
             <img>1.bmp</img>
         </full_update>
         <stop>stop</stop>
       </image_name>
       <slide_interval>0</slide_interval>
       <en_set_temperature>0</en_set_temperature>
       <temperature>25</temperature>
       <waveform_mode>2</waveform_mode>
       <rotate>180</rotate>
 </epd>
 </epd_config>
User usually set up image path with user’s environment in EPD package file and put image file into image path. All tag attributes in xml describe below.
<image path> : User must make sure image path exist in user’s operating system and file put into this path. If file is not in path , EPD application may lead to error occur.
<img> : Image name write between <img> </img>and image file should put in image path. It can be assigned more than one tag name between <full_update> and </full_update> . EPD application will display image in sequence. It's only support Bmp and jpg extension type.
<stop> Stop tag use to load image at once. Above mention stop tag in xml, application terminated after 1.bmp update done. In carousel mode stop tag must remove from xml.
<slide_interval>: Slide interval is delay time in second between every image display.
<set_temperature> 0 is disable and user should not change to other value.
<waveform_mode> Waveform mode usually choose mode 2 for image refresh. waveform explicit detail see Section 1.4 waveform mode
<rotate> The image will present different rotation on panel and only 4 of options to choose 0 、90、180、270 of angle.
Execution
User make sure image path exists in host system before execute or EPD application it may cause error occur.
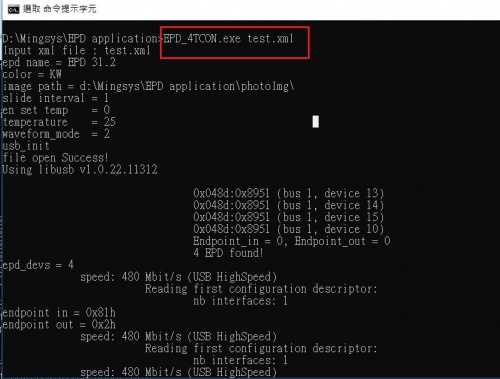
1. Open command line
2. Current directory switch to EPD_4TCON
3. Execute command EPD_4TCON with parameter xml file name
Windows : "EPD_4Tcon.exe setting.xml"
Linux : $sudo ./EPD_4Tcon setting.xml
Quick start
To use this “Quick start” feature, user must completed Section 1.5.2.2 software prepare step
Single mode and carousel mode example describe as below.
Following step to achieve different play mode.
Single mode
This example showing how to configure xml for image display once on linux ubuntu 18.04 or 22.04.
Step 1: Image path depends on user's defined. we assume path that is in /usr/local/photoImg in this example.
Step 2: we assume one picture that name is 1.bmp to display , we should put 1.bmp in image path and put img tag in xml.
 <?xml version="1.0"?>
 <epd_config>
   <epd name="EPD 31.2">
       <color>KW</color>
       <image_path>/usr/local/photoImg</image_path>
       <image_name>
         <full_update>
             <img>1.bmp</img>
         </full_update>
         <stop>stop</stop>
       </image_name>
       <slide_interval>0</slide_interval>
       <en_set_temperature>0</en_set_temperature>
       <temperature>25</temperature>
       <waveform_mode>2</waveform_mode>
       <rotate>180</rotate>
 </epd>
 </epd_config>
Step 3: $sudo ./EPD_4Tcon setting.xml
This application will stop after updating content of 1.bmp
Carousel mode
Carousel mode is non-stop application except system signal , user could stop running procedure by SIGINT ,SIGKILL signal.
Below example is xml format in carousel mode that three images display in sequence every 10 seconds intervals .
Step 1: Image path depends on user's defined. we defined path that is in /usr/local/photoImg in this example.
Step 2: There are three images to display , we should put 1.bmp,2.bmp,3.bmp in image path and put img tag in xml.
Step 3: Removed tag of <stop>.
Step 4: We defined every 10 seconds to change image and writing 10 at tag of <slide_interval>
<?xml version="1.0"?>
 <epd_config>
   <epd name="EPD 31.2">
       <color>KW</color>
       <image_path>/usr/local/photoImg</image_path>
       <image_name>
         <full_update>
             <img>1.bmp</img>
             <img>2.bmp</img>
             <img>3.bmp</img>
         </full_update>
       </image_name>
       <slide_interval>10</slide_interval>
       <en_set_temperature>0</en_set_temperature>
       <temperature>25</temperature>
       <waveform_mode>2</waveform_mode>
       <rotate>180</rotate>
 </epd>
 </epd_config>
In mode 0 ,it is used to completely clear the display when initial panel then using white image to display panel instead of mode 0. It prevents panel from damaging.
In mode 1 Du mode non-flashy waveform but it easily appear Ghosting on panel. it is suitable highlight text.
In mode 2it userd for 16 level grayscale images. When panel is wide temperature Range(-20 ~ 70 °C), it only support mode 0、1、2 not support mode 3、4、5
In mode 3 it's same with mode 2 but mode 3 has high quality image appearance.
In mode 4 it is used for fast switching or simple animation only the conversion between black and white, sacrificing the image quality and afterimage effect for fast response time.
mode 4 (A2)scenario
In mode 5 it's used for text turn to page when text is arranged on the same horizontal on next page .
