IoTGateway/BSP/Android/ABV2 User Guide iMX6
Android BSP User Guide for iMX6 series
Contents
Getting Started
Prerequisites
All operations in this guide are based on Ubuntu 12.04 LTS 64bit only.
First please install Ubuntu 12.04 LTS 64bit* with minimum 2GB memory.
* ubuntu-12.04.1-desktop-amd64.iso
To install required packages
Please login and perform the following commands:
$ sudo apt-get install ssh
$ sudo apt-get install ia32-libs libx11-dev:i386 libreadline6-dev:i386 \
libgl1-mesa-glx:i386 zlib1g-dev:i386 uuid-dev:i386 liblzo2-dev:i386 \
libncurses5-dev:i386
$ sudo apt-get install \
bison build-essential ccache dpkg flex gcc g++ gettext intltool \
libarchive-zip-perl libfreetype6-dev libdbus-glib-1-dev liborbit2-dev \
libxml2-dev libx11-dev libgtk2.0-dev liblzo2-2 libtool m4 \
patch rpm tcl uboot-mkimage uuid zlib1g zlib1g-dev \
git gnupg flex bison gperf build-essential  zip \
curl libc6-dev libncurses5-dev x11proto-core-dev libx11-dev:i386 \
libreadline6-dev:i386 libgl1-mesa-glx:i386 libgl1-mesa-dev g++-multilib \
mingw32 tofrodos python-markdown libxml2-utils xsltproc zlib1g-dev:i386 \
gcc-4.6 g++-4.6 cpp-4.6 gcc-4.6-multilib uuid-dev liblzo2-dev \
uboot-mkimage libarchive-zip-perl \
wget git-core unzip texinfo gawk diffstat build-essential chrpath \
sed cvs subversion coreutils texi2html \
docbook-utils python-pysqlite2 help2man make gcc g++ \
desktop-file-utils libgl1-mesa-dev libglu1-mesa-dev mercurial \
autoconf automake groff curl lzop asciidoc xterm
$ sudo apt-get install libncurses5-dev:i386 liblzo2-dev:i386 uuid-dev:i386
$ sudo ln -s /usr/lib/i386-linux-gnu/mesa/libGL.so.1 /usr/lib/i386-linux-gnu/libGL.so
$ tar zcvf ~/usr_lib_i386-linux-gnu_for_Building_Android_KK.tar.gz \
/usr/lib/i386-linux-gnu/{libuuid.a,libuuid.so,liblzo2.so,liblzo2.a}
$ sudo apt-get install uuid-dev liblzo2-dev
$ sudo tar zxvf ~/usr_lib_i386-linux-gnu_for_Building_Android_KK.tar.gz -C /
To install JDK
Please download "jdk-6u45-linux-x64.bin" manually, put it to directory ~/FILES/ and perform the following commands:
$ cd /usr/lib
$ sudo ~/FILES/jdk-6u45-linux-x64.bin
$ sudo mkdir jvm
$ cd jvm
$ sudo mv ../jdk1.6.0_45 .
$ cd jdk1.6.0_45/
$ sudo update-alternatives --install /usr/bin/java    java    /usr/lib/jvm/jdk1.6.0_45/jre/bin/java    2
$ sudo update-alternatives --install /usr/bin/javac   javac   /usr/lib/jvm/jdk1.6.0_45/bin/javac   2
$ sudo update-alternatives --install /usr/bin/jar     jar     /usr/lib/jvm/jdk1.6.0_45/bin/jar     2
$ sudo update-alternatives --install /usr/bin/javap   javap   /usr/lib/jvm/jdk1.6.0_45/bin/javap   2
$ sudo update-alternatives --install /usr/bin/javadoc javadoc /usr/lib/jvm/jdk1.6.0_45/bin/javadoc 2
$ sudo update-alternatives --config javap
$ sudo update-alternatives --config javadoc
$ sudo update-alternatives --config java
$ sudo update-alternatives --config javac
$ sudo update-alternatives --config jar
$ cd ~/
$ sudo sh -c "echo "JAVA_HOME=/usr/lib/jvm/jdk1.6.0_45" >> /etc/environment"
Introducing BSP
- The BSP contains cross toolchain, linux kernel source code, u-boot source code, Android root file system and some scripts. It is consist of three top folders: "android", "image", "scripts".
Overview
- The description of some important folders as below:
- android/
- prebuilt/gcc/linux-x86/host/ : cross toolchain
- bootable/bootloader/uboot-imx/ : u-boot source code
- kernel_imx/ : linux kernel source code
- device/
- fsl/ : Android device related settings
- fsl-proprietary/ : modules & firmware(e.g. WiFi, GPU)
- hardware/imx/ : HAL (Hardware Abstraction Layer)
- image/ : all built images located in
- scripts/ : to simplify building process (Please refer to 1.4 & 1.5 for details)
- android/
Naming Rule
- It is consist of the model name followed by "AB" plus version number, for example, 4410ABV2080 which "4410" stands for RSB-4410, "AB" is acronym of Android BSP, "V2080" stands for Version 2.080; other model names list below:
- "3420" stands for ROM-3420
- "5420" stands for ROM-5420
- "7420" stands for ROM-7420
- "DS31" stands for UBC-DS31
- "U220" stands for UBC-220
Conventions
${BOARD} : target board name (list below)
- rsb_4410 / rom_3420 / rom_5420 / rom_7420 / ubc_ds31 / ubc_200
${BSPHOME} : the directory that BSP tarball extacted to
${SD_DEVICE} : device name of SD card in Ubuntu (e.g. /dev/sdf)
${MMC_DEVICE} : device name of on-board eMMC in Android (e.g. /dev/block/mmcblk0)
debug console / serial console
- serial terminal program (e.g. minicom, putty, teraterm ...) that serial port is configured to 115200 8N1
terminal console
- terminal program (e.g. gnome-terminal, xfce4-terminal ...)
Build Instructions
To build everything
- Perform one of the following commands in terminal console
- engineer version (default option)
$ cd ${BSPHOME}/scripts$ ./mk_android.sh ${BOARD}
- user version
$ cd ${BSPHOME}/scripts$ ./mk_android.sh ${BOARD} user
To build boot loader
- Perform the following command in terminal console
$ cd ${BSPHOME}/scripts$ ./mk_bootloader.sh ${BOARD}
To build boot image
- Perform the following command in terminal console
$ cd ${BSPHOME}/scripts$ ./mk_bootimg.sh ${BOARD}
To build recovery image
- Perform the following command in terminal console
$ cd ${BSPHOME}/scripts$ ./mk_recoveryimg.sh ${BOARD}
To build system image
- Perform the following command in terminal console
$ cd ${BSPHOME}/scripts$ ./mk_systemimg.sh ${BOARD}
To build OTA image
- Perform the following command in terminal console
$ cd ${BSPHOME}/scripts$ ./mk_otapackage.sh ${BOARD}
- and the OTA package, update.zip, is located in the following directory
- ../android/out/target/product/${BOARD}.
Boot up from SD card or eMMC
To create a bootable SD card
- Perform the following command in terminal console
$ cd ${BSPHOME}/scripts$ ./mksd-android.sh ${SD_DEVICE}
To transfer whole system to onboard eMMC
- Boot up from SD card
- Perform the following commands in debug console
# cd /data/mkimage/scripts# sh ./mksd-android.sh ${MMC_DEVICE}
- Remove SD card, then target board can boot up from onboard eMMC.
Software Functionality
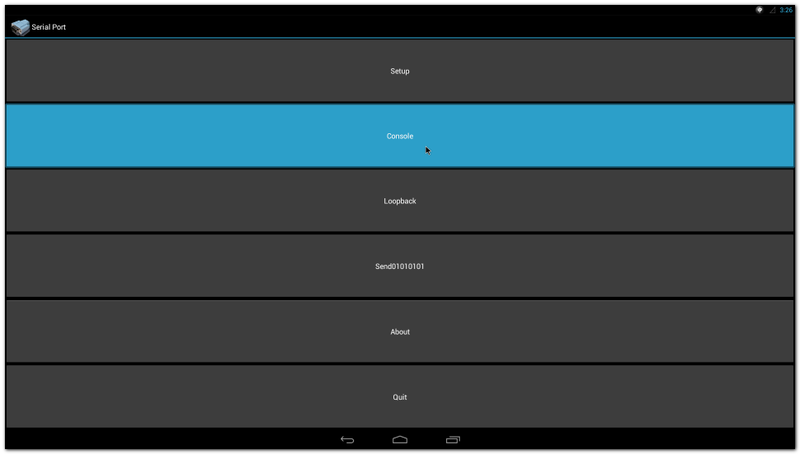
Serial Port Test
Serial Port Setup
- Click "Serial Port"
- Click "Setup"
- Click "Device" , and choose the used device(e.g. ttymxc1)
- Click "Baud rate" , and choose the used baudrate(e.g. 115200)


Console Test
- Open one serial console.
- Click "Console"
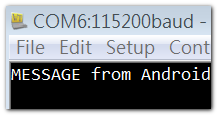
- Typing some characters (e.g. "This is a test. 123456789ABCDEF") then pressing Enter in serial console, the identical message will shows up in reception block as below:
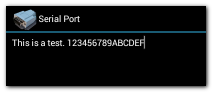
- On the other hand, typing some message (ex. "MESSAGE from Android") in emission block, the identical message will shows up in serial console as below:


Loopback Test
- Plug loopback device into COM2
- Click "Loopback"
- The loopback test result will show up as below


Send01010101 Test
- Open one serial console.
- Click Send01010101 .
- The character "U" (b'01010101) will show up continuously as below:


Display Output Option
Single HDMI Display
- Perform the following command in u-boot:
> setenv bootargs 'console=ttymxc0,115200 androidboot.console=ttymxc0 vmalloc=400M init=/init video=mxcfb0:dev=hdmi,1920x1080M@60,bpp=32 video=mxcfb1:off video=mxcfb2:off video=mxcfb3:off fbmem=28M androidboot.hardware=freescale'> saveenv> reset
Single VGA Display
- Perform the following command in u-boot:
> setenv bootargs 'console=ttymxc0,115200 androidboot.console=ttymxc0 vmalloc=400M init=/init video=mxcfb0:dev=lcd,1920x1080M@60,bpp=32 video=mxcfb1:off video=mxcfb2:off video=mxcfb3:off fbmem=28M androidboot.hardware=freescale'> saveenv> reset
Single LVDS Display
- Perform the following command in u-boot:
> setenv bootargs 'console=ttymxc0,115200 androidboot.console=ttymxc0 vmalloc=400M init=/init video=mxcfb0:dev=ldb,1024x768M@60,bpp=24 video=mxcfb1:off video=mxcfb2:off video=mxcfb3:off fbmem=28M androidboot.hardware=freescale'> saveenv> reset
Dual Display
- For example of HDMI & VGA, Perform the following command in u-boot:
> setenv bootargs 'console=ttymxc0,115200 androidboot.console=ttymxc0 vmalloc=400M init=/init video=mxcfb0:dev=hdmi,1920x1080M@60,bpp=32 video=mxcfb1:dev=lcd,1920x1080M@60,bpp=32 video=mxcfb2:off video=mxcfb3:off fbmem=28M,28M androidboot.hardware=freescale'> saveenv> reset
Network Setup
Wi-Fi
- Click "Settings"
- Turn Wi-Fi on
- Choose ESSID (e.g. ESSD Testing )
- Input correct password
- Wi-Fi Authenticating/Connecting/Obtaining IP address
- Wi-Fi connected


Ethernet
- Click "Settings" / "Ethernet configuration" , then Turn on Ethernet
- Click "Ethernet configuration"
- Choose Connection Type (DHCP or Static IP)


To update system
- Refer to 1.4.6 to build OTA package.
- Plug SD card that contains OTA package(update.zip) into SD slot.
- Click "Settings" / "About tablet" / "Addition system updates" :
- Wait for one moment, system will reboot for updating
- It will take some time to update.


System Recovery
Please refer to 1.5.1 & 1.5.2 to create a bootable SD card and transfer whole system to on-board eMMC.