Android Software Features
Contents
Logo Change
Logo for customer Boot Logo U-boot [Android 4.2 ~ Android 4.4]
 (1)  BSP support
 (2)  Convert the bmp file to hex value.
      Example : bmp file name is aaa.c
 (3)  Step1.
        Add aaa.o in board/freescale/common/Makefile
        Add aaa.c in board/freescale/common/
      Step2.
        Modify LCD setting in board/freescale/mx6q-rom-3420/mx6q_rom-3420.c
        Fill in correct timing parameters for customer panel.
      Step3.
        Enable CONFIG_SPLASH_SCREEN config
        Set lvds_num to 0, because we use LVDS0 channel.
Boot Logo Android Frameworks [Android 4.2 ~ Android 4.4]
 (1) Please rename your Logo file to "android-logo-mask.png"
 (2) Replace the logo image file
     --> frameworks/base/core/res/assets/images/android-logo-mask.png.
ADV Loader
(ADV loader)Advantech loader in RISC
RISC platform boot sequence.
ADV loader have some function.
1. Include DDR parameter
2. Multi-Boot function
Android Version
Get Android Version
# getprop ro.build.version.release
Get Android SDK Version
# getprop ro.build.version.sdk
Linux Kernel Version
Get Linux Kernel Version
# uname -r
# 3.14.52
USB Camera
USB Camera Porting Add support USB camera in android 6.0.1.
Solution:
(1) Add "setprop back_camera_name uvc" in device/fsl/xxx/init.rc
$ vim device/fsl/xxx/init.rc
    #Define the config for dual camera
    setprop camera.disable_zsl_mode 1
    #For landscape mode, orient is 0
    #For portrait mode, orient is 90
    #the android before honycomb are all in portrait mode
	setprop back_camera_name ov5640_mipi
    setprop back_camera_name uvc
    setprop back_camera_orient 0
    #setprop front_camera_orient 0
$ vim device/fsl/xxx/init.i.MX6Q.rc
    on boot
    # Set OpenGLES version
    setprop ro.opengles.version 131072

    # Set GPU 3D minimum clock to 3/64
    write /sys/bus/platform/drivers/galcore/gpu3DMinClock 3

    # set back camera.
    setprop back_camera_name ov5640_mipi
    setprop back_camera_name uvc

    # disable front camera.
      setprop front_camera_name 0
3G
3G module Porting (QUECTEL UC20)
(1) In linux kernel
1. You need to add the mechanism for processing zero packets during transmission of “usb_wwan.c” file under “[KERNEL]/drivers/usb/serial”.
You need to add the following statements to the “usb_wwan_setup_urb” function, as shown below:
/* Helper functions used by usb_wwan_setup_urbs */
static struct urb *usb_wwan_setup_urb(struct usb_serial *serial, int endpoint,
                      int dir, void *ctx, char *buf, int len,
                      void (*callback) (struct urb *))
{
    struct urb *urb;

    if (endpoint == -1)
        return NULL;    /* endpoint not needed */

    urb = usb_alloc_urb(0, GFP_KERNEL);    /* No ISO */
    if (urb == NULL) {
        dbg("%s: alloc for endpoint %d failed.", __func__, endpoint);
        return NULL;
    }

    /* Fill URB using supplied data. */
    usb_fill_bulk_urb(urb, serial->dev,
              usb_sndbulkpipe(serial->dev, endpoint) | dir,
              buf, len, callback, ctx);

    /*Quectel PRODEUCTS*/
    if (dir == USB_DIR_OUT) {
        struct usb_device_descriptor *desc = &serial->dev->descriptor;
        if (desc->idVendor == 0x05C6 && (desc->idProduct == 0x9003
            || desc->idProduct == 0x9090
            || desc->idProduct == 0x9215)) {
                urb->transfer_flags |= URB_ZERO_PACKET;
        }
    }
    return urb;
}
2. Add UC15/UC20/EC20's Vendor ID and Product ID in "option_ids[]" in the file "drivers/usb/serial/option.c":
static const struct usb_device_id option_ids[] = {
 // Added by Quectel
{ USB_DEVICE(0x05C6, 0x9090) }, //For UC15
{ USB_DEVICE(0x05C6, 0x9003) }, //For UC20
{ USB_DEVICE(0x05C6, 0x9215) }, //For EC20
#end
(2) You need to configure the kernel to support PPP dial up. Check your menuconfig. Ref: Quectel_Android_RIL_Driver_User_Guide_V1.3.pdf
ps : In android 4.4.2. we already enable ppp config and USB driver for GSM/CDMA modems.
(3) Modify init.rc. In android\device\fsl\imx6\etc\init.rc.
  on boot
    setprop rild.libargs "-d /dev/ttyUSB2"

  service ril-daemon /system/bin/rild -l /system/lib/libreference-ril.so
      class main
      socket rild stream 660 root radio
      socket rild-debug stream 660 radio system
      user root
      group radio cache inet misc audio sdcard_rw log
(4) tar zxvf reference-ril.tar.gz to android/hardware/ril/
(5) Mark chat.c module form AOSP (android\external\ppp\pppd\Android.mk)
# Force sizeof(enum)=4
LOCAL_CFLAGS := -fno-short-enums -DANDROID_CHANGES -DCHAPMS=1 -DMPPE=1 -Iexternal/openssl/include

LOCAL_MODULE:= pppd
LOCAL_MODULE_TAGS := optional
include $(BUILD_EXECUTABLE)

#include $(CLEAR_VARS)
#LOCAL_SRC_FILES := chat.c
#LOCAL_SHARED_LIBRARIES := libcutils
#LOCAL_MODULE := chat
#LOCAL_MODULE_TAGS := optional
#include $(BUILD_EXECUTABLE)
GPS
GPS Porting (QUECTEL UC20)
This document mainly introduces how to integrate the GPS driver into Android OS for Quectel GPS module.
(1) In linux kernel: Check vid and pid.
(2) Copy Source Code Directory of GPS Driver
Copy the “gps/” from source code directory of Quectel GPS driver to “(_$AndroidSourceRoot)/hardware /libhardware /modules”.
(3) Modify Android Makefile Modify the “Android.mk” file under the “(_$AndroidSourceRoot)/hardware/libhardware/modules” directory as below:
hardware_modules := gralloc hwcomposer audio nfc gps
include $(call all-named-subdir-makefiles,$(hardware_modules))
1. Modify GPS module type (take UC20 for example):
MODULE_TYPE=UC20
2. Modify NMEA port path (take UC20 for example):
NMEA_PORT_PATH=/dev/ttyUSB1
3. Modify baud rate (take UC20 for example):
BAUD_RATE=115200
logcat -s gps_ql
#define QL_GPS_LOG
#define QL_GPS_LOG_PATH "/mnt/ql_gps_log"
- Move your GPS antenna out of your window, make sure it can receive GPS signal.
- Ensure the directory of “/system/lib/hw” only has “gps.default.so”.
- Ensure you have modify “gps_cfg.inf” correctly.
- Ensure “gps_cfg.inf” is in the right directory on your board.
- Ensure the GPS in Android system setting has been enabled.
- Check GPS log to ensure the GPS driver has been loaded.
- If you have checked all the aspects above, and the problem cannot be solved yet, please modify the
GPS log level to “LOG_DEBUG”. After obtaining GPS log file, please send the file to Quectel technical support, we will solve your problem as soon as possible.
ADB over TCP/IP
ADB over TCP/IP (Example: Android 6.0.1_2.1.0 version)
Step1 In devices/Platform
# stop adbd
# setprop service.adb.tcp.port 5555
# start adbd
Step2 In PC (Ubuntu)
$ adb connect 172.22.12.178:5555
$ adb shell
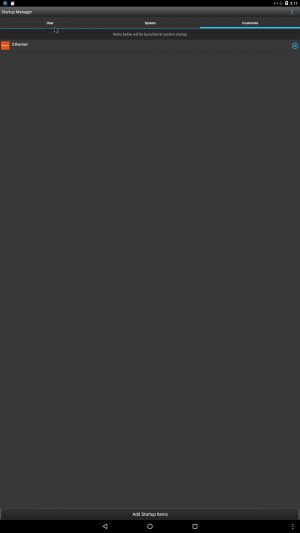
Android Startup Manager
Step1: Install Startup Manager APK.
Step2: Choose the "Customize" item and Add Startup Items(APP)
Step3: System restart

