Difference between revisions of "MCU/WISE-1540 SDK"
| (66 intermediate revisions by 2 users not shown) | |||
| Line 1: | Line 1: | ||
= Introduction = | = Introduction = | ||
<div style="margin-left:0.75cm;margin-right:0cm;">This document is description about WISE-1540 software development kit (SDK). It includes source tree of SDK, development environment, flash programming…etc. There are some examples provided by WISE-1540 SDK the user can refer to it for how to do about connection to WISE-PaaS, communication between mote and gateway…etc., and also can refer to it for developing their application.</div><div style="margin-left:0.75cm;margin-right:0cm;"><br/></div><div style="margin-left:0.75cm;margin-right:0cm;"></div> | <div style="margin-left:0.75cm;margin-right:0cm;">This document is description about WISE-1540 software development kit (SDK). It includes source tree of SDK, development environment, flash programming…etc. There are some examples provided by WISE-1540 SDK the user can refer to it for how to do about connection to WISE-PaaS, communication between mote and gateway…etc., and also can refer to it for developing their application.</div><div style="margin-left:0.75cm;margin-right:0cm;"><br/></div><div style="margin-left:0.75cm;margin-right:0cm;"></div> | ||
| + | == Glossary == | ||
| − | |||
*Gateway | *Gateway | ||
| + | |||
:The gateway like WISE-3310 has connectivity with SmartMesh IP manager responsible for communication with WISE-1540.<br/><br/> | :The gateway like WISE-3310 has connectivity with SmartMesh IP manager responsible for communication with WISE-1540.<br/><br/> | ||
*Mote | *Mote | ||
| + | |||
:The mote is WISE-1540 that has connectivity with SmartMesh IP mote responsible for communication with gateway.<br/><br/> | :The mote is WISE-1540 that has connectivity with SmartMesh IP mote responsible for communication with gateway.<br/><br/> | ||
| − | + | ||
| + | |||
= WISE-1540 Software Development Kit (SDK) = | = WISE-1540 Software Development Kit (SDK) = | ||
== Source Tree == | == Source Tree == | ||
| − | <div style="margin-left:0.847cm;margin-right:0cm;">The user can find source tree as below from | + | <div style="margin-left:0.847cm;margin-right:0cm;">The user can find source tree as below from [https://github.com/ADVANTECH-Corp/WISE-1540-SDK WISE-1540-SDK].</div> |
| Line 32: | Line 35: | ||
| style="border:0.5pt solid #00000a;padding-top:0cm;padding-bottom:0cm;padding-left:0.199cm;padding-right:0.191cm;" | src/ | | style="border:0.5pt solid #00000a;padding-top:0cm;padding-bottom:0cm;padding-left:0.199cm;padding-right:0.191cm;" | src/ | ||
| style="border:0.5pt solid #00000a;padding-top:0cm;padding-bottom:0cm;padding-left:0.199cm;padding-right:0.191cm;" | Source files including examples, sensor driver and etc. | | style="border:0.5pt solid #00000a;padding-top:0cm;padding-bottom:0cm;padding-left:0.199cm;padding-right:0.191cm;" | Source files including examples, sensor driver and etc. | ||
| + | |- | ||
| + | | style="border:0.5pt solid #00000a;padding-top:0cm;padding-bottom:0cm;padding-left:0.199cm;padding-right:0.191cm;" | tool/ | ||
| + | | style="border:0.5pt solid #00000a;padding-top:0cm;padding-bottom:0cm;padding-left:0.199cm;padding-right:0.191cm;" | Tools. | ||
|} | |} | ||
| − | |||
| + | |||
| + | <div style="text-align:center;"> | ||
| + | |||
| + | |||
| + | </div> | ||
= Setup Development Environment = | = Setup Development Environment = | ||
| Line 40: | Line 50: | ||
== Preparing for Hardware == | == Preparing for Hardware == | ||
<div style="margin-left:0.847cm;margin-right:0cm;">The user needs to prepare for hardware as following: | <div style="margin-left:0.847cm;margin-right:0cm;">The user needs to prepare for hardware as following: | ||
| − | *For mote, WISE-1540, WISE-1500 and WISE-ED20 or WISE-ED22. | + | *For mote, WISE-1540, WISE-1500 and WISE-ED20 or [[WISE-ED22_User_Manual|WISE-ED22]]. |
*For gateway, WISE-3310. | *For gateway, WISE-3310. | ||
*PC running LINUX operating systems such as Ubuntu 16.04.1. | *PC running LINUX operating systems such as Ubuntu 16.04.1. | ||
| Line 46: | Line 56: | ||
Please refer to the following steps for setup a WISE series of boards before using WISE-1540 SDK. | Please refer to the following steps for setup a WISE series of boards before using WISE-1540 SDK. | ||
</div><div style="margin-left:0.75cm;margin-right:0cm;"> | </div><div style="margin-left:0.75cm;margin-right:0cm;"> | ||
| − | '''Step01:''' Please prepare boards as below. [[File:WISE1520 SDK HW 04-6.png|center|WISE1520 SDK HW 04-6.png]] <span style="color:#7030a0;">'''①'''</span><span style="color:#7030a0;">WISE-1540</span> | + | '''Step01:''' Please prepare boards as below. [[File:WISE1520 SDK HW 04-6.png|center|WISE1520 SDK HW 04-6.png]]<br/><span style="color:#7030a0;">'''①'''</span><span style="color:#7030a0;">WISE-1540</span><br/>The user must to choose the CN1 on WISE-1540 as below is connected to WISE-ED20 or WISE-ED22 through FPC.<br/>[[File:Wise1540 cn1.png|center|300px|Wise1540 cn1.png]] |
<span style="color:#e36c0a;">'''②'''</span><span style="color:#e36c0a;">WISE-1500</span> | <span style="color:#e36c0a;">'''②'''</span><span style="color:#e36c0a;">WISE-1500</span> | ||
| Line 73: | Line 83: | ||
*Power supplies for UART3 debug port. | *Power supplies for UART3 debug port. | ||
| − | <span style="color:#ff719f;">'''⑨'''</span><span style="color:#ff719f;">Com port</span> | + | <span style="color:#ff719f;">'''⑨'''</span><span style="color:#ff719f;">Com port</span> |
*<span style="color:#000000;">No supported.</span> | *<span style="color:#000000;">No supported.</span> | ||
| + | |||
| + | '''Step02:''' Connect the WISE-ED20 to PC using micro-USB cable. | ||
| + | |||
| + | |||
| + | |||
| + | [[File:WISE1520 SDK HW 05.png|center|WISE1520 SDK HW 05.png]] | ||
| + | |||
| + | |||
| + | |||
| + | The device will be visible in the Device Manager as below after FTDI driver installed. The user can find the FTDI driver in source tree. | ||
| + | </div> | ||
| + | |||
| + | |||
| + | |||
| + | == Setting for Connectivity == | ||
| + | <div style="margin-left:0.847cm;margin-right:0cm;"> | ||
| + | WISE-1540 is designed in connectivity for wireless IoT communication with Linear Dust SmartMesh IP wireless sensor networks. The Linear Dust networks support a self-forming and self-healing mesh network solution complaint to 6LoWPAN Internet Protocol (IP) and IEEE802.15.4e standard. Before using WISE-1540 SDK, the user needs to check or set some parameters through the console for API. | ||
| + | </div> | ||
| + | |||
| + | |||
| + | === Information and Parameters Setting === | ||
| + | <div style="margin-left:0.847cm;margin-right:0cm;"> | ||
| + | The user needs to double check connectivity setting the same as below table with SmartMesh IP networks before using WISE-1540 SDK: | ||
| + | </div> | ||
| + | {| align="center" style="border-spacing:0;width:16.101cm;" | ||
| + | |- style="background-color:#c6d9f1;border:0.5pt solid #00000a;padding-top:0cm;padding-bottom:0cm;padding-left:0.199cm;padding-right:0.191cm;" | ||
| + | | align="center" | '''Parameter''' | ||
| + | | align="center" | '''Expected Setting''' | ||
| + | |- | ||
| + | | style="border:0.5pt solid #00000a;padding-top:0cm;padding-bottom:0cm;padding-left:0.199cm;padding-right:0.191cm;" | Network ID | ||
| + | | style="border:0.5pt solid #00000a;padding-top:0cm;padding-bottom:0cm;padding-left:0.199cm;padding-right:0.191cm;" | 2001 (The same as manager on WISE-3310) | ||
| + | |- | ||
| + | | style="border:0.5pt solid #00000a;padding-top:0cm;padding-bottom:0cm;padding-left:0.199cm;padding-right:0.191cm;" | Join Key | ||
| + | | style="border:0.5pt solid #00000a;padding-top:0cm;padding-bottom:0cm;padding-left:0.199cm;padding-right:0.191cm;" | 4A4F494E414456414E54454348494F54 (The same as manager on WISE-3310) | ||
| + | |- | ||
| + | | style="border:0.5pt solid #00000a;padding-top:0cm;padding-bottom:0cm;padding-left:0.199cm;padding-right:0.191cm;" | Auto Join | ||
| + | | style="border:0.5pt solid #00000a;padding-top:0cm;padding-bottom:0cm;padding-left:0.199cm;padding-right:0.191cm;" | On | ||
| + | |} | ||
| + | <div style="text-align:center;"></div> | ||
| + | |||
| + | |||
| + | === Reset to default setting === | ||
| + | <div style="margin-left:0.847cm;margin-right:0cm;"> | ||
| + | This function can be used back to default setting the same as above section [[#Information_and_Parameters_Setting|"Information and Parameters Setting"]]. The user can refer to section [[#Preparing_for_Hardware|"Preparing for Hardware"]] for how to do it on the WISE-1500. | ||
| + | </div><br/> | ||
| + | === Console for API === | ||
| + | <div style="margin-left:0.847cm;margin-right:0cm;"> | ||
| + | We provide the console and the user can set parameters for connectivity by command set we supported. | ||
| + | |||
| + | |||
| + | |||
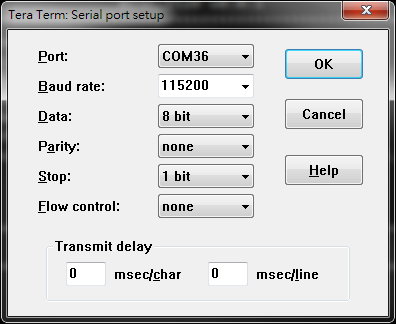
| + | '''Step01:''' Check device connected from WISE-ED20 or WISE-ED22 to PC using micro-USB cable and choose any terminal you like. (e.g., the snapshot is setting of Tera Term.) | ||
| + | |||
| + | [[File:WISE1520 SDK Compile debug 06.png|center|500px|WISE1520 SDK Compile debug 06.png]]<br/>[[File:WISE1520 SDK Compile debug 07.png|center|500px|WISE1520 SDK Compile debug 07.png]] | ||
| + | |||
| + | |||
| + | |||
| + | '''Step02:''' Check jumper.<br/>Please check both 3.3V and GPIO0 of CN2 are shorted on WISE-1500 and press reset button on the WISE-ED20 or WISE-ED22 to restart device. | ||
| + | |||
| + | |||
| + | |||
| + | [[File:WISE1520 SDK HW 07 short.png|center|500px|WISE1520 SDK HW 07 short.png]] | ||
| + | |||
| + | |||
| + | |||
| + | '''Step03:''' User can see snapshot as below after begin execution. | ||
| + | |||
| + | |||
| + | |||
| + | [[File:Wise1540 api console 01.png|center|700px|Wise1540 api console 01.png]] | ||
| + | |||
| + | |||
| + | |||
| + | [[File:Wise1540 api console 02.png|center|700px|Wise1540 api console 02.png]] | ||
| + | |||
| + | |||
| + | |||
| + | |||
| + | </div><br/> | ||
| + | == ARM mbed == | ||
| + | <div style="margin-left:0.847cm;margin-right:0cm;"> | ||
| + | The ARM mbed is IoT device platform and it has a lot of resources for IoT development. We supported ARM mbed OS on WISE-1540 to make user easily to get started and obtain great benefit from ARM mbed. | ||
| + | </div> | ||
| + | === mbed CLI === | ||
| + | <div style="margin-left:0.847cm;margin-right:0cm;"> | ||
| + | The mbed CLI is command-line tool. The user needs to setup CLI for WISE-1540 SDK and please follows the steps to install related tools. For more details, please refer to [https://docs.mbed.com/docs/mbed-os-handbook/en/latest/dev_tools/cli/ mbed CLI].<br/>Note: We expected the user setups mbed CLI in Linux as default. If the user preferred Windows, ARM mbed provides the [https://www.youtube.com/watch?v=cM0dFoTuU14 Video tutorial] for manual installation. | ||
| + | |||
| + | *Install Python | ||
| + | |||
| + | :mbed CLI supports Windows, Linux and Mac OS X operating systems. You can select the OS you prefer to work with. mbed CLI is a Python script, so you’ll need Python to use it. The [https://www.python.org/downloads/release/python-2711/ version 2.7.11 of Python] has been verified with mbed CLI. | ||
| + | :Note: mbed CLI is incompatible with Python 3. | ||
| + | <pre> | ||
| + | Install python 2.7.11 | ||
| + | $ sudo wget https://www.python.org/ftp/python/2.7.11/Python-2.7.11.tgz | ||
| + | $ tar zxvf Python-2.7.11.tgz | ||
| + | $ cd Python-2.7.11 | ||
| + | $ sudo ./configure | ||
| + | $ sudo make altinstall | ||
| + | |||
| + | Check the python version | ||
| + | $ python --version | ||
| + | </pre> | ||
| + | |||
| + | |||
| + | |||
| + | *(Optional) Install Git or Mercurial | ||
| + | |||
| + | :If you would like to maintain your source code in repositories, you can continue with the next step. mbed CLI supports both Git and Mercurial repositories, you can install which one you prefer: | ||
| + | :[https://git-scm.com/ Git] - version 1.9.5 or later. | ||
| + | :[https://www.mercurial-scm.org/ Mercurial] - version 2.2.2 or later. | ||
| + | :If you don’t want to use repositories, you can just skip it. | ||
| + | <pre>Install Git latest | ||
| + | $ sudo add-apt-repository ppa:git-core/ppa | ||
| + | $ sudo apt-get update | ||
| + | $ sudo apt install git | ||
| + | </pre> | ||
| + | |||
| + | Mercurial install commands as follow | ||
| + | <pre>Install mercurial latest | ||
| + | $ sudo add-apt-repository ppa:mercurial-ppa/releases | ||
| + | $ sudo apt-get update | ||
| + | $ sudo apt-get install mercurial | ||
| + | </pre> | ||
| + | |||
| + | *Install GCC | ||
| + | |||
| + | :mbed CLI invokes the mbed OS 5 tools for various features, such as compiling, testing and exporting to industry standard toolchains. To compile your code, you will need either a compiler or an IDE: | ||
| + | :: Compilers: GCC ARM, ARM Compiler 5, IAR. | ||
| + | :: IDE: Keil uVision, DS-5, IAR Workbench. | ||
| + | :We select GCC ARM Embedded, so you can install [https://launchpad.net/gcc-arm-embedded version 4.9 of GCC ARM Embedded]. | ||
| + | <pre>Install GCC ARM Embedded | ||
| + | $ sudo add-apt-repository ppa:team-gcc-arm-embedded/ppa | ||
| + | $ sudo apt-get update | ||
| + | $ sudo apt-get install gcc-arm-embedded | ||
| + | </pre> | ||
| + | |||
| + | :Note: When installing the Arm Compiler 5 on a 64-bit Linux machine, you may need to also install the i386 architecture package: | ||
| + | <pre> | ||
| + | $ sudo dpkg --add-architecture i386 | ||
| + | $ sudo apt-get update | ||
| + | $ sudo apt-get install libc6:i386 libncurses5:i386 libstdc++6:i386 | ||
| + | </pre> | ||
| + | |||
| + | |||
| + | |||
| + | *Install mbed CLI | ||
| + | |||
| + | :You can get the latest stable version of mbed CLI from PyPI | ||
| + | <pre> $ pip install mbed-cli </pre> | ||
| + | |||
| + | :Note: On Linux or Mac, you may need to run with sudo. | ||
| + | |||
| + | *Other necessary package | ||
| + | <pre>$ sudo pip install colorama | ||
| + | $ sudo pip install pyserial | ||
| + | $ sudo pip install prettytable | ||
| + | $ sudo pip install jinja2 | ||
| + | $ sudo pip install intelhex | ||
| + | $ sudo pip install junit_xml | ||
| + | $ sudo pip install mbed_ls | ||
| + | $ sudo pip install beautifulsoup4 | ||
| + | $ sudo pip install fuzzywuzzy | ||
| + | $ sudo pip install mbed_host_tests | ||
| + | $ sudo pip install mbed_greentea | ||
| + | </pre> | ||
| + | </div> | ||
| + | |||
| + | === mbed CLI configuration === | ||
| + | <div style="margin-left:0.847cm;margin-right:0cm;"> | ||
| + | *GCC_ARM_PATH | ||
| + | |||
| + | :Set GCC_ARM_PATH to the binary directory of your GCC Arm installation | ||
| + | <pre>$ mbed config -G GCC_ARM_PATH "/home/erick/gcc-arm-none-eabi-4_9-2015q3/bin" | ||
| + | [mbed] /home/erick/gcc-arm-none-eabi-4_9-2015q3/bin now set as global GCC_ARM_PATH | ||
| + | </pre> | ||
| + | |||
| + | |||
| + | </div> | ||
| + | |||
| + | == Flash Programming == | ||
| + | <div style="margin-left:0.75cm;margin-right:0cm;">For flash programming, the user can do it through [[WISE-ED22_User_Manual|WISE-ED22]] or WISE-ED20 with different programming tool. Please refer to the following steps for flash programming.</div> | ||
| + | === Programming through WISE-ED22 === | ||
| + | <div style="margin-left:0.847cm;margin-right:0cm;"> | ||
| + | Please refer to [[WISE-ED22_User_Manual|WISE-ED22]] for flash programming. | ||
| + | |||
| + | |||
| + | </div> | ||
| + | === Programming through WISE-ED20 === | ||
| + | |||
| + | ==== Running Flash Loader Installer ==== | ||
| + | <div style="margin-left:0.847cm;margin-right:0cm;"> | ||
| + | '''Step01:''' Find installer flash_loader_demo_v2.9.0RC1.exe” in source tree, run it to install tool and set installation directory to default as below. | ||
| + | |||
| + | [[File:Wise1540 rogramming through ed20 01.png|center|500px|Wise1540 rogramming through ed20 01.png]] | ||
| + | |||
| + | |||
| + | |||
| + | '''Step02:''' Installation process. | ||
| + | |||
| + | [[File:Wise1540 programming through ed20 02.png|center|Wise1540 programming through ed20 02.png]] | ||
| + | |||
| + | |||
| + | |||
| + | '''Step03:''' Finish installation. | ||
| + | |||
| + | [[File:Wise1540 programming through ed20 03.png|center|Wise1540 programming through ed20 03.png]] | ||
| + | </div> | ||
| + | |||
| + | |||
| + | ==== Programming ==== | ||
| + | <div style="margin-left:0.847cm;margin-right:0cm;"> | ||
| + | '''Step01''' Set into programming mode. | ||
| + | |||
| + | Please check pin1 of SW2 to “ON” on WISE-ED20 for flash programming. | ||
| + | |||
| + | [[File:WISE1520 SDK HW Siwtch wiseed30 programming mode.png|center|500px|WISE1520 SDK HW Siwtch wiseed30 programming mode.png]] | ||
| + | |||
| + | |||
| + | |||
| + | '''Step02:''' Launch Flash Loader and select Port name "COMx" detected from your PC. | ||
| + | |||
| + | [[File:Wise1540 programming through ed20 04.png|center|500px|Wise1540 programming through ed20 04.png]] | ||
| + | |||
| + | |||
| + | |||
| + | |||
| + | |||
| + | '''Step03:''' Check device if get response from it. | ||
| + | |||
| + | [[File:Wise1540 programming through ed20 05.png|center|Wise1540 programming through ed20 05.png]] | ||
| + | |||
| + | |||
| + | |||
| + | |||
| + | |||
| + | '''Step04:''' Select target as below for programming. | ||
| + | |||
| + | [[File:Wise1540 programming through ed20 06.png|center|Wise1540 programming through ed20 06.png]] | ||
| + | |||
| + | |||
| + | |||
| + | |||
| + | |||
| + | '''Step05:''' Enable option "Global Erase" and programming for binary from the path you specified. | ||
| + | |||
| + | [[File:Wise1540 programming through ed20 07.png|center|Wise1540 programming through ed20 07.png]] | ||
| + | |||
| + | |||
| + | |||
| + | |||
| + | |||
| + | '''Step06:''' Programming in progress. | ||
| + | |||
| + | [[File:Wise1540 programming through ed20 08.png|center|Wise1540 programming through ed20 08.png]] | ||
| + | |||
| + | |||
| + | |||
| + | |||
| + | |||
| + | '''Step07:''' Check the process of programming is done and successful. | ||
| + | |||
| + | [[File:Wise1540 programming through ed20 09.png|center|Wise1540 programming through ed20 09.png]] | ||
| + | |||
| + | |||
| + | |||
| + | '''Step08''' Set into boot mode.<br/>Please check pin1 of SW2 to “OFF” on WISE-ED20. | ||
| + | |||
| + | [[File:WISE1520 SDK HW Siwtch wiseed30 boot mode.png|center|500px|WISE1520 SDK HW Siwtch wiseed30 boot mode.png]] | ||
| + | |||
| + | |||
| + | |||
| + | '''Step09:''' Boot from flash.<br/>Press reset button and you can see snapshot like as below. | ||
| + | |||
| + | [[File:Wise1540 programming through ed20 10.png|center|Wise1540 programming through ed20 10.png]] | ||
| + | |||
| + | |||
| + | |||
| + | |||
| + | </div> | ||
| + | |||
| + | = Example = | ||
| + | <div style="margin-left:0.847cm;margin-right:0cm;"> | ||
| + | There are two examples in WISE-1540 SDK. One is “Send Data” the user can refer to it for how to use connectivity to send data from mote to gateway. The other is “Exchange Data with Sensor Format” the user can refer to it for how to add sensor in mote and send data accessed from sensor to WISE-PaaS through mote and gateway. | ||
| + | </div> | ||
| + | |||
| + | |||
| + | == Compile example == | ||
| + | <div style="margin-left:0.847cm;margin-right:0cm;"> | ||
| + | Please refer to [https://github.com/ADVANTECH-Corp/WISE-1540-SDK WISE-1540-SDK] for compilation. | ||
| + | </div> | ||
| + | |||
| + | |||
| + | == Send Data == | ||
| + | <div style="margin-left:0.847cm;margin-right:0cm;"> | ||
| + | This example is demonstrated how we could send data from mote to gateway. The user needs to run two programs synchronously that one is on WISE-1540 and the other is on gateway. In example it communicates with gateway using API in “mote_api.h” that can found located at folder “inc\wsn\sm_ipmt” of source tree of WISE-1540 SDK. The API has been implemented based on [http://www.linear.com/docs/41886 SmartMesh IP Mote API Guide] and the user can refer to it for getting detailed if needed. | ||
| + | |||
| + | Please refer to the following to run example between mote and gateway: | ||
| + | |||
| + | === Running example on Gateway === | ||
| + | <div style="margin-left:0.847cm;margin-right:0cm;"> | ||
| + | '''Step01:''' Get IoT Gateway SDK and Setup on PC.<br/>The IoT Gateway SDK is not provided as default and the user needs contact with Advantech to get it. | ||
| + | |||
| + | '''Step02:''' Compile example.<br/>① Set environment variable for compilation.<br/><span style="background-color:#FFFF00;">PC #</span> cd /opt/poky/1.5.3/<br/><span style="background-color:#FFFF00;">PC #</span> source ./environment-setup-cortexa9hf-vfp-neon-poky-linux-gnueabi | ||
| + | |||
| + | [[File:Wise1540 example 02-01.png|center|850px|Wise1540 example 02-01.png]] | ||
| + | |||
| + | <br/>② The example “wise1021_senddata_gw.tar.bz2” is located in folder “src\sample” of source tree of WISE-1540 SDK. Please extract wise1021_senddata_gw.tar.bz2 to PC.<br/><span style="background-color:#FFFF00;">PC #</span> tar jxvf wise1021_senddata_gw.tar.bz. | ||
| + | |||
| + | [[File:Wise1540 example 08-01.png|center|600px|Wise1540 example 08-01.png]] | ||
| + | |||
| + | <br/>③ Compile and output binary.<br/><span style="background-color:#FFFF00;">PC #</span> cd wise1021_senddata_gw/<br/><span style="background-color:#FFFF00;">PC #</span> make clean<br/><span style="background-color:#FFFF00;">PC #</span> make | ||
| + | |||
| + | [[File:Wise1540 example 03-01.png|center|850px|wise1540_example_03-01.png]] | ||
| + | |||
| + | <span style="background-color:#FFFF00;">PC #</span> ls ipmg/ | ||
| + | |||
| + | [[File:Wise1540 example 09-01.png|center|800px|wise1540_example_09-01.png]] | ||
| + | |||
| + | <br/><br/>'''Step03:''' Upload binary to WISE-3310.<br/>The following commands are for the user reference. These commands are demonstrated how the PC’s file system can be mounted through NFS on WISE-3310 and then the user can copy binary to WISE-3310 using command “cp”.<br/><span style="background-color:#00FF00;">WISE-3310 #</span> mount -t nfs -o nolock 172.22.12.223:/tmp /mnt/<br/><span style="background-color:#00FF00;">WISE-3310 #</span> cp /mnt/wise1021_senddata_gw/ipmg/wise1021_receive_sample /tmp | ||
| + | |||
| + | <br/>'''Step04:''' Begin execution.<br/>The user can see snapshot as below while getting data from mote | ||
| + | |||
| + | <span style="background-color:#00FF00;">WISE-3310 #</span> /tmp/ipmg/wise1021_receive_sample /dev/ttyUSB0 | ||
| + | |||
| + | [[File:Wise1540 example 05-01.png|center|800px|wise1540_example_05-01.png]] | ||
| + | </div> | ||
| + | |||
| + | |||
| + | === Running example on WISE-1540 === | ||
| + | <div style="margin-left:0.847cm;margin-right:0cm;"> | ||
| + | '''Step01:''' Compile example and programming.<br/>① Please refer to [https://github.com/ADVANTECH-Corp/WISE-1540-SDK WISE-1540-SDK] for compilation.<br/>② Please refer to section [[#Programming_through_WISE-ED22|"Programming through WISE-ED22"]] or [[#Programming_through_WISE-ED20|"Programming through WISE-ED20"]] for flash programming. | ||
| + | |||
| + | '''Step02:''' Check status.<br/>[[File:Wise1540 programming through ed20 10.png|center|Wise1540 programming through ed20 10.png]] | ||
| + | |||
| + | |||
| + | </div></div> | ||
| + | == Exchange Data with Sensor Format == | ||
| + | <div style="margin-left:0.847cm;margin-right:0cm;"> | ||
| + | This example is demonstrated how it could exchange data with sensor format between mote and gateway. The sensor format defined by Advantech combines IPSO data format with CoAP like protocol. By implementation the user needs to study “WISE sensor API” to know how to add sensor by self. In example it adds fake temperature sensor with sensor format and exchanges data between mote and gateway. Finally the fake temperature will be transfer to WISE-PaaS and it is presented by UI on browser, but WISE-PaaS has no more detailed in this document. Please get contact about WISE-PaaS detailed with Advantech if needed. | ||
| + | </div> | ||
| + | === How to Handle Data between Mote and Gateway === | ||
| + | <div style="margin-left:0.847cm;margin-right:0cm;"> | ||
| + | Based on sensor format, the brief in bidirectional explain how it has been implemented in example as below: | ||
| + | |||
| + | <u>'''From mote to gateway'''</u>''': '''<br/>① The data accessed from sensor are encoded as packet with sensor format by mote.<br/>② The packet is sent from mote to gateway.<br/>③ The packet is received and decoded by gateway and then the received information will be transfer to WISE-PaaS. | ||
| + | |||
| + | '''<u>From gateway to mote</u>''' :<br/>① The data and command are encoded as packet by gateway.<br/>② The packet is sent from gateway to mote.<br/>③ The packet is received and decoded by mote.<br/>④ Depend on command/data received from gateway, the information about WISE-1540 and sensor data in real time are encoded by mote and send it back to gateway. | ||
| + | <div style="margin-left:0.847cm;margin-right:0cm;"></div></div> | ||
| + | === Running Example === | ||
| + | <div style="margin-left:0.847cm;margin-right:0cm;"> | ||
| + | Please refer to the following to run example between mote and gateway: | ||
| + | </div> | ||
| + | ==== Running example on Gateway ==== | ||
| + | <div style="margin-left:0.847cm;margin-right:0cm;"> | ||
| + | There is nothing to do. This example is supported as default on WISE-3310. | ||
| + | </div> | ||
| + | ==== Running example on WISE-1540 ==== | ||
| + | <div style="margin-left:0.847cm;margin-right:0cm;"> | ||
| + | '''Step01:''' Compile example and programming.<br/>① Please refer to [https://github.com/ADVANTECH-Corp/WISE-1540-SDK WISE-1540-SDK] for compilation.<br/>② Please refer to section [[#Programming_through_WISE-ED22|"Programming through WISE-ED22"]] or [[#Programming_through_WISE-ED20|"Programming through WISE-ED20"]] for flash programming. | ||
| + | |||
| + | '''Step02:''' Check status. | ||
| + | |||
| + | [[File:Wise1540 programming through ed20 10.png|center|Wise1540 programming through ed20 10.png]] | ||
| + | |||
| + | |||
| + | </div> | ||
| + | |||
| + | = Appendix = | ||
| + | |||
| + | == References == | ||
| + | |||
| + | === '''Liner Dust''' === | ||
| + | <div style="margin-left:0.847cm;margin-right:0cm;"> | ||
| + | About SmartMesh IP Networks: | ||
| + | |||
| + | ◎ [http://www.linear.com/docs/41885 SmartMesh IP Mote CLI Guide]<br/>◎ [http://www.linear.com/docs/41886 SmartMesh IP Mote API Guide] | ||
</div> | </div> | ||
Latest revision as of 12:13, 7 March 2018
Contents
Introduction
Glossary
- Gateway
- The gateway like WISE-3310 has connectivity with SmartMesh IP manager responsible for communication with WISE-1540.
- Mote
- The mote is WISE-1540 that has connectivity with SmartMesh IP mote responsible for communication with gateway.
WISE-1540 Software Development Kit (SDK)
Source Tree
| Directory | Description |
| doc/ | Documents about WISE-1540 SDK. |
| inc/ | Header files including examples, sensor driver and etc. |
| lib/ | Library. |
| src/ | Source files including examples, sensor driver and etc. |
| tool/ | Tools. |
Setup Development Environment
Preparing for Hardware
- For mote, WISE-1540, WISE-1500 and WISE-ED20 or WISE-ED22.
- For gateway, WISE-3310.
- PC running LINUX operating systems such as Ubuntu 16.04.1.
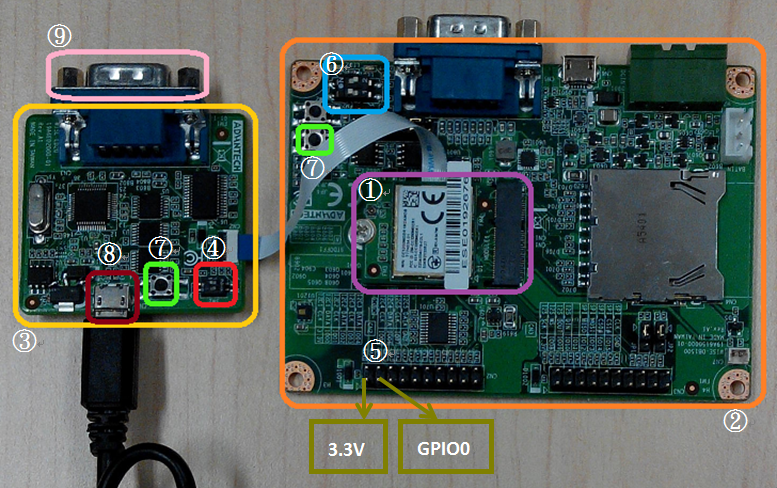
Please refer to the following steps for setup a WISE series of boards before using WISE-1540 SDK.
①WISE-1540
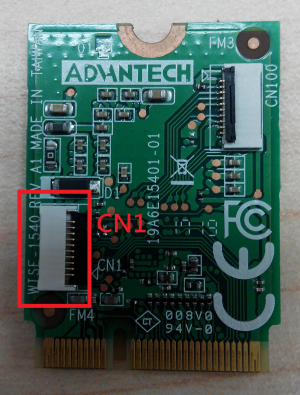
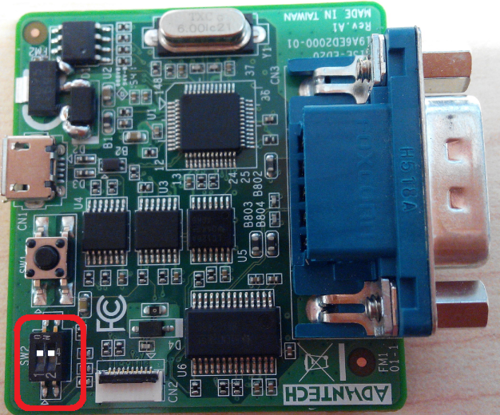
The user must to choose the CN1 on WISE-1540 as below is connected to WISE-ED20 or WISE-ED22 through FPC.
②WISE-1500
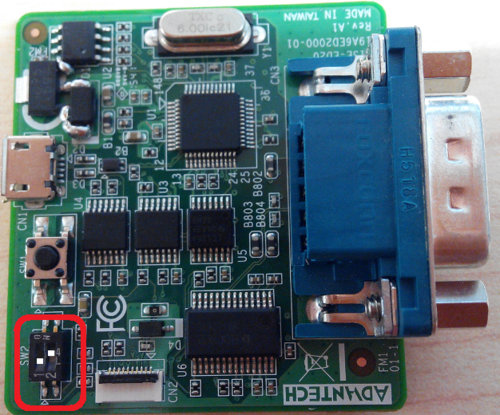
③WISE-ED20
④SW2 on WISE-ED20
- Please check pin1 and pin2 to “ON” as default.
- Switch pin1 to “ON”: flash programming, “OFF”: boot from flash.
⑤CN2 on WISE-1500
- Booting into the mode of network connection when both 3.3V and GPIO0 are opened.
- Booting into the mode of console of API when both 3.3V and GPIO0 are shorted.
⑥SW3 on WISE-1500
- Please check pin1 and pin2 to “OFF” as default.
- Switch pin2 to decide whether running “backup to default” while device booting. “ON”: enabled, “OFF”: disabled.
⑦One reset button on WISE-1500 and the other on WISE-ED20
⑧Micro USB connector
- Power supplies for UART3 debug port.
⑨Com port
- No supported.
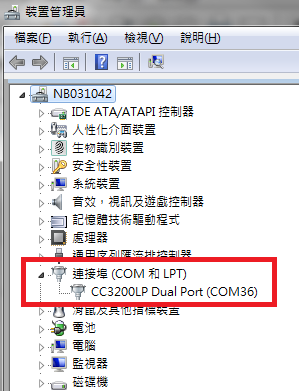
Step02: Connect the WISE-ED20 to PC using micro-USB cable.
The device will be visible in the Device Manager as below after FTDI driver installed. The user can find the FTDI driver in source tree.
Setting for Connectivity
WISE-1540 is designed in connectivity for wireless IoT communication with Linear Dust SmartMesh IP wireless sensor networks. The Linear Dust networks support a self-forming and self-healing mesh network solution complaint to 6LoWPAN Internet Protocol (IP) and IEEE802.15.4e standard. Before using WISE-1540 SDK, the user needs to check or set some parameters through the console for API.
Information and Parameters Setting
The user needs to double check connectivity setting the same as below table with SmartMesh IP networks before using WISE-1540 SDK:
| Parameter | Expected Setting |
| Network ID | 2001 (The same as manager on WISE-3310) |
| Join Key | 4A4F494E414456414E54454348494F54 (The same as manager on WISE-3310) |
| Auto Join | On |
Reset to default setting
This function can be used back to default setting the same as above section "Information and Parameters Setting". The user can refer to section "Preparing for Hardware" for how to do it on the WISE-1500.
Console for API
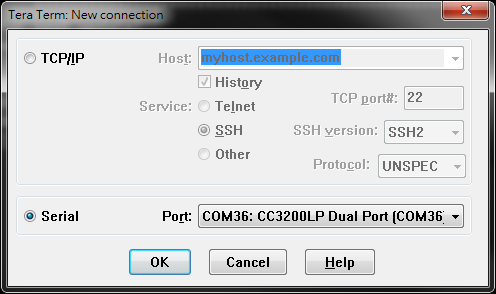
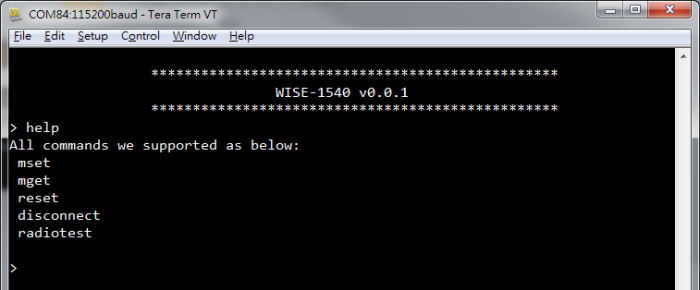
We provide the console and the user can set parameters for connectivity by command set we supported.
Step01: Check device connected from WISE-ED20 or WISE-ED22 to PC using micro-USB cable and choose any terminal you like. (e.g., the snapshot is setting of Tera Term.)
Step02: Check jumper.
Please check both 3.3V and GPIO0 of CN2 are shorted on WISE-1500 and press reset button on the WISE-ED20 or WISE-ED22 to restart device.
Step03: User can see snapshot as below after begin execution.
ARM mbed
The ARM mbed is IoT device platform and it has a lot of resources for IoT development. We supported ARM mbed OS on WISE-1540 to make user easily to get started and obtain great benefit from ARM mbed.
mbed CLI
The mbed CLI is command-line tool. The user needs to setup CLI for WISE-1540 SDK and please follows the steps to install related tools. For more details, please refer to mbed CLI.
Note: We expected the user setups mbed CLI in Linux as default. If the user preferred Windows, ARM mbed provides the Video tutorial for manual installation.
- Install Python
- mbed CLI supports Windows, Linux and Mac OS X operating systems. You can select the OS you prefer to work with. mbed CLI is a Python script, so you’ll need Python to use it. The version 2.7.11 of Python has been verified with mbed CLI.
- Note: mbed CLI is incompatible with Python 3.
Install python 2.7.11
$ sudo wget https://www.python.org/ftp/python/2.7.11/Python-2.7.11.tgz
$ tar zxvf Python-2.7.11.tgz
$ cd Python-2.7.11
$ sudo ./configure
$ sudo make altinstall

Check the python version
$ python --version
- (Optional) Install Git or Mercurial
- If you would like to maintain your source code in repositories, you can continue with the next step. mbed CLI supports both Git and Mercurial repositories, you can install which one you prefer:
- Git - version 1.9.5 or later.
- Mercurial - version 2.2.2 or later.
- If you don’t want to use repositories, you can just skip it.
Install Git latest
$ sudo add-apt-repository ppa:git-core/ppa
$ sudo apt-get update
$ sudo apt install git
Mercurial install commands as follow
Install mercurial latest
$ sudo add-apt-repository ppa:mercurial-ppa/releases
$ sudo apt-get update
$ sudo apt-get install mercurial
- Install GCC
- mbed CLI invokes the mbed OS 5 tools for various features, such as compiling, testing and exporting to industry standard toolchains. To compile your code, you will need either a compiler or an IDE:
- Compilers: GCC ARM, ARM Compiler 5, IAR.
- IDE: Keil uVision, DS-5, IAR Workbench.
- We select GCC ARM Embedded, so you can install version 4.9 of GCC ARM Embedded.
Install GCC ARM Embedded
$ sudo add-apt-repository ppa:team-gcc-arm-embedded/ppa
$ sudo apt-get update
$ sudo apt-get install gcc-arm-embedded
- Note: When installing the Arm Compiler 5 on a 64-bit Linux machine, you may need to also install the i386 architecture package:
$ sudo dpkg --add-architecture i386
$ sudo apt-get update
$ sudo apt-get install libc6:i386 libncurses5:i386 libstdc++6:i386
- Install mbed CLI
- You can get the latest stable version of mbed CLI from PyPI
$ pip install mbed-cli
- Note: On Linux or Mac, you may need to run with sudo.
- Other necessary package
$ sudo pip install colorama
$ sudo pip install pyserial
$ sudo pip install prettytable
$ sudo pip install jinja2
$ sudo pip install intelhex
$ sudo pip install junit_xml
$ sudo pip install mbed_ls
$ sudo pip install beautifulsoup4
$ sudo pip install fuzzywuzzy
$ sudo pip install mbed_host_tests
$ sudo pip install mbed_greentea
mbed CLI configuration
- GCC_ARM_PATH
- Set GCC_ARM_PATH to the binary directory of your GCC Arm installation
$ mbed config -G GCC_ARM_PATH "/home/erick/gcc-arm-none-eabi-4_9-2015q3/bin"
[mbed] /home/erick/gcc-arm-none-eabi-4_9-2015q3/bin now set as global GCC_ARM_PATH
Flash Programming
Programming through WISE-ED22
Please refer to WISE-ED22 for flash programming.
Programming through WISE-ED20
Running Flash Loader Installer
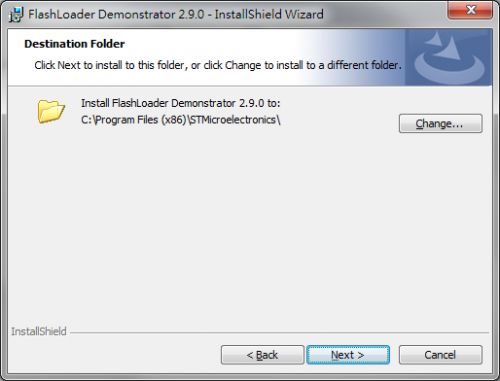
Step01: Find installer flash_loader_demo_v2.9.0RC1.exe” in source tree, run it to install tool and set installation directory to default as below.
Step02: Installation process.
Step03: Finish installation.
Programming
Step01 Set into programming mode.
Please check pin1 of SW2 to “ON” on WISE-ED20 for flash programming.
Step02: Launch Flash Loader and select Port name "COMx" detected from your PC.
Step03: Check device if get response from it.
Step04: Select target as below for programming.
Step05: Enable option "Global Erase" and programming for binary from the path you specified.
Step06: Programming in progress.
Step07: Check the process of programming is done and successful.
Step08 Set into boot mode.
Please check pin1 of SW2 to “OFF” on WISE-ED20.
Step09: Boot from flash.
Press reset button and you can see snapshot like as below.
Example
There are two examples in WISE-1540 SDK. One is “Send Data” the user can refer to it for how to use connectivity to send data from mote to gateway. The other is “Exchange Data with Sensor Format” the user can refer to it for how to add sensor in mote and send data accessed from sensor to WISE-PaaS through mote and gateway.
Compile example
Please refer to WISE-1540-SDK for compilation.
Send Data
This example is demonstrated how we could send data from mote to gateway. The user needs to run two programs synchronously that one is on WISE-1540 and the other is on gateway. In example it communicates with gateway using API in “mote_api.h” that can found located at folder “inc\wsn\sm_ipmt” of source tree of WISE-1540 SDK. The API has been implemented based on SmartMesh IP Mote API Guide and the user can refer to it for getting detailed if needed.
Please refer to the following to run example between mote and gateway:
Running example on Gateway
Step01: Get IoT Gateway SDK and Setup on PC.
The IoT Gateway SDK is not provided as default and the user needs contact with Advantech to get it.
Step02: Compile example.
① Set environment variable for compilation.
PC # cd /opt/poky/1.5.3/
PC # source ./environment-setup-cortexa9hf-vfp-neon-poky-linux-gnueabi
② The example “wise1021_senddata_gw.tar.bz2” is located in folder “src\sample” of source tree of WISE-1540 SDK. Please extract wise1021_senddata_gw.tar.bz2 to PC.
PC # tar jxvf wise1021_senddata_gw.tar.bz.
③ Compile and output binary.
PC # cd wise1021_senddata_gw/
PC # make clean
PC # make
PC # ls ipmg/
Step03: Upload binary to WISE-3310.
The following commands are for the user reference. These commands are demonstrated how the PC’s file system can be mounted through NFS on WISE-3310 and then the user can copy binary to WISE-3310 using command “cp”.
WISE-3310 # mount -t nfs -o nolock 172.22.12.223:/tmp /mnt/
WISE-3310 # cp /mnt/wise1021_senddata_gw/ipmg/wise1021_receive_sample /tmp
Step04: Begin execution.
The user can see snapshot as below while getting data from mote
WISE-3310 # /tmp/ipmg/wise1021_receive_sample /dev/ttyUSB0
Running example on WISE-1540
Step01: Compile example and programming.
① Please refer to WISE-1540-SDK for compilation.
② Please refer to section "Programming through WISE-ED22" or "Programming through WISE-ED20" for flash programming.
Exchange Data with Sensor Format
This example is demonstrated how it could exchange data with sensor format between mote and gateway. The sensor format defined by Advantech combines IPSO data format with CoAP like protocol. By implementation the user needs to study “WISE sensor API” to know how to add sensor by self. In example it adds fake temperature sensor with sensor format and exchanges data between mote and gateway. Finally the fake temperature will be transfer to WISE-PaaS and it is presented by UI on browser, but WISE-PaaS has no more detailed in this document. Please get contact about WISE-PaaS detailed with Advantech if needed.
How to Handle Data between Mote and Gateway
Based on sensor format, the brief in bidirectional explain how it has been implemented in example as below:
From mote to gateway:
① The data accessed from sensor are encoded as packet with sensor format by mote.
② The packet is sent from mote to gateway.
③ The packet is received and decoded by gateway and then the received information will be transfer to WISE-PaaS.
From gateway to mote :
① The data and command are encoded as packet by gateway.
② The packet is sent from gateway to mote.
③ The packet is received and decoded by mote.
④ Depend on command/data received from gateway, the information about WISE-1540 and sensor data in real time are encoded by mote and send it back to gateway.
Running Example
Please refer to the following to run example between mote and gateway:
Running example on Gateway
There is nothing to do. This example is supported as default on WISE-3310.
Running example on WISE-1540
Step01: Compile example and programming.
① Please refer to WISE-1540-SDK for compilation.
② Please refer to section "Programming through WISE-ED22" or "Programming through WISE-ED20" for flash programming.
Step02: Check status.
Appendix
References
Liner Dust
About SmartMesh IP Networks:
