Difference between revisions of "WISE-1530 SDK"
Erick.huang (talk | contribs) |
|||
| (112 intermediate revisions by 2 users not shown) | |||
| Line 1: | Line 1: | ||
= Overview = | = Overview = | ||
| − | WISE-1530 is used Cypress's WICED<sup>®</sup> SDKs to develop Wi-Fi and BLE application. WISE-1530 SDK use C/C++ language Runs on Windows<sup>®</sup> through Eclipse<sup>®</sup>-based integrated development environment (IDE). | + | WISE-1530 is used Cypress's WICED<sup>®</sup> SDKs to develop Wi-Fi and BLE application. WISE-1530 SDK use C/C++ language Runs on Windows<sup>®</sup>, Mac<sup>®</sup> OS X<sup>®</sup>, and Linux<sup>®</sup> through Eclipse<sup>®</sup>-based integrated development environment (IDE). |
Single installer package with support for: | Single installer package with support for: | ||
| Line 25: | Line 25: | ||
*WISE-1530, WISE-1500 and [[WISE-ED22_User_Manual|WISE-ED22]]. | *WISE-1530, WISE-1500 and [[WISE-ED22_User_Manual|WISE-ED22]]. | ||
*802.11b/g/n (2.4 GHz) Wireless Access Point (AP). | *802.11b/g/n (2.4 GHz) Wireless Access Point (AP). | ||
| − | *PC | + | *PC Runs on Windows®, Mac® OS X®, and Linux® |
Please refer to the following steps for setup a WISE series of boards before using WISE-1530. | Please refer to the following steps for setup a WISE series of boards before using WISE-1530. | ||
| Line 31: | Line 31: | ||
'''Step01:''' Please prepare boards as below. | '''Step01:''' Please prepare boards as below. | ||
| − | [[File:WISE-1530 hardware setup.png|RTENOTITLE]] | + | [[File:WISE-1530 hardware setup.png v2.png|543x386px|RTENOTITLE]] |
'''①''' WISE-1530 | '''①''' WISE-1530 | ||
| Line 60: | Line 60: | ||
'''⑨''' RF connector | '''⑨''' RF connector | ||
| − | '''⑩ | + | '''⑩ '''Power connector |
| − | '''Step02:''' Connect the [[WISE-ED22_User_Manual|WISE-ED22]] to PC using micro-USB cable(Please refer to [http://ess-wiki.advantech.com.tw/ | + | '''Step02:''' Connect the [[WISE-ED22_User_Manual|WISE-ED22]] to PC using micro-USB cable(Please refer to WISE-ED22 [http://ess-wiki.advantech.com.tw/view/WISE-ED22_User_Manual#Connection_with_target_board Connection with target board]). |
*Install Driver ( [https://developer.mbed.org/media/downloads/drivers/mbedWinSerial_16466.exe Download latest driver] ) | *Install Driver ( [https://developer.mbed.org/media/downloads/drivers/mbedWinSerial_16466.exe Download latest driver] ) | ||
| − | *The device will be visible in the Device Manager as below | + | *The device will be visible in the Device Manager as below. |
| − | [[File:Mbed uart.png|649x466px|Mbed uart.png]] | + | [[File:Mbed uart.png|649x466px|Mbed uart.png]] |
== WICED Studio == | == WICED Studio == | ||
| Line 76: | Line 76: | ||
The user can refer to the following steps for setup WICED Studio with WISE-1530 SDK. | The user can refer to the following steps for setup WICED Studio with WISE-1530 SDK. | ||
| − | === | + | === Windows Install === |
| − | #Download [https:// | + | #Download [https://www.cypress.com/products/wiced-software WICED-Studio_SDK download] |
#Extract the installer exe from the zip file to temp folder on your computer; do not execute the installer from the zip file | #Extract the installer exe from the zip file to temp folder on your computer; do not execute the installer from the zip file | ||
#Double click the installer exe to install WICED Studio as below picture | #Double click the installer exe to install WICED Studio as below picture | ||
| Line 100: | Line 100: | ||
[[File:WICED installer 6.png|480x342px|WICED installer 6.png]] | [[File:WICED installer 6.png|480x342px|WICED installer 6.png]] | ||
| − | === | + | === Copy patch file === |
| − | #Download and unzip [[Media: | + | #Download and unzip [[Media:WM-BN-BM-22_SDK_5.1.x_platform_patch_v1.6.zip|WM-BN-BM-22_SDK_5.1.x_platform_patch.zip]] |
#Copy platforms and WICED folders to <SDK folder>\43xxx_Wi-Fi\ and select replace | #Copy platforms and WICED folders to <SDK folder>\43xxx_Wi-Fi\ and select replace | ||
| Line 115: | Line 115: | ||
[[File:WICED make target new.png|392x262px|WICED make target new.png]] | [[File:WICED make target new.png|392x262px|WICED make target new.png]] | ||
| − | Step3: Type "snip.gpio- | + | Step3: Type "snip.gpio-WISE_1530A1" |
[[File:WICED make target input name-v02.png|RTENOTITLE]] | [[File:WICED make target input name-v02.png|RTENOTITLE]] | ||
| − | Field explanation: '''<u>snip.gpio</u>'''-'''<u> | + | Field explanation: '''<u>snip.gpio</u>'''-'''<u>WISE_1530A1</u>''' |
*snip.gpio: application project name | *snip.gpio: application project name | ||
| − | * | + | *WISE_1530A1: platform name, for WISE-1530 A1 version platform don't change this field. |
| + | |||
| + | *The platform name had rename to WISE_1530A1. Please the following picture WISE_1530 replace to WISE_1530A1. | ||
[[File:WICED make target snip.gpio.png|RTENOTITLE]] | [[File:WICED make target snip.gpio.png|RTENOTITLE]] | ||
| Line 146: | Line 148: | ||
It will generate three bin files in <SDK folder>\43xxx_Wi-Fi\build folder when build complete. | It will generate three bin files in <SDK folder>\43xxx_Wi-Fi\build folder when build complete. | ||
| − | #Bootloader: waf.bootloader-NoOS- | + | #Bootloader: waf.bootloader-NoOS-WISE_1530A1.bin |
#DCT( Device Configuration Table): DCT.bin: | #DCT( Device Configuration Table): DCT.bin: | ||
| − | #Application: snip.gpio- | + | #Application: snip.gpio-WISE_1530A1.bin |
[[File:WICED 3-bin files v02.png|RTENOTITLE]] | [[File:WICED 3-bin files v02.png|RTENOTITLE]] | ||
| Line 177: | Line 179: | ||
Generate a programming file then use [[WISE-ED22_User_Manual|WISE-ED22]] to program WISE-1530. User can refer WISE-ED22 [http://ess-wiki.advantech.com.tw/view/WISE-ED22_User_Manual#Drag-n-drop_Programming Drag-n-drop Programming] section. | Generate a programming file then use [[WISE-ED22_User_Manual|WISE-ED22]] to program WISE-1530. User can refer WISE-ED22 [http://ess-wiki.advantech.com.tw/view/WISE-ED22_User_Manual#Drag-n-drop_Programming Drag-n-drop Programming] section. | ||
| + | |||
| + | == Debug Setting == | ||
| + | |||
| + | Launch a serial port tool(use tera term in this), then setting as below. | ||
| + | |||
| + | [[File:Serial tool setting.png|386x314px|Serial tool setting.png]] | ||
| + | |||
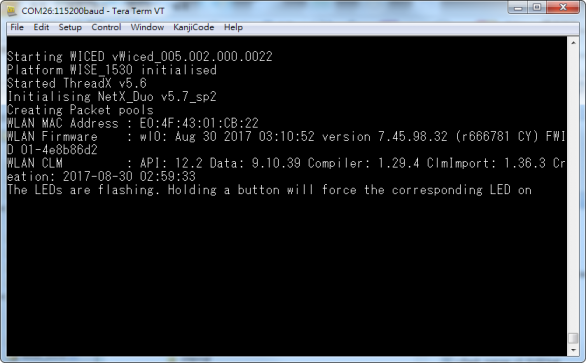
| + | Press WISE-1530 reset button, the screen will show as below. | ||
| + | |||
| + | [[File:WISE 1530 snip.gpio screen.png|586x363px|WISE 1530 snip.gpio screen.png]] | ||
= Example = | = Example = | ||
| Line 208: | Line 220: | ||
=== Step by step usage guide === | === Step by step usage guide === | ||
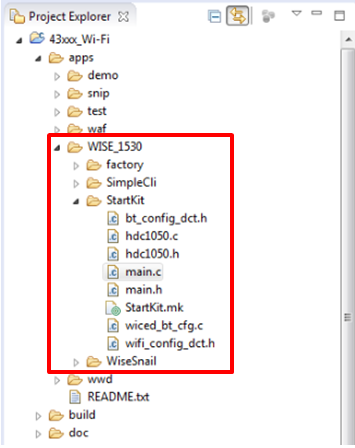
| − | Step 1: Download and unzip [[Media: | + | Step 1: Download and unzip [[Media:WISE_1530_patch_v06.zip|WISE_1530_patch.zip]], then copy WISE_1530 folder to <SDK folder>\43xxx_Wi-Fi\ apps. Project Explorer window will appear WISE_1530 folder. You can press 'F5' to refresh if you do not see. |
| − | [[File: | + | [[File:WISE-1530 folder v01.png.png|RTENOTITLE]] |
| − | |||
| − | [[File: | + | |
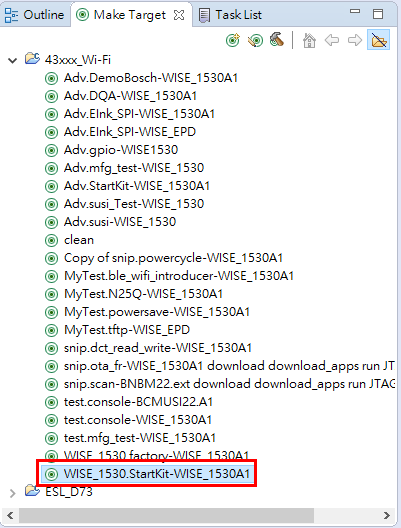
| + | Step 2: Create a "WISE_1530.StartKit-WISE_1530A1" target file and build the application. | ||
| + | |||
| + | [[File:WISE-1530 startkit v2.png]] | ||
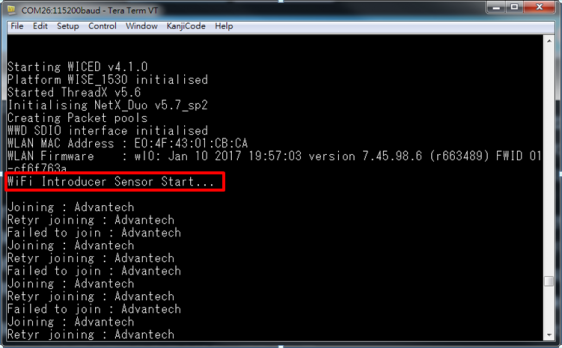
Step 3: Follow "[http://ess-wiki.advantech.com.tw/view/WISE-1530_SDK#Generate_a_Programming_File Generate a Programming File]" to generate a bin file, then download bin file to WISE-1530. You will see below message in console screen if success. | Step 3: Follow "[http://ess-wiki.advantech.com.tw/view/WISE-1530_SDK#Generate_a_Programming_File Generate a Programming File]" to generate a bin file, then download bin file to WISE-1530. You will see below message in console screen if success. | ||
| Line 222: | Line 236: | ||
| − | Step 4 to step 8 are manipulated | + | Step 4 to step 8 are manipulated on your phone. |
Step 4: Install and launch the BLE Scanner app. | Step 4: Install and launch the BLE Scanner app. | ||
| Line 228: | Line 242: | ||
[[File:WISE-1530 BLE scanner app.jpg|RTENOTITLE]] | [[File:WISE-1530 BLE scanner app.jpg|RTENOTITLE]] | ||
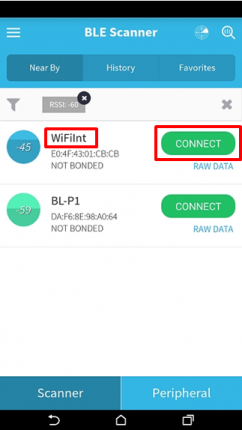
| − | Step 5: | + | Step 5:Pull down the screen to rescan devices and it will list nearby BLE devices. Find the '''WiFiInt '''device and press CONNECT button. |
[[File:WISE-1530 BLE scaaner-1.png|244x430px|WISE-1530 BLE scaaner-1.png]] | [[File:WISE-1530 BLE scaaner-1.png|244x430px|WISE-1530 BLE scaaner-1.png]] | ||
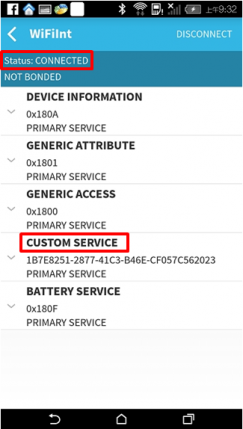
| − | Step 6: If the connection is successful can see the below | + | Step 6: If the connection is successful, you can see the picture below. Press the "CUSTOM SERVICE" button. |
[[File:WISE-1530 BLE scaaner-2.png|244x430px|WISE-1530 BLE scaaner-2.png]] | [[File:WISE-1530 BLE scaaner-2.png|244x430px|WISE-1530 BLE scaaner-2.png]] | ||
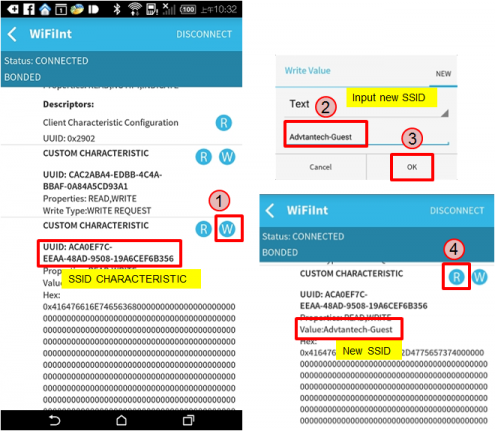
| − | Step 7: Find the UUID: ACA0EF7C-EEAA-48AD-9508- | + | Step 7: Find the UUID: ACA0EF7C-EEAA-48AD-9508-19A6F6B356 for SSID characteristic. Press the "W" button to enter input window. Input new SSID name then press the OK button. Last, user can press "R" button to check new SSID name. |
[[File:WISE-1530 BLE scaaner-3.png|495x431px|WISE-1530 BLE scaaner-3.png]] | [[File:WISE-1530 BLE scaaner-3.png|495x431px|WISE-1530 BLE scaaner-3.png]] | ||
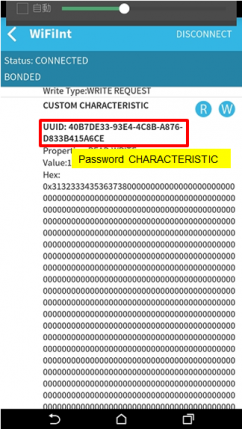
| − | Step 8: Find the UUID: 40B7DE33-93E4-4C8B-A876-D833B415A6CE for Password characteristic then procedure as | + | Step 8: Find the UUID: 40B7DE33-93E4-4C8B-A876-D833B415A6CE for Password characteristic then procedure as Step7. |
[[File:WISE-1530 BLE scanner-4.png|244x430px|WISE-1530 BLE scanner-4.png]] | [[File:WISE-1530 BLE scanner-4.png|244x430px|WISE-1530 BLE scanner-4.png]] | ||
| Line 247: | Line 261: | ||
[[File:WISE-1530 BLE scanner-5.png|563x348px|WISE-1530 BLE scanner-5.png]] | [[File:WISE-1530 BLE scanner-5.png|563x348px|WISE-1530 BLE scanner-5.png]] | ||
| + | |||
| + | Step 10: If Connect to broker and WISESnail success, user can see temperature, humidity, GPIO1 and GPIO2 on cloud server. | ||
| + | |||
| + | [[File:WISE-1530 Conn to Broker.jpg|602x372px|WISE-1530 Conn to Broker.jpg]] | ||
| + | |||
| + | [[File:WISE-1530 Conn to Snail.jpg|602x372px|WISE-1530 Conn to Snail.jpg]] | ||
| + | |||
| + | === Memory/Flash Usage === | ||
| + | |||
| + | The WISE-1530 has 1 MBytes flash and 256 KBytes RAM. The Start kit flash and memory usage ia as below. | ||
| + | |||
| + | ---- | ||
| + | |||
| + | {| border="1" cellspacing="1" cellpadding="1" style="width: 446px;" | ||
| + | |- | ||
| + | | style="width: 252px; text-align: center;" | Module <br/> | ||
| + | | style="width: 85px; text-align: center;" | Flash<br/> | ||
| + | | style="width: 92px; text-align: center;" | Static RAM<br/> | ||
| + | |- | ||
| + | | style="width: 252px;" | Adv_WiseSnail<br/> | ||
| + | | style="width: 85px; text-align: center;" | 18284<br/> | ||
| + | | style="width: 92px; text-align: center;" | 27096 | ||
| + | |- | ||
| + | | style="width: 252px;" | Bluetooth_Embedded_Low_Energy_Stack<br/> | ||
| + | | style="width: 85px; text-align: center;" | 154<br/> | ||
| + | | style="width: 92px; text-align: center;" | 57<br/> | ||
| + | |- | ||
| + | | style="width: 252px;" | bluetooth_low_energy<br/> | ||
| + | | style="width: 85px; text-align: center;" | 78493<br/> | ||
| + | | style="width: 92px; text-align: center;" | 9348<br/> | ||
| + | |- | ||
| + | | style="width: 252px;" | button_manager <br/> | ||
| + | | style="width: 85px; text-align: center;" | 588<br/> | ||
| + | | style="width: 92px; text-align: center;" | 4 | ||
| + | |- | ||
| + | | style="width: 252px;" | command_console<br/> | ||
| + | | style="width: 85px; text-align: center;" | 3688<br/> | ||
| + | | style="width: 92px; text-align: center;" | 404 | ||
| + | |- | ||
| + | | style="width: 252px;" | command_console_wifi <br/> | ||
| + | | style="width: 85px; text-align: center;" | 11146<br/> | ||
| + | | style="width: 92px; text-align: center;" | 0 | ||
| + | |- | ||
| + | | style="width: 252px;" | crc<br/> | ||
| + | | style="width: 85px; text-align: center;" | 1060<br/> | ||
| + | | style="width: 92px; text-align: center;" | 0 | ||
| + | |- | ||
| + | | style="width: 252px;" | DHCP_Server<br/> | ||
| + | | style="width: 85px; text-align: center;" | 1524<br/> | ||
| + | | style="width: 92px; text-align: center;" | 132 | ||
| + | |- | ||
| + | | style="width: 252px;" | DNS<br/> | ||
| + | | style="width: 85px; text-align: center;" | 1724<br/> | ||
| + | | style="width: 92px; text-align: center;" | 44 | ||
| + | |- | ||
| + | | style="width: 252px;" | GPIO_button<br/> | ||
| + | | style="width: 85px; text-align: center;" | 120 | ||
| + | | style="width: 92px; text-align: center;" | 4 | ||
| + | |- | ||
| + | | style="width: 252px;" | Host MCU-family library<br/> | ||
| + | | style="width: 85px; text-align: center;" | 15718<br/> | ||
| + | | style="width: 92px; text-align: center;" | 2492 | ||
| + | |- | ||
| + | | style="width: 252px;" | Interrupt Vectors<br/> | ||
| + | | style="width: 85px; text-align: center;" | 388<br/> | ||
| + | | style="width: 92px; text-align: center;" | 0 | ||
| + | |- | ||
| + | | style="width: 252px;" | libc<br/> | ||
| + | | style="width: 85px; text-align: center;" | 48018<br/> | ||
| + | | style="width: 92px; text-align: center;" | 3364 | ||
| + | |- | ||
| + | | style="width: 252px;" | MQTT_Client<br/> | ||
| + | | style="width: 85px; text-align: center;" | 5643<br/> | ||
| + | | style="width: 92px; text-align: center;" | 736 | ||
| + | |- | ||
| + | | style="width: 252px;" | Networking<br/> | ||
| + | | style="width: 85px; text-align: center;" | 5113<br/> | ||
| + | | style="width: 92px; text-align: center;" | 13280<br/> | ||
| + | |- | ||
| + | | style="width: 252px;" | NetX-Duo - Interfaces & Stacks<br/> | ||
| + | | style="width: 85px; text-align: center;" | 0 | ||
| + | | style="width: 92px; text-align: center;" | 16 | ||
| + | |- | ||
| + | | style="width: 252px;" | Other<br/> | ||
| + | | style="width: 85px; text-align: center;" | 170044<br/> | ||
| + | | style="width: 92px; text-align: center;" | 2930 | ||
| + | |- | ||
| + | | style="width: 252px;" | Packet Buffers<br/> | ||
| + | | style="width: 85px; text-align: center;" | 0 | ||
| + | | style="width: 92px; text-align: center;" | 23088<br/> | ||
| + | |- | ||
| + | | style="width: 252px;" | platform<br/> | ||
| + | | style="width: 85px; text-align: center;" | 1620<br/> | ||
| + | | style="width: 92px; text-align: center;" | 308<br/> | ||
| + | |- | ||
| + | | style="width: 252px;" | RAM Initialisation<br/> | ||
| + | | style="width: 85px; text-align: center;" | 4028<br/> | ||
| + | | style="width: 92px; text-align: center;" | 0 | ||
| + | |- | ||
| + | | style="width: 252px;" | resources<br/> | ||
| + | | style="width: 85px; text-align: center;" | 385936<br/> | ||
| + | | style="width: 92px; text-align: center;" | 0 | ||
| + | |- | ||
| + | | style="width: 252px;" | Ring_Buffer<br/> | ||
| + | | style="width: 85px; text-align: center;" | 112<br/> | ||
| + | | style="width: 92px; text-align: center;" | 0 | ||
| + | |- | ||
| + | | style="width: 252px;" | Startup Stack & Link Script fill<br/> | ||
| + | | style="width: 85px; text-align: center;" | 144<br/> | ||
| + | | style="width: 92px; text-align: center;" | 25 | ||
| + | |- | ||
| + | | style="width: 252px;" | Supplicant - BESL<br/> | ||
| + | | style="width: 85px; text-align: center;" | 3470<br/> | ||
| + | | style="width: 92px; text-align: center;" | 812 | ||
| + | |- | ||
| + | | style="width: 252px;" | ThreadX<br/> | ||
| + | | style="width: 85px; text-align: center;" | 8596<br/> | ||
| + | | style="width: 92px; text-align: center;" | 400 | ||
| + | |- | ||
| + | | style="width: 252px;" | TLV<br/> | ||
| + | | style="width: 85px; text-align: center;" | 28 | ||
| + | | style="width: 92px; text-align: center;" | 0 | ||
| + | |- | ||
| + | | style="width: 252px;" | WICED<br/> | ||
| + | | style="width: 85px; text-align: center;" | 5452 | ||
| + | | style="width: 92px; text-align: center;" | 1040 | ||
| + | |- | ||
| + | | style="width: 252px;" | WICED_Bluetooth_Firmware_Driver<br/> | ||
| + | | style="width: 85px; text-align: center;" | 36692<br/> | ||
| + | | style="width: 92px; text-align: center;" | 0 | ||
| + | |- | ||
| + | | style="width: 252px;" | wiced_log<br/> | ||
| + | | style="width: 85px; text-align: center;" | 290 | ||
| + | | style="width: 92px; text-align: center;" | 1104 | ||
| + | |- | ||
| + | | style="width: 252px;" | wifi_utils<br/> | ||
| + | | style="width: 85px; text-align: center;" | 1082 | ||
| + | | style="width: 92px; text-align: center;" | 36 | ||
| + | |- | ||
| + | | style="width: 252px;" | WWD<br/> | ||
| + | | style="width: 85px; text-align: center;" | 20429<br/> | ||
| + | | style="width: 92px; text-align: center;" | 3176 | ||
| + | |- | ||
| + | | style="width: 252px; background-color: rgb(255, 255, 51);" | TOTAL (bytes) <br/> | ||
| + | | style="width: 85px; background-color: rgb(255, 255, 0); text-align: center;" | 825556<br/> | ||
| + | | style="width: 92px; background-color: rgb(255, 255, 0); text-align: center;" | 89896<br/> | ||
| + | |} | ||
| + | |||
| + | == I/O Test (factory) == | ||
| + | |||
| + | === Introduction === | ||
| + | |||
| + | The I/O Test application is a WISE-1530 I/O testing example. It's need extra I/O board(WISE-ED30) to plug in to WISE-1500. The hardware setup as below. This instance could test m2.com I/O that WISE-1530 supported([[MCU/WISE-1530|M2.COM Pinout]]), include GPIO, ADC, I2C. SPI...etc interface. It used WICED SDK API to read and write I/O. | ||
| + | |||
| + | [[File:WISE-1530 IO testing setup v3.png|RTENOTITLE]] | ||
| + | |||
| + | === I/O Test Use WICED API === | ||
| + | |||
| + | Step 1: Download and unzip [[Media:WISE_1530_patch_v06.zip|WISE_1530_patch.zip]], then copy WISE_1530 folder to <SDK folder>\43xxx_Wi-Fi\ apps. | ||
| + | |||
| + | Step 2: I/O test source code please refer as below files. | ||
| + | |||
| + | [[File:WISE-1530 IO testing src code v2.png|RTENOTITLE]] | ||
| + | |||
| + | |||
| + | |||
| + | |||
| + | |||
| + | Step 3: Create a "WISE_1530.factory-WISE_1530A1" target file and build the application. Download firmware to WISE-1530 then press reset button. | ||
| + | |||
| + | [[File:WISE-1530 IO testing target file v2.png|RTENOTITLE]] | ||
| + | |||
| + | Step 4: You will see below message in console screen if success. Input '1' to select I/O Function Test, the screen will show I/O test items.Input 1~7 to test I/0 and 0 to return previous page. | ||
| + | |||
| + | [[File:WISE-1530 IO testing screen.png|553x384px|WISE-1530 IO testing screen.png]] | ||
| + | |||
| + | === I/O Test Use SUSI API === | ||
| + | |||
| + | The I/O Test example also support SUSI API (please refer [http://ess-wiki.advantech.com.tw/wiki/images/f/f0/SUSI4_User_Manual.pdf SUSI_API]).The SUSI support GPIO, I2C, SPI, ADC and PWM APIs. You can simple revise setting to accomplish SUSI API I/O Test. | ||
| + | |||
| + | Step 1: The SUSI API I/O test source code are as below files. | ||
| + | |||
| + | [[File:WISE-1530 SUSI src code.png|RTENOTITLE]] | ||
| + | |||
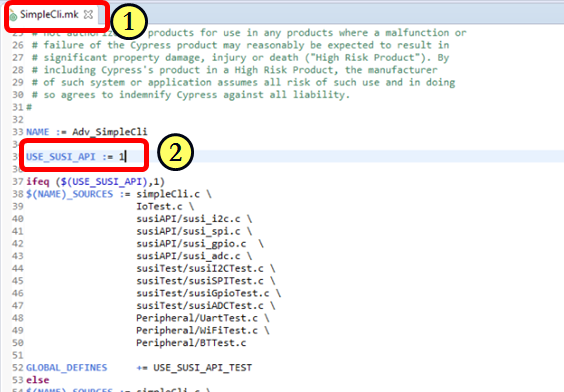
| + | Step 2: Open SimpleCli.mk and change USE_SUSI_API to 1. | ||
| + | |||
| + | [[File:WISE-1530 SUSU setting.png|RTENOTITLE]] | ||
| + | |||
| + | Step 3: Double click "WISE_1530.factory-WISE_1530A1" target file and build the application. Then download the firmware to WISE-1530, you can see the screen that same as I/O Function Test. | ||
Latest revision as of 04:38, 25 February 2021
Contents
Overview
WISE-1530 is used Cypress's WICED® SDKs to develop Wi-Fi and BLE application. WISE-1530 SDK use C/C++ language Runs on Windows®, Mac® OS X®, and Linux® through Eclipse®-based integrated development environment (IDE).
Single installer package with support for:
- Wi-Fi + Bluetooth combo solution
- Wi-Fi solutions
- Bluetooth (Basic Rate, Enhanced Data Rate and Bluetooth Low Energy)
- Sample applications for many popular use cases like
- Connecting to cloud services
- Low-power BLE-based sensors and beacons
- Smart home gateways
- BLE-WiFi introducer
- Code snippets to understand WICED APIs
User can refer to WICED Software to get more information.
Setup Development Environment
Preparing for Hardware
The user needs to prepare for hardware as following:
- WISE-1530, WISE-1500 and WISE-ED22.
- 802.11b/g/n (2.4 GHz) Wireless Access Point (AP).
- PC Runs on Windows®, Mac® OS X®, and Linux®
Please refer to the following steps for setup a WISE series of boards before using WISE-1530.
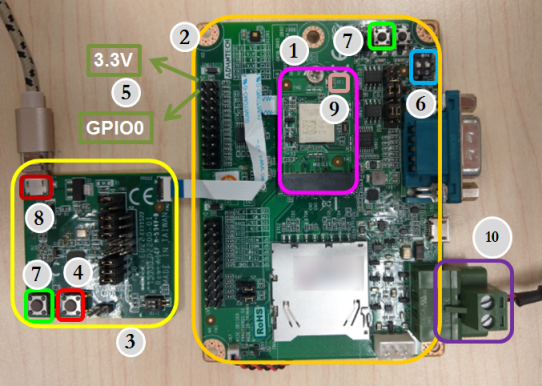
Step01: Please prepare boards as below.
① WISE-1530
② WISE-1500
③ WISE-ED22
④ WISE-ED22 reset button
⑤ CN2 on WISE-1500
⑥ SW3 on WISE-1500
- Pleas check pin1 and pin2 to “OFF” as default.
- Switch pin2 to decide whether running “backup to default” while device
booting. “ON”: enabled, “OFF”: disable
⑦ WISE-1530 reset button, one button on WISE-1500 and the other on WISE-ED22
⑧ Micro USB connector
- Drag-n-drop programming
- Serial port and debugging
- Power supplies for UART1 debug port
⑨ RF connector
⑩ Power connector
Step02: Connect the WISE-ED22 to PC using micro-USB cable(Please refer to WISE-ED22 Connection with target board).
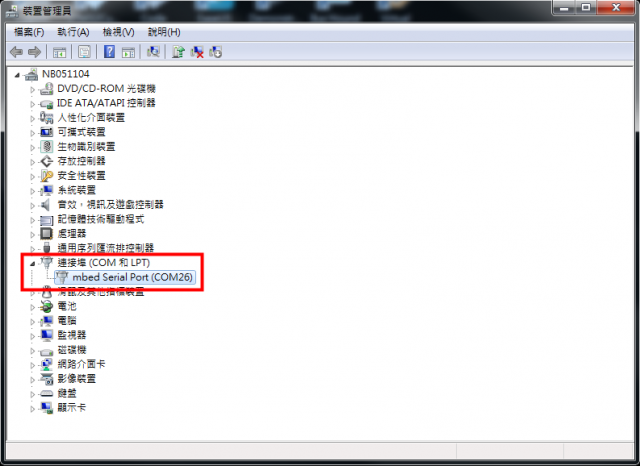
- Install Driver ( Download latest driver )
- The device will be visible in the Device Manager as below.
WICED Studio
The user can refer to the following steps for setup WICED Studio with WISE-1530 SDK.
Windows Install
- Download WICED-Studio_SDK download
- Extract the installer exe from the zip file to temp folder on your computer; do not execute the installer from the zip file
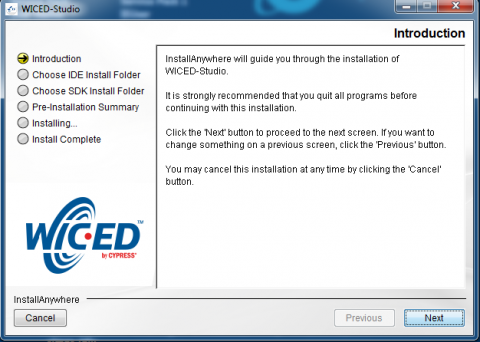
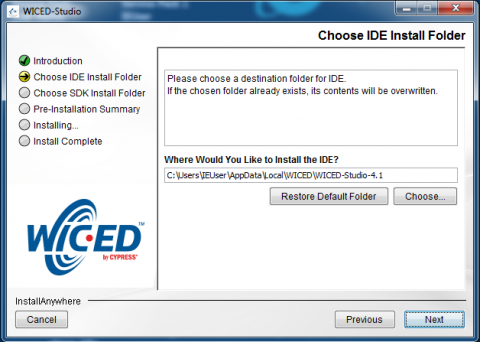
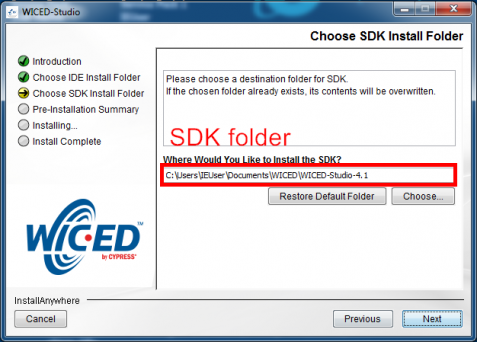
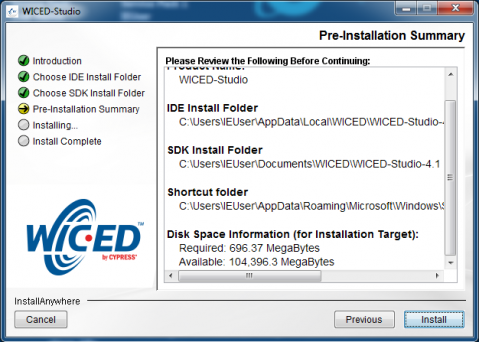
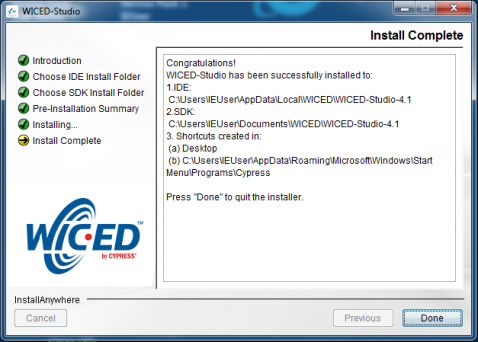
- Double click the installer exe to install WICED Studio as below picture
- After installation in completed, launch WICED Studio IDE from shortcut on desktop
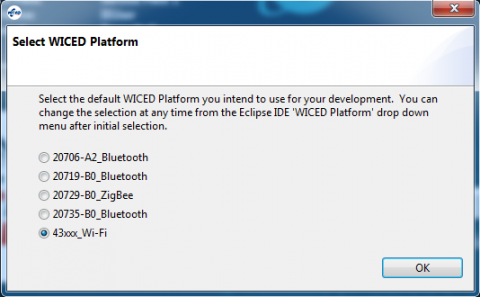
- When you see the Select WICED Platform page, choose the 43xxx_Wi-Fi item. You can change in "WICED Platform" in SDK toolbar also.
Copy patch file
- Download and unzip WM-BN-BM-22_SDK_5.1.x_platform_patch.zip
- Copy platforms and WICED folders to <SDK folder>\43xxx_Wi-Fi\ and select replace
Build Source File
Create a "Make Target" file
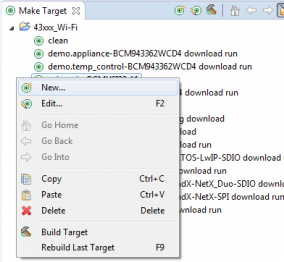
Step1: In Make Target window click mouse right button
Step2: Select New...
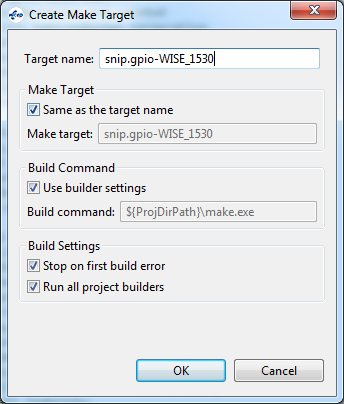
Step3: Type "snip.gpio-WISE_1530A1"
Field explanation: snip.gpio-WISE_1530A1
- snip.gpio: application project name
- WISE_1530A1: platform name, for WISE-1530 A1 version platform don't change this field.
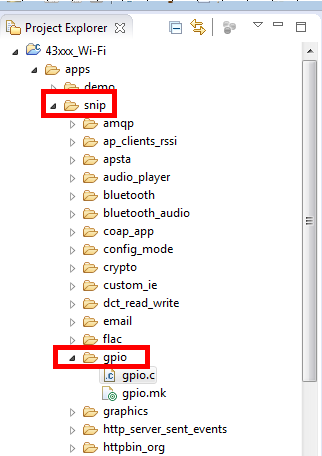
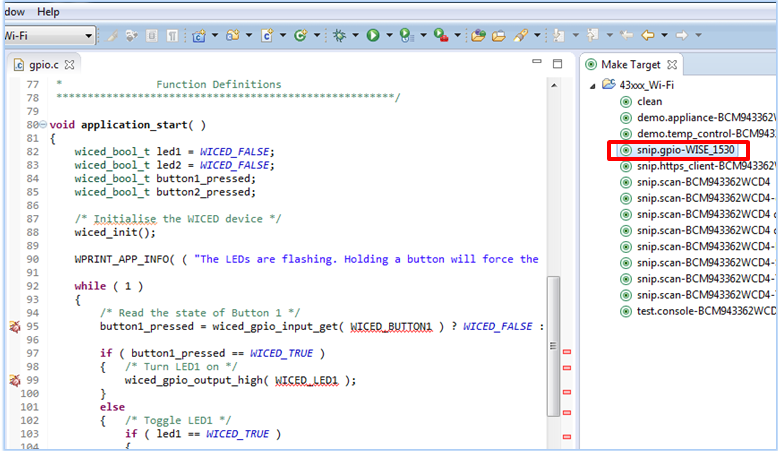
*The platform name had rename to WISE_1530A1. Please the following picture WISE_1530 replace to WISE_1530A1.
Build Project
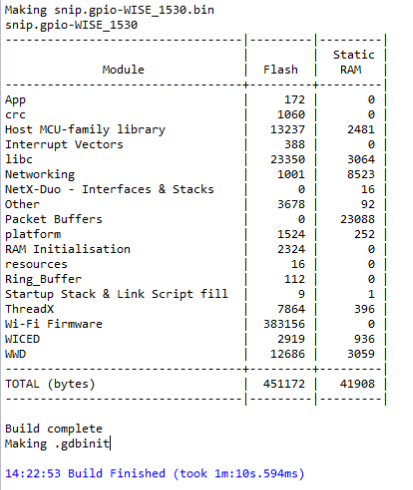
Double click "Make Target" file to build project.
It is build complete when you see below
Generate a Programming File
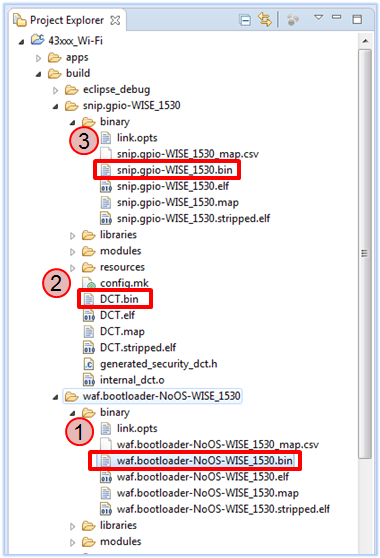
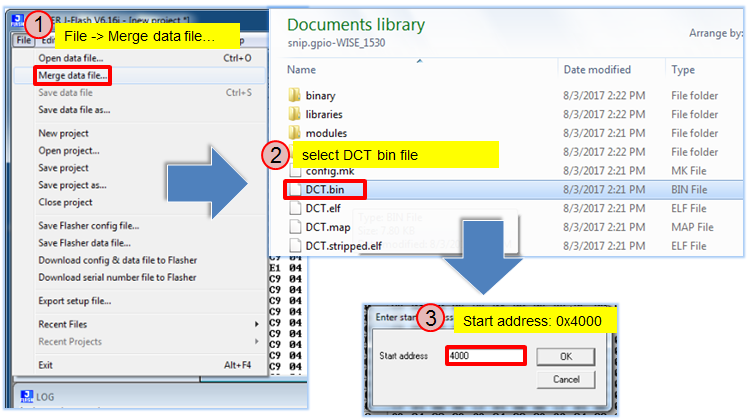
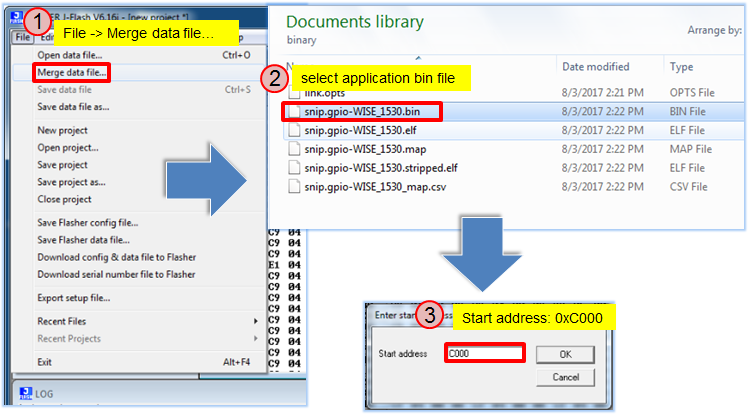
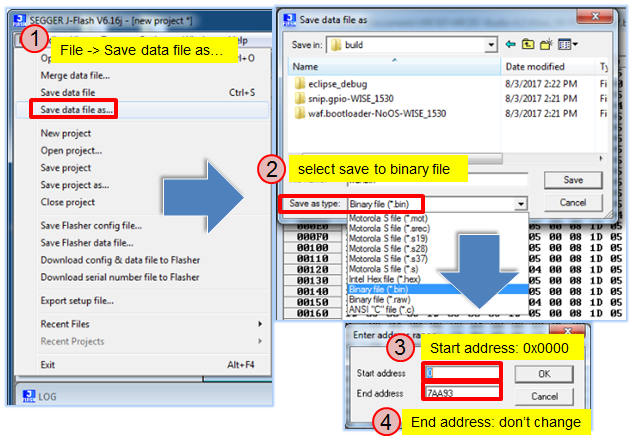
It will generate three bin files in <SDK folder>\43xxx_Wi-Fi\build folder when build complete.
- Bootloader: waf.bootloader-NoOS-WISE_1530A1.bin
- DCT( Device Configuration Table): DCT.bin:
- Application: snip.gpio-WISE_1530A1.bin
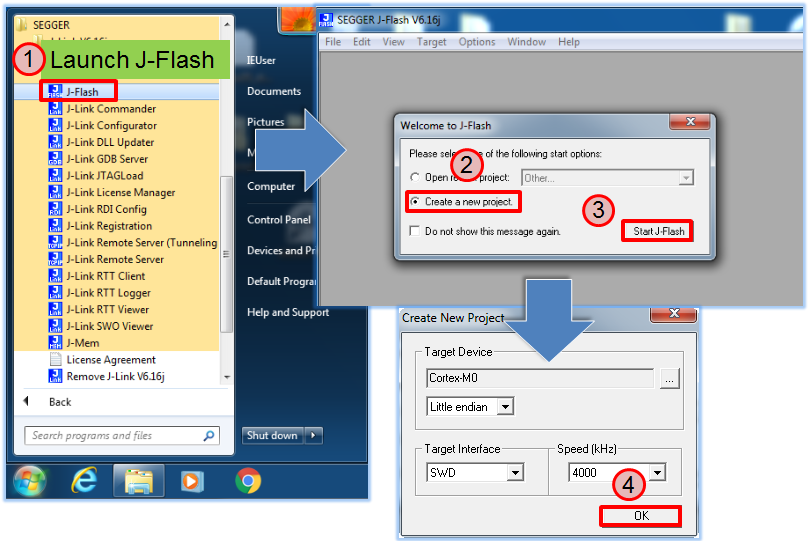
Download and install J-Link software, we need J-Flash tool to combine three bin files for programming.
Launch J-Flash
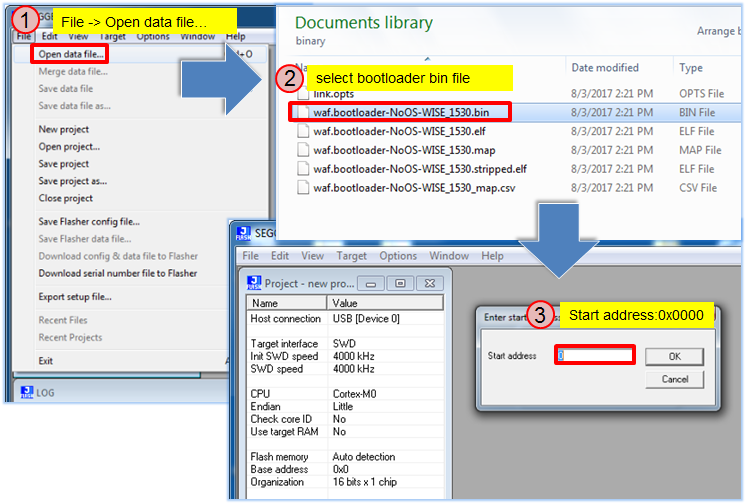
Open bootloader bin file
Merge DCT bin file
Merge application bin file
Save as a final bin file
Programming
Generate a programming file then use WISE-ED22 to program WISE-1530. User can refer WISE-ED22 Drag-n-drop Programming section.
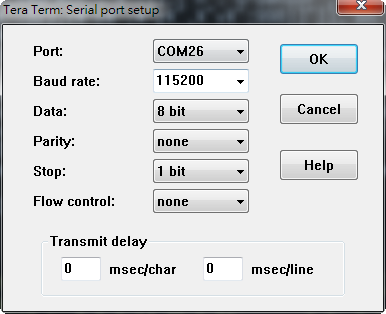
Debug Setting
Launch a serial port tool(use tera term in this), then setting as below.
Press WISE-1530 reset button, the screen will show as below.
Example
WISE-1530 Demo(StartKit)
Introduction
The Demo application has two main function. One is an BLE and WiFi introducer example. It demonstrates GATT database initialization, DCT configuration, processing read/write requests from a BLE client, and sending data to the client. The BLE WiFi Introducer has two components, an app running on a WICED devices, and an app(BLE Scanner) running on Android device. The other is AgentLite exapmle. It demonstrates how to get the sensor value from WISE-1500 sensors and upload data to cloud server.
Detailed about WISE-1530 Demo
The detailed behavior about this example is explained as following:
- System initiation.
- Initiation hardware, Wi-Fi wlan connectivity, button1 thread…etc.
- BLE and WiFi introducer
- WISE-1530 will attempt use default SSID and password connection to AP. If success, WISE-1530 will Loop in AgentLite. Otherwise BLE will advertising for set SSID and password. The manipulation follow as below Step by step usage guide .
- Initiation sensor and access data from it.
- The TI HDC1050 has been design-in on WISE-1500. It’s a digital humidity sensor with integrated temperature sensor. The HDC1050 is initialized in example and the user can get data of humidity and temperature from it.
- Loop in AgentLite or web service.
- When device connect to AP, there are many things needed to do including connected to WISE-PaaS server, keep getting data from sensor and data exchanged through AgentLite. It is going to infinite loop for cloud service.
Step by step usage guide
Step 1: Download and unzip WISE_1530_patch.zip, then copy WISE_1530 folder to <SDK folder>\43xxx_Wi-Fi\ apps. Project Explorer window will appear WISE_1530 folder. You can press 'F5' to refresh if you do not see.
Step 2: Create a "WISE_1530.StartKit-WISE_1530A1" target file and build the application.
Step 3: Follow "Generate a Programming File" to generate a bin file, then download bin file to WISE-1530. You will see below message in console screen if success.
Step 4 to step 8 are manipulated on your phone.
Step 4: Install and launch the BLE Scanner app.
Step 5:Pull down the screen to rescan devices and it will list nearby BLE devices. Find the WiFiInt device and press CONNECT button.
Step 6: If the connection is successful, you can see the picture below. Press the "CUSTOM SERVICE" button.
Step 7: Find the UUID: ACA0EF7C-EEAA-48AD-9508-19A6F6B356 for SSID characteristic. Press the "W" button to enter input window. Input new SSID name then press the OK button. Last, user can press "R" button to check new SSID name.
Step 8: Find the UUID: 40B7DE33-93E4-4C8B-A876-D833B415A6CE for Password characteristic then procedure as Step7.
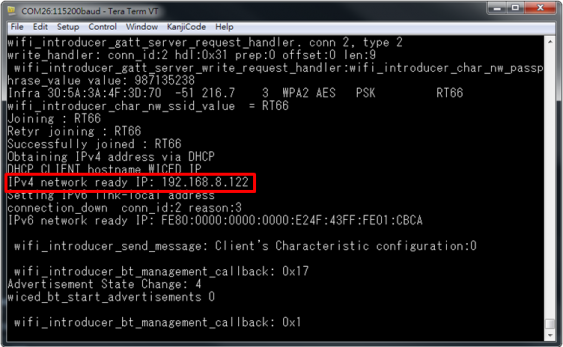
Step 9: If the join is successful can see network IP on console screen.
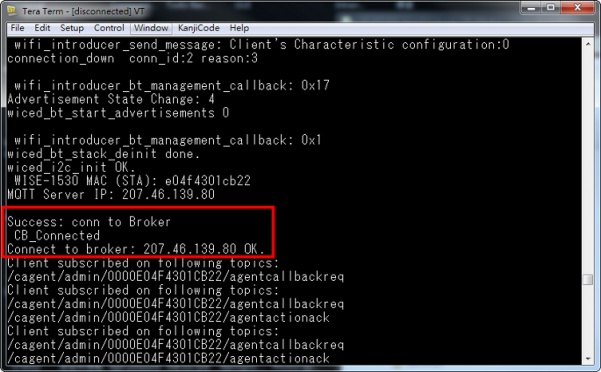
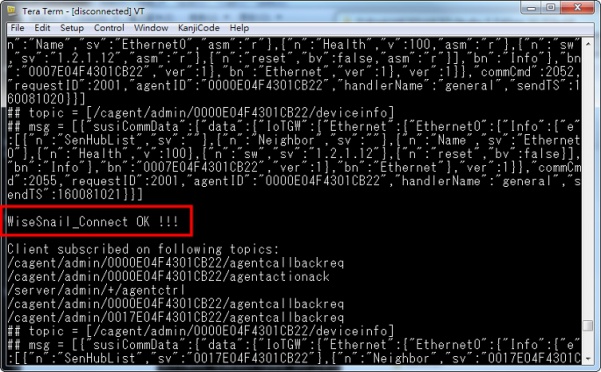
Step 10: If Connect to broker and WISESnail success, user can see temperature, humidity, GPIO1 and GPIO2 on cloud server.
Memory/Flash Usage
The WISE-1530 has 1 MBytes flash and 256 KBytes RAM. The Start kit flash and memory usage ia as below.
| Module |
Flash |
Static RAM |
| Adv_WiseSnail |
18284 |
27096 |
| Bluetooth_Embedded_Low_Energy_Stack |
154 |
57 |
| bluetooth_low_energy |
78493 |
9348 |
| button_manager |
588 |
4 |
| command_console |
3688 |
404 |
| command_console_wifi |
11146 |
0 |
| crc |
1060 |
0 |
| DHCP_Server |
1524 |
132 |
| DNS |
1724 |
44 |
| GPIO_button |
120 | 4 |
| Host MCU-family library |
15718 |
2492 |
| Interrupt Vectors |
388 |
0 |
| libc |
48018 |
3364 |
| MQTT_Client |
5643 |
736 |
| Networking |
5113 |
13280 |
| NetX-Duo - Interfaces & Stacks |
0 | 16 |
| Other |
170044 |
2930 |
| Packet Buffers |
0 | 23088 |
| platform |
1620 |
308 |
| RAM Initialisation |
4028 |
0 |
| resources |
385936 |
0 |
| Ring_Buffer |
112 |
0 |
| Startup Stack & Link Script fill |
144 |
25 |
| Supplicant - BESL |
3470 |
812 |
| ThreadX |
8596 |
400 |
| TLV |
28 | 0 |
| WICED |
5452 | 1040 |
| WICED_Bluetooth_Firmware_Driver |
36692 |
0 |
| wiced_log |
290 | 1104 |
| wifi_utils |
1082 | 36 |
| WWD |
20429 |
3176 |
| TOTAL (bytes) |
825556 |
89896 |
I/O Test (factory)
Introduction
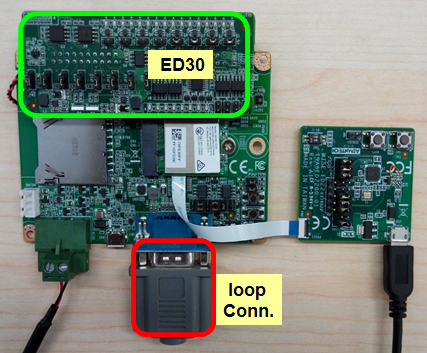
The I/O Test application is a WISE-1530 I/O testing example. It's need extra I/O board(WISE-ED30) to plug in to WISE-1500. The hardware setup as below. This instance could test m2.com I/O that WISE-1530 supported(M2.COM Pinout), include GPIO, ADC, I2C. SPI...etc interface. It used WICED SDK API to read and write I/O.
I/O Test Use WICED API
Step 1: Download and unzip WISE_1530_patch.zip, then copy WISE_1530 folder to <SDK folder>\43xxx_Wi-Fi\ apps.
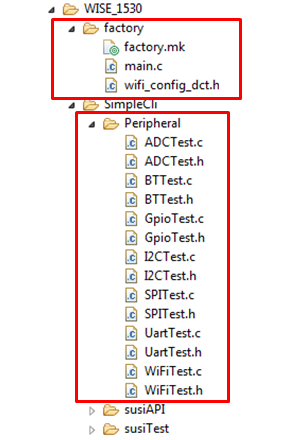
Step 2: I/O test source code please refer as below files.
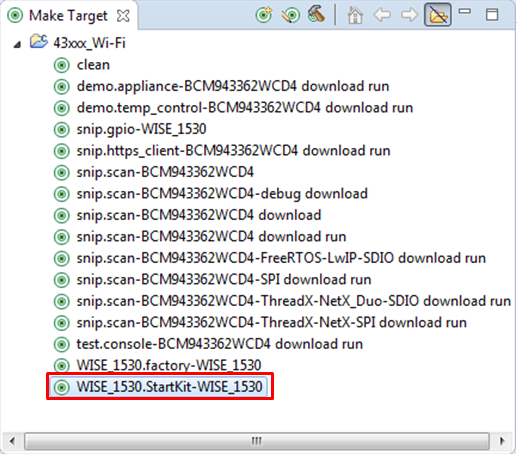
Step 3: Create a "WISE_1530.factory-WISE_1530A1" target file and build the application. Download firmware to WISE-1530 then press reset button.
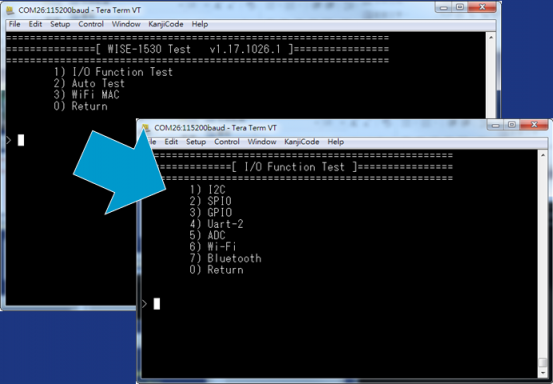
Step 4: You will see below message in console screen if success. Input '1' to select I/O Function Test, the screen will show I/O test items.Input 1~7 to test I/0 and 0 to return previous page.
I/O Test Use SUSI API
The I/O Test example also support SUSI API (please refer SUSI_API).The SUSI support GPIO, I2C, SPI, ADC and PWM APIs. You can simple revise setting to accomplish SUSI API I/O Test.
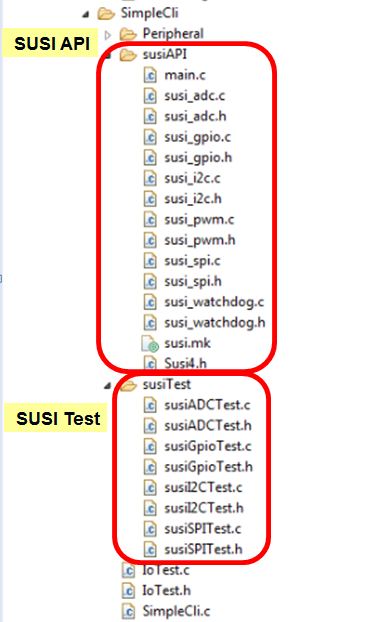
Step 1: The SUSI API I/O test source code are as below files.
Step 2: Open SimpleCli.mk and change USE_SUSI_API to 1.
Step 3: Double click "WISE_1530.factory-WISE_1530A1" target file and build the application. Then download the firmware to WISE-1530, you can see the screen that same as I/O Function Test.
