Difference between revisions of "ROM-2860 windowsonarm user guide"
Nathan.wang (talk | contribs) |
|||
| (5 intermediate revisions by 3 users not shown) | |||
| Line 1: | Line 1: | ||
| − | {{DISPLAYTITLE:ROM-2860}} | + | {{DISPLAYTITLE:ROM-2860 WOA user guide}} |
== '''產品介紹(Product introduction )''' == | == '''產品介紹(Product introduction )''' == | ||
| Line 24: | Line 24: | ||
=== '''接口布局和尺寸(Layout and Sizes)''' === | === '''接口布局和尺寸(Layout and Sizes)''' === | ||
| − | === ''' | + | === '''EPC-R2860 接口布局圖 Board Dimension Layout''' === |
| | ||
| Line 34: | Line 34: | ||
''' TBD''' | ''' TBD''' | ||
| − | |||
| − | | + | === '''Windows 11 UFS存儲 燒錄程序 (Windows 11 UFS Storage Flashing Procedure )''' === |
| + | |||
| + | ROM-2860 Windows installation method | ||
| + | |||
| + | #Prepare a windows PC, Installed 7zip. | ||
| + | #Use 7z decompress rom2860_image_ADV0.5.5.7z (Password is 12345678) | ||
| + | #Install QUD.WIN.1.1 Installer_10065.1 1.zip | ||
| + | #Use micro USB cable downing image to ROM-2860. | ||
| + | |||
| + | [[File:ROM-2860 win 1.PNG|RTENOTITLE]] | ||
| + | |||
| + | 5.Turn off the power, Change ROM-2860 SW1 to 1 on and 2 on & SW2 1 on & 2off for download mode, then turn on the power. | ||
| + | |||
| + | 6.Then Press SW4 button. | ||
| + | |||
| + | [[File:ROM-2860 Boot Switch SW4.png]] | ||
| + | |||
| + | 7.You can see QDloader (COMXX) in Device manager(In your laptop or PC) | ||
| + | |||
| + | [[File:ROM-2860 win 3.PNG|RTENOTITLE]] | ||
| + | |||
| + | 8. Execute burnimage.bat COMXX<br/> <br/> [[File:ROM-2860 win 4.PNG|RTENOTITLE]] | ||
| + | |||
| + | Note: When you execute the bat file . need to “press any key” by three time (you can ignore the message | ||
| + | |||
| + | 9. Need to wait 1 or 2 hours (depend on your pc )<br/> [[File:ROM-2860 win 5.PNG|RTENOTITLE]] | ||
| + | |||
| + | 10. If the process fails, it will display the error screen (red screen).<br/> <br/> [[File:ROM-2860 win 6.PNG|RTENOTITLE]] | ||
| + | |||
| + | 11.If the process successes , it will show “ the operation completed successfully” , then turn off the power | ||
| + | |||
| + | [[File:ROM-2860 win 7.PNG|RTENOTITLE]] | ||
| + | |||
| + | 12. Disconnect with ROM-2860<br/> [[File:ROM-2860 win 8.PNG|RTENOTITLE]] | ||
| + | |||
| + | 13. Change Switch to 1 off 2 on , then turn on the power | ||
| + | |||
| + | [[File:ROM-2860 win 9.PNG|RTENOTITLE]] | ||
| + | |||
| + | 14. Re-plug the power.<br/> [[File:ROM-2860 win 10.PNG|RTENOTITLE]] | ||
| + | |||
| + | 15. After turn the power , press SW4 | ||
| + | |||
| + | [[File:ROM-2860 Boot Switch SW4.png]] | ||
| + | |||
| + | 16. Connect with HDMI or DP , Its start to boot up from windows OS. | ||
| + | |||
| + | [[File:ROM-2860 win 12.PNG|RTENOTITLE]] | ||
| + | |||
| + | [[File:ROM-2860 win 13.PNG|RTENOTITLE]] | ||
| + | |||
| + | [[File:ROM-2860 win 14.PNG|RTENOTITLE]] | ||
Latest revision as of 03:18, 13 March 2025
Contents
產品介紹(Product introduction )
產品特性(Product Features)
- Qualcomm 8 Kryo cores up to 2.7GHz
- Onboard LPDDR5 8GB, 8533MT/s memory
- Onboard 128GB UFS and 128GB eMMC
- 1x 2ch. LVDS, 1x DP and 1x HDMI for displays
- 2x USB3.2 Gen1, 2x USB2.0, 2x PCIe Gen3.0 x1, 2x 4wire UART, 1x SPI,16x GPIO, 1x I2C, 2x MIPI-CSI x4
- 1x Micro SD and 1x Nano SIM
- Support Windows 11 IoT Enterprise
產品官網連結(Product official website link)
TBD
硬件接口說明(Hardware interface introduction)
接口布局和尺寸(Layout and Sizes)
EPC-R2860 接口布局圖 Board Dimension Layout
快速入門 (Quick Start)
系统下载 (OS Download)
TBD
Windows 11 UFS存儲 燒錄程序 (Windows 11 UFS Storage Flashing Procedure )
ROM-2860 Windows installation method
- Prepare a windows PC, Installed 7zip.
- Use 7z decompress rom2860_image_ADV0.5.5.7z (Password is 12345678)
- Install QUD.WIN.1.1 Installer_10065.1 1.zip
- Use micro USB cable downing image to ROM-2860.
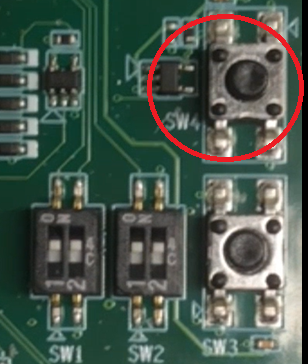
5.Turn off the power, Change ROM-2860 SW1 to 1 on and 2 on & SW2 1 on & 2off for download mode, then turn on the power.
6.Then Press SW4 button.
7.You can see QDloader (COMXX) in Device manager(In your laptop or PC)
8. Execute burnimage.bat COMXX

Note: When you execute the bat file . need to “press any key” by three time (you can ignore the message
9. Need to wait 1 or 2 hours (depend on your pc )

10. If the process fails, it will display the error screen (red screen).

11.If the process successes , it will show “ the operation completed successfully” , then turn off the power
13. Change Switch to 1 off 2 on , then turn on the power
15. After turn the power , press SW4
16. Connect with HDMI or DP , Its start to boot up from windows OS.


