Difference between revisions of "EPD-132 EVK User Manual"
Erick.huang (talk | contribs) |
Erick.huang (talk | contribs) |
||
| Line 11: | Line 11: | ||
|- | |- | ||
| style="text-align: center;" | '''1''' | | style="text-align: center;" | '''1''' | ||
| − | | style="width: 255px;" | ''' | + | | style="width: 255px;" | ''' 13.3” EPAPER''' |
|- | |- | ||
| style="text-align: center;" | '''2''' | | style="text-align: center;" | '''2''' | ||
| − | | style="width: 255px;" | ''' | + | | style="width: 255px;" | ''' Mainboard'''<br/> |
|- | |- | ||
| style="text-align: center;" | '''3''' | | style="text-align: center;" | '''3''' | ||
Revision as of 03:25, 28 September 2018
Contents
EVALUATION KIT OF EPD-132
This document will teach you how to use EPD-132 EVK to display image.
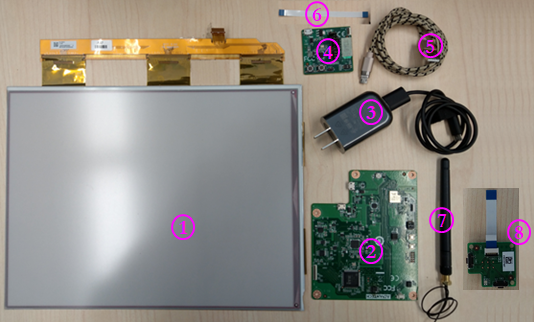
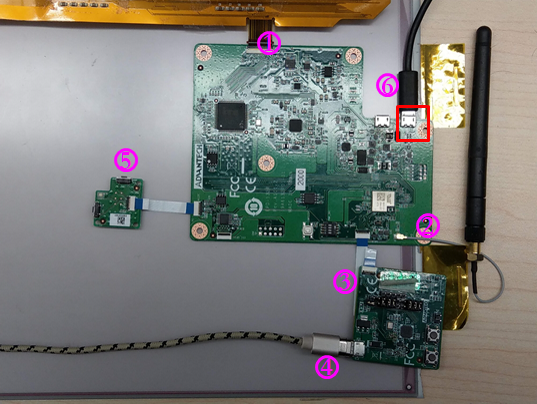
Components List
| Item | Description |
|---|---|
| 1 | 13.3” EPAPER |
| 2 | Mainboard |
| 3 | Power adapter and cable |
| 4 | ED22 board |
| 5 | ED22 micro USB cable |
| 6 | 10 pin FFC cable x2 |
| 7 | 2.4G Wi-Fi antenna |
| 8 | I/O daughter board |
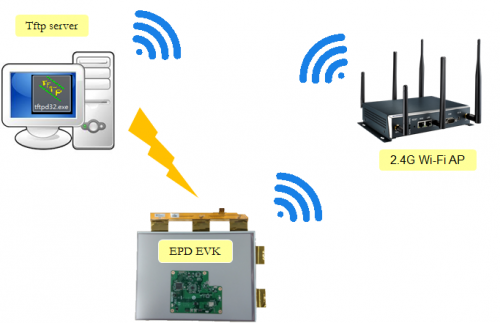
SYSTEM ARCHITECURE
BLOCK DIAGRAM
TOOL AND DEVELOPMENT ENVIRONMENT SETUP
2.4G Wi-Fi AP SETTING WITH BLE APP
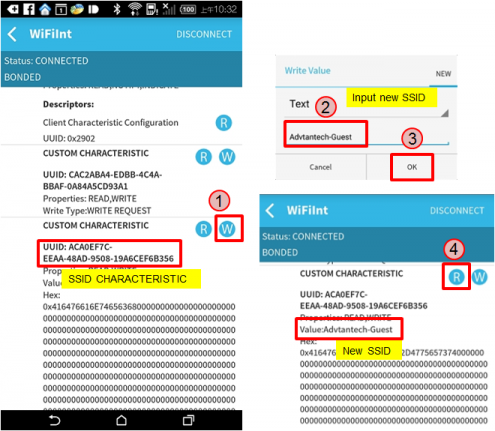
Ble-WiFi introducer service is a demonstration that set SSID and password to join network by phone. EVK will launch a BLE GATT server and advertise itself.
Then you need to manipulate on your phone.
Step 1: Install and launch the BLE Scanner app on iOS or Android.
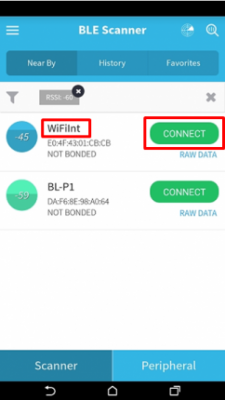
Step 2: Pull down the screen to rescan devices and it will list nearby BLE devices. Find the “WiFiInt” device and press CONNECT button.
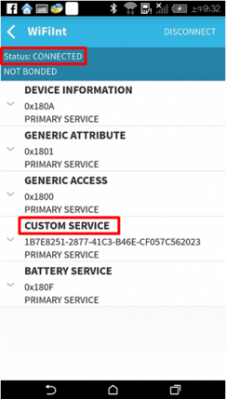
Step 3: If the connection is successful, you can see the picture below. Press the "CUSTOM SERVICE" button.
Note: You need to remove bluetooth pairing with "WiFiInt" from bluetooth setting when you can not connect to device.
Step 4: Find the UUID: ACA0EF7C-EEAA-48AD-9508-19A6F6B356 for SSID characteristic.
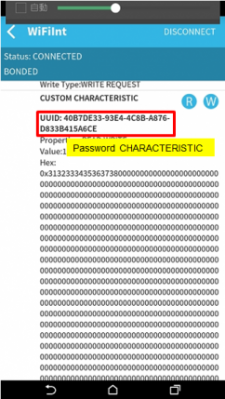
Step 5: Find the UUID: 40B7DE33-93E4-4C8B-A876-D833B415A6CE for Password characteristic then procedure as Step4.
Win7 PC
Prepare a win7 PC.
TFTP DOWNLOAD/UPLOAD FILE
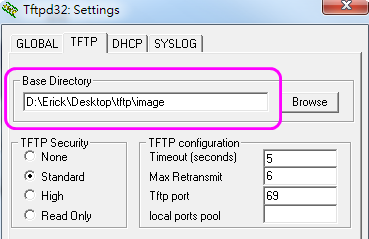
- Make sure PC connect to 2.4G Wi-Fi AP and get IP address
- Recommend used tftpd64
- Set the process reference link https://www.youtube.com/watch?v=YdVEonLMWYs
Python Environment Setup
- Download and install Python (must use Python 2.7.x Windows x86)
- Set the variables of Widows environment path: add “C:\Python27;C:\Python27\Scripts” to path
- Download and install python PIL package
- Download and unzip picture transformation tool "BmpToPixel_EPD-132R.py"
Bmp Image To EPD Format
- Run BmpToPixel_D73.py <source BMP image filename> <output filename> in cmd window
- source BMP image filename: the image file to be converted
- output filename: converted file name(recommend to use "esl" as the extension)
- Bmp size must comply with EPD resolution 1600 x 1200
- Bmp file: mono color/16 color/256 color/24bits bitmap format
- Ex: BmpToPixel_D73.py EVK_03.bmp EVK_03.esl
- Type BmpToPixel.bat to use batch conversion in directory
- Copy output files to tftp Base Directory
WISE-ED22 Setup
- Download and install WISE-ED22 driver
- Update WISE-ED22 FW for EPD-132 project. You can reference ED22 Firmware Update.
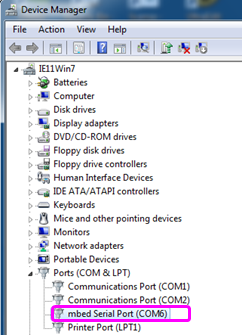
- Connected to PC via a micro USB cable, the Device Manager will appear mbed Serial Port
EVALUATION KIT HANDS-ON
Setup the hardware
- Connected EPD FPC to mainboard
- Connected Wi-Fi antenna to mainboard
- Connected ED22 board to mainboard via FFC cable
- Connected ED22 board to PC via micro USB cable
- Connected IO daughter to mainboard
- Connected power cable to mainboard USB(CN3)
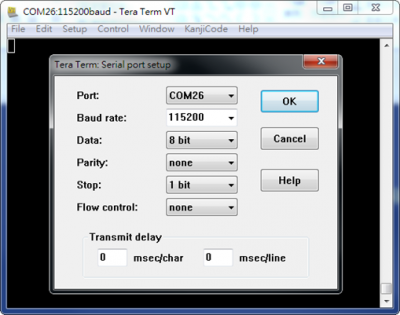
Command Console Setting
Start a serial tool(use tera term in this), and make the communication setting as shown below.
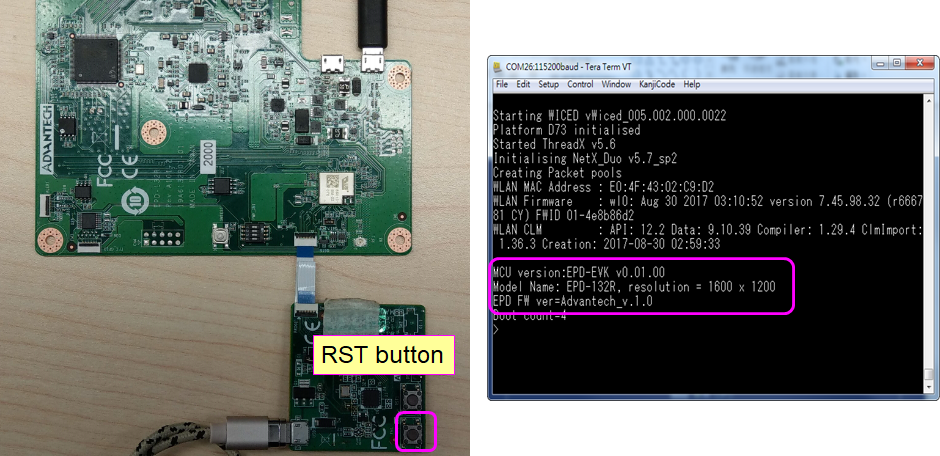
RESET EPD-132
Press “RST” button, the screen will show as below
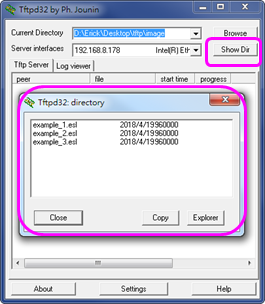
Launch TFTP Service
- PC join to Wi-Fi AP
- Lunch tftpd64.exe and select "Tftp Server" tab
- Check image folder, image file size must be 960000 byte
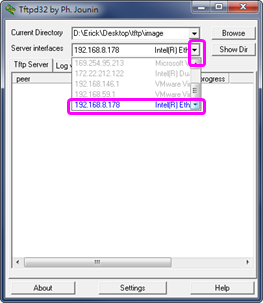
- Select tftp server IP
EPD-132 JOIN WIFI AP
- EVK operates in command mode, you must start a serial tool.
- type join <SSID> <encryption> [key]
- SSID, encryption protocol and key consistent with Wi-Fi AP setting
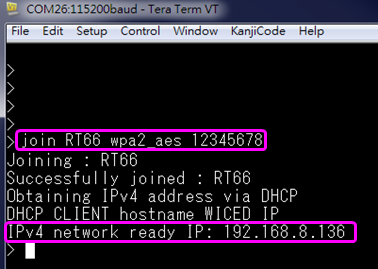
- Ex: join RT66 wpa2_aes 12345678
- Get IPv4 IP if join successful
Command List
Describes the EVK commands that you can use.
| Command |
Function |
| evk_info |
get EVK version |
| epd_info |
get EPD information |
| get_mac_addr |
get MAC |
| ping |
ping command |
| join |
Wi-Fi connect |
| leave | leave an AP after join |
| tftp |
download Images to Flash |
| epd_disp |
refresh Image |
| iperf |
Wi-Fi throughput test |
| bt_wifi |
start ble-wifi introducer service |
| carousel | start epd into carousel mode |
| led | set the led light or dark |
Command Description
- evk_info: Return EVK version
- epd_info: Return EPD model name, resolution and F/W version
- get_mac_addr: Return EVK MAC address
- ping <dest> [-i <interval in ms>] [-n <number>] [-l <length>]
- Return ping reply time if successful
- ping 8.8.8.8 -i 100 -n 5 -l 50
- join: Reference “EVK Join to Wi-Fi AP”
- leave: leave an AP router
- tftp: Reference “Download Images to Flash”
- epd_disp: Reference "Refresh Image”
- carousel: Reference "Carousel Mode"
- led: set the led light or dark
- led 1 0 ; turn-off led
- led 1 1 ; turn-on led
Download Images to EPD-132 &REFLASH IMAGE
- DOWNLOAD THE IMAGE
tftp <ip> <filename> <flash index> [-r]
- ip: tftp server ip
- filename: image file name
- flash index: range 0~3, that have maximum 4 images(0~3) be saved in flash
- -r : immediate refresh after download complete
- Ex: tftp 192.168.8.178 example_2.esl 1 -r
- DOWNLOAD THE IMAGE
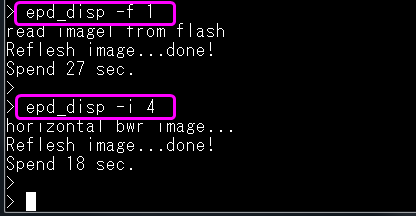
epd_disp <-f flash index | -i internal image index>
- -f: display image that read from flash, range 0~3
- -i: display internally generated image, range 0~4
0: fully black
1: full white
2: full red
3: black/white/red vertical stripes
4: black/white/red horizontal stripes - Ex: epd_disp -f 1
- Ex: epd_disp -i 4
EPD-132 Carousel Mode
carousel<-e | -p | -s | -t >
- -e <1 / 0 > : set carousel mode
- 1: enable, 0: disable
- Ex: carousel -e 1 // enable carousel mode.
- -p <P0 P1...Pn> : edit carousel page
- P0~Pn: carousel page, n>0, n<14
- Ex: carousel -p 1 2 5 8 10 // set carousel page 1, 2, 5, 8, 10
- Ex: carousel -p 1 1 1 3 3 3 6 // you can use same page when use partial update
- -s <Sn start-X start-Y Image-W image-H mode> : edit carosuel setting
- Sn: carousel sequence number, associated with the -p order, n>0, n<16
- start-X: refresh X coordinate
- start-Y: refresh Y coordinate
- image-W: refresh width
- image-H: refresh height
- mode: refresh mode, 0: GC mode(by default), 1: DU mode(only usu in B/W panel), 2: Rolling mode(only usu in B/W panel)
- Ex: carousel -s 1 0 0 1600 1200 0 // S1 (x,y)=(0,0) (w,h)=(1600,1200) use GC mode
- -t <Sn time> : set the interval between the next image
- Sn: carousel sequence number, associated with the -p order, n>0, n<16
- time: the unit is second.
- Ex: carousel -t 1 5 // set S1 to S2 interval 5 second
- A carousel example
- join ssid wpa2_aes password // join the AP router named "ssid"
- tftp 192.168.8.178 BSD_00.esl 0 -r // load BSD_00.esl to page 0
- tftp 192.168.8.178 BSD_01.esl 1 -r // load BSD_01.esl to page 3
- tftp 192.168.8.178 BSD_02.esl 2 -r // load BSD_02.esl to page 6
- carousel -p 0 3 3 3 6 6 6 // set carousel page P0(S0) P3(S1) P3(S2) P3(S3) P6(S4) P6(S5) P6(S6)
- carousel -s 0 0 0 1600 1200 0 // set S0 (x, y)=(0, 0), (w, h)=(1600, 1200), full update with GC mode
- carousel -s 1 1095 50 140 240 0 // set S1 (x, y)=(1095, 50), (w, h)=(140, 240), partial update with GC mode
- carousel -s 2 215 740 1230 85 0 // set S2 (x, y)=(215, 740), (w, h)=(1230, 85), partial update with GC mode
- carousel -s 3 130 20 910 320 0 // set S3 (x, y)=(130, 20), (w, h)=(910, 320), partial update with GC mode
- carousel -s 4 1095 50 140 240 0 // set S4 (x, y)=(1095, 50), (w, h)=(140, 240), partial update with GC mode
- carousel -s 5 215 740 1230 85 0 // set S5 (x, y)=(215, 740), (w, h)=(1230, 85), partial update with GC mode
- carousel -s 6 130 20 910 320 0 // set S6 (x, y)=(130, 20), (w, h)=(910, 320), partial update with GC mode
- carousel -e 1 // enable carousel mode
CN2 USB DOWNLOAD IMAGE IN EPD-132/130 REFERE TO CHAPTER4
EPD-132 Firmware Update
You can reference WISE-ED22 "Drag-n-drop Programming"
===================================================
Easy and Fast to Refresh Image via USB
Hardware Setup
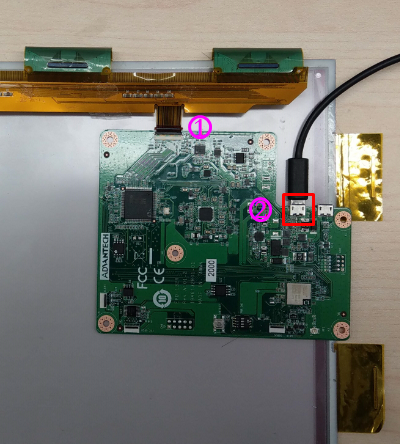
Follow steps and picture below to setup the hardware
- Connected EPD FPC to mainboard
- Connected USB cable to mainboard USB2(CN2)
Tool Setup
- Download and unzip EPD-132R_CLItool
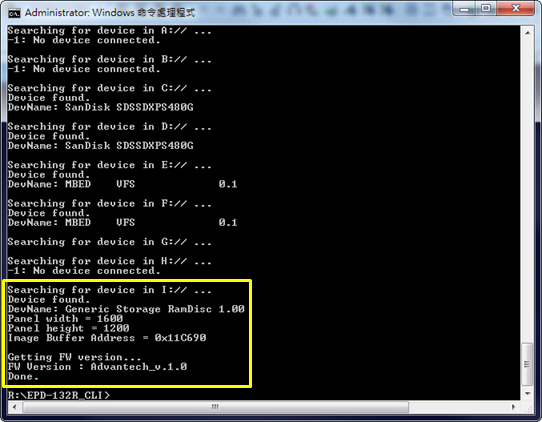
- Click "IT8951_FWVersion.bat" to get EPD panel information
Download and Refresh Image
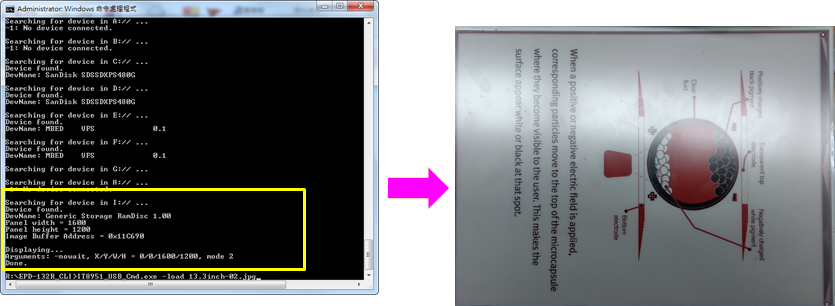
- Click "IT8951_UpdateImage1.bat" to update "13.3inch-01.bmp" to EPD.
- Click "IT8951_UpdateImage2.bat" to update "13.3inch-02.bmp" to EPD.
- Open "IT8951_UpdateImage1.bat" and edit "13.3inch-02.bmp" for your image name.
- The image will not saved in flash
