MCU/WISE-1570 SDK
Contents
Introduction
WISE-1570 Software Development Kit (SDK)
Setup Development Environment
Preparing for Hardware
With the WISE-DB-1505 I/O board
- For mote, WISE-1570, WISE-DB-1505.
- PC running LINUX operating systems such as Ubuntu 16.04.1.
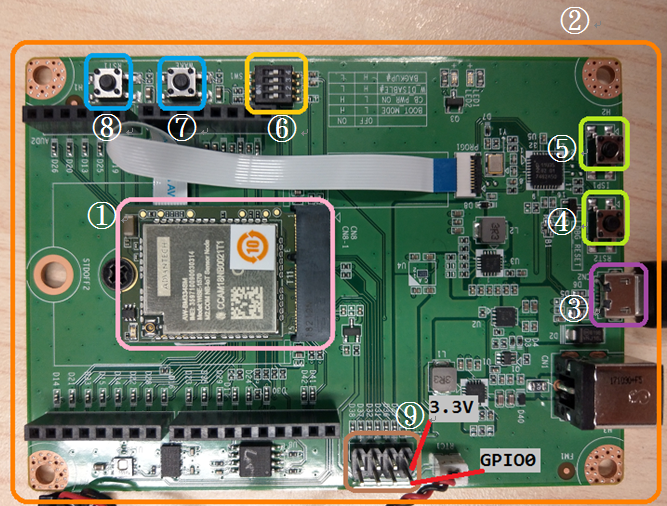
Please refer to the following steps for setup a WISE series of boards before using WISE-1570 SDK.
①WISE-1570
- The user must to choose the FPC connector on WISE-1570 is connected to FPC connector "PROG1" through FPC.
②WISE-DB-1505
③Micro USB connector
④RST2 button
- Reset with daplink.
⑤ISP1 button
- It's used to reset MCU through daplink.
⑥SW1 switch
- Please check pin1 ~ pin4 to “OFF” as default.
- Pin1 to “ON”: flash programming, “OFF”: boot from flash.
- Pin2 to “ON”: carrier board power on, “OFF”: carrier board power off.
- Pin3 not supported.
- Pin4 to decide whether running “backup to default” while device booting. “ON”: enabled, “OFF”: disabled.
⑦WAKE button
- Not supported.
⑧RST1 button
- It's used to reset MCU.
⑨CN9
- Booting into the mode of network connection when both 3.3V and GPIO0 are opened.
- Booting into the mode of console;when both 3.3V and GPIO0 are shorted.
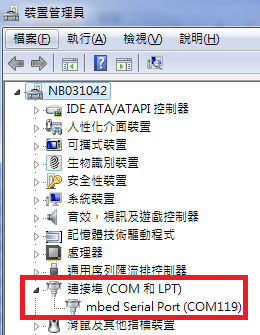
Step02: Connect the WISE-DB-1505 to PC using micro-USB cable.
The device will be visible in the Device Manager as below after serial port driver installed.
With the WISE-DB-1500 I/O board
- For mote, WISE-1570, WISE-1500 and WISE-ED22 or WISE-ED20.
- PC running LINUX operating systems such as Ubuntu 16.04.1.
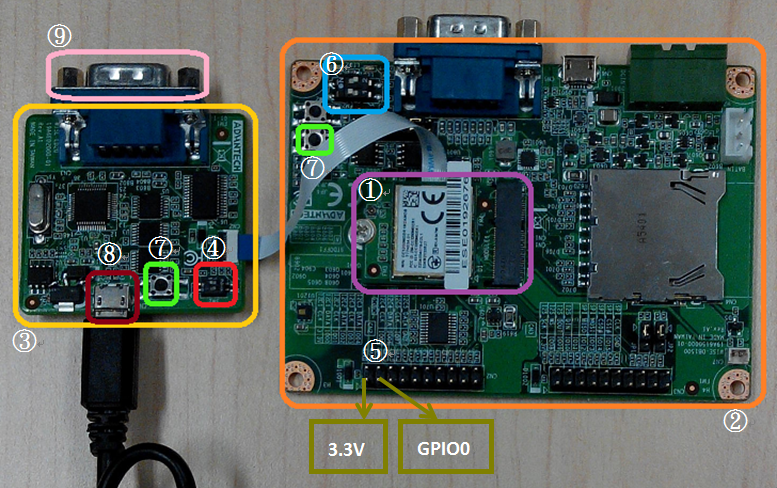
Please refer to the following steps for setup a WISE series of boards before using WISE-1570 SDK.
①WISE-1570
The user must to choose the CN1 on WISE-1570 is connected to WISE-ED20 or WISE-ED22 through FPC.
②WISE-1500
③WISE-ED20
④SW2 on WISE-ED20
- Please check pin1 and pin2 to “ON” as default.
- Switch pin1 to “ON”: flash programming, “OFF”: boot from flash.
⑤CN2 on WISE-1500
- Booting into the mode of network connection when both 3.3V and GPIO0 are opened.
- Booting into the mode of console of API when both 3.3V and GPIO0 are shorted.
⑥SW3 on WISE-1500
- Please check pin1 and pin2 to “OFF” as default.
- Switch pin2 to decide whether running “backup to default” while device booting. “ON”: enabled, “OFF”: disabled.
⑦One reset button on WISE-1500 and the other on WISE-ED20
⑧Micro USB connector
- Power supplies for UART3 debug port.
⑨Com port
- No supported.
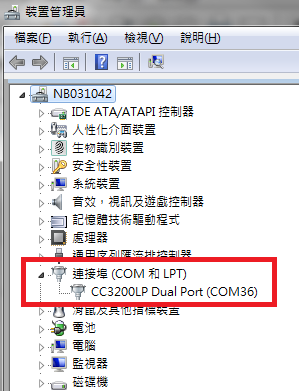
Step02: Connect the WISE-ED20 to PC using micro-USB cable.
The device will be visible in the Device Manager as below after FTDI driver installed. The user can find the FTDI driver in source tree.
ARM mbed
The ARM mbed is IoT device platform and it has a lot of resources for IoT development. We supported ARM mbed OS on WISE-1570 to make user easily to get started and obtain great benefit from ARM mbed.
mbed CLI
The mbed CLI is command-line tool. The user needs to setup CLI for WISE-1570 SDK and please follows the steps to install related tools. For more details, please refer to mbed CLI.
Note: We expected the user setups mbed CLI in Linux as default. If the user preferred Windows, ARM mbed provides the Video tutorial for manual installation.
- Install Python
- mbed CLI supports Windows, Linux and Mac OS X operating systems. You can select the OS you prefer to work with. mbed CLI is a Python script, so you’ll need Python to use it. The version 2.7.11 of Python has been verified with mbed CLI.
- Note: mbed CLI is incompatible with Python 3.
Install python 2.7.11
$ sudo wget https://www.python.org/ftp/python/2.7.11/Python-2.7.11.tgz
$ tar zxvf Python-2.7.11.tgz
$ cd Python-2.7.11
$ sudo ./configure
$ sudo make altinstall

Check the python version
$ python --version
- (Optional) Install Git or Mercurial
- If you would like to maintain your source code in repositories, you can continue with the next step. mbed CLI supports both Git and Mercurial repositories, you can install which one you prefer:
- Git - version 1.9.5 or later.
- Mercurial - version 2.2.2 or later.
- If you don’t want to use repositories, you can just skip it.
Git install commands as follow
Install Git latest
$ sudo add-apt-repository ppa:git-core/ppa
$ sudo apt-get update
$ sudo apt-get install git

Check the git version
$ git --version
Mercurial install commands as follow
Install mercurial latest
$ sudo add-apt-repository ppa:mercurial-ppa/releases
$ sudo apt-get update
$ sudo apt-get install mercurial

Check the mercurial version
$ hg --version
- Install GCC
- mbed CLI invokes the mbed OS 5 tools for various features, such as compiling, testing and exporting to industry standard toolchains. To compile your code, you will need either a compiler or an IDE:
- Compilers: GCC ARM, ARM Compiler 5, IAR.
- IDE: Keil uVision, DS-5, IAR Workbench.
- We select GCC ARM Embedded, so you can install version 4.9 of GCC ARM Embedded.
Install GCC ARM Embedded
$ sudo add-apt-repository ppa:team-gcc-arm-embedded/ppa
$ sudo apt-get update
$ sudo apt-get install gcc-arm-embedded

Check the Gcc version
$ arm-none-eabi-gcc --version
- Note: When installing the Arm Compiler 5 on a 64-bit Linux machine, you may need to also install the i386 architecture package:
$ sudo dpkg --add-architecture i386
$ sudo apt-get update
$ sudo apt-get install libc6:i386 libncurses5:i386 libstdc++6:i386
- Install mbed CLI
- You can get the latest stable version of mbed CLI from PyPI
$ pip2 install mbed-cli
- Note: On Linux or Mac, you may need to run with sudo.
- Note2: Please make sure you have a mbed-cli version that is greater than 1.8.0.
- Other necessary package
$ sudo pip2 install colorama
$ sudo pip2 install pyserial
$ sudo pip2 install prettytable
$ sudo pip2 install jinja2
$ sudo pip2 install intelhex
$ sudo pip2 install junit_xml
$ sudo pip2 install mbed_ls
$ sudo pip2 install beautifulsoup4
$ sudo pip2 install fuzzywuzzy
$ sudo pip2 install mbed_host_tests
$ sudo pip2 install mbed_greentea
mbed CLI configuration
- GCC_ARM_PATH
- Set GCC_ARM_PATH to the binary directory of your GCC Arm installation
$ mbed config -G GCC_ARM_PATH "/home/erick/gcc-arm-none-eabi-4_9-2015q3/bin"
[mbed] /home/erick/gcc-arm-none-eabi-4_9-2015q3/bin now set as global GCC_ARM_PATH
Flash Programming
Programming through WISE-ED22
Please refer to WISE-ED22 for flash programming.
Programming through WISE-DB-1505
The WISE-ED22 has been built-in on WISE-DB-1505. Please note that the button "ISP1" of WISE-DB-1505 is the same as "SW1" of WISE-ED22 and "RST2" of WISE-DB-1505 is the same as "RST1" of WISE-ED22. Please refer to WISE-ED22 for flash programming.
Software API
Mbed API
Example
First Example
The user can use this example to communicate with RF by specified AT command. Please follow the below steps to give it a try. About AT command manual if needed, please get in touch your contact person from ADVANTECH.
- Step01: Get source code and compile it by mbed CLI.
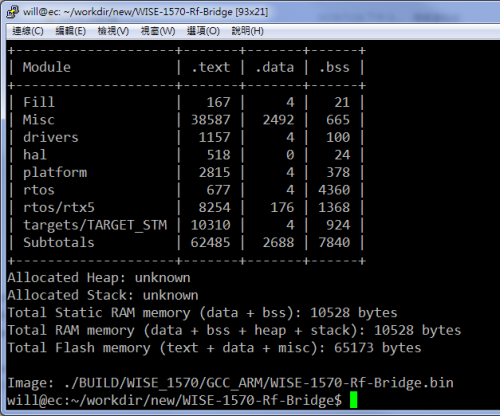
- Please click "Link to source" and review the file "README.md" to know how to deployment and compilation with this example. The output binary will be "source_dir/BUILD/WISE_1570/GCC_ARM/WISE-1570-Rf-Bridge.bin"
- Step02: Flash programming by WISE-ED22
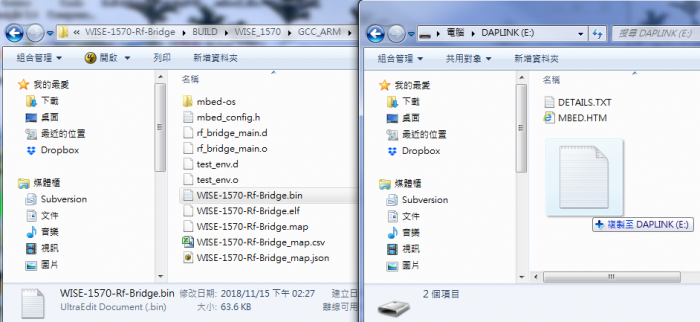
- Check device connected from WISE-ED22 to PC using micro-USB cable and use drag-and-drop programming with your binary.
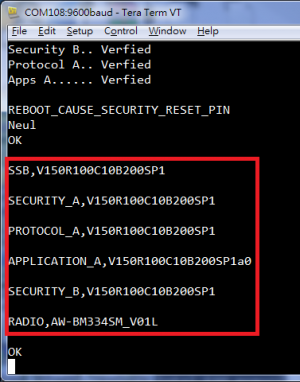
- Step03: Get the version of RF by AT command "AT+CGMR"
- Choose any terminal you like. (e.g., the snapshot is setting of Tera Term.)
- Please set terminal as the below setting:
- Baud rate: 9600
- Data: 8bit
- Parity: None
- Stop: 1bit
- Flow control: None
- Type AT command "AT+CGMR" and see the response on the console.
Peripheral
I2C
This example uses I2C bus to read humidity and temperature sensor which is built-in WISE-1500
#include "mbed.h"

#define TI_HDC1050_DEVICE_ADDR            0X40
#define TI_HDC1050_TEMPERATURE_ADDR       0X00
#define TI_HDC1050_HUMIDITY_ADDR          0X01
#define TI_HDC1050_CONFIGURATION_ADDR     0x02
#define TI_HDC1050_SERIALID0_ADDR         0XFB
#define TI_HDC1050_SERIALID1_ADDR         0XFC
#define TI_HDC1050_MANUFACTURER_ID_ADDR   0xFE
#define TI_HDC1050_DEVICE_ID_ADDR         0XFF
#define TI_HDC1050_MANUFACTURER_ID        0x5449
#define TI_HDC1050_DEVICE_ID              0x1050

static I2C i2c0(I2C0_SDA,I2C0_SCL);
static DigitalOut g_tPower(CB_PWR_ON);

int main(int argc, char* argv[])
{
    char rxBuff[4];
    char ofs = TI_HDC1050_TEMPERATURE_ADDR;
    uint16_t u16Humidity = 0;
    float fTemperature = 0;
    I2C *i2c = &i2c0;
    g_tPower = 1;

    //
    // Set clock frequency of I2C interface is 100KHz
    //
    i2c->frequency(100000);

    //
    // Access sensor by read/write transaction through I2C interface
    //
    for(int i=0; i<10; i++) {
        i2c->write(TI_HDC1050_DEVICE_ADDR << 1, &ofs, 1);
        wait_ms(100);
        i2c->read(TI_HDC1050_DEVICE_ADDR << 1, rxBuff, 4);

        fTemperature = (float)(( rxBuff[0] << 8) | (rxBuff[1] ));
        fTemperature = (fTemperature*165)/65536-40;
        u16Humidity = (rxBuff[2] << 8) | (rxBuff[3] );
        u16Humidity = (u16Humidity*100)/65536;
        printf("temperature:%.2f, humidity:%d \n\r", fTemperature, u16Humidity);
        wait(1);
    }
    return 0;
}
Power Consumption Measurement
This example is demonstrated for power saving on WISE-1570. Please follow the below steps to give it a try. For this example, the user needs some hardware that have reworked for current measurement. please get in touch your contact person from ADVANTECH if needed details.
- Step01: Get source code and compile it by mbed CLI.
- Please click "Link to source" and review the file "README.md" to know how to deployment and compilation with this example. The output binary will be "source_dir/BUILD/WISE_1570/GCC_ARM/WISE-1570-Rf-PSM.bin"
- Step02: Flash programming by WISE-ED22
- Check device connected from WISE-ED22 to PC using micro-USB cable and use drag-and-drop programming with your binary.
- Step03: Open the terminal and observe behavior"
- Choose any terminal you like. (e.g., the snapshot is setting of Tera Term.)
- Please set terminal as the below setting:
- Baud rate: 115200
- Data: 8bit
- Parity: None
- Stop: 1bit
- Flow control: None
- Step04: Disconnect the WISE-ED22 for leakage current, reset the WISE-1570 and measure the current by digital multimeter"
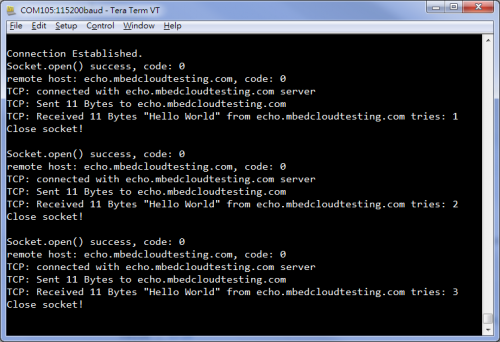
- Depend on this example that have the transaction with echo server, the user will measure the current approximately 3.x uA in minimum when WISE-1570 goes into sleep, and the current of average is approximately 3x.x uA.
Smart Connection Platform
The user can use this example to connect to Smart Connection Platform of CHT IoT.
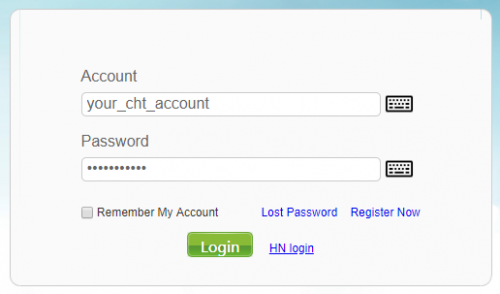
- Step01: Log in by your CHT's account to Smart Connection Platfrom of CHT IoT.
- Step02: Create a new template for WISE-1570
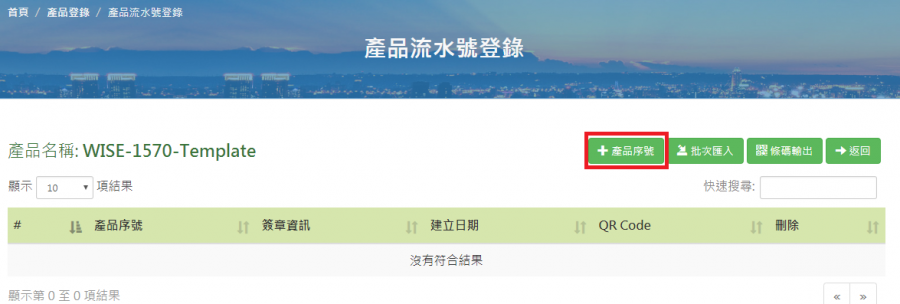
- Firstly, please make sure you have permission to access with "Product Registry" / "產品登錄". If you don't have permission, please get in touch your contact person from CHT.
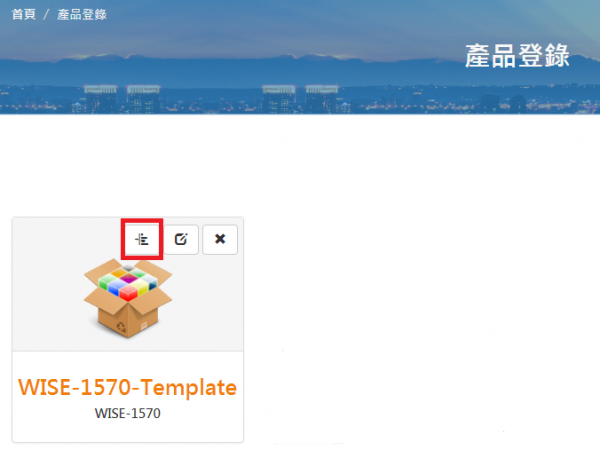
- Click the icon "Add Product" / "增加產品"
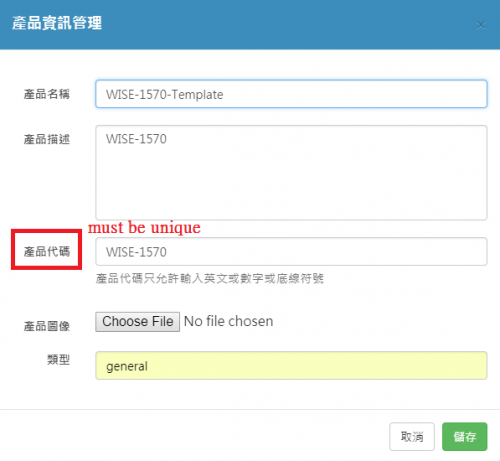
- Fill in information about the product in this template, then click the icon "Save" / "儲存" to save it.
- Please note the "Product code" / "產品代號" you input must be unique on the cloud.
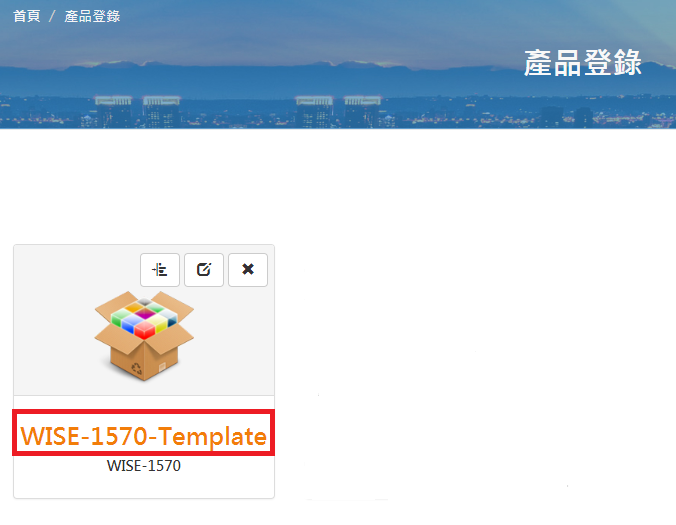
- Click the icon "編輯樣板" / "edit template" to edit template.
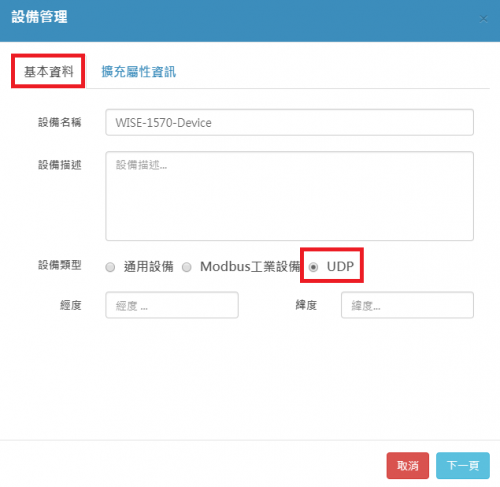
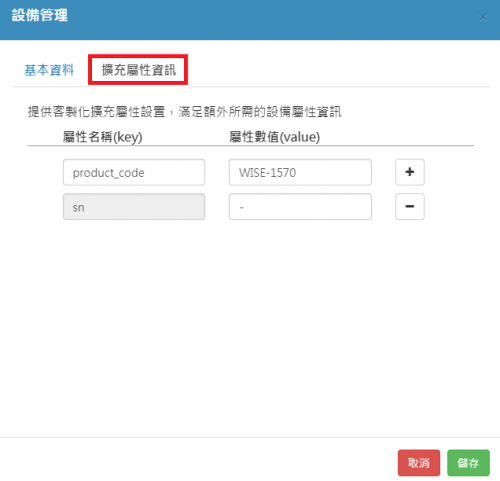
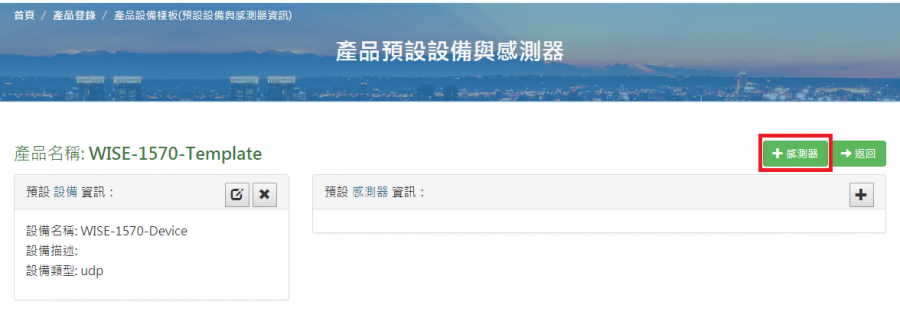
- Add new device at first time and fill in information as below, then click the icon "Save" / "儲存" to save it.
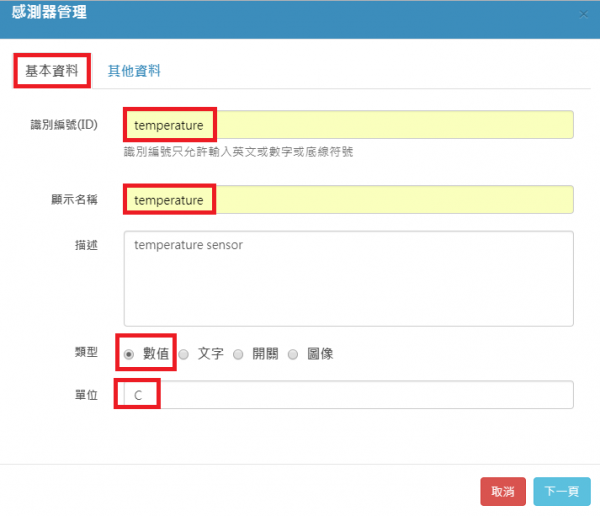
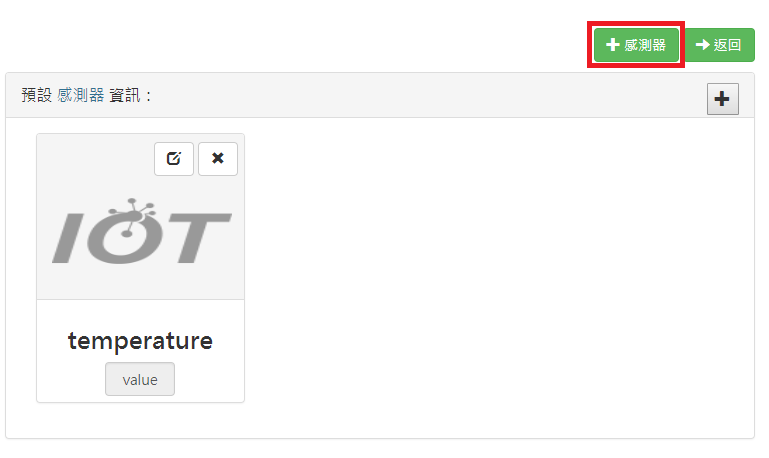
- Add temperature & humidity sensor by clicking the icon "Sensor" / "感測器".
- Add temperature sensor. Please note to make sure to fill in field of "ID" / "識別編號" correctly as "temperature"
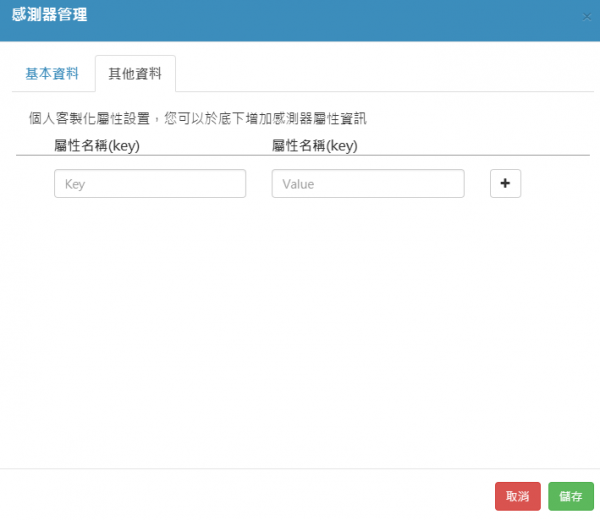
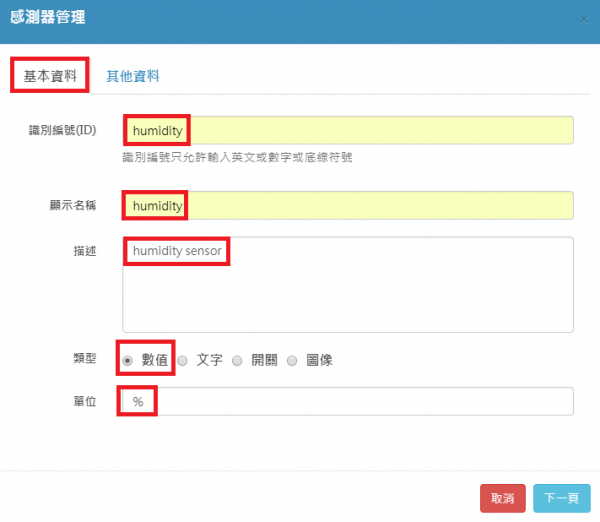
- Add humidity sensor by clicking the icon "Sensor" / "感測器". Please note to make sure to fill in field of "ID" / "識別編號" correctly as "humidity"
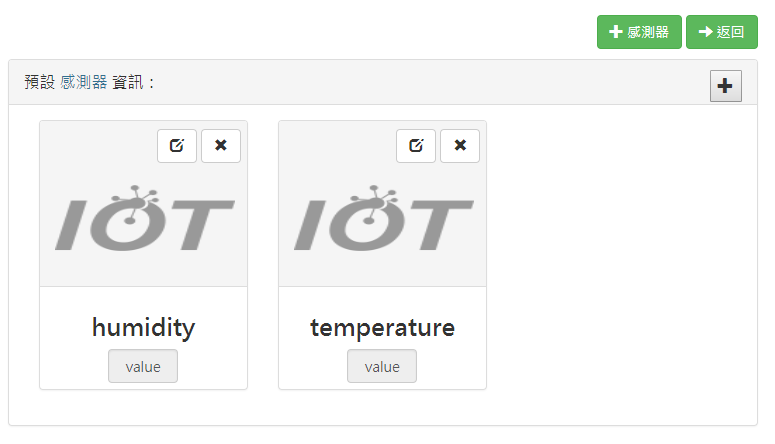
- The user will see there are two sensors in the template
- Step03: Add a device with the template
- Click the below template link
- Click the icon "Serial number" / "產品序號" to add a device
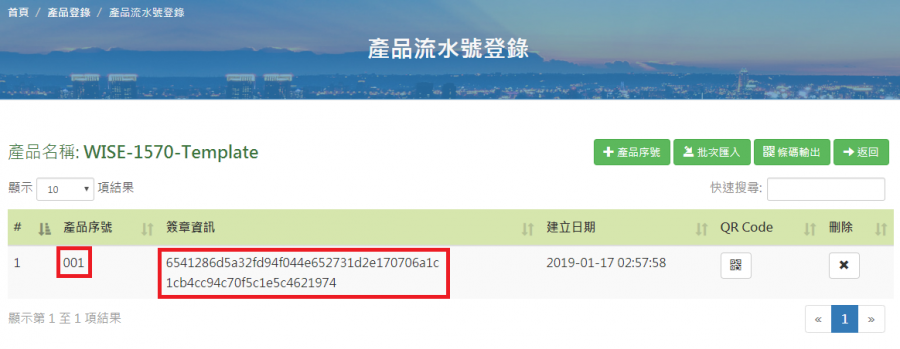
- Input the serial number "001", then click the icon "Save" / "儲存" to save it.
- The user will see the serial number and digest generated automatically by cloud
- Step04: Create a new project and find the project key
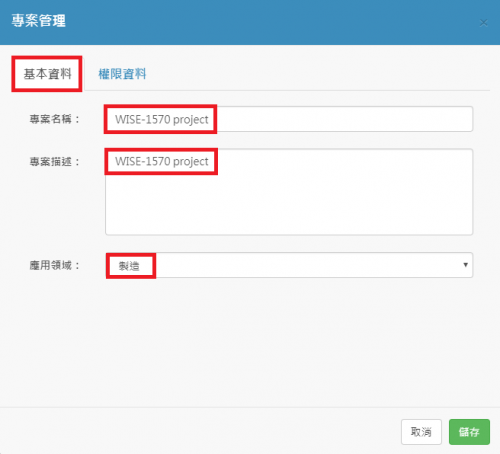
- Click the icon "Add project" / "增加專案" to add a new project
- Fill in information as below
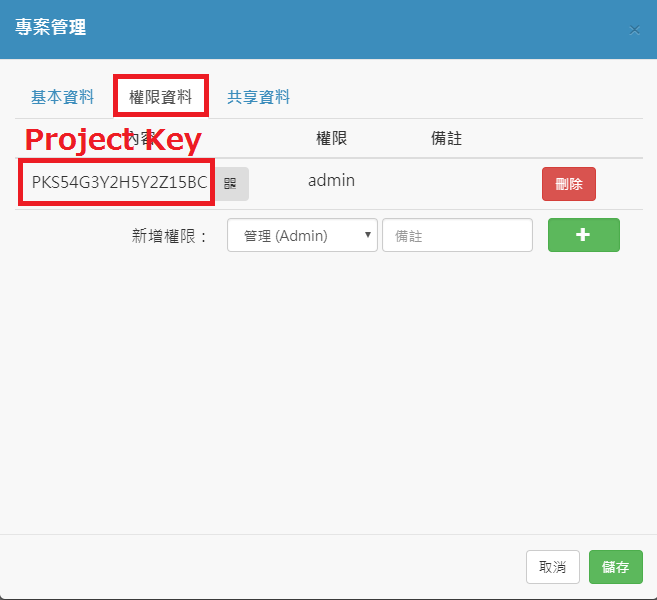
- Find the project key and save this project by clicking the icon "Save" / "儲存"
- Step05: Get source code and prepare the firmware
- Prepare parameters include "project Key", "serial number" and "digest" as above stpe3 and step4
- Please click "Link to source" and review the file "README.md" to know how to deployment with this example.
- Build out the hex file and it will be "source_dir/BUILD/WISE_1570/GCC_ARM/WISE-1570-IoTSmartPlatform.hex"
- Step06: Flash programming by WISE-ED22
- Check device connected from WISE-ED22 to PC using micro-USB cable.
- Please open and set terminal as the below setting:
- Baud rate: 115200
- Data: 8bit
- Parity: None
- Stop: 1bit
- Flow control: None
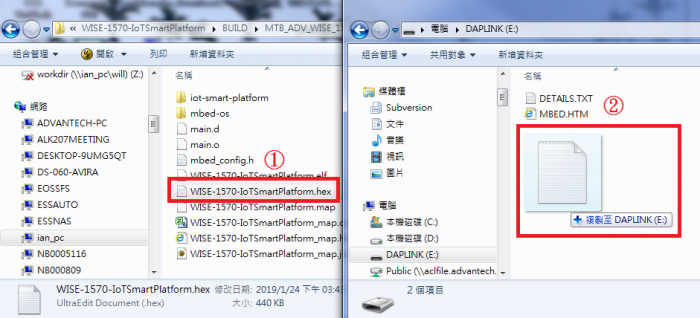
- Use drag-and-drop programming with your hex file
- Registration to cloud
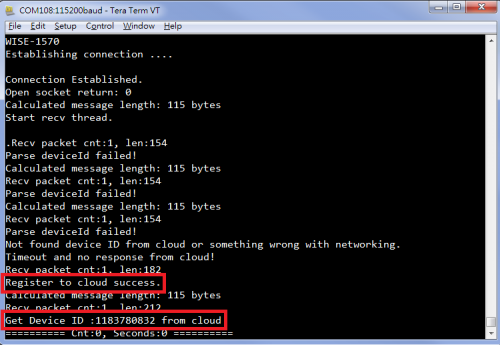
- Before the procedure of registration complete at first time, the device can't get device ID from cloud. then, it will try to register to cloud and you will see the successful response on the console if the credentials you input all are correct
- Before the procedure of registration complete at first time, the device can't get device ID from cloud. then, it will try to register to cloud and you will see the successful response on the console if the credentials you input all are correct
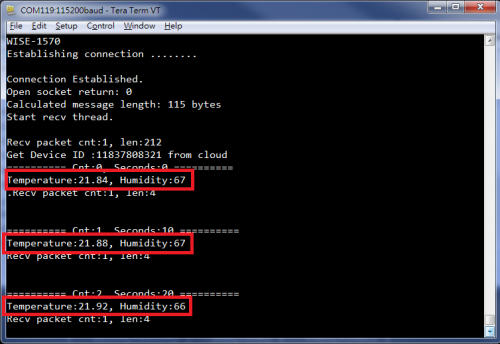
- Report temperature and humidity data to cloud periodically
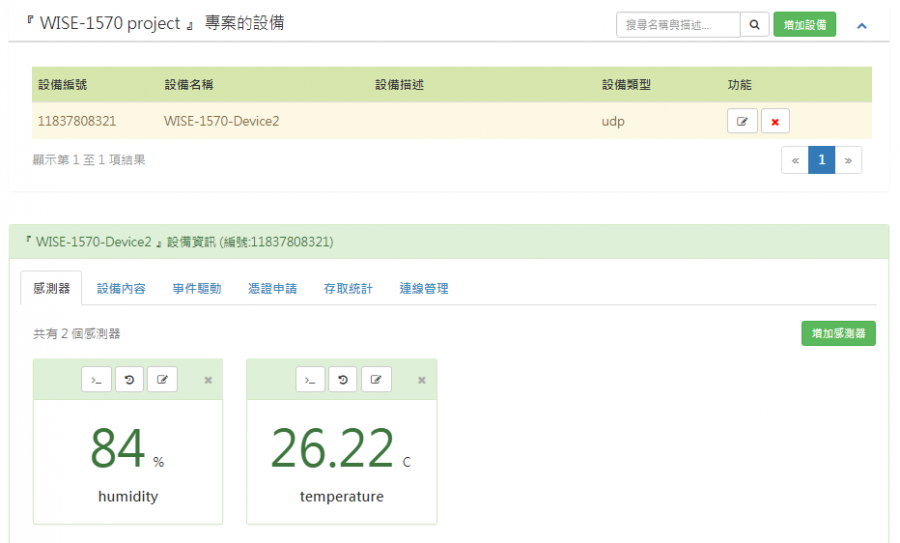
- Step07: Observe sensor data on cloud
- Click the below project link
- You will see data reported as below dash board
ARM Pelion
PDMC(Pelion Device Management Client) Example
This example is demonstrate how to connect to Pelion Device Management. Please follow the below steps to give it a try.
- Step01: Prepare an Mbed account
- Before a device connected to Pelion Device Management, the user need an Mbed account. please refer to the below link to sign up
- An Mbed account - "sign up if you don't have one."
- Access to Pelion Device Management - "request access here"
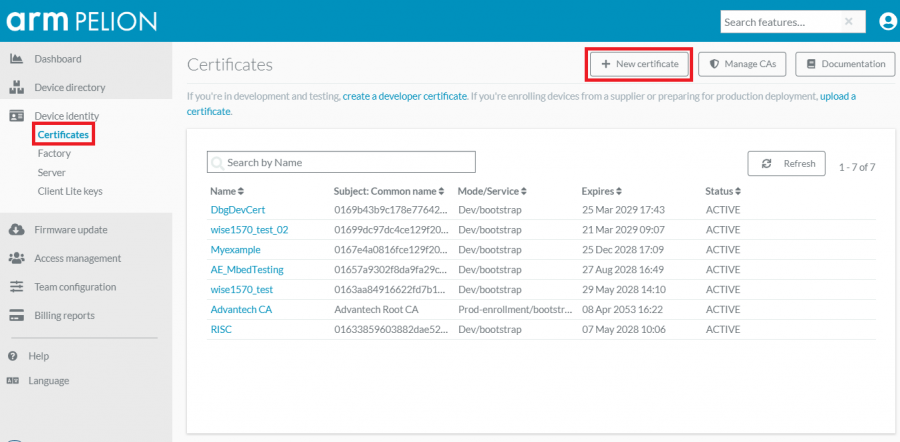
- Step02: Create developer certificate.
- Please click "link to create certificate" and follow the below steps to create a new one.
- Click the "New certificate"
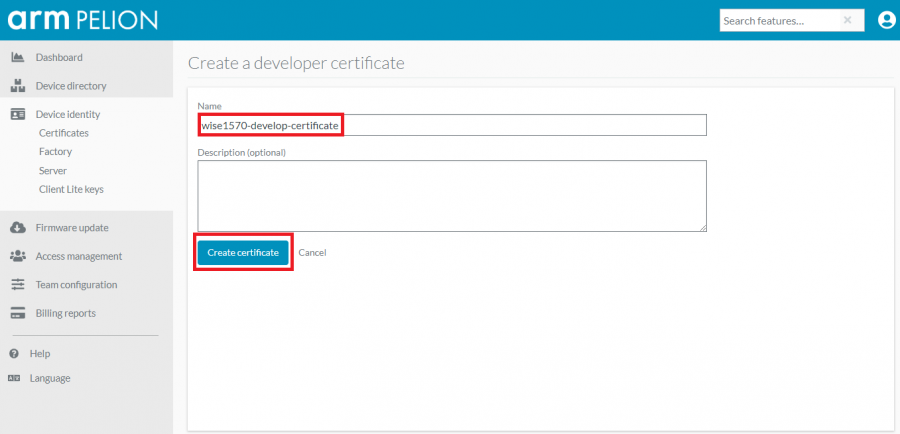
- Click the "Create a developer certificate" in pop-up window
- Give a name of your certificate and click "Create certificate"
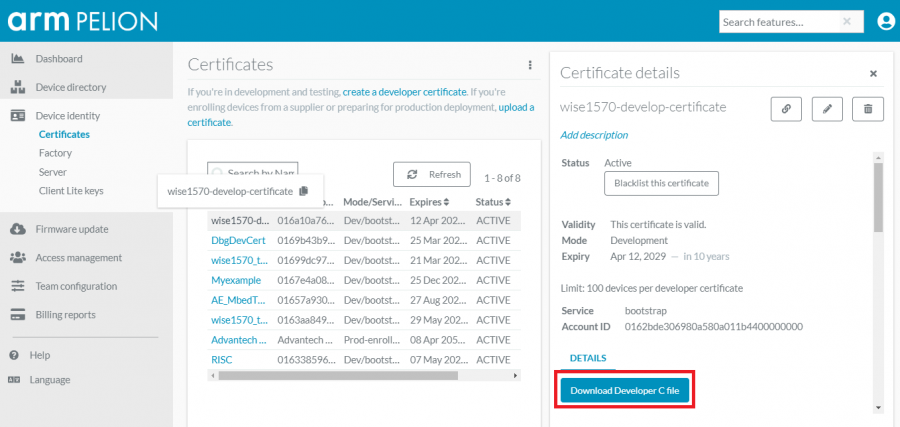
- Click the "Download Developer C file" to download the certificate and get the file "mbed_cloud_dev_credentials.c"
- Step03: Get source code and compile it by mbed CLI.
- Please click "Link to source" and review the file "README.md" to know how to deployment and compilation with this example. The output hex file will be "source_dir/BUILD/WISE_1570/GCC_ARM/WISE-1570-Pelion-Device.hex"
- Step04: Flash programming by DAPLink on WISE-DB-1505
- Check device connected to PC using micro-USB cable and use drag-and-drop programming with your hex file.
- Step05: Access sensor data in Pelion Device Management Portal
- Check which endpoint name you have on the console.
- Please set terminal as the below setting:
- Baud rate: 115200
- Data: 8bit
- Parity: None
- Stop: 1bit
- Flow control: None
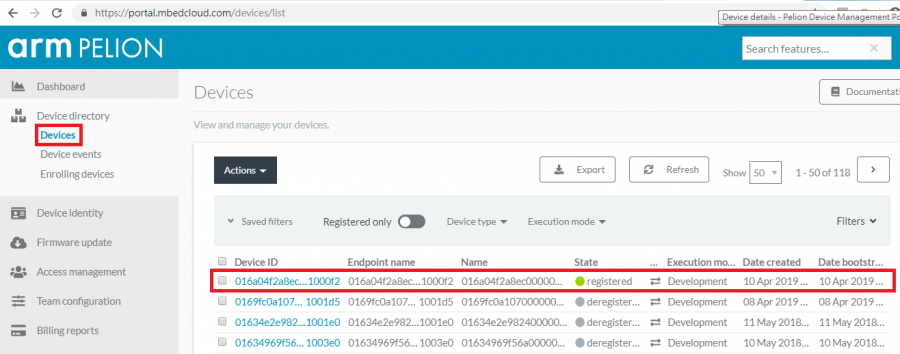
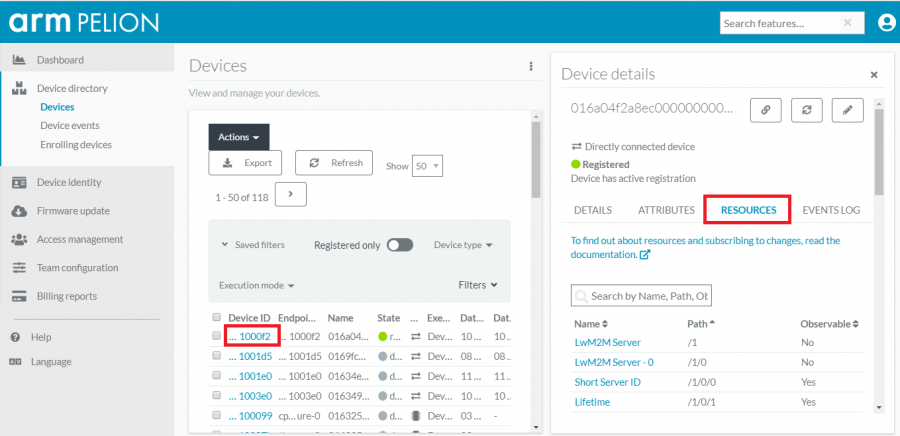
- Open browser and go to "Device Management Portal's Device Directory page.". The user will see the list of devices.
- Click the device ID the same as endpoint name and select the "RESOURCES" tab to view the device's exposed LwM2M resources.
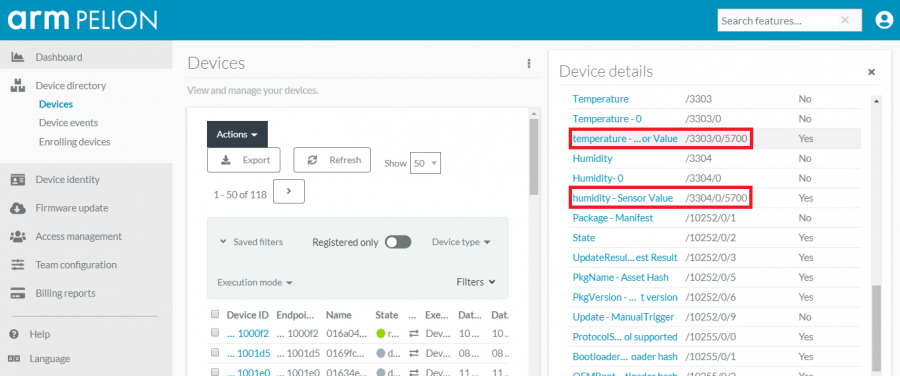
- Scroll down to locate the resource temperature or humidity.
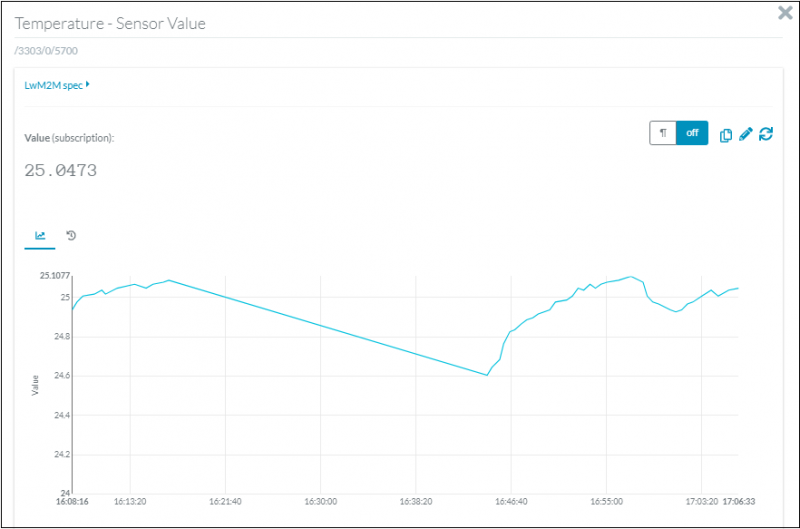
- Click "temperature - Sensor Value" or "humidity - Sensor Value" to open the graph and observe the sensor's data changed.
OTA with PDMC
The “Over the Air” (OTA) is method for firmware update. For PDMC, we need to prepare two firmwares, one is programmed into WISE-1570 and anthoer is hosted in your PC, and use the manifest tool to demonstrate how it works. Please follow the below steps to give it a try.
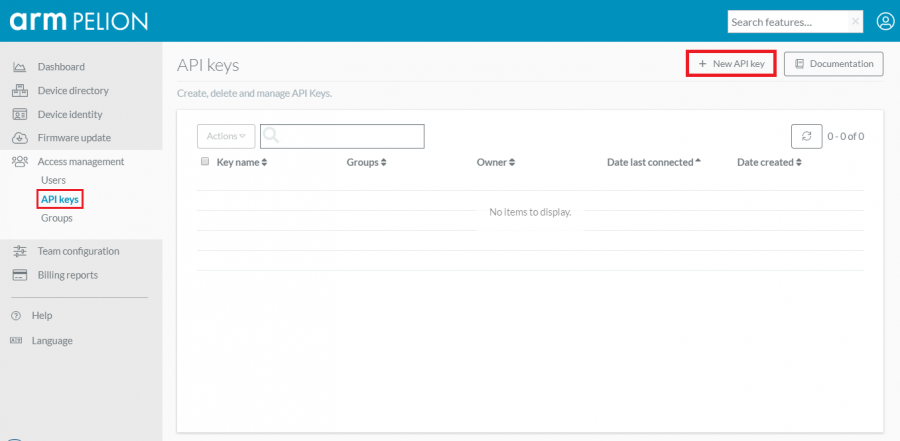
- Step01: Create an API key on Pelion Device Management Portal
- Click the "New API key"
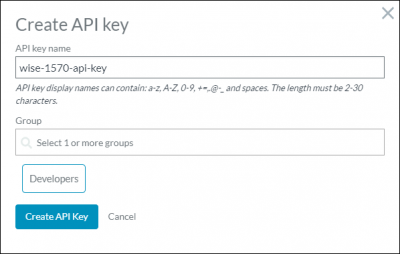
- Give a "API key name" and select the "Developers" group
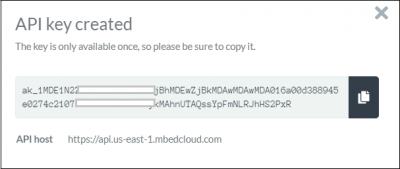
- Copy the API key and API host, then save it in your PC
- Please note that the key is only available once, so please be sure to copy it.
- Step02: Install manifest tool
- The manifest tool is compatible both with Python 2.7.11 and later and with Python 3.5.1 and later.
- Option1: install from PyPi with pip
$ pip install manifest-tool
- Option2: install from GitHub over HTTPS.
$ pip install git+https://github.com/ARMmbed/manifest-tool.git
- Step03: Create a new project
- Initialize by manifest-tool.
$ manifest-tool init -d "<company domain name>" -m "<product model identifier>" -a "<Device Management API Key>" -S "<Device Management Alternative API address>"
- Example:
$ manifest-tool init -d "www.advantech.com" -m "wise-1570" -a "ak_1MDE1N2ZmZTA5ZGEzMDAaMjBhM12wZjBkMDAwMD87MDA016a00d388945e0274c21077000000004bkctykMAhnUTAQssYpFmNLRJhHS2PxR" -S "https://api.us-east-1.mbedcloud.com"
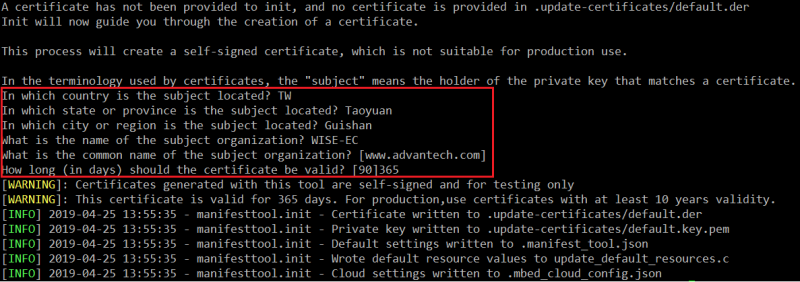
- Fill in the information.
- Output files
- Step04: Add certificate into source tree and rebuild the PDMC
- Please replace the file "update_default_resources.c" generated by manifest tool into your source tree.
- Build out the hex file and it will be "source_dir/BUILD/WISE_1570/GCC_ARM/WISE-1570-Pelion-Device.hex"
- Please replace the file "update_default_resources.c" generated by manifest tool into your source tree.
- Step05: Flash programming by DAPLink on WISE-DB-1505
- Check device connected to PC using micro-USB cable and use drag-and-drop programming with your hex file.
- Step06: Build the new PDMC that has "OTA" string displayed on console
- Comment out the macro "OTA_TEST" in main.cpp and rebuild the PDMC.
- The output binary will be "source_dir/BUILD/MTB_ADV_WISE_1570/GCC_ARM/WISE-1570-Pelion-Device_update.bin
- Comment out the macro "OTA_TEST" in main.cpp and rebuild the PDMC.
- Step07: Launch OTA
- Launch OTA by mainfest tool (PC):
$ manifest-tool update device -p <payload> -D <device ID>
- Example:
$ manifest-tool update device -p WISE-1570-Pelion-Device_update.bin -D 016a533470bb000000000001001003ca
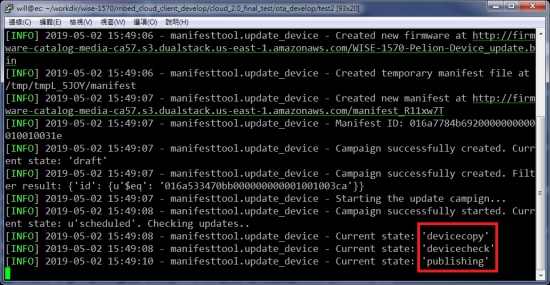
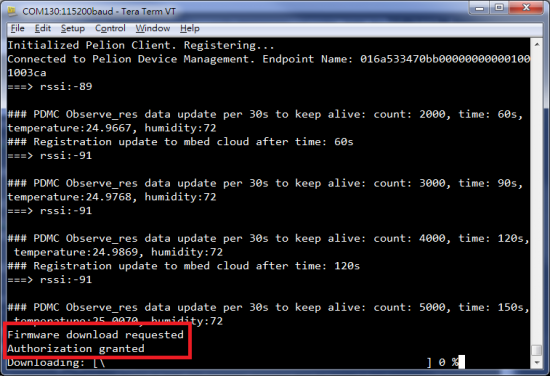
- You will see the state keep on publishing (PC)
- You will see the state keep on publishing (PC)
- Get request on endpoint (Device)
- Get request on endpoint (Device)
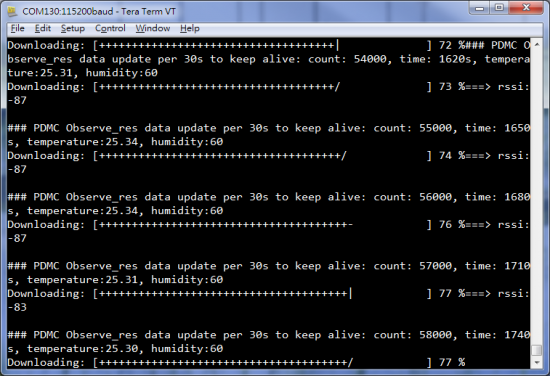
- Download in progress (Device)
- Download in progress (Device)
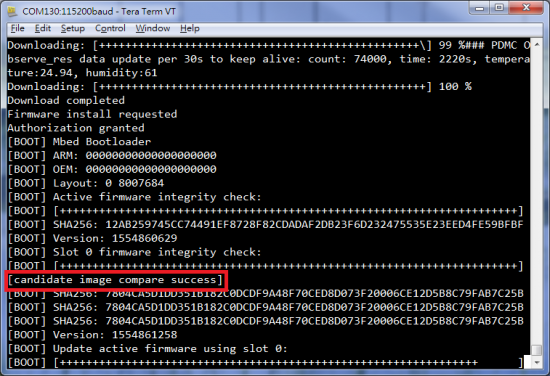
- Check integrity with the firmware image (Device)
- Check integrity with the firmware image (Device)
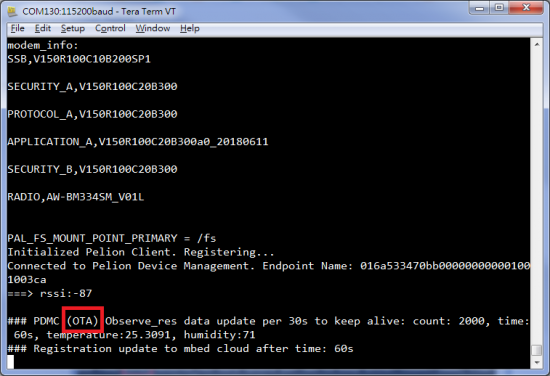
- You will see "OTA" string on console after reboot (Device)
- You will see "OTA" string on console after reboot (Device)
Reset to Default Setting
Please follow the below steps to restore configurations to default with PDMC if needed.
- Step01: Check switch to enable backup function
- If you have the WISE-DB-1505, please check pin4 of SW1 to "ON". The user can find the switch on item6 of "WISE-DB-1505".
- If you have the WISE-DB-1500, Please check pin2 of SW3 to "ON". The user can find the switch on item6 of "WISE-DB-1500".
- Step02: Reboot device
- If you have the WISE-DB-1505, please press reset button "RST1" once. The user can find the button on item8 of "WISE-DB-1505".
- If you have the WISE-DB-1500, please press reset button once. The user can find the button on item7 of "WISE-DB-1500".
- Then you will see the screenshot as below.
- Step03: Disable backup function
- If you have the WISE-DB-1505, please check pin4 of SW1 to "OFF". The user can find the switch on item6 of "WISE-DB-1505".
- If you have the WISE-DB-1500, Please check pin2 of SW3 to "OFF". The user can find the switch on item6 of "WISE-DB-1500".
APN Setting
Please follow the below steps to set APN if needed.
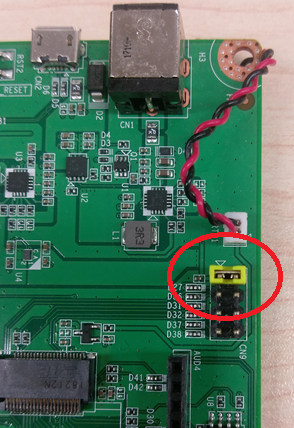
- Step01: Check the jumper with console mode.
- If you have the WISE-DB-1505, Please check both 3.3V and GPIO0 of CN9 are shorted on WISE-DB-1505 as below.
- If you have the WISE-DB-1500, Please check both 3.3V and GPIO0 of CN2 are shorted on WISE-DB-1500 as below.
- Step02: Reboot device
- If you have the WISE-DB-1505, please press reset button "RST1" once. The user can find the button on item8 of "WISE-DB-1505".
- If you have the WISE-DB-1500, please press reset button once. The user can find the button on item7 of "WISE-DB-1500".
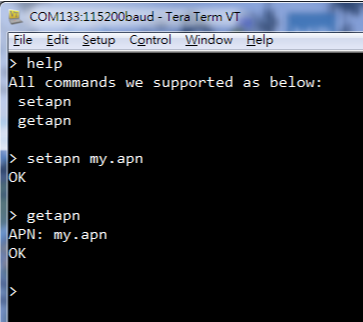
- Step03: Set APN on the console
- Set APN by using setapn command
- Command usage: setapn your_apn_string
- Note: Type "help" to show what commands we supported.
- Note2: Type any "command name" to get usage about this command.
- Note: Type "help" to show what commands we supported.
