EPM-880 Application Notes
Contents
EPD-320 Application guide
This application provide user a way that image full update and carousel mode for EPD-320 panel display. user configure xml file follow setting rule.
Components LIST
|
Item |
Description |
|---|---|
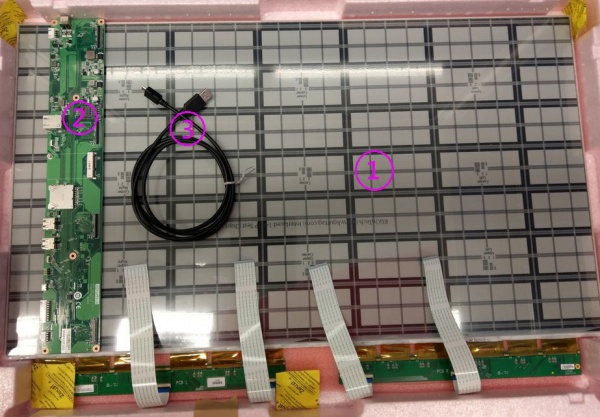
| 1 | 32” EPAPER |
| 2 | EPD-320 PCBA |
| 3 | cable |
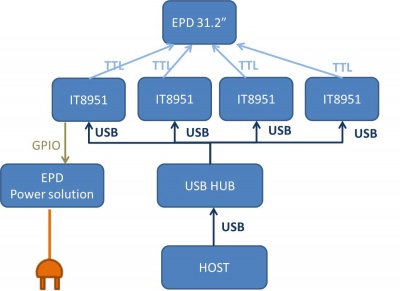
SYSTEM ARCHITECURE
System support
We has been tested on host operating system as below
- linux-ubuntu 16.04
- OpenWrt
- windows(windows 7 or windows 10)
Waveform mode
There are six Waveform mode for image update and short name as below table. The mode parameter will use in update command.
| mode 0 | mode 1 | mode 2 | mode 3 | mode 4 | mode 5 |
| INIT | DU | GC16 | GCC16 | A2 | GL16 |
INIT(Global update WF) :
- Initialize is used to completely clear the display, if it's left in an unknown state (i.e. if the previous image has been lost by a re-boot)
DU(Local update WF) :
- Direct update Non-flashing waveform that can be used to update. it can update any changed graytone pixel to black or white only.
GC16(Global update WF) :
- Grayscale clear, 16 levels A "flashy" waveform used for 16 level grayscale images. All the pixels are updated or cleared
GCC16( Global clear update WF) :
- Grayscale Clear, 16 Levels A "more flashy" waveform used for 16 level grayscale images. All the pixels are updated or cleared.
- This provides the best image appearance.
A2(Local update WF) :
- animation, 2 Levels is a non-flashing waveform that can be used for fast updates and simple animation.
- This wave form support black & white updates only.
- image quality and ghosting is reduced in exchange for the response time.
GL16(Local update WF when white to white , Global update when 16 gray levels) :
- The GL16 waveform is used to update anti-aliased text with reduced flash. GL16 should bed used only with Full Display Update..
- The entire display except pixels staying in white will update as the new image is written. The GL16 waveform has 16 unique gray levels.
Push image application
Hardware prepare
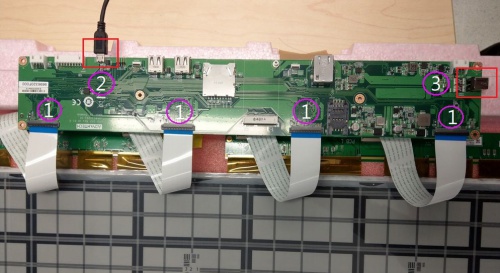
1. Connected EPD FPC to mainboard
2. Connected micro USB cable to mainboard USB2(CN2) , usb port connect to computer usb port which installed windows or linux ubuntu
3. Connected 12V power cable to mainboard.
Software prepare
Windows
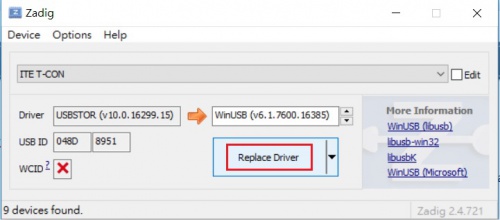
1. Download usb driver tool zadig usb tool
2.Execute zadig.exe and click Option->List All Devices
3.ITE T-CON appeared in list and click Replace Driver button , waiting installation until success
4.Repeat step 3 replace others ITE T-CON driver.
Linux
User must install library as below
1. Installed libusb 1.0.22.
2. Installed OpenCV 2.4.13.
3. libjepg
OpenWrt
software package has been integrate to latest Firmware on Hardware model of WISE-3270. Others hardware platform should install follow library
1. Installed libusb 1.0.22.
2. Installed OpenCV 2.4.13.
3. libjepg
Contact with Advantech product division get software package.
Xml parameter
Before image display ,user have to configure xml of file path、file name、 slide_interval and waveform mode. Below is content of xml file
 <?xml version="1.0"?>
 <epd_config>
   <epd name="EPD 31.2">
       <color>KW</color>
       <image_path>D:\application\photoImg\</image_path>
       <image_name>
         <full_update>
             <img>1.bmp</img>
         </full_update>
         <stop>stop</stop>
       </image_name>
       <slide_interval>0</slide_interval>
       <en_set_temperature>0</en_set_temperature>
       <temperature>25</temperature>
       <waveform_mode>2</waveform_mode>
       <rotate>180</rotate>
 </epd>
 </epd_config>
<image path> : User should assign photo image path in operating system , application search image file under this path.
<img> : User have to write the image name in xml file and application follow path and name to load image file. It can be assigned more than one <img> tag name between <full_update> and </full_update> then following <img> tag to load image and display in sequence.
<stop> Stop tag use to load image at once. Above mention stop tag in xml, application terminated after 1.bmp update done. In carousel mode stop tag must removed from xml.
<slide_interval>: Slide interval is delay time in second between every image display.
<set_temperature> user don't need configure temperature.
<waveform_mode> Waveform mode usually choose mode 2 for image update. waveform explicit detail see Section 1.4 waveform mode
<rotate> There are 4 options 0 、90、180、270 angle to choose and rotate image following angle.
Application execution
User should check all information of xml is correct before execute application or it may cause error procedure.
1. Open command line
2. Change current directory to EPD_4TCON
3. Execute command EPD_4TCON with parameter xml file name
Windows : "EPD_4Tcon.exe test.xml"
Linux : $./EPD_4Tcon test.xml
Quick start
User reference
Single display
This example showing how to configure xml for image display once on linux ubuntu 16.04.
Step 1: Image path depends on user's defined. we defined path that is in /usr/local/photoImg in this example.
Step 2: we assume one picture that name is 1.bmp to display , we should put 1.bmp in image path and chaning img tag in xml.
<?xml version="1.0"?>
 <epd_config>
   <epd name="EPD 31.2">
       <color>KW</color>
       <image_path>/usr/local/photoImg</image_path>
       <image_name>
         <full_update>
             <img>1.bmp</img>
         </full_update>
         <stop>stop</stop>
       </image_name>
       <slide_interval>0</slide_interval>
       <en_set_temperature>0</en_set_temperature>
       <temperature>25</temperature>
       <waveform_mode>2</waveform_mode>
       <rotate>180</rotate>
 </epd>
 </epd_config>
Step 3:


